Certificate of Liability Insurance
Create Certificates of Liability Insurance (Cert) in the eForms Manager. If you have entered policy detail information, then AMS360 uses that data to create the Cert. However, you can also enter the information for a Cert if the policy data is not in AMS360.
|
The information you enter on the form in eForms Manager using the editing feature is saved with the form in eForms Manager. The data is not saved in the policy database and does not flow back to the Policy data entry form. |
As of AMS360 version 2016 R2 with ACORD 25 (2016/03) the certificate populates differently than it did before. The following are points to remember when using the new version of the form:
- The data entry points haven’t changed, only form populating.
- Older form editions aren’t impacted by the changes. That is, if you create a certificate using the older edition date, form populating remains the same.
- The new certificate uses a non-proportional font. Use mixed case instead of all uppercase to fit the most data on the form.
- In AMS360, holder names 1 and 2 have a maximum of 51 characters. The form populates so that if space remains after name 1 is inserted, it will add name 2. If additional space exists after that you can place the form in edit mode to add more data.
- We encourage you to abbreviate as much as possible. For example, Its Successors and Or Assigns can be abbreviated to ISAOA.
- Email, fax number, and contact name no longer populate the Certificate Holder area.
-
See Side-by-side Comparison of Certificate of Liability form populating for an example.
As of AMS360 2023 R2, the ACORD 25 certificate populates differently than it did previously.
-
When "Other" is selected with a Line of Business utilizing the General Liability data entry (i.e., AGLIA Agriculture Liability, CGL General Liability, PL Professional Liability, etc.) the corresponding policy data will map to ACORD 25 fields.
-
See ACORD 25 Mapping for further instructions.
- On the 360 Toolbox menu, click eForms.
- Search for and select a customer.
- In the eForms Manager, click Certificates.
- Search for and select a customer.
- On the eForms menu, click Certificate of Liability.
The following menus are available in a data entry form. Click each menu item to see detailed information. Note that the available menus vary depending on the form.
![]()
When you create the Certificate of Liability you are creating a master certificate that can be issued for multiple holders. After creating the certificate you add holders using the Add/Edit Certificate Holders data entry form.
Use the following procedure to create a Certificate of Liability (cert) from policy information:
- From the Customer/Policy Transaction/Form Tree in the eForms Manager, select the policy that includes the information for which you want to create the cert. From the menu, click eForms > Certificate of Liability > New. The Certificate of Liability Selection form appears.
- Select or enter information for the cert. See the Certificate of Liability Selections section in this topic for specific field information.
- When your selections are made, click Create in the upper right corner of the Certificate of Liability Selection form. The cert appears in place of the selection form.
- To make changes to the cert, click the Edit Form icon on the toolbar, or from the menu select File > Edit. You can type in the fields that are shaded in the form display.
The data you type on the form is saved with the form in eForms Manager. It is not saved in the policy database and does not flow back to the Policy data entry form. - When your changes are complete, select File>Save or File>Save & Close from the menu.
- Select or enter information for the cert. See the Certificate of Liability Selections section in this topic for field information.
- When you have finished entering information or making your selections, click Create in the upper right corner of the Certificate of Liability selection form. The cert appears in place of the selection form.
- To enter information on the cert click the Edit icon on the toolbar, or from the menu click File > Edit. You can type in the fields that are shaded in the form display.
The data you type on the form is saved with the form in eForms Manager. It is not saved in the policy database and does not flow back to the policy data entry form. - When your changes are complete, select File > Save (or Save & Close) icon.
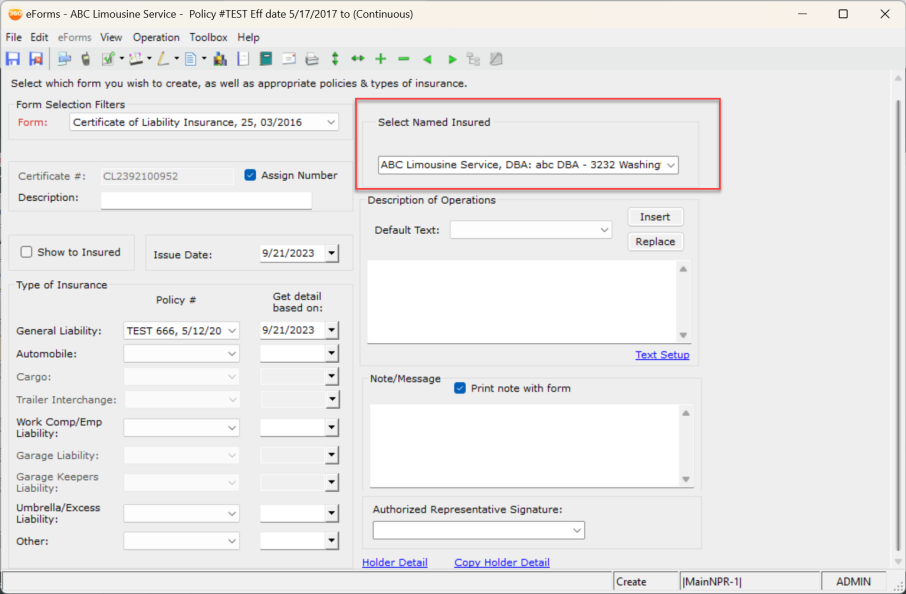
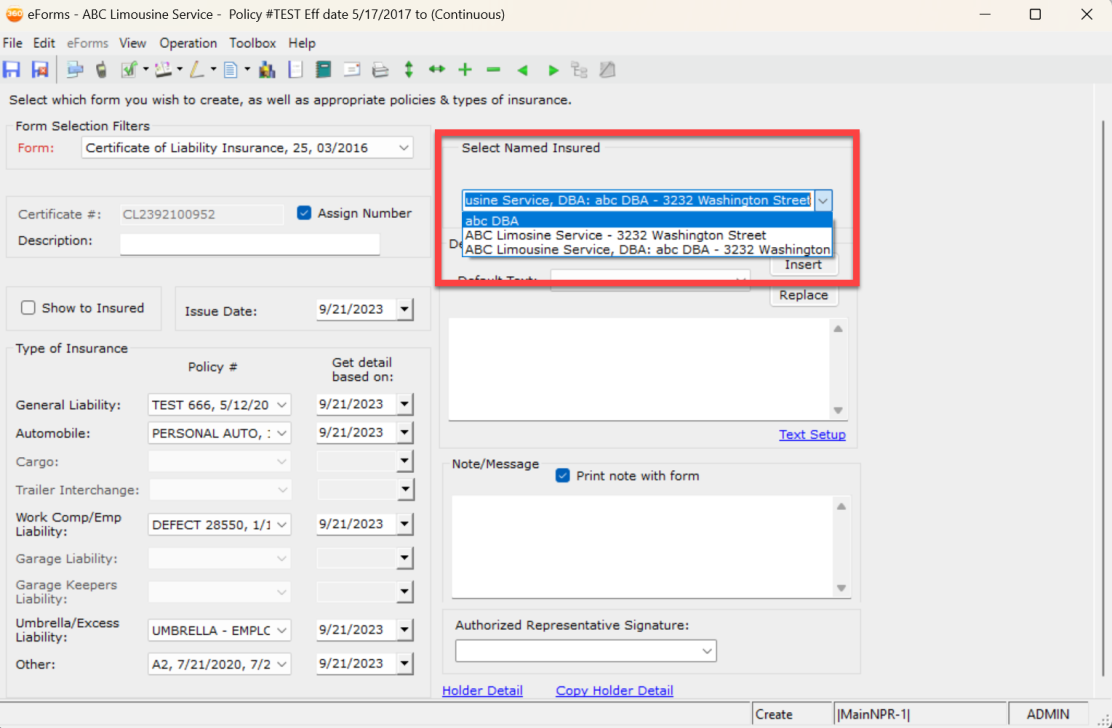
Users now have the option to select the "Named Insured" from a drop-down menu that includes all "First Named Insured" and "Commercial Supplemental Names" from all policies attached to the certificate.
-
Open the customer profile
-
From the Policy list view, select and/or highlight the desired row, or open the policy winform
-
Select Eforms > Certificate of Liability
-
The user will choose either Form 25 or Form 30
-
A new section for "Select Named Insured" is visible in the upper right-hand corner of the winform

-
As policies are added to the selections, available options for named insured are updated.
-
This action will pull all "First Named Insured" and "Commercial Supplemental Names" from each selected policy

-
-
Once all selections have been made, "Create" the certificate and add any necessary holders, as usual.
|
NOTE: Once a certificate is created, this selection cannot be changed when Updating/Editing OR Copy certificate; the drop-down menu will be grayed out and disabled. **Renew and Replace Certificate will allow a new named insured selection prior to Create |
You can copy a certificate at any time by doing the following:
- In eForms Manager, Customer/Policy Transaction/Form Tree, select the Master Certificate or the certificate for the specific holder that you want to copy.
- From the menu select eForms > Certificate of Liability > Copy.
- AMS360 performs the following functions automatically for you:
- All information, including notes, copies to a new certificate. Attachments at the Holder level do not copy forward.
- Use the Copy Holders Detail feature to choose the holders to copy to the new certificate.
- The copy appears for editing so that you can update information as needed. The fields available for editing in the selection form are: the Certificate #; if the Assign Number checkbox is unchecked, the Description, Description of Operations, Print note with form checkbox; and the Note/Message and Signature to Use areas.
No changes are made to the original certificate and there is no link between the two forms.
- In eForms Manager, Customer/Policy Transaction/Form Tree, select the Master Certificate or the certificate for the specific holder that you want to renew.
- Right-click the mouse to open the right-click menu.
- Select Renew to open the Renew Certificate of Liability data entry form. All information, including attachments, notes and holders, copy to the form.
- Update information as needed.
- When you are done making your changes, click Create.
| Field/Selection | What is this? | ||||||||||||
|---|---|---|---|---|---|---|---|---|---|---|---|---|---|
|
Form Selection Filters |
|
||||||||||||
|
Certificate # |
By default the Assign Number check box is selected, which disables the Certificate Number field. The system automatically assigns a number. The system numbering method is as follows:
Example: For a liability certificate created on 5/5/05, the system-assigned number is CL055500012. For a certificate created on 12/25/05, the number is CL05122500414. (The five digit number is a continuous incrementing number. It does not restart daily.) ____________________ If you want to key in an agency-defined number, take the mark out of the Assigned Number check box, and enter the desired number. See the Assign Number field description below for more information. |
||||||||||||
|
Assign Number |
The Assign Number check box is selected by default and the system automatically assigns an incremental number. For more information on the system assigned number, see the Certificate # field above. If your agency wants to assign an agency-defined certificate number, take the check mark out of the Assign Number check box and enter the desired number. Example: 05WKCOMPFJ001 - 05 for the two digit year, WKCOM for Worker's Comp, FJ for the initials of the person entering the certificate, and 001 an incremental number. |
||||||||||||
|
Description |
Use this field to enter a description for the certificate that distinguishes it from other certificates. |
||||||||||||
|
Show to Insured |
Mark this box to make the certificate appear in Insurlink or Service 24/7 if the client is set up for it. For more information about Insurlink see Insurlink Agency Setup. |
||||||||||||
|
Issue Date |
Choose the date the certificate is issued. The current date defaults, but can be changed. |
||||||||||||
|
Type of Insurance |
|
||||||||||||
|
Description of Operations |
|
||||||||||||
|
Note/Message |
|
||||||||||||
|
Signature to Use |
|
||||||||||||
|
Holder Detail |
When you have made your selections for this certificate and are ready to add holders and create the form, click this link to open the Add/Edit Certificate Holders selections form. Use this form to enter holders and contact information for Certificate of Liability Insurance. |
||||||||||||
|
Copy Holder Detail |
Make your selections for this certificate first before adding holders using the Copy Holder Detail form. If the holder(s) you want to add to this Certificate of Liability Insurance is already entered on another certificate for this customer, you can use the Copy Holder Detail form to quickly add the holder. |
To change the selections for the certificates available in the folder, on the View menu click Refine Certificate Folder. The eForms Refine Certificate Folder data selection form appears. You can change selections for what appears in the display. Your choices include type of certificate, the date range, certificate holder name prefix. You can also change the sort option for displayed certificates.
What's Next?
After entering the Master Certificate do you need to enter holders? See Add/Edit Certificate Holders for more information.