eForms Setup
Use eForms Setup to inactivate or activate forms for use in eForms Manager. If you have forms that you don't use you can inactivate them so they do not appear in lists. This is especially helpful in hiding state-specific forms where you don't do business.
You can also set options for your agency.
- Open the Administration Center.
- On the Sidebar menu, click Customer/Policy > eForms Setup.
Enable Personally Identifiable Information (PII) Masking on ACORD Forms while viewing | Securing personal information is mandated by law. When this option is marked, fields marked as PII will have a mask applied if you aren't specifically entering data in that field. This is to help maintain the privacy of the data in case someone is walking by while the form is being entered or edited. |
Allow Users to copy Waiver of Subrogation from existing Certificate | Mark this option if you want users to be able to copy the waiver from another certificate. |
Print/Email Default | Users with admin access will see an option to set the Print/Email Default This will be updated for all users at the agency. When users go into eForms, they will see the radio button selected based on what is set up in the admin center.
|

The following columns are available.
Active | A check in the check box in this column indicates the form is active and available in the lists in eForms Manager. |
Form Name | The name of the form that appears in the lists in eForms Manager. You can click the arrow in the header of this column to filter the forms that appear in the grid by name. To sort the forms alphabetically by name in descending order, click the column header. |
Form No. | If the form has an ACORD number, it appears in this column. |
State | If the form applies to a specific state, the state abbreviation appears in this column. |
Category | Identifies the type of business that the form applies to. The categories are:
|
Type | Indicates the type of form this is. The types include:
|
Version | Lists the version date of the form. |
Form List Filter
You can choose to filter the forms in the grid by:
- Form Name
- Form Number
- State
Look For
You can also type in a term or phrase to search for that specifically.
Resize Columns
You can change the size of any column by pointing to the left or right edge of the column header. When the pointer turns to a double-arrow, click and hold the mouse while dragging the column border to the size you want. When you have the desired size, release the mouse button.
The column size is reset to the default size each time eForms Setup is opened.
Activate/Deactivate
You have several ways you can activate or deactivate a form.
- Mark or clear the individual check boxes in the Active column in the grid.
- Filter the forms using Look for and click Check All or Uncheck All. The action is taken only on the forms visible in the grid.
- Check Latest - looks for forms with multiple versions and clears the mark for the older form.
Using this feature only affects active forms. For example, if you have deactivated state forms that you don't use, clicking the button doesn't activate the latest forms for those because they are inactive. |
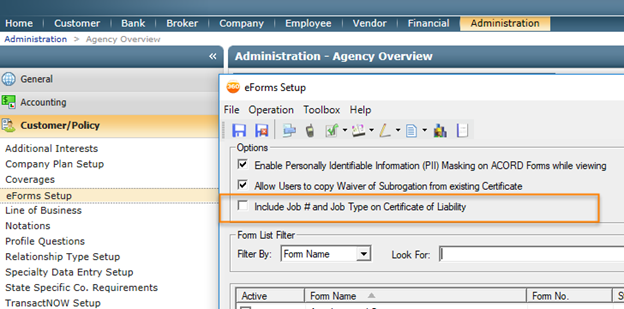
A new option has been added to eForms Setup data entry in the Administration center. This enables you to choose to include the Job # and Job Type to be mapped to the ACORD 25 (2016/03) version of the Certificate of Liability form.
This setup option defaults to unchecked.
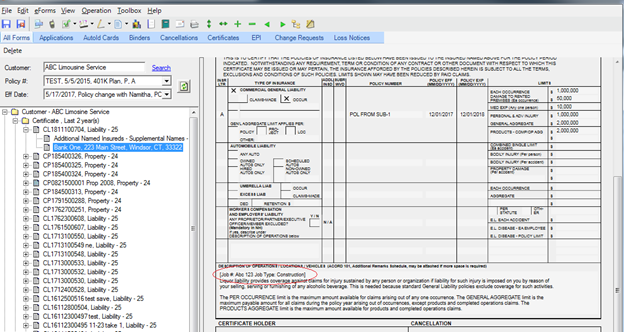
To include this information, click the Include Job # and Job Type on Certificate of Liability checkbox in eForms Setup. When selected, the Job # and Job Type will print first in the Description of Operations field on the Certificate of Liability.
For an agency to make use of this new feature, it does need to be turned on. |
Include Job # and Job Type
Certificate of Liability: Job # and Job Type
Before
ACORD Forms used to be printed first, followed by Overflows. They were not in a sequential order, and they could not be saved in a single PDF.
Now
Forms and Overflows are arranged in order within a single .pdf. You have the option to create a single .pdf file or individual .pdf files. Attachments are included in the .pdf if they are printable.
This means you can create one .pdf per certificate holder; when you send the .pdfs to your insured, they can print a specific certificate, rather than all of them. The .pdfs will also print in correct order:
Attachments such as Excel Spreadsheets or .csv files will be copied as files into the output folder.
When faxing: Items that are printable but can't be written to .pdf will appear at the end of the fax job.
To print forms with overflows/attachments and save as separate PDFs:
Launch eForms Manager for a customer.
Click the Print button.
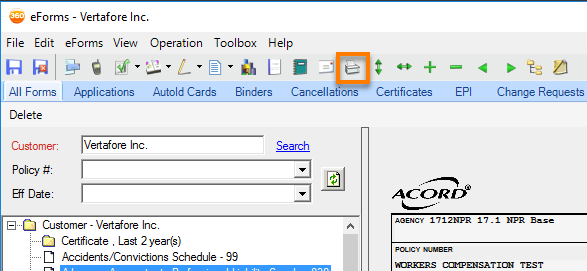
Print Button
Choose the Form, Overflow Pages, and Attachments.
If you want a single .pdf, leave Create separate PDF file(s) unchecked; if you want separate .pdf files click the Create separate PDF file(s) checkbox.
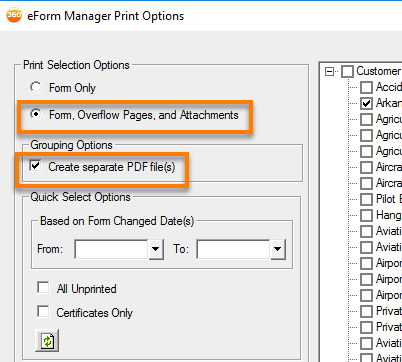
Print Selection and Grouping Options
Click Save as PDF.
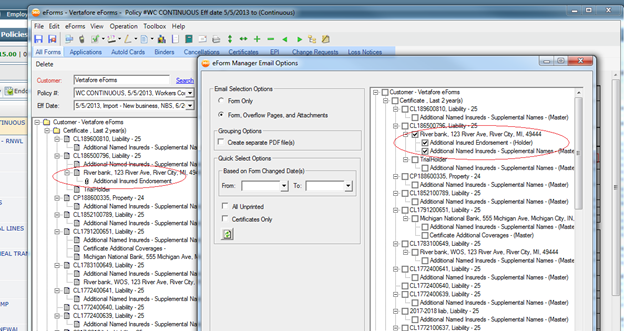
eForm Manager Email Options

Email: ACORD Form Attachment .pdf
Job # and Job Type can now be added in the row description within the tree by updating the Refine Certificate Folder view.
To do this:
Launch eForms Manager.
Click View, and select Refine Certificate Folder.
Click the Job # and Job Type checkboxes. The folder will then be refreshed to include this information.
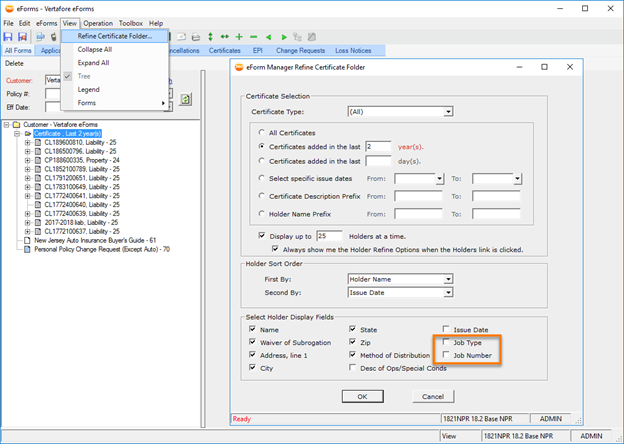
Refine Certificate Folder: Job Type and Job Number
You can also include the Job # and Job Type within the Description of Operations/Locations/Vehicles field.
Within eForms Manager, right-click a certificate. Click Add/Edit Holder.
Under the Additional Information section, add a Job Type and Job #.
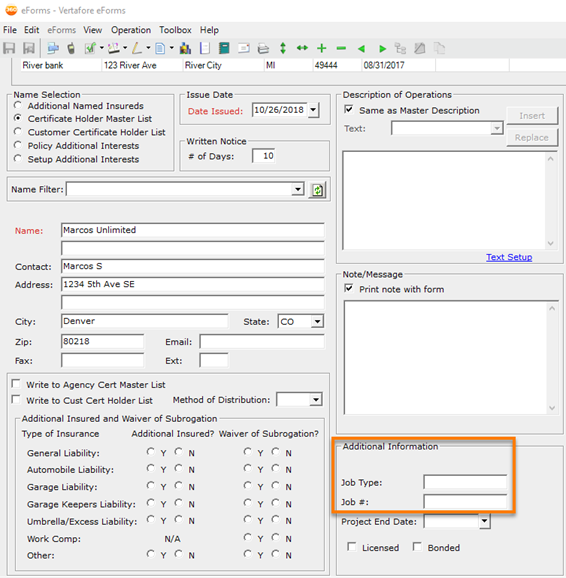
Additional Information
Click Save.
Click Create/Refresh forms.
The description of operations will show the Job Type and Job # followed by the description of operations text.
Forms and Overflows are arranged in order within a single .pdf. You have the option to create a single .pdf file or individual .pdf files. Attachments are included in the .pdf if they are printable.
This means you can create one .pdf per certificate holder; when you send the .pdfs to your insured, they can print a specific certificate, rather than all of them. The .pdfs will also print in correct order:
Attachments such as Excel Spreadsheets or .csv files will be copied as files into the output folder.
When faxing: Items that are printable but can't be written to .pdf will appear at the end of the fax job.
To print forms with overflows/attachments and save as separate PDFs:
Launch eForms Manager for a customer.
Click the Print button.
Print Button
Choose the Form, Overflow Pages, and Attachments.
If you want a single .pdf, leave Create separate PDF file(s) unchecked; if you want separate .pdf files click the Create separate PDF file(s) checkbox.
Print Selection and Grouping Options
Click Save as PDF.
eForm Manager Email Options
Email: ACORD Form Attachment .pdf