
Generating a Self-Signed SSL Certificate
By using this process, it is not possible to generate a user defined Common name. The certificate always generates with a local computer name.
- For example, if the AMS360 application is accessible with ams360.local.vertafore.com but the name of the computer used to generate the certificate is ABC001 then the certificate will be generated with the name ABC001.
-
Go to the Start menu & click on Administrative Tools, then click on Internet Information Services (IIS) Manager.

-
Click on the server name in the Connections column on the left and double-click on Server Certificates.

-
Click on Create Self-Signed Certificate in the Actions Column on the right.

-
Type in the name and then click OK to proceed.

-
Once that is complete you should now see the SSL in the list of Self-Signed certificates. Now, you have an IIS Self-Signed Certificate with 1 year validation.
By using this process, it is possible to generate the certificate with the same info as an AMS360 application domain name.
-
Download the Internet Information Services (IIS) 6.0 Resource Kit Tools and install SelfSSL. Once it is installed, click on the Start menu, go to IIS Resources, then SelfSSL, and run SelfSSL with elevated privilege (Run as Administrator).

-
Paste in the following command and provide CN with the hostname of your AMS360 IIS site. If you receive the error "Error opening metabase: 0x80040154", just ignore it. We will be manually binding the certificate to the website.
-
/V:1000 is validity of certificate in number of days.
-

-
After the command is finished, you will have an IIS self-signed certificate with the correct common name listed in the Server Certificates section of IIS. Now bind the newly created self-signed certificate to AMS360 IIS website. (Steps to bind the certificate to AMS360 web site are provided in the Enabling SSL on the IIS Server document).
![]()
-
After you have bound the new certificate to your IIS site, visit it with https in your web browser and you will encounter another error: "The security certificate presented by this website was not issued by a trusted certificate authority." (the SSL Certificate Not Trusted error)

-
This is a normal error for self-signed certificates because the certificate is signed by itself instead of a trusted SSL provider. All visitors to the site will see this error unless they import the self-signed certificate into their Trusted Root Certification Authorities store (or the appropriate SSL certificate store for the browser they are using).
-
You can easily add the IIS self-signed certificate to the store on the server by following the instructions below. If you need to import the certificate on another Windows machine, just follow the instructions on how to Move or copy an SSL certificate from a Windows server.
Add the Self Signed Certificate to Trusted Root Certificate Authorities
-
Click on the Start menu and click Run.
-
Type in mmc and click OK.

-
Click on the File menu and click Add/Remove Snap-in...

-
Double-click on Certificates.

-
Click on Computer Account and then click Next.

-
Leave Local Computer selected and click Finish.

-
Expand the Certificates item on the left and expand the Personal folder. Click on the Certificates folder and right-click on the self-signed certificate that you just created and select Copy.
![]()
-
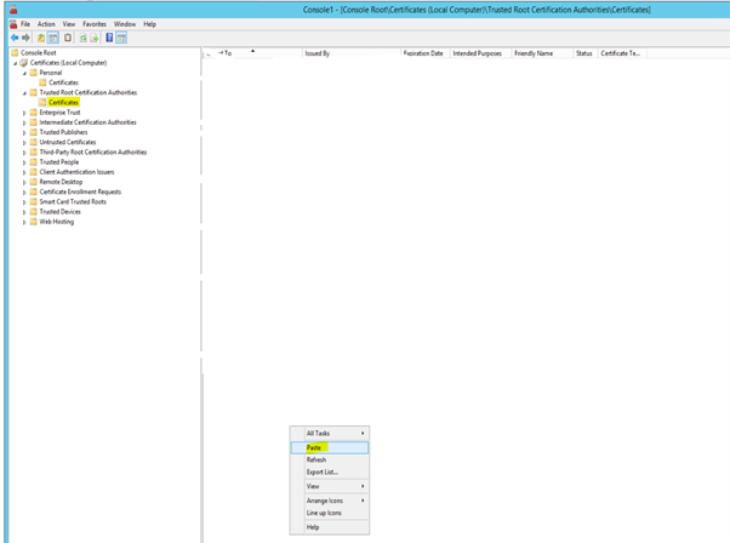
Expand the Trusted Root Certification Authorities folder and click the Certificates folder underneath it. Right-click in the white area below the certificates and click Paste.
-
Now you can visit your site with https in your web browser and you won’t receive any errors as Windows will now automatically trust your IIS self-signed certificate.
-
Restart IIS and if required restart the Web server.