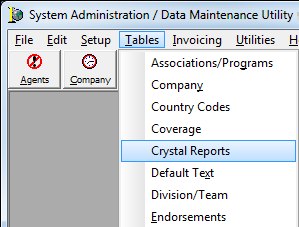
In this topic, we continue our discussion of the commands located on the Tables Menu.
AIM makes use of Crystal Reports to provide you with basic reports. You can also add Crystal Reports that you have created yourself and make them available to AIM users. We will show you how Crystal Reports can be added, edited, tested, and deleted using the Crystal Reports menu command.
- On the Tables menu, click the Crystal Reports menu command.

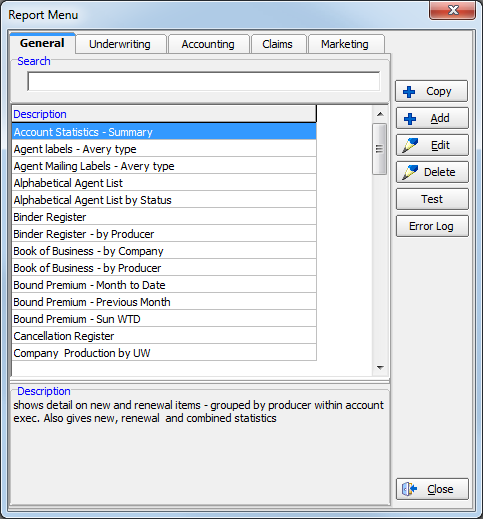
The Report Menu dialog box contains multiple tabs. The General tab displays all of the Crystal Reports that have been added to your AIM system. The remaining Underwriting, Accounting, Claims, and Marketing tabs show only those reports that have been categorized. We will show you how to add a report to a particular category in the instructions that follow.
The same buttons are used on each tab to manage your Crystal Reports. The following table shows you the buttons in the Report Menu dialog box and how they are used.
| Button | Function |
|---|---|
|
|
Copy the selected report |
|
|
Add a new Crystal Report file |
|
|
Edit the selected report |
|
|
Delete the selected report |
|
|
Generate test results using the selected report file. |
|
|
View the error log |
|
|
Close the Report Menu dialog box |

We will show you how to search for a report and how to add a new report next. Since the controls used to add a new report are also used to copy and edit reports, you can use the information that we provide to copy and edit existing reports.

|
Creation of new Crystal Reports falls outside of the scope of this guide. If you need assistance creating a Crystal Report, contact your Vertafore account manager. |
- Open the Report Menu dialog box as explained earlier.
- To search for a specific report,type all or the first part of the report name in the Search box.
The report will be highlighted in the list. - To add a new report, click the Add button.
To modify an existing report, you can select a report in the list and click the Edit button and adapt the steps that follow.

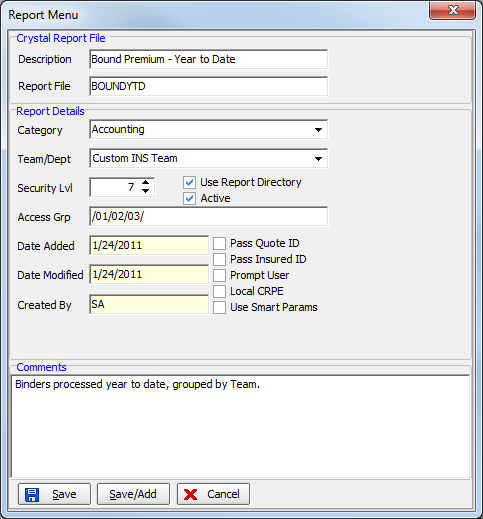
- In the Crystal Report File pane, enter the new report information in the boxes based on the descriptions that follow.
- Description – identifiable description or name of the report file. The description will be viewed by users, so it should be easy to understand.
- Report File – name of the report file. Crystal Reports files use the RPT file format and must be placed in the Reports folder of your mapped AIM drive. For example, if your mapped AIM drive letter is L:, the path to the Reports folder would be L:\AIM\Reports.
- Enter the appropriate information in the Report Details pane.
- Category – Select the category in which the report should be placed, that is, the tab on which the report should be displayed.
- Team/Dept – Select the team or department that should have access to the report. Leave this option blank to give all teams and departments access. The entry here is overridden by the entry in the Access Grp box.
- Security Lvl – Type or select the minimum security level (0 lowest to 9 highest) required to access the report.
- Use Report Directory – Select whether or not the default report directory will be used when accessing the Crystal Report. Contact AIM product support for assistance modifying the default report directory.
- Active – Make the Crystal Report active in the AIM system.
- Access Grp – Enter the team names authorized to use the report. The names must be enclosed with a / (slash mark), for example, /01/02/03/.
- The entry here overrides the entry in the Team/Dept box above.
- If the Access Grp box is left blank, only users belonging to the team/department specified in the Team/Dept box will be able to view the report.
- Date Added, Date Modified, and Date Created – entries are read only. The dates are entered automatically.
- Select the following options only if the report was created to accept the noted item as a report parameter:
- Pass Quote ID
- Pass Insured ID
- Select Prompt User if users should be prompted whether to add the quote ID or insured ID to the report.
If not selected, these values will be passed directly into the report. - Select Local CRPE to define whether the Crystal Report DLL files on the workstation or in the AIM directory should be used.
- Select Smart Params to use Smart Parameters.
- Enter a description of the report in the Comments box.
The description will be displayed when you select a report in the list displayed in the Report Menu dialog box. - Click Save to save the report.
Click Save/Add to save the report and begin adding a new report. Click Cancel to close the Report Menu dialog box without saving your changes.
