Enhanced Security
In AIM 6.7, integration with Microsoft Active Directory was added to give customers the ability to use their Microsoft Active Directory configuration to assign specific security rights and grant access to users of Agency Information Manager (AIM).
Security rights are assigned using groups, roles, and individuals. These rights authorize people to perform specific actions with your agency’s AIM environment. In this guide, we discuss how groups, roles, and individuals can be configured in Data Maintenance Utility (DMU) and how they work together.
Before we begin, let us define some key terms that are used throughout this guide.
- Security Role – A group for security rights. A security role cannot contain another security role. Security role assignments are done in DMU, but are created and maintained solely in AIM.
- User Group – A collection of user ID codes and are assigned to a set of security roles. User group security role assignments are managed in DMU. User groups can contain multiple security roles. User group membership assignments are managed in Microsoft Active Directory.
- User Account – Active Directory user account created and managed in the Active Directory user interface.
AIM Active Directory integration makes use of your agency’s existing Microsoft Active Directory. Before you can configure AIM Active Directory integration, you must first configure your AIM user accounts into groups within Microsoft Active Directory. Such groups may include underwriters, administrators, managers, customer service representatives, etc.
It is important to note that once AIM Active Directory integration is enabled, security rights are controlled by Microsoft Active Directory roles and groups. This includes the various menus and features within DMU such as the speed bar buttons and right-click menu options. Unless access is granted to DMU menus and commands prior to enabling Active Directory integration, you will not be able to access the Active Directory menu to make further modifications.
You should configure an administrator or management group to have access to DMU and the ActiveDirectory menu prior to enabling Active Directory integration. Prior to Active Directory integration being enabled, all commands on the ActiveDirectory menu can only be accessed by a user with level 9 rights.
Active Directory integration is enabled by updating the FlagUseAd column in the Control 2 table of the CIS database. A flag of 0 indicates that Active Directory integration is disabled. A flag of 1 indicates that Active Directory integration is enabled. Please contact Vertafore Product Support for the AIM product if you require assistance updating the database.
We will begin by showing you how to configure AIM security roles in DMU and add rights to those roles.
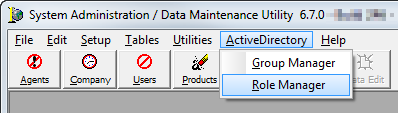
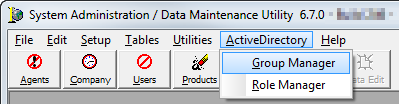
- On the ActiveDirectory menu, click Role Manager.
- Use the buttons described below to manage roles in Role Manager.
- Add – add a new role
- Delete – delete the selected role
- Edit – modify the name of the selected role
- View Change Log:
- The top button is used to view the change log for security roles.
- The bottom button is used to view the change log for changes to rights selection.
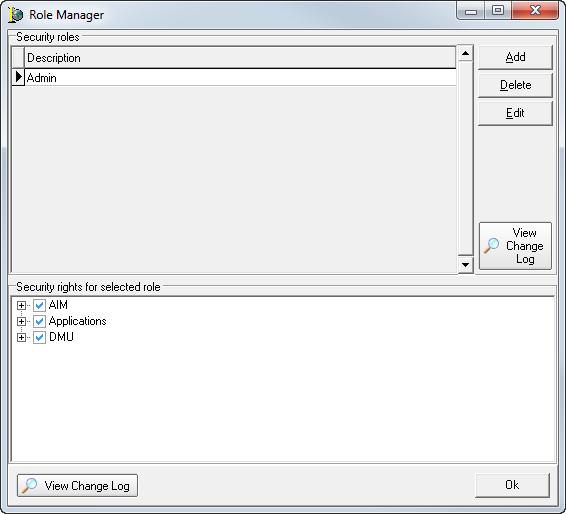
- In the Security rights for selected role pane, select rights for the applications and controls within the applications to which the role that you are creating has access.
- AIM – specific AIM application rights
- Applications – Logon rights to AIM, DMU, and Process Manager applications and modules
- DMU – specific DMU application rights
 – Indicates that the right is selected, or if used at the top level of a node, it indicates that all rights nested within the node are selected.
 – Indicates that only some of the nested rights are selected.
 – The right is not selected, or if used at the top level of a node, none of the nested options are selected.
Click  to expand a node and explore the options within. You can also select the top level of a node to select all options below it.
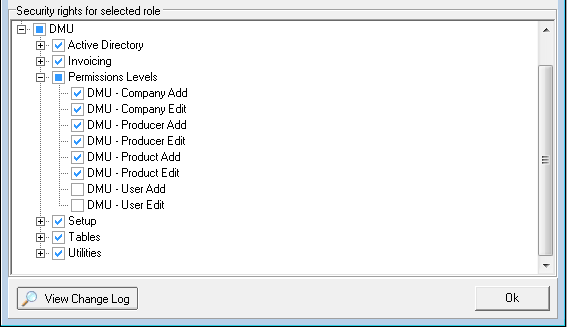
- If you need to assign rights to add or edit companies, producers, or users in DMU, expand the Permissions Levels node and select the applicable rights.

|
The information associated with this icon offers a little more insight into features or issues that may be of special interest without distracting you from the answers you are looking for. |
- Once you have selected the applicable rights for the role, click OK to close Role Manager and save your changes.
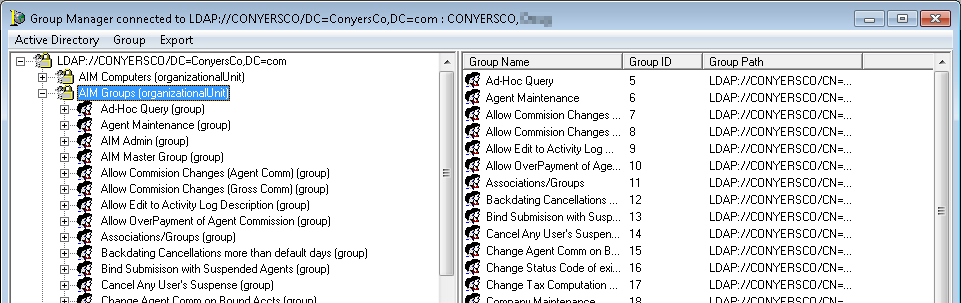
Using Group Manager, you can assign roles to your agency’s groups. The groups are imported from your agency’s Microsoft Active Directory. We will show you how to assign roles to groups.
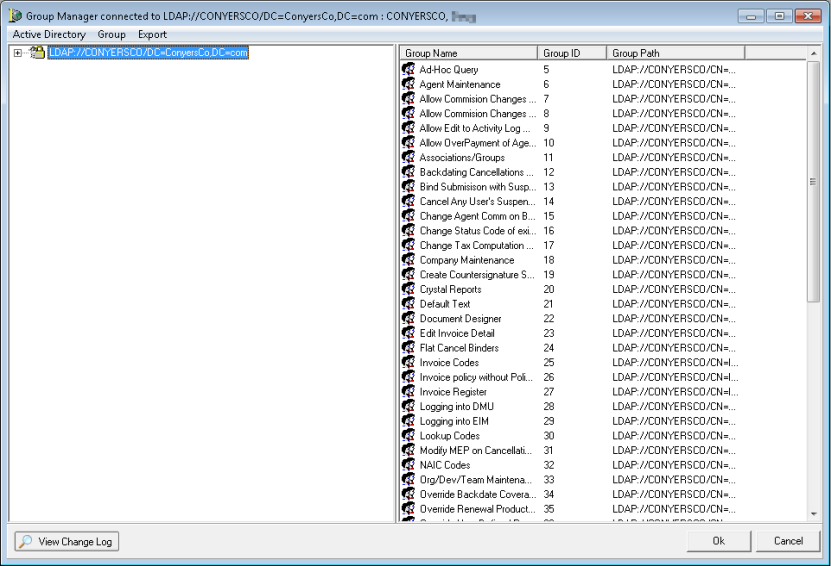
You can open the Group Manager dialog box by clicking Group Manager on the ActiveDirectory menu.
The domain to which you are connected is shown on the left side of Group Manager.
On the right side of the dialog box, all active AIM groups are shown.
You can review changes that have been made to Group Manager by clicking View Change Log.
In the steps that follow, we will show you how to connect to a domain and add groups from Microsoft Active Directory to AIM Active Directory integration.
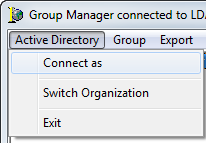
- If you are not connected to a domain, or if you need to connect to a different domain, click the Active Directory menu, and then click Connect as.
If you are not connected to a domain, no domain appears in the left side of Group Manager.
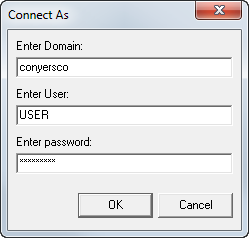
- In Connect As, enter the connection information for the domain in the following boxes:
- Enter Domain – domain name
- Enter User – domain user ID
- Enter password – domain password
- Click OK. Once you are connected, the domain appears in pane on the left.
- Click to expand the domain connection node to view the Active Directory groups for the domain.
- Locate the AIM groups that you configured in Microsoft Active Directory and click to expand the node. In our example, the group is called AIM Groups; however, the name is unique to your agency.
- Double-click a group in your Active Directory AIM group on the left to move it to the list of active AIM groups on the right. Alternatively, you can drag the group from the left side to the right, or click the Map command on the Group menu.
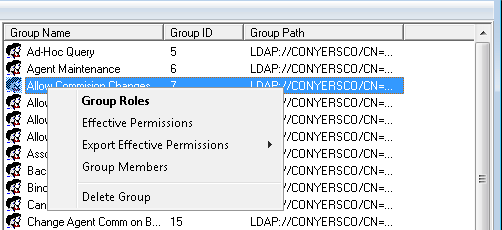
- Right-click a group, and then click a command to review or edit the following:
- Group Roles – edit group roles and group organizations
- Effective Permissions – view effective permission
- Export Effective Permissions – export effective permissions:
- For Selected Groups
- For All Groups
- For Users from Selected Groups
- For Users from All Groups
- Group Members – review group members
- Delete Group – delete the group
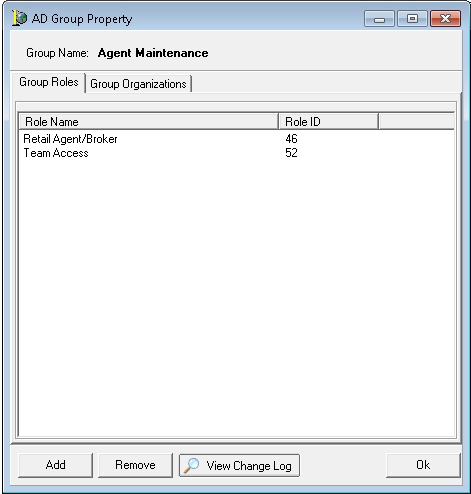
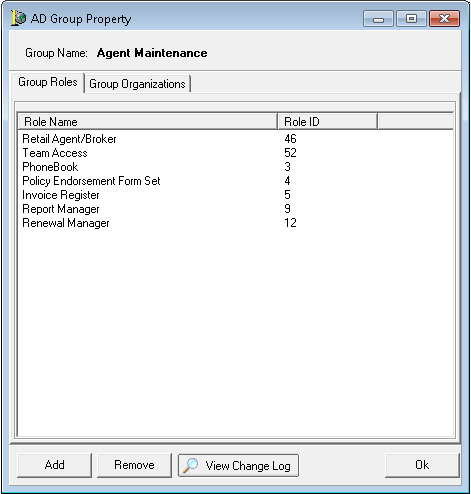
You can assign the roles that we showed you above to the selected group. You can do this by either right-clicking the group in Group Manager and clicking Group Roles or by double-clicking the group.
Assigned group roles are displayed on the Group Roles tab. The role name and role ID code are shown. To make searching easier, you can click the header of each column to sort the roles. For example, clicking the Role ID header sorts the role ID codes by ascending or descending numerical order.
Below, we describe the AD Group Property buttons and their respective functions.
- Add – Add roles to the group.
- Remove – Remove the selected role from the group.
- View Change Log – View the change log to review specific information about changes made.
- OK – Save changes and close AD Group Property.
- Click Add to add a role to the group.
- In the Select Roles dialog box, click a role to select it.
You can also use Shift+click to select blocks of roles, or hold down Ctrl while clicking to select multiple roles. - Click OK to add the roles, or click Cancel to abandon your changes.
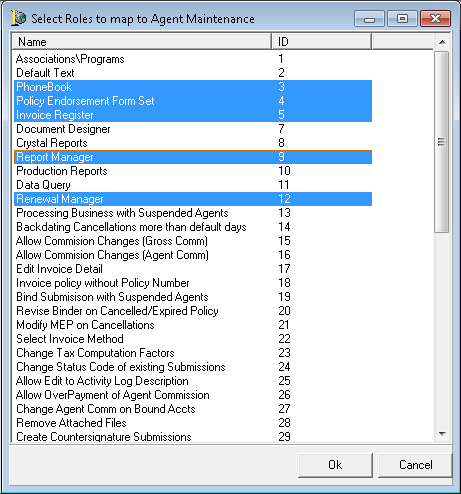
- Review the group roles that you added and make changes as needed.
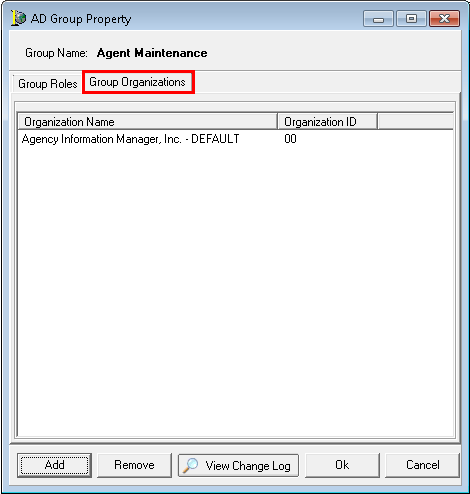
If your agency uses the Organizations feature of AIM to connect to multiple sets of data, you can use the Group Organizations tab to give the group permissions in other organizations. If your agency does not have organizations enabled, this tab is not shown.
Organizations to which the group has permissions are displayed on the Group Organizations tab. The default organization is indicated with the word DEFAULT with an Organization ID of 00.
If no organizations are shown, the rights assigned to the role are the same across all organizations.
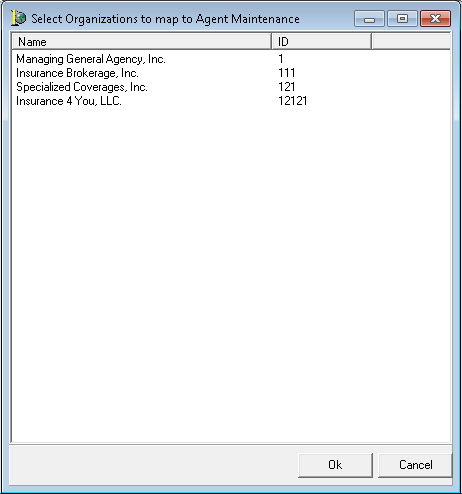
- Click Add to add permissions to a new organization.
- Click to select the required organization.
You can also use Shift+click to select a block of organizations, or hold down Ctrl while clicking to select multiple organizations. - Click OK to add the organization, or click Cancel to abandon your changes.