Guide to Desktop Controls
As part of a release upgrade, Sagitta is now implementing installs using Microsoft’s Windows Installer (push) technology. Based on your agency environment, you have two options to load your desktop controls: Managed vs. non-Managed environments. All installs need Administrative rights to the workstations.
All Vertafore MSI packages have a public property called INSTALLDIR. This is the destination directory on the workstation where the client app will get installed. Vertafore recommends that you do not change the value of this property.
| Environment | Description |
|---|---|
| Non-Managed | A desktop user with Admin rights installs software to a PC. |
| Managed | An IT individual applies software automatically (via a command line) for the desktop user. |
Load Sagitta Desktop Controls – Non-Managed Environment
As a desktop user, follow the steps below to apply the latest desktop controls by accessing the LoadSagittaClient.asp page.
- Close all Sagitta sessions of Internet Explorer (including Email and Microsoft Word).
- Open Internet Explorer.
- Choose one of the following:
| If you are... | Then…. |
|---|---|
| Sagitta Online Users |
|
| All Other Users |
Type the following URL substituting the name of the server you use to access Sagitta for server name: http://servername/sagitta/active/loadsagittaclient.asp Example: http://ntsagitta/sagitta/active/loadsagittaclient.asp
|
| The LoadSagittaClient.asp page displays: |

|
-
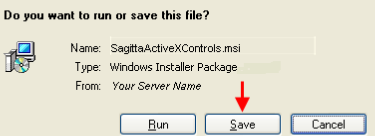
4. Locate and click SagittaSagittaActiveXControls.msi to display the dialog: Do you want to run or save this file?

- Click Save to save the SagittaActiveXControls.msi to your local or network workstation. The Save As dialog displays.
- Click Save to download the SagittaActiveXControls.msi to your local or network workstation. A copy of the SagittaSagittaActivxControls.msi file resides on your workstation.
- Right-click on the file and select Install to display the Welcome to the InstallShield Wizard for Sagitta Sagitta ActiveX Controls dialog.
- Click Next.


|
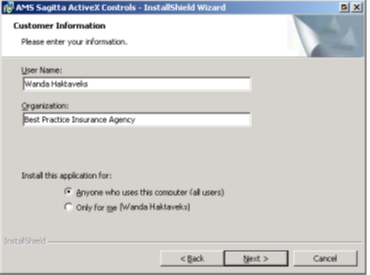
You have the option to install Sagitta Sagitta ActiveX Controls for use by anyone who uses the desktop or only for use by the individual performing this install. Vertafore recommends you choose the default; to install for Anyone who uses this computer (all users). |
- Click Next at the Customer Information page.
- Choose one of the following:
| If you receive… | Then…. |
|
A popup box indicating that the system will install the ImportIt program in the C:\Program Files\Sagitta\Sagitta directory.
|
The path on the Destination Folder page defaults to C:\Program Files\Sagitta\DesktopActiveX\ Vertafore recommends that you use the default directory. Proceed to Step 11. |
|
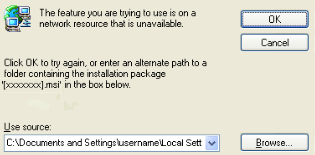
Either one of the following messages:
Or,
|
You must manually uninstall the desktop control at each workstation.
|
- Click Next to display the Setup Type dialog appears.
- Choose one of the following:
| If you would like to… | Then…. |
|---|---|
| Install the controls for all required and optional features |
|
| Install the controls for all required features, and choose what optional features to install (i.e. Lotus Notes, Exchange, etc.) |
|
|
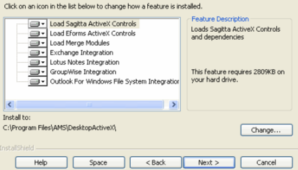
In this example, the desktop controls for all required and optional features will install. The Install To path defaults to the same Destination Folder used in Step 10. You have the option to change the Destination Folder on this page, but Vertafore recommends that you accept the default folder as the destination directory. To deselect features for installation:
|
- Click Install to begin the installation.
- At the Setup Status page, you will see the progress of the files being installed followed by the InstallShield Wizard Complete page.
- Click Finish to complete the install. If an option to restart your computer displays, click Yes. The configuration changes will only take effect once you restart the computer. Close your Internet Explorer.
- Access Sagitta.
Install Desktop Controls - Managed Desktop Environment
Complete Install
Applying the ActiveXControls MSI install in a Managed Desktop environment allows you to run the install by command line with little or no user intervention.
There are two types of installs:
- Complete Installs the controls for all required and optional features.
- Custom Installs the controls for all required features, but you are choosing what optional features to install (i.e. Lotus Notes, Exchange, etc.)
Command Line Syntax
This Command Line example below shows how to install required and optional features for any user of a workstation.
Msiexec /i path to MSI\SagittaSagittaActiveXControls.msi /q /lv c:\name of log file ALLUSERS=1 ADDLOCAL=requiredfeatures,optionalfeatures
The table below explains the components of a command:
| Where | Represents |
|---|---|
| /i | Installs this product |
| path to MSI Path | Where the msi is located (Required) |
| SagittaSagittaActiveXControls.msi | MSI package name (Required) |
| /q | Run in Quiet mode (optional)
/q does not show you any errors unless you use the logging option. |
| /lv c:\name of log file | /lv = Path to Log file
c:\name of log file = Your Log file name and path
Note your Log file name and path are required if /lv component is used in your command line. |
| ALLUSERS=1 | Registers the items when an individual does not have admin rights (Required) |
| ADDLOCAL= | If you choose to install only the required features and or certain optional features, include ADDLOCAL=r in your command line. Example: install only required features ADDLOCAL=DELCONT,SAGITTA,MERGEMOD Example: install required features multiple optional features ADDLOCAL=DELCONT,SAGITTA,MERGEMOD,LNOTES,EFORMS Refer to the table on Page 7 for more information. |

|
|
Command Line
Msiexec /i path to MSI\SagittaSagittaActiveXControls.msi /q /lv c:\name of log file ALLUSERS=1
| Where | Represents |
|---|---|
| /i | Installs this product |
| path to MSI | Path where the msi is located (Required) |
| /q |
Run in Quiet mode (optional) /q does not show you any errors unless you use the logging option. |
| /lv | Path to Log file (optional) |
| c:\name of log file | Your Log file name and path |
| ALLUSERS=1 |
Command Line Example
Msiexec /i s:\sagitta\setups\SagittaSagittaActiveXControls.msi /q /lv c:\SagittaSagittaActiveXControls.log ALLUSERS=1
Custom Install
For a successful custom install, include the DELCONT, SAGITTA and MERGEMOD features with your MSI command line.
Command Lines
The following is a list of all required and optional features in SagittaSagittaActiveXControls install package, a description and a command line example for each:
| Optional Features | Description / Command Line Example |
|---|---|
| DELCONT | Remove Sagitta ActiveX Controls only if this is the first time you are installing this product Msiexec /i path to MSI\SagittaSagittaActiveXControls.msi /q /lv c:\name of log file ALLUSERS=1 ADDLOCAL=DELCONT,SAGITTA,MERGEMOD |
| SAGITTA | Load Sagitta ActiveX Controls Msiexec /i path to MSI\SagittaSagittaActiveXControls.msi /q /lv c:\name of log file ALLUSERS=1 ADDLOCAL=DELCONT,SAGITTA,MERGEMOD |
| MERGEMOD | Load Merge Modules Msiexec /i path to MSI\SagittaSagittaActiveXControls.msi /q /lv c:\name of log file ALLUSERS=1 ADDLOCAL=DELCONT,SAGITTA,MERGEMOD |
| EFORMS |
Load Eforms ActiveX Controls Msiexec /i path to MSI\SagittaSagittaActiveXControls.msi /q /lv c:\name of log file ALLUSERS=1 ADDLOCAL=DELCONT,SAGITTA,MERGEMOD,EFORMS |
| EXCH |
Load Exchange Integration Controls Msiexec /i path to MSI\SagittaSagittaActiveXControls.msi /q /lv c:\name of log file ALLUSERS=1 ADDLOCAL=DELCONT,SAGITTA,MERGEMOD,EXCH |
| LNOTES |
Load Lotus Notes Integration Controls Msiexec /i path to MSI\SagittaSagittaActiveXControls.msi /q /lv c:\name of log file ALLUSERS=1 ADDLOCAL=DELCONT,SAGITTA,MERGEMOD,LNOTES |
| GWISE |
Load GroupWise Integration Controls Msiexec /i path to MSI\SagittaSagittaActiveXControls.msi /q /lv c:\name of log file ALLUSERS=1 ADDLOCAL=DELCONT,SAGITTA,MERGEMOD,GWISE |
| OWFS |
Load Outlook for Windows File System Integration Controls Msiexec /i path to MSI\SagittaSagittaActiveXControls.msi /q /lv c:\name of log file ALLUSERS=1 ADDLOCAL=DELCONT,SAGITTA,MERGEMOD,OWFS |
Tips and Techniques
If this is the first time you are running the SagittaSagittaActiveXControls.msi, the system will delete and remove any existing ActiveX Controls previously installed by Sagitta or eForms.
| Verify the results to view the files and registry items removed |
Add the following to our command line: c:\RemoveSagittaControls.log |
| List files installed along with version, date, location and what feature they are installed with. |
|

|
Uninstall options for MSI–Managed and non-Managed Environments: All Sagitta MSI packages can be uninstalled. However, it is critically important the uninstall method be consistent with the install method. You should not use a command-line uninstall unless you installed the MSI via the command-line. Similarly, if you install an MSI for all users of a desktop you should uninstall it for all users. Mixing install and uninstall methods may leave a desktop in a corrupt state by disabling Sagitta functions or making future upgrades/installs fail. |
Managed Environment
All Sagitta MSI packages can be uninstalled using the following command-line:
msiexec /uninstall S:\Sagitta\Setups\SagittaSagittaActiveXControls.msi /quiet /log c:\uninstall SagittaSagittaActiveXControls.log
You can replace the standard path (below) with the path to the install package. Vertafore recommends using the /log command with log file names to help when troubleshooting problems.
S:\Sagitta\Setups\SagittaSagittaActiveXControls.msi
You can get all the parameters available to any MSI by typing the /? Command after MSI. Alternatively, you can type msiexec on a command line.
Non-Managed Environment
- Go to Add/Remove progrSagitta.
- Select the program to uninstall (SagittaSagittaActiveXControls.msi)
- Click on Remove button to completely remove the program.
Troubleshooting Tips
| Problem | Cause | To Resolve |
|---|---|---|
| The Add/remove program does not show an entry for our install. | The user logged in is not the same user who installed it, or this user does not have administrator rights to the workstation. |
For example: Msiexec /IS:\Sagitta\Setups\SagittaSagittaActiveXControls.msi ALLUSERS=1 |
| The upgrade MSI did not remove the previous version of MSI from add/remove progrSagitta but added a new entry. | The user logged in is not the same user as previous install so it does not have rights to remove the previous install. |
|
| When running an upgrade, you will get a message that the system cannot find the previous MSI. | The user logged in is not the same user as previous install so it cannot find the cached MSI or the MSI was deleted. |
|
Windows Installer Options
msiexec /Option <Required Parameter> [Optional Parameter]
Install Options
</package | /i> <Product.msi>
Installs or configures a product
/a <Product.msi>
Administrative install - Installs a product on the network
/j<u|m> <Product.msi> [/t <Transform List>] [/g <Language ID>]
Advertises a product - m to all users, u to current user
</uninstall | /x> <Product.msi | ProductCode>
Uninstalls the product
Display Options
/quiet
Quiet mode, no user interaction
/passive
Unattended mode - progress bar only
/q[n|b|r|f]
Sets user interface level
n - No UI
b - Basic UI
r - Reduced UI
f - Full UI (default)
/help
Help information
Restart Options
/norestart
Do not restart after the installation is complete
/promptrestart
Prompts the user for restart if necessary
/forcerestart
Always restart the computer after installation
Logging Options
/l[i|w|e|a|r|u|c|m|o|p|v|x|+|!|*] <LogFile>
i - Status messages
w - Nonfatal warnings
e - All error messages
a - Start up of actions
r - Action-specific records
u - User requests
c - Initial UI parameters
m - Out-of-memory or fatal exit information
o - Out-of-disk-space messages
p - Terminal properties
v - Verbose output
x - Extra debugging information
+ - Append to existing log file
! - Flush each line to the log
* - Log all information, except for v and x options
/log <LogFile>
Equivalent of /l* <LogFile>
Update Options
/update <Update1.msp>[;Update2.msp]
Applies update(s)
/uninstall <PatchCodeGuid>[;Update2.msp] /package <Product.msi | ProductCode>
Remove update(s) for a product
Repair Options
/f[p|e|c|m|s|o|d|a|u|v] <Product.msi | ProductCode>
Repairs a product
p - only if file is missing
o - if file is missing or an older version is installed (default)
e - if file is missing or an equal or older version is installed
d - if file is missing or a different version is installed
c - if file is missing or checksum does not match the calculated value
a - forces all files to be reinstalled
u - all required user-specific registry entries (default)
m - all required computer-specific registry entries (default)
s - all existing shortcuts (default)
v - runs from source and recaches local package
Setting Public Properties
[PROPERTY=PropertyValue]
Consult the Windows ® Installer SDK for additional documentation on the command line syntax.
References:
- Windows Installer
- Overview of Windows Installer Technology
- Frequently Asked Questions About Windows Installer


