Create Dunning Letters with Adobe Acrobat Pro
Use this topic to learn how to use Adobe Acrobat Pro to create dynamic Dunning Letters that include selected data prefilled from Insurer receivable (invoice), client and policy records.
Before you begin:
- The LetterElements.pdf template contains all the tags necessary to create your dynamic letter. This template is located in the Letter grid on the ASD Server Personalization page in Sagitta.
- The document you wish to modify must be in Adobe format (.pdf).
Note that navigation to specific tools in Adobe Pro may vary based on the version of the software you are using.
- Open Adobe Acrobat Professional and click File > Open.
- Navigate to the folder containing the dynamic letter you are creating.
- Highlight a letter and click Open.
The document you selected displays in an Adobe window. Here is an example. - From your document toolbar, click File.
- Click Open.
- Highlight the LetterElements.pdf located in the Letters grid on the ASD Server Personalization page and click Edit.
This will open another window with the contents of the LetterElements.pdf document. For best results, leave both pdf windows open and visible on your desktop. - On the toolbar for the document to which you are mapping data (your letter) click Tools > Forms > Text Field Tool.
The data fields on the LetterElements.pdf will be highlighted. - On the toolbar for the LetterElements.pdf document, click Tools > Forms > Text Field Tool to enable the Adobe functions on that document.
- Right click on the text box for the field you wish to have prefill to your letter and select Edit > Copy. The selected field will be highlighted.
- On the toolbar for the document you are modifying (your letter), click Edit > Paste.
The field you had copied from LetterElements.pdf will be pasted into the center of this document. - Using your mouse, drag the text box to the place on the letter where you wish this data to prefill.
- Once the field is in place, you can right-click your mouse and select Properties
- When the Text Field Properties window displays, click the Appearance Tab where you can modify the font of the text, if desired
- When you have finished modifying the font information, click Close. When the data prefills to the form, it will display in the Adobe window according to the selections you have chosen here.
- You can also modify the size and placement of the text box by dragging your mouse over the perimeter of the text box. Repeat this process for as many fields as you wish.
- Once you have aligned all the boxes on the letter to your liking, click File > Save. Import the new letter template in the Letters grid on the ASD Server Personalization page by clicking Add in the grid and navigating to the location of the new attachment.
-
Do not make or save changes to LetterElements.pdf.
- Close all Adobe Acrobat Professional windows.
When the Dunning Letter is created and the document is viewed in Adobe prior to printing, the dynamic data will display according to how you personalized the font when you created the form.
Fields available for use in Dunning Letter templates are shown below.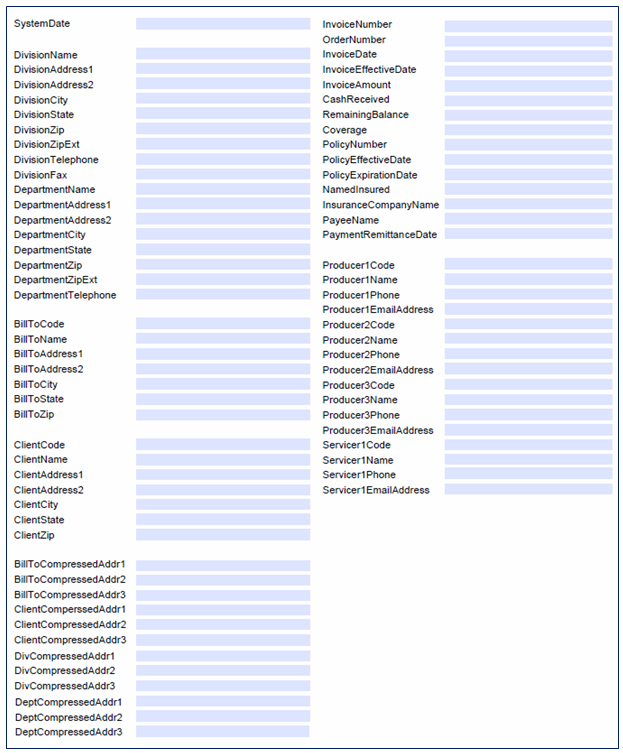
Compressed Address fields are available for Client, Bill-To, Division and Department. Using these fields instead of the standard address fields will;
- Realign lines horizontally when printing 2- vs. 3-line addresses
- Strip spaces between values when printing City, State and Zip on a single line
When creating templates, embed fields as follows:
(File)CompressedAddr1
(File)CompressedAddr2 (File)CompressedAddr3
Printed results when Address 1 and Address 2, City, State and Zip are populated in the database:
1 Main Street
PO Box 100
Windsor, CT 06095-7001
Printed results when Address 1 (only), City, State and Zip are populated in the database:
1 Main Street
Windsor, CT 06095