Sagitta 2024 R1.2.0 Release Notes
Vertafore is pleased to release Sagitta 2024 R1.2.0. With this release, we are incrementally improving and updating Sagitta to provide you with the best possible experience.
The following table summarizes the enhancements in this release. The Feature column indicates whether the feature falls into one of the following categories:
-
Core: Available when the release is loaded.
-
Optional: Flag-driven or otherwise not mandatory in the core environment
|
Enhancement |
Description |
FEATURE IS... |
|---|---|---|
| New Home Page |
Modern home page with easy-to-use widgets |
Core |
| Address Validation |
Addresses are validated on Client Details and Additional Interests |
Core |
| One Up Auto IDs | A single Auto ID card prints per page | Core |
| Production Credit |
Calculate Production Credit for producers and brokers |
Optional |
| NAICS Codes |
New fields on Client Details for NAICS codes |
Optional |
| Renew Remarketed Policies |
Renew a re-marketed policy through Company Download |
Optional |
| Prior History / Other Insurance |
Policy search on the Prior History / Other Insurance page |
Optional |
| Copy to Next Term |
Copy changes to all next terms of a policy |
Optional |
| Company Download |
MHOME is supported for Company Download |
Optional |
|
Cash Receipts Web Service Updates |
|
Optional |
| Logos |
Area (space) for logo on invoices and statements has been increased |
Optional |
|
Service Fees and Related Policies Page |
New policy page to associate policies for Service Fees and Underlying & Related Policies |
Optional |
For optimal performance of the application, we recommend the following as a minimal workstation configuration:
|
Hardware / Software |
Minimum RequirementS / Recommendation |
|---|---|
|
Processor/CPU Speed |
Recommended: i5, i7 or Multi-core: 2.6 GHz or above Minimum: Core 2 Duo: 2.3 GHz or above Not Supported: Single Core, Reduced-feature CPUs such as Celeron or AMD Sempron |
|
Memory |
Recommended: 16GB Minimum: 4GB |
|
Hard Drive Space |
Minimum: 150Mb of local disc space per user |
|
Operating System |
Recommended: Windows 11 Minimum: Windows 10 (64-bit) |
|
MS Office (Word, Excel) |
Recommended: Office 2016 Professional Minimum: Office 2010 Professional |
|
Browser |
Recommended: Chrome Support: Edge in IE Mode, Chrome, and Edge |
| .NET Framework | Minimum: .NET 4.7.2 |
https://support.vertafore.com/
We value your feedback to ensure we are working on what is most important to you. Please use MyVertafore to provide feedback. We appreciate your input, whether positive or negative, on any visible change.
In 24R1, the Sagitta Home Page has a new, modern design. Welcome to My Dashboard!

|
You must be logged into Sagitta while using Chrome or Edge (without IE Mode) to use the new Home Page. |
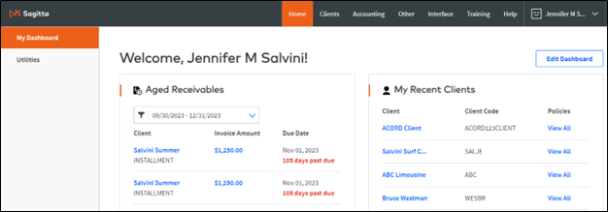
MY DASHBOARD
My Dashboard gathers important Sagitta data in easy-to-read widgets. The maximum number of displayable items in each widget is 20 entries. Widgets with a "View All" option, such as Processed Reports, will display more than 20 entries after you click "View All."
Aged Receivables Widget
The Aged Receivables widget displays open agency bill receivables for clients, where you are the invoice servicer. The Policy Number is displayed under the Client Name for policy-related invoices. Due dates are listed in ascending order by date. Conversely, days-past-due are listed in descending order.
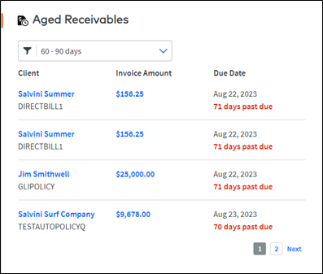
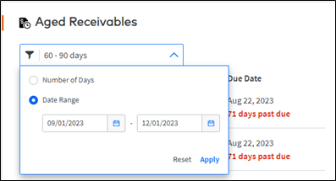
The filter drop-down allows the flexibility to display receivables by the Number of Days overdue or by the Date Range they are due. Use the drop-down on the filter to access the radio buttons for Number of Days and Date Range. For both options, the days entered cannot be higher than 365 days. Click "Apply" to show receivables that match the selected criteria.
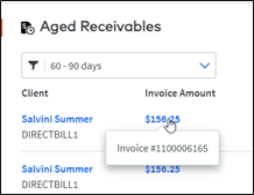
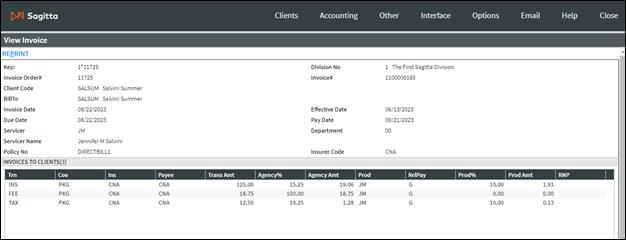
The links on the widget provide additional information about the receivable. Hover over the Invoice Amount to display the Invoice # associated with the Invoice Amount.
Click the Invoice Amount link to launch the View Invoice page and review the details on the agency bill invoice. Reprint the invoice or close the window.
Click the Client Name link to launch the Client Details page.
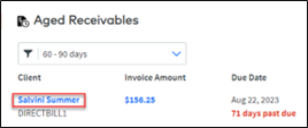
The widget refreshes automatically following invoice actions such as "add," "revise," "void," and "updating cash receipts."
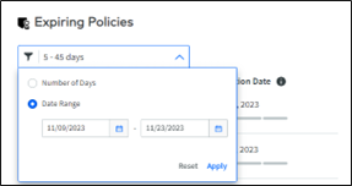
Expiring Policies Widget
The Expiring Policies widget displays policies that are past due for clients, where you are the Policy Servicer. Policies are listed in ascending order by expiration date.
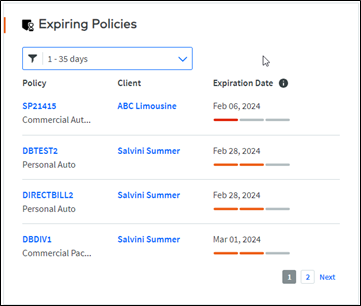
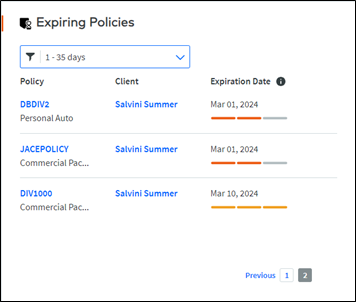
The filter allows the flexibility to display policies based on Number of Days Before Expiration or by a Date Range of expiration dates. Use the drop-down on the filter to access the radio buttons for Number of Days and Date Range. The days entered cannot be higher than 365 days. Click Apply to show results that match the selected criteria.
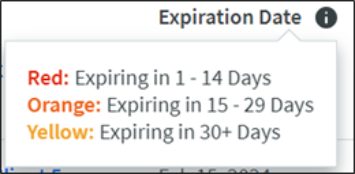
Hover over the i icon to reveal a tool tip that shows the date ranges associated with each color used in the Expiration Date column.
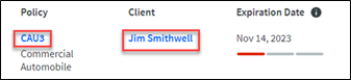
Click the Policy link to launch the Policy Details page.
Click the Client link to launch the Client Details page.
My Recent Clients Widget
The My Recent Clients widget displays your most recently viewed clients.
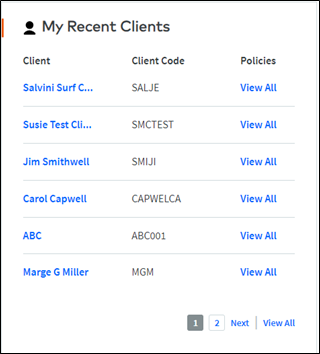
Click the Client link to launch the Client Details page.
Click the View All link on a specific client to launch the Policy Selection page.
Click the View All link on the bottom right-hand corner of the page to view a complete list of recent clients, which will appear on a separate page.

|
To alphabetize My Recent Clients, select Settings from the User Name drop-down menu on the Global Navigation and check Alphabetize Recent Clients. |
My Sagitta Widget
The My Sagitta widget displays the pages you have added to your My Sagitta by using the star on the secondary navigation bar. If "Activities" are available to the user, this option is displayed as the first link on the My Sagitta widget. Access to Activities is defined under the user’s Home Page Role and the user’s Role-Based Security role.
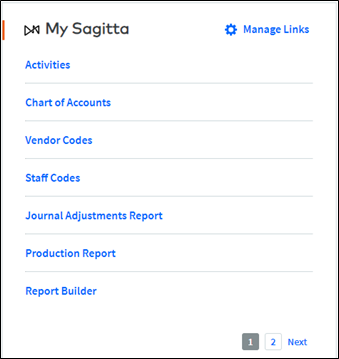
Click a link on the list to launch a new window to that page.
Click Manage Links to reorder or remove your My Sagitta links. "Manage Links" will be displayed when there are links available to reorder or to remove, besides Activities.
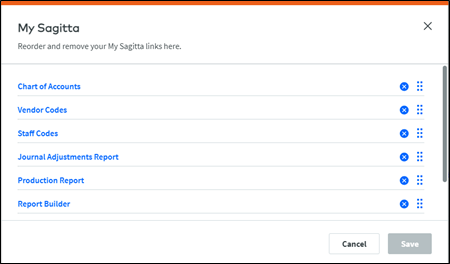
To remove the page link, click the X on the line. The link is removed from the widget and from My Sagitta on the secondary navigation menu in Accounting and Other sections.
To reorder the pages, click on the link and drag-and-drop to the preferred location.
The "Save" button is enabled whenever there is a change. Click Save to complete the change, and the widget will refresh.
|
|
Activities cannot be removed from the widget. Click the Activities link to access the Activity Log. |
Other Links Widget
The Other Links widget contains links to agency-defined web pages, such as MyVertafore.com.
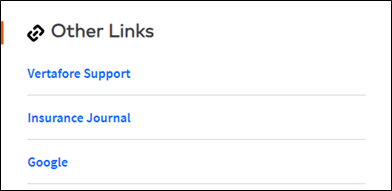
When you click a link, the following prompt is displayed. Click Continue to launch the selected website.

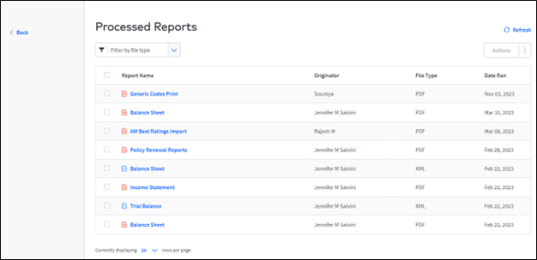
Processed Reports Widget
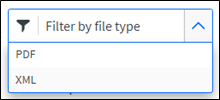
The Processed Reports widget displays reports generated by Overnight, Batch and Report Distribution. Click on a Report Name to launch the PDF or XML report. Reports are listed in descending order by date range. Collapse or keep the widget expanded, depending on your preference.
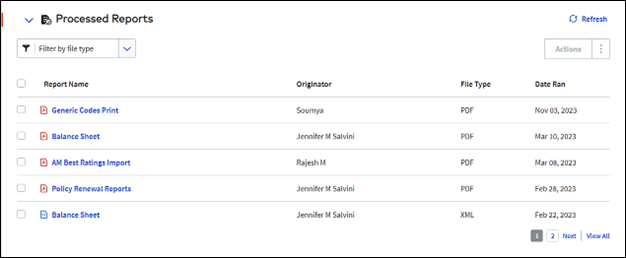
You can filter by file type, whether PDF or XML, by using the filter drop-down.
Click Refresh to update the table with the new reports you generated, or to undo any interactions with the grid, such as deselecting the selected row(s) on the grid or disabling applied filtering; you will then return to the first page of the widget.

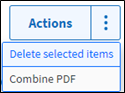
Check one or more reports to activate the Actions drop-down button.
-
Delete selected items will delete the selected report
-
Combine PDF will combine several reports into a single PDF. Selecting an XML with a PDF report does not provide the Combine PDF option. If selected, the report types of XML and PDF can only be deleted.
View All will display all reports in a larger window with the same functionality. Click the Back button to return to My Dashboard.
Recent Claims Widget
The Recent Claims widget displays your most recently viewed claims and includes every claim status. Claims are listed in order, where the most recent claim is shown first and the oldest claim shown last.
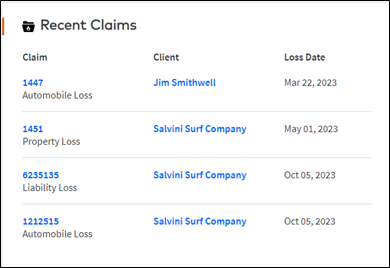
Click the Claim link (Loss ID) to launch the policy Claim page. The auto-refresh function will trigger the changes you made to Claims and reflect them in the widget.
The Loss Type will be displayed underneath the Loss ID.
Click the Client link to launch the Client Details page.
|
|
If a user has 20 recent claims on the widget and a claim is opened, updated or created , the oldest claim in the list will be removed. The newly updated, viewed or created claim will appear at the top of the list, as it will be the most recent. |
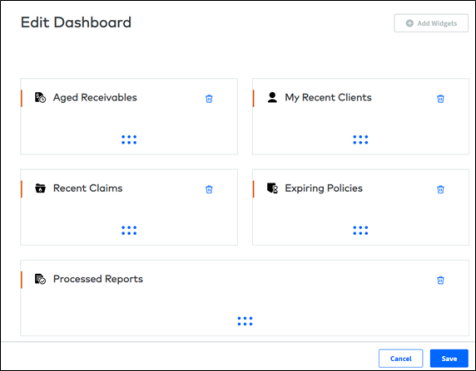
Edit Dashboard
You can edit the layout of the dashboard, add widgets, or remove widgets that are personalized to your role.

Click Edit Dashboard to re-order or remove a widget.
-
Click on the trashcan symbol to remove a widget from your Home Page.
-
Click on a widget to drag and drop it to a different location.
-
Click Save to implement your changes and return to My Dashboard.
-
Click Add Widgets to add available widgets that you had previously removed from My Dashboard.
-
Click Cancel to discard your changes.
|
|
You can remove all widgets except for one, which then leaves the last widget on the Dashboard. |
Options Renamed to Settings
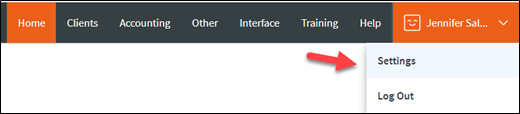
On the Home Page, Options on the Global Navigation has been removed and is now available under the user drop-down Settings.
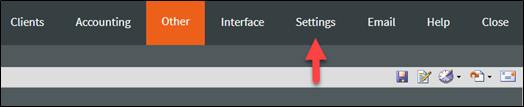
Options in the Global Navigation menu on other pages is renamed to Settings.
NOTIFICATIONS
As an administrator, changing any Home Role or Role-Based Staff Code pushes a notification to the corresponding user or group of users in anticipation of the next time they log in. This notification appears as a blue bar across the top of My Dashboard and reads as follows: "Permissions Updated: Your access has been updated. If you have questions, contact your administrator." Selecting X on the "Permissions Updated" notification banner or logging out will remove the notification.
The notification message is created in the following cases:
-
Changes to the Home Role or Security Role for a Staff Code create an individual notification to that user.
-
Changes to a Home Role page creates a notification to all users who are assigned to that Home Role.
-
Changes to a Role-Based Security page to update the permissions of a page, or when adding or removing a page, creates a notification to all assigned users . However, if a new staff code is added to an existing role, or if it is removed from a role, only that user will receive this notification.

UTILITIES
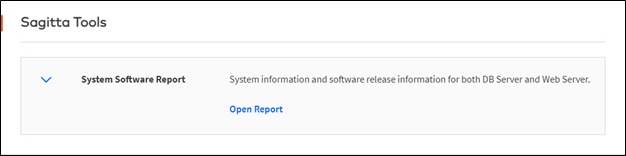
The "Utilities" tab on the Home Page will display the Sagitta Tools, Templates, and Vertafore Services sections.
Sagitta Tools
-
Use the drop-down menu in the Sagitta Tools section to access the System Software Report.
-
Click Open Report to display the System Software Report.
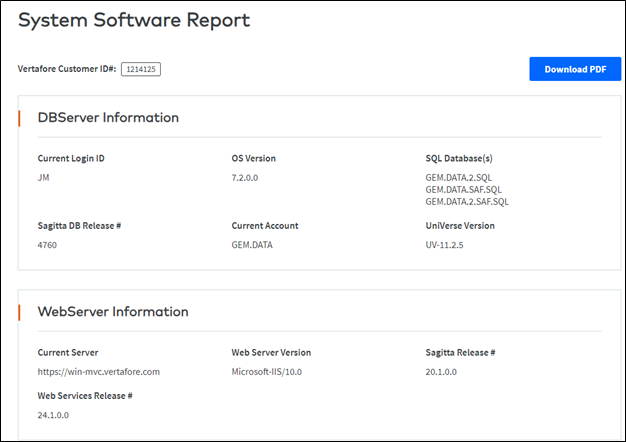
-
Click Download PDF to download the report as a PDF.

-
Use the drop-down menu in the Templates section to access Client Schedule, Accounting Schedule, or the Multi Bill-To Templates
-
Click XML to download the XML template
Vertafore Services
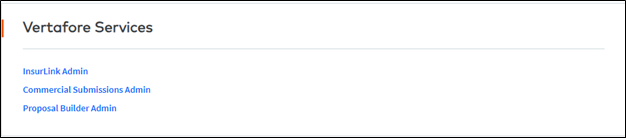
-
Vertafore Services lists the pages to which you have access as an administrator.
-
If you are not an administrator for these pages, the following message will be displayed: "No Vertafore Services links available."
MY DASHBOARD PERSONALIZATION
The Home Page is personalized by the Home Page Role on your Staff Code. You can personalize each Home Page Role to determine the widgets to be available on My Dashboard. You can also change the Widget name. For example, Activities can be changed to To Do or Other Links can be changed to Quick Links.
The following widgets are loaded to all home roles:
|
target page |
widget text |
|---|---|
| CP_179.ASP |
Activities NOTE: This option is displayed on My Sagitta and is not a widget. |
| AGEDRECEIVABLES.WIDGET | Aged Receivables |
| EXPIRINGPOLICIES.WIDGET | Expiring Policies |
| MYCLIENTS.ASP | My Recent Clients |
| MYSAGITTA.ASP | My Sagitta |
| MYFAVORITES.ASP | Other Links |
| RECENTCLAIMS.WIDGET | Recent Claims |
| VERTAFORESERVICES.ASP |
Vertafore Services NOTE: This option is on the Utilities page and is not a widget. |
|
|
There is no Target Page for Processed Reports, since every user has access to this widget. |
SAGITTA API CHANGE TO SUPPORT NEW HOME PAGE
|
|
As part of the 24R1.1.0 installation process, Sagitta API keys are automatically refreshed if they have expired, or if they will expire within the next 10 days. Sagitta API keys will also automatically refresh as part of the Overnight Process when their expiration date is within 10 days. |
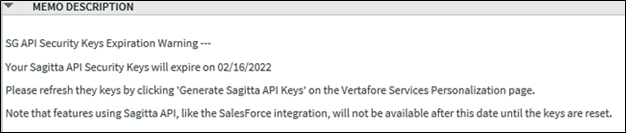
Previously, the staff codes in the Security Keys Expiration Notifications field on the Vertafore Services Personalization page would have received an activity/memo with the description shown in the screenshot shown below, and you would have had to click the Generate Sagitta API Keys button.
This activity will no longer be displayed, since Sagitta API keys are now automatically refreshed.
In the unlikely event a problem occurs with the Sagitta API keys being refreshed, the following new activity will be created.
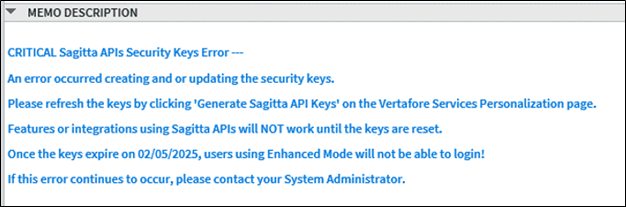
This new activity will be sent to the Staff codes setup in the Security Keys Expiration Notifications field on the Vertafore Services Personalization page. If there are no Staff codes set up in this field, the activity will be sent to the staff setup on the Overnight UTM Process Parameters page within the Staff ID for UTM reports field.
|
|
If the critical activity is not resolved, any users who possess the Enhanced mode setting will not be able to log in. In addition, any features or integrations that utilize Sagitta APIs will not work until the keys are reset. Beginning with this 24R1 upgrade, the Enhanced mode is automatically enabled for all users. |
Users who are set up to have this checkbox disabled will continue to be able to log in.
To resolve the above Critical activity, the System Administrator can navigate to the Vertafore Services Personalization page and select the Generate Sagitta API Keys button in the Sagitta API section.
DISABLING THE NEW HOME PAGE
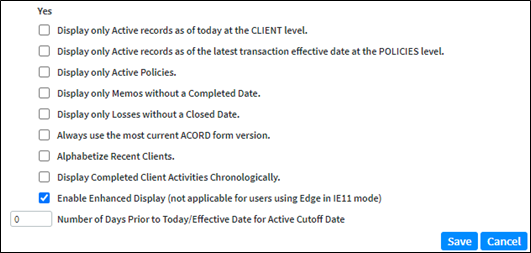
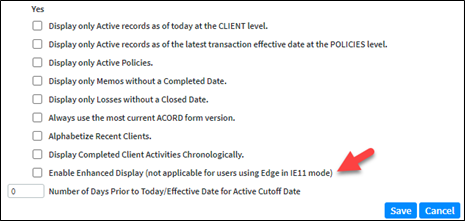
Select Settings from the User Name drop-down menu on Global Navigation and un-check Enable Enhanced Display (not applicable for anyone using Edge in IE11 mode). Log out of Sagitta and log back in. The Classic Home Page will then be displayed.
PREREQUISITE STEPS TO USE MY DASHBOARD
|
|
The 24R1 Deployment Guide includes prerequisites to consider prior to loading 24R1, in order to load this release without introducing login errors. Please be sure to review this material prior to loading 24R1, which will ensure that users will be able to log in and access My Dashboard once the release has been installed. If this process is not followed and there are issues to resolve, subsequently loading 24R1 will then prevent users from being able to log in. |

|
Watch the demo related to the new Home Page. |
Client and Additional Interest addresses now use an API called "Melissa Data" to perform address look-ups for U.S. addresses. Search by using type-ahead auto-completion in the "Address #1" or "Mail Address" field to select the best match. An address validation indicator check mark (Melissa Address Key [MAK] in Report Builder and ODBC) next to the Address section will display different colors for verification.
CLIENT DETAILS ADDRESS VALIDATION
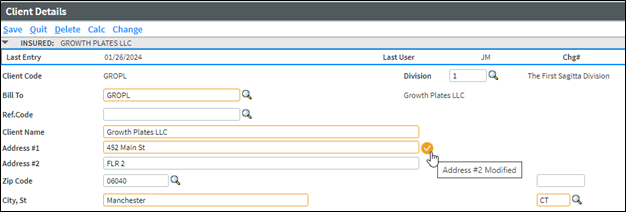
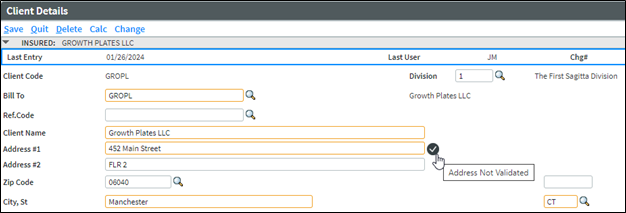
On the Client Details page, valid addresses are displayed in a drop-down menu after you type two characters in the Address #1 field. Continue typing until the desired address is shown. Select the address to pre-fill the following fields: Address #1, City, State, and ZIP Code. The Address #2 field will not populate via Melissa Data, but that information may be added manually.

Once the address is populated, the check mark next to the address shows as Green. Hover over the check mark to display a tool-tip of Address Validated.

The check mark shows as Yellow when Address #2 is entered. Hover over the check mark to display a tool-tip of Address #2 Modified.
The check mark shows as Gray when the Address #1, City, State or ZIP Code fields are modified, or when a user bypasses the drop-down options and manually enters the address. Hover over the check mark to display a tool-tip of Address Not Validated.
If an Address in Client details and Additional Interests page is not previously validated, but a valid address is presented in Melissa Data, clicking on the check mark will validate the address by turning it Green.
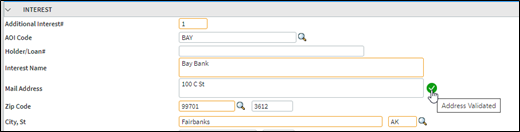
ADDITIONAL INTERESTS ADDRESS VALIDATION
Address Validation has been added to the Mail Address field on the Client Level and Policy Level Additional Interests pages, and the Additional Interests Maintenance page. Valid addresses appear in a drop-down menu after you type two characters in the Mail Address field.
After the address populates, the check mark next to the address shows as Green. Hover over the check mark to display a tool-tip of Address Validated.
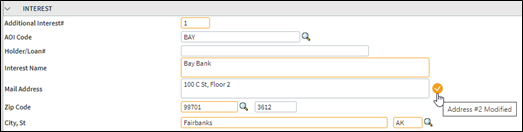
Since the Additional Interests page does not have a separate field for Address Line #2, a comma is used for the delineation between Address #1 and Address #2. When a comma is added to the end of a valid Address #1, the green check mark will turn yellow, with the tool-tip of Address #2 Modified.
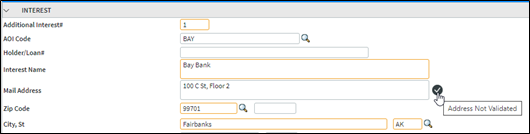
The check mark shows as Gray when Address #1, City, State or Zip Code is modified, or when a user bypasses the drop-down options and manually enters the address. Hover over the check mark to display a tool-tip of Address Not Validated.
To validate the address, click the check mark. If a single address matches to it, the check mark will turn Green if there are no additional address lines entered, or it will turn yellow Yellow if there are. Any additional potential addresses will be displayed in a drop-down menu on the Mail Address field.
Processes that Affect AOI Address Validation
The Additional Interests address validation check mark is carried forward or updated based on changes made in other programs. If the Additional Interest address is changed from the validated address on the policy, the Address Validation check mark color will change accordingly.
-
Programs that could change the Address Validation check mark:
-
Company Download
-
ProducerPlus
-
Schedules Import
-
-
The Address Validation check mark for Additional Interests carries forward on these processes:
-
Client Schedules Import (when imported using an exported list from a policy)
-
Copy / Merge to another policy
-
Copy / Next to the next term
-
Renewing a policy
-
Remarketing a policy
-
Rewriting a policy
-
Copying Client Level Additional Interests to a Policy-Level Additional Interest
-
Adding an Additional Interest to a client that has been validated on the Additional Interests Maintenance page.
-
ADDRESS VALIDATION TIPS
-
When an address with a nonexistent ZIP in the Sagitta database is selected from the drop-down options, this new ZIP code is added to the ZIPS file.
-
P.O. box numbers are returned without the periods, e.g., PO.
-
Most P.O. box numbers are not included as part of the validated address drop-down options.
-
Search for "Apartment" by using Apt, and search for "Suite" by using Ste. or Ste (Suite).
|
|
Watch the demo on Address Validation. |
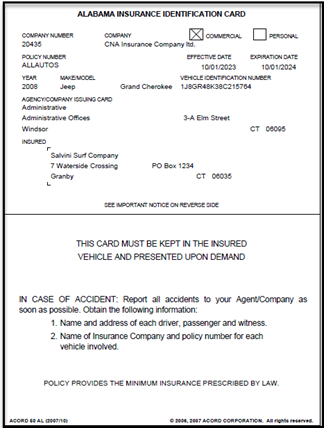
Auto ID cards (ACORD 50, 51, 52 and 53 cards) now print one card per page instead of multiple cards per page. All cards are printed in Portrait format, where the front (Page 1) is shown at the top of the page, and the back (Page 2) is shown at the bottom of the page. This change does not apply to New York Auto ID cards.
Example of previous 4-Up Alabama Auto ID Card:
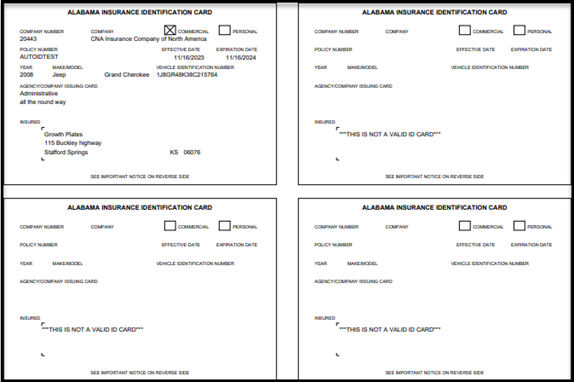
New 1 Up Alabama Auto ID:
Along with changing Auto IDs to one card per page, new card editions have been added to Sagitta. The complete list may be found in the New Additions to the Vertafore ACORD Library section in this document.
Notable Changes to Auto IDs include:
-
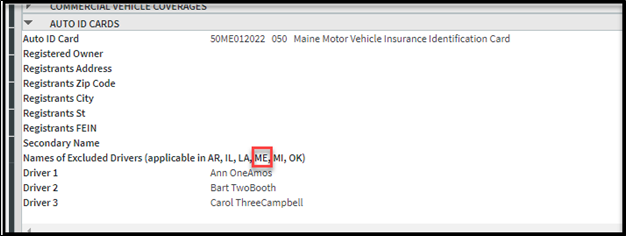
The new Maine Auto ID ACORD 50 and 51 (2022/01) has Names of Excluded Drivers on the back of the card. The Names of Excluded Drivers field within the Auto ID Cards section of the policy level Vehicles page has been modified to include the state of Maine.
-
The second line of the address field for Company Name and Address pre-fills for state cards that have a second address field

-
When 24R1 is loaded, a post-upgrade program will update any Vehicles that have specific Auto ID cards personalized to the new one-up version of the card. New York vehicles, and vehicles with personalized state cards that were already at the most recent version and are already in the correct one-up format (AR, CA, GA, IA, MD, ND, and UT) are not updated.
-
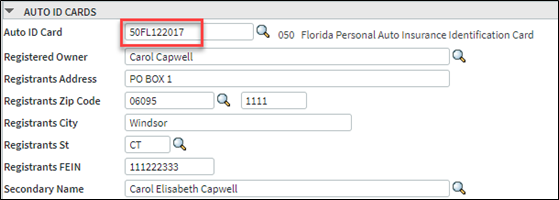
The ACORD 51 FL has been removed and will be replaced on the Vehicles page with the ACORD 50 FL.
-
Format For Duplex is no longer applicable for One-Up Auto ID cards, except for the following:
-
NY Auto IDs, which remain unchanged
-
TX Auto IDs; when Format for Duplex is checked, the card is printed in the Portrait format. When Format for Duplex is not checked, the card is printed in the Landscape format.
-
TROUBLESHOOTING FOR AUTO ID CARDS
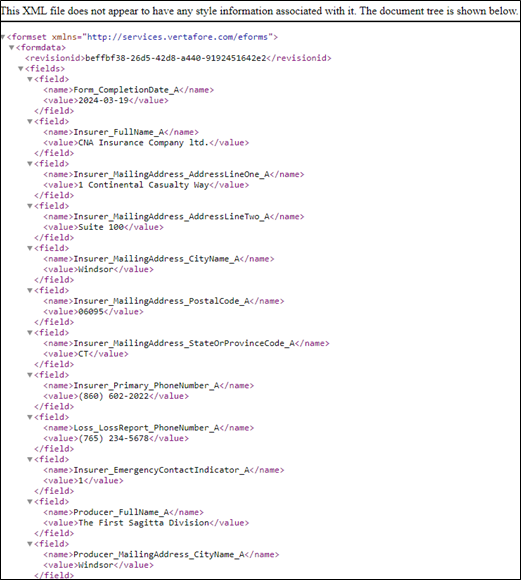
To support the new Auto ID Cards, in case of errors, XML export has been added to aid in troubleshooting. Highlight an Auto ID form set, right-click, and select Export. An XML will be generated that can be shared with Customer Support to troubleshoot Auto ID issues.

New York Auto IDs use the same export work flow but will generate a different type of file (JSON). The following scenarios yield these results:
-
Multiple vehicles with ALL NY Auto IDs do not export an XML.
-
Multiple vehicles with SOME NY Auto IDs generate the XML for Non-NY Auto IDs.
-
Multiple vehicles with NO NY Auto IDs generate the XML.
|
|
Watch the demo on One-Up Auto IDs. |
Production Credit allows for an allocation of producer compensation that is separate from producer commissions. New fields exist on the Client Multi and Policy Multi pages to support new producer types and Production Credit percentages. When an invoice is created using the Multi page, a Production Credit amount is calculated against the Agency Commission. The Production Credit amount is displayed on the Policy Invoice page and flows to an exported Production Report. These amounts do not affect Financials.
PRODUCTION CREDIT PERSONALIZATION
Production Credit is optional and must be enabled if your agency wishes to use it. Follow the personalization steps listed below to begin using Production Credit.
-
Enable Production Credit in Accounting Flags; go to Other > Maintenance > Accounting.
-
Create Producer Types in Generic Codes; go to Other > Maintenance > Policy.
-
Assign a Producer Type in Staff Codes; go to Other > Maintenance > Accounting.
Enable Production Credit in Accounting Flags
There is a new flag for Production Credit Accounting Flags called Enable Production Credit? After 24R1 is loaded, the flag is set as blank which is the same as No.
-
Yes: The fields on the Multi screens are mandatory and perform calculations based on Producer Type set in personalization.

-
No or blank: The fields on the Multi screens are not mandatory and do not perform any calculations. Invoicing prefills with 0.00 amounts.
|
|
To hide the new fields on grids, see Changing How a Grid Displays. The following grids will be affected:
|
Create Producer Types in Generic Codes
The Producer Type determines the percentage split on the Client Multi or Policy Multi and whether the staff is an outside broker or internal.
-
Enter PRODUCER.TYPES in Generic Codes
-
Add the mandatory fields:
-
Code: Maximum five characters
-
Description: Type description that pre-fills to the Production Report
-
Broker Net Impact:
-
Yes = Outside Broker. Answering "Yes" performs a different calculation as illustrated in the Invoicing Production Credit section.
-
No = Internal Staff
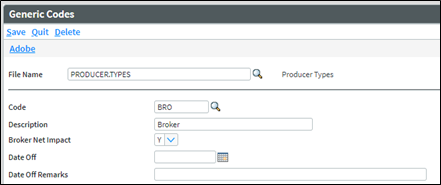
-
-
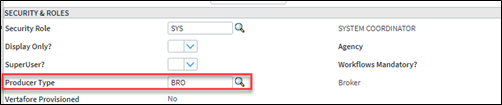
Assign a Producer Type in Staff Codes
Assign a Producer Type to a user in Staff Codes. Producer Type is located under the Security & Roles section. Producer Type indicates how percentages are split on the Client Multi and Policy Multi pages.
PRODUCTION CREDIT FIELDS ON CLIENT MULTI AND POLICY MULTI - ENABLE PRODUCTION CREDITS IS YES
The Multiple Producer section on Client Multi and Policy Multi is renamed to Split Information. New fields that are mandatory when Enable Production Credits? = Yes.
-
Prod Type (pre-fills from personalization but is editable)
-
Prod Credit New%
-
Prod Credit Ren%
-
Net Impact (not editable, pre-fills from Producer Type)
The following error will be displayed if the fields are left blank after saving the page: (6030) Production Credit fields are mandatory.
If Enable Production Credits? = No, entering Producer Type and Production Credit % amounts will display the following error after saving: (6027) Production Credit is not enabled and cannot be used.
When you add Client Multi or Policy Multi details to a Client or Policy for the first time, Production Credit percentages will pre-fill, depending on the number of producers listed by Producer Type.
For example, there are three producers on the Policy Details page. One producer has a producer type of BRO, with Broker Net Impact set to "Yes," and the other two producers have a producer type of PRD1, with Broker Net Impact set to "No." The single producer with Net Impact set to Yes will pre-fill with 100%, and the two with the same producer type will split the percentages 50/50. If all three producers were the same Producer Type, the percentages would be 33.34/33.33/33.33.
The % per Producer Type is validated to equal 100% or 0%. If the total percentages by producer type are not 100 or 0, the following error will be displayed after saving the page: (6028) Sum of Prod Credit New% does not total 0.00 or 100.00.
Production Credit fields are carried over on Renewals, Remarkets and Rewrites when Automatically Copy Policy Multi Information on Renewal, Rewrite or Remarket? and Copy Policy Multi Information on Automatic Renewals in Download? are set to Yes. Refer to Help for Accounting Flags for additional information on these flags.
INVOICING PRODUCTION CREDITS
Once your Multi screen is set up with Production Credit percentages, you can begin the invoicing process. Production Credits only flow from the Multi screen. Invoicing uses Policy Multi first, or Client Multi if Policy Multi does not exist. If neither Policy Multi or Client Multi is set up, Production Credit will not be calculated.
There are two types of calculations:
-
When Net Impact on a ProdType is Yes, Prod Credit Amt will pre-fill on the producer line using the formula: Agency Amt * Prod Credit %
-
When Net Impact on a Prod Type is No, Prod Credit Amt will pre-fill on the producer line using the formula: (Total Agency Amt - Total Broker Amount) = (Net) * Prod Credit %
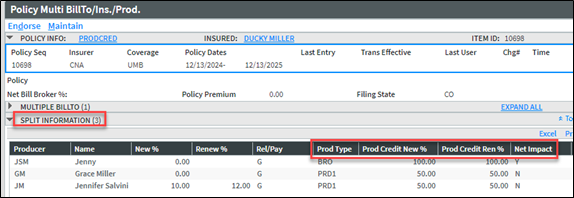
In the example shown below, the first line of Split Information is an outside broker with Net Impact set to "Yes." A new business invoice is created for a $1,000 Transaction Amount and a $102.50 Agency Amount. The producer commission is calculated according to the New%.
For an invoice where there is a producer with Net Impact = Y, each Production Credit Amount is calculated as follows:
-
Producer JM = $102.50 x 0% = $0.00
-
Producer CEC = $102.50 – 10.25 (JM’s producer commission) = $92.25 x 50% = $46.13
-
Producer GM = $102.50 – 10.25 (JM’s producer commission) = $92.25 x 50% = $46.13
Policy Multi
Policy Invoice

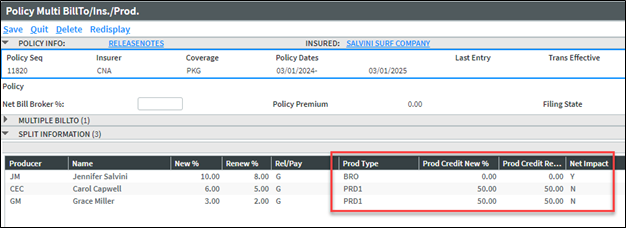
In the example shown below, all producers have a Net Impact = N. A new business invoice is created for a $5,000 Transaction Amount and a $750 Agency Amount. The producer commission is calculated according to the New%.
Each Production Credit line is calculated as follows:
-
Producer CEC = $750 x 50% = $375
-
Producer GM = $750 x 50% = $375
-
Producer BRW = $750 x 70% = $525
-
Producer LTB = $750 x 30% = $225
Policy Multi
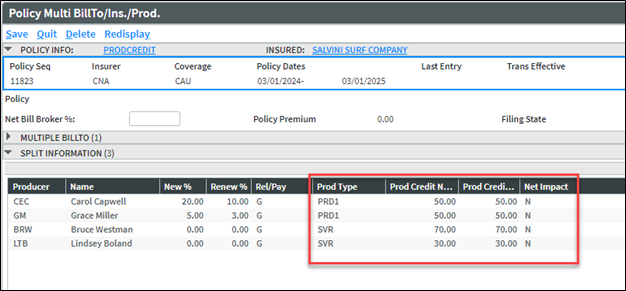
Policy Invoice

|
|
If Enable Production Credits? = No, you can enter a Producer Type and Production Credit percentages on the Invoicing tab; however, calculations will not occur. |
STAFF CODE GLOBAL CHANGE
Staff Code Global Change of a producer updates the Producer Type field on Client Multi and Policy Multi but does not update Production Credit percentages.
If producers with Production Credits are changed, the following toast message will be displayed following the Final Report: Client Multi & Policy Multi Production Credit% must be changed manually.
PROGRAMS THAT USE PRODUCTION CREDIT
When Production Credits are personalized on Client Multi or Policy Multi, the following programs are affected:
-
Agency Bill and Direct Bill Invoicing
-
Installments
-
Direct Bill Invoicing
-
Automatic Invoicing
-
One Step Direct Bill Receipts and Disbursements
-
Direct Bill Commission Statement Download
-
SOAP Web Methods:
-
invoiceInsert
-
invoiceVoid
-
invoiceDelete
-
commissionStatementInsert
-
Policy Multi
-
|
|
Once 24R1 has been loaded, all invoices on the Policy Invoice page will display 0.00 for Production Credit Percentage and Amounts. |
REPORTING
The Production Credit fields are reflected in an exported Production Report.
Dictionaries for Report Builder and SQL are listed in the Report Builder and SQL Dictionaries Added section of these release notes.
|
|
Watch the demo on Production Credit. |
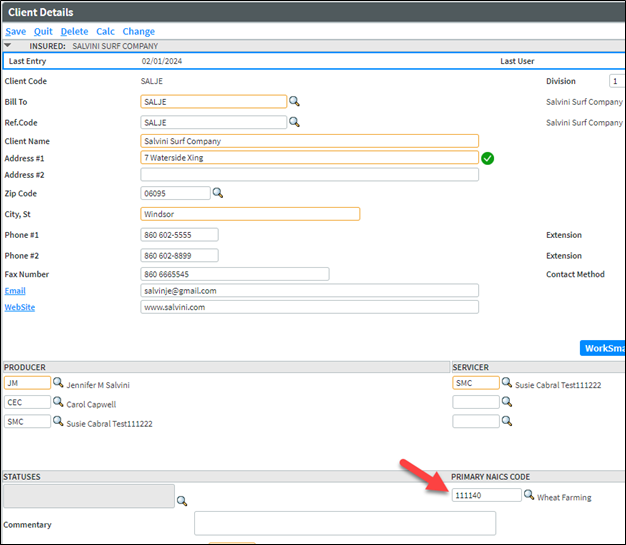
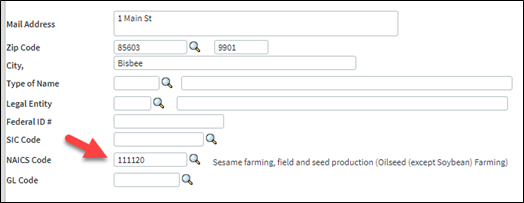
The Client Details page has a new field for Primary NAICS Code and a Line Item Set for multiple NAICS Codes. These new fields focus on targeted marketing efforts with clients who are in similar or identical industries.

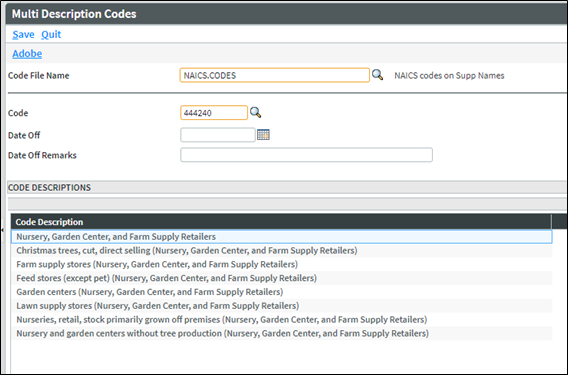
NAICS.CODES in Multi-Description Codes
The NAICS.CODES are stored in Multi-Description Codes. Multi-Description Codes allow one code to be used for multiple NAICS descriptions. These descriptions are stored with the main description on the first line, while subsequent lines display the sub-categories (main description). NAICS.CODES has been updated from the latest list of codes as found at https://www.census.gov/naics/.
NAICS Codes on Supplemental Names
The NAICS Codes field on Supplemental Names has also been updated to use the Multi Description Codes, NAICS.CODES file.

-
Any NAICS Code added or deleted on a Supplemental Name will update the NAICS Code Line Item Set on Client Details. The primary NAICS Code field on Client Details is not affected.
-
Any NAICS Code added or deleted on Client Details does NOT update the Supplemental Name page.
-
Supplemental Names Import now uses the new codes and descriptions.
-
Once 24R1 has been loaded, NAICS Codes on active supplemental names will update the NAICS Codes Line Item Set on Client Details for active policies. The description of the NAICS Code is the first line of the code without a subcategory.
Web Services
The Web Services SOAP methods for Client Insert and Client Update now support NAICS Code fields.
Remarketed Policies can now be renewed through Company Download without having to change their re-market status. Previously, a user received the following error: This policy is Remarketed. You must activate the policy first and then process this Renewal transaction.
ENABLE DOWNLOAD TO RENEW INTERIM POLICIES IN POLICY FLAGS
A new flag has been added to the Policy Flags page, titled Renew Interim Policies.

-
Yes: Allows the renewal in Company Download to renew a re-marketed policy
-
No: Does not allow the renewal of a re-marketed policy
|
|
If you have Custom Release 598075 that allows the user to match a renewal download transaction to a policy that has been remarketed, answering "Yes" to the new Enable Download prompt will override this custom software. To maintain this custom feature, the Enable Download flag must be "blank" or "No." |
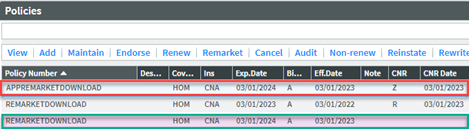
REMARKET DOWNLOAD WORKFLOW
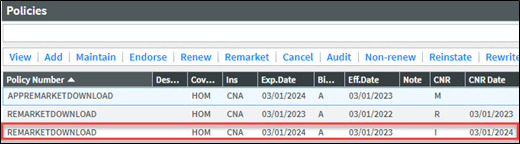
When the downloaded renewal is applied to an interim policy, the following changes occur:
-
The Interim policy (Original Term) CNR flag changes to R.
-
The new term created through download is now the policy with CNR = I. The CNR date is also updated.
-
All linkage for Prior and Next Term are updated.
Example of a Workflow when Enable Download to Renew Interim Policies is Yes
-
The REMARKETDOWNLOAD policy is re-marketed to APPREMARKETDOWNLOAD.
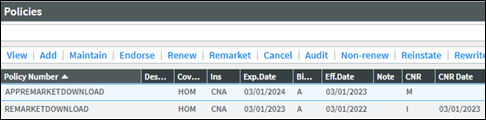
-
The carrier sends the renewal transaction through Company Download. The download is updated, and the following events occur:
-
Changes the original term to (R)enewal
-
Creates a new (I)nterim policy
-
-
Maintaining the remarketed policy continues to provide these options.
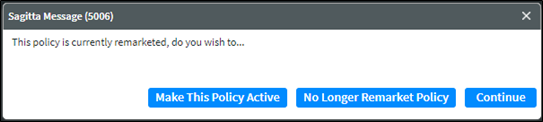
-
Selecting No Longer Remarket Policy will cause the following to occur:
-
Deactivates the re-marketed term with CNR = Z CNR status.
-
Activates the Interim CNR status policy term, by removing the CNR Status and CNR Date.
-
-
Selecting "Make This Policy Active" will:
-
Activate the re-marketed term
-
Remove the Interim CNR status from the prior term policy.
-
-
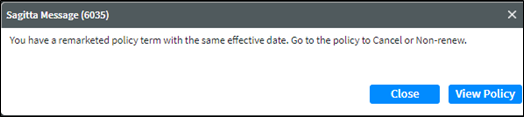
The policy is saved and a new prompt is displayed.
-
Close: Finishes the process
-
-
View Policy: Launches the user to the Policy Details page of the Interim Policy. The user can Cancel or Non-Renew the policy term with the same effective date.
|
|
Watch the demo on Renew Remarketed Policies in Company Download. |
Copy Changes to Next Term now prompts the user to copy to all next terms of a policy.
If you have an original policy term, and it has been Remarketed, but the Renewal for the original term comes in through Company Download, there are three terms of the policy. If your agency has Copy Changes to Next Term? set to Yes, you can make a change in the original term of the policy and it will prompt to copy the change first to the renewal term, and then to the re-marketed term. The prompt to copy changes will be shown as follows:
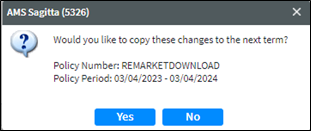
Select "Yes" to display the prompt for creating a new transaction, or select an existing transaction.
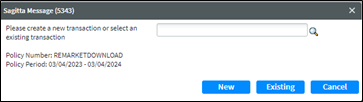
Once the transaction is selected, the prompt is displayed for the next policy term; this process repeats for following term until the Current term is reached.
If a Policy term is locked when the "Copy to Next" function is being processed, the user sees the following error message: "Tthe changes are not copied. The policy term is skipped and the Copy to Next function continues to the following term."
For more information on Copy Changes to Next Term, see Copy Policy Changes to Next Term Overview in Sagitta Help.
|
|
Watch the demo on Copy to Next Term. |
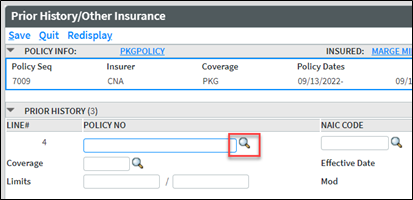
The Prior History / Other Insurance page's policy-number field now has search available. Use the search function to find a client's policy, or type an existing policy number into the field. A policy that does not exist in Sagitta continues to be allowed in the field without the field pre-filling.
|
|
The "Save & Copy" button has been removed to prevent data integrity issues that might occur when adding an existing policy or one that does not exist. |
|
|
Watch the demo on Prior History Policy Number. |
The line of business MHOME is now supported for importing Mobile Home updates for Company Download. Previously, Mobile Home policies were processed in the company mailbox as Homeowners (HOME) transactions. To process Company Download transactions with the MHOME line of business, MHOME and appropriate personalization must be added to Company DL Certified LOBs, Company Mailbox, and Insurer/Coverage Personalization. For more information, check out the following MyVertafore articles: "Company Download Certified LOBs" DOC ID 23581, "Company Mailbox Personalization" DOC ID 23584, and "Insurer/Coverage Personalization" DOC ID 23589.
|
|
Watch the demo on MHOME in Company Download. |
Cash Receipt Web Services now allows a zero-check amount for a Client Cash Receipt and a negative check amount for a Non-Client Cash Receipt.
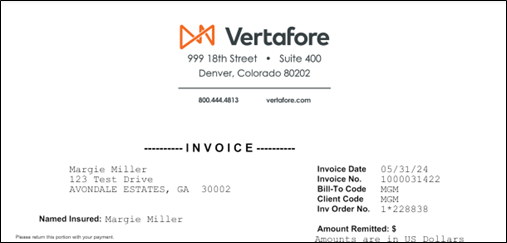
The area for logos to fill on Invoices and Statements has been enlarged to cover the entire top section of the invoice or statement. You can add white space around the logo image to adjust the size of the logo at the top of an invoice or a statement.
Logo before the upgrade:

Logo as of the 24R1 release:
|
|
Watch the demo on how to adjust the size of the logo for invoices or statements. |
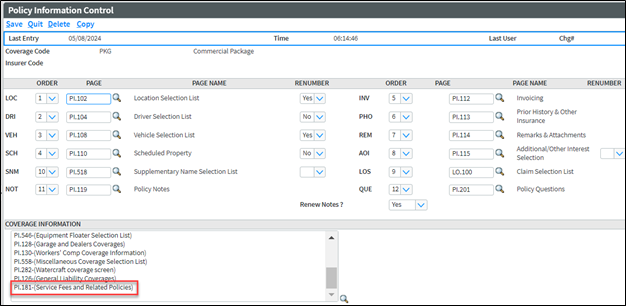
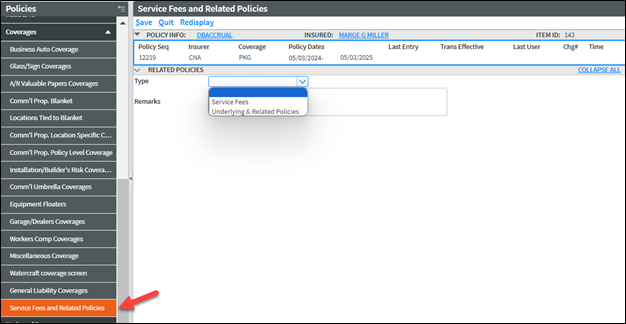
Service Fees and Related Policies is a new page to associate policies that are connected and/or dependent for a client. This includes Fee, Layer/Tower, and/or Subscription/Quota Share policies.
PERSONALIZATION
Add the Service Fees and Related Policies page to applicable coverages in Policy Information Control by performing the following steps:
-
Go to Other > Personalization > System > Policy Information Control
-
Enter the Coverage Code where you want the new page to appear (e.g., PKG)
-
Enter the Insurer Code (if applicable)
-
Click "Load"
-
Enter PI.181 to Coverage Information
-
Click "Save."
SERVICE FEES AND RELATED POLICIES PAGE
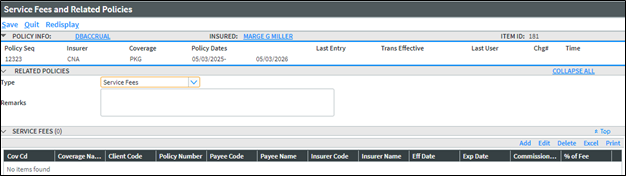
Access the page on the Policy secondary navigation under Coverages. Select a Type in the drop-down menu to display the grid for Service Fees or Underlying & Related Policies. You may only select one type on the page.
Select Service Fees to display the Service Fees grid. The fields displayed are Coverage Code, Coverage Name, Client Code, Policy Number, Payee Code, Payee Name, Insurer Code, Insurer Name, Effective Date, Expiration Date, Commissionable?, and % of Fee.
Select Underlying & Related Policies to display the Underlying & Related Policies grid. The fields displayed are Coverage Code, Coverage Name, Client Code, Policy Number, Payee Code, Payee Name, Insurer Code, Insurer Name, Effective Date, Expiration Date, Layer #, Layer Limit, and Quota Share %.
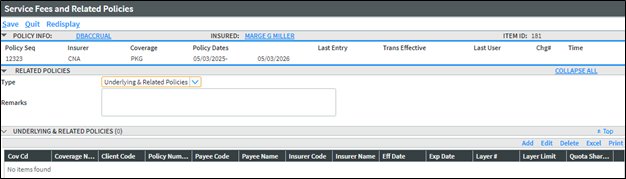
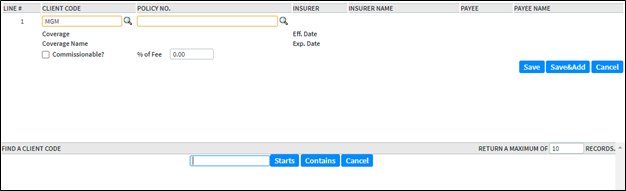
Click "Add" on either grid to add a policy. The Client Code will pre-fill with current client and Policy Lookup filters, listed by the Client Code. The policy must exist on the Sagitta system. The Client Code Lookup allows for the selection of a different client.
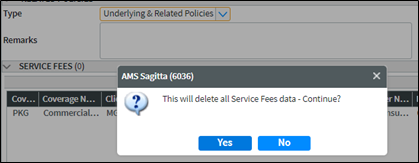
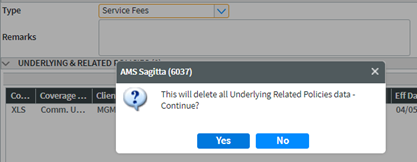
DATA IS REMOVED FROM INCORRECT TYPE
When the Type drop-down menu is changed, the prompts below it will show if data has already been entered in the grid.
Navigating away from the Service Fees grid with data entered:
Navigating away from the Underlying & Related Policies grid with data entered:
|
|
Information on the aforementioned page will not carry forward to a policy that is renewed, re-marketed, or rewritten. |
|
|
Watch the demo on the Service Fees and Related Policies page. |
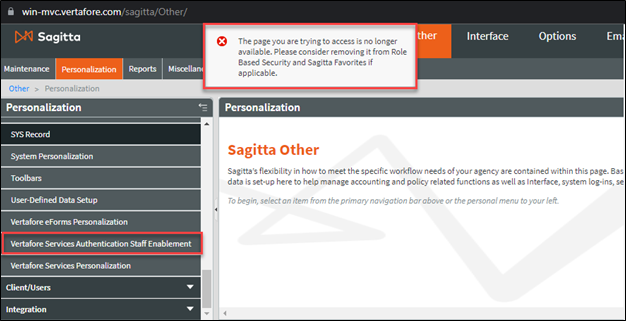
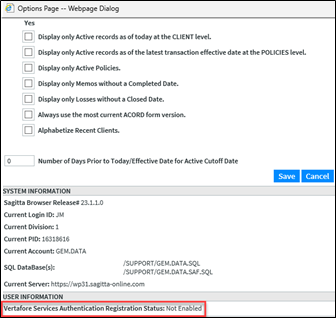
Access to the Vertafore Services Authentication Staff Enablement page has been removed, since this authentication method is no longer valid.
If this page has been added to any roles, please consider removing it since accessing it will trigger the following error message:
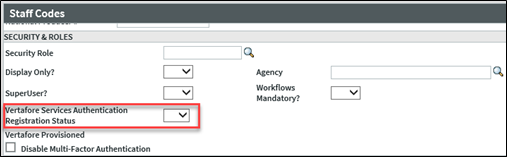
Supporting information for the Vertafore Services Authentication Registration Status field has also been removed from Staff Codes and Settings.
Staff Codes:
Options:
|
acord form |
state |
version |
form name |
|---|---|---|---|
| 50 | CT | 2022/07 |
Connecticut Insurance Identification Card |
| 50 | LA | 2018/10 | Louisiana Auto ID Card |
| 50 | ME | 2022/01 |
Maine Motor Vehicle Insurance Identification Card |
| 51 | ME | 2022/01 |
Temporary Maine Motor Vehicle Insurance Identification Card |
| 50 | TX | 2020/01 | Texas Liability Insurance Card |
|
Sagitta file |
attribute dict's |
synonym dictionaries |
odbc sql dictionaries |
|---|---|---|---|
| ADDITIONAL.INTERESTS | 60 | MAK | MAK |
| CLIENTS | 23 | MAK | MAK |
| CLIENTS | 74 | NAICS.CODES | NAICSCODES |
| CLIENTS | 75.1 | PRIMARY.NAICS.CODE | PRIMARYNAICSCODE |
| CLIENTS | 75.2 | PRIMARY.NAICS.DESCRIPTION | PRIMARYNAICSDESCRIPTION |
| CLIENTS | 76 | NAICS.DESCRIPTION | NAICSDESCRIPTION |
| PRODUCER.TYPES | 0 | CODE | PRODUCER_TYPES_CODE |
| PRODUCER.TYPES | 3 | DESCRIPTION | PRODUCER_TYPES_DESCRIPTION |
| PRODUCER.TYPES | 8 | BROKER.NET.IMPACT | PRODUCER_TYPES_BROKERIMPACT |
| STAFF | 100 | PRODUCERTYPE | PRODUCER.TYPE |
| CLIENTS.ACCT.PREFILL | 43 | PRODUCTION.CREDIT.NEW | PRODUCTION_CREDIT_NEWPERCEN |
| CLIENTS.ACCT.PREFILL | 44 | PRODUCTION.CREDIT.REN | PRODUCTION_CREDIT_RENPERCEN |
| CLIENTS.ACCT.PREFILL | 45 | BROKER.NET.IMPACT | BROKER_NET_IMPACT |
| CLIENTS.ACCT.PREFILL | 46 | PRODUCER.TYPE | PRODUCER_TYPE |
| POLICIES.ACCT.PREFILL | 43 | PRODUCER.CREDIT.NEW% | PRODUCTION_CREDIT_NEWPERCEN |
| POLICIES.ACCT.PREFILL | 44 | PRODUCER.CREDIT.REN% | PRODUCTION_CREDIT_RENPERCEN |
| POLICIES.ACCT.PREFILL | 45 | BROKER.NEW.IMPACT | BROKER_NET_IMPACT |
| POLICIES.ACCT.PREFILL | 46 | PRODUCER.TYPE | PRODUCER_TYPE |
| SALES | 71 | PRODUCER.TYPE | PRODUCER_TYPE |
| SALES | 72 | PROD.CREDIT% | PROD_CREDIT_PERCENT |
| SALES | 73 | PROD.CREDIT.AMOUNT | PROD_CREDIT_AMOUNT |
| SALES | 74 | NET.IMPACT | NET_IMPACT |
| PREMIUMS | 41 | PRODUCER.TYPE | PRODUCER_TYPE |
| PREMIUMS | 42 | PROD.CREDIT% | PROD_CREDIT_PERCENT |
| PREMIUMS | 43 | PROD.CREDIT.AMOUNT | PROD_CREDIT_AMOUNT |
| PREMIUMS | 44 | NET.IMPACT | NET_IMPACT |
| PRIOR.HISTORY | 28 | OTHER.INS.POL.SEQ | PRIORPOLSEQ |
| PRIOR.HISTORY | 29 | PRIOR.POLICY.SEQ | OTHERINSPOLSEQ |
| SERVICE.FEES | 2 | TYPE | TYPE |
| SERVICE.FEES | 3 | REMARKS | REMARKS |
| SERVICE.FEES | 6 | SF.POLICYNO | SERVICEFEEPOLICYNO |
| SERVICE.FEES | 7 | SF.INSURORCODE | SERVICEFEEINSURORCODE |
| SERVICE.FEES | 8 | SF.INSURORNAME | SERVICEFEEINSURORNAME |
| SERVICE.FEES | 9 | SF.PAYEECODE | SERVICEFEEPAYEECODE |
| SERVICE.FEES | 10 | SF.PAYEENAME | SERVICEFEEPAYEENAME |
| SERVICE.FEES | 11 | SF.COVCD | SERVICEFEECOVERAGECODE |
| SERVICE.FEES | 12 | SF.COVNAME | SERVICEFEECOVERAGENAME |
| SERVICE.FEES | 13 | SF.EFF.DATE | SERVICEFEEEFFDATE |
| SERVICE.FEES | 14 | SF.EXP.DATE | SERVICEFEEEXPDATE |
| SERVICE.FEES | 15 | COMMISSIONABLE | SERVICEFEECOMMISSIONABLE |
| SERVICE.FEES | 16 | PCT.FEE | PERCENTOFFEE |
| SERVICE.FEES | 17 | SF.CLIENT.CODE | SERVICEFEECLIENTCD |
| SERVICE.FEES | 21 | URP.POLNUMBER | UNDERLYINGPOLICYNO |
| SERVICE.FEES | 22 | URP.INSURORCODE | UNDERLYINGINSURORCODE |
| SERVICE.FEES | 23 | URP.INSURORNAME | UNDERLYINGINSURORNAME |
| SERVICE.FEES | 24 | URP.PAYEECODE | UNDERLYINGPAYEECODE |
| SERVICE.FEES | 25 | URP.PAYEENAME | UNDERLYINGPAYEENAME |
| SERVICE.FEES | 26 | URP.COVCODE | UNDERLYINGCOVCODE |
| SERVICE.FEES | 27 | URP.COVNAME | UNDERLYINGCOVNAME |
| SERVICE.FEES | 28 | URP.EFF.DATE | UNDERLYINGEFFDATE |
| SERVICE.FEES | 29 | URP.EXP.DATE | UNDERLYINGEXPDATE |
| SERVICE.FEES | 30 | LAYER | LAYERNO |
| SERVICE.FEES | 31 | LAYER.LIMIT | LAYERLIMIT |
| SERVICE.FEES | 32 | QSHARE.PCT | QSHAREPERCENT |
| SERVICE.FEES | 33 | RP.CLIENT.CODE | UNDERLYINGCLIENTCD |
|
SAGITTA FILE |
WEB SERVICE TAG |
|---|---|
| ADDITIONAL.INTERESTS | AddressValidation |
| CLIENTS | AddressValidation |
| CLIENTS | PrimaryNAICS |
| CLIENTS | NAICSInfo |
| STAFF | ProducerType |
| CLIENTS.ACCT.PREFILL | ProducerType |
| CLIENTS.ACCT.PREFILL | ProductionCdNewPct |
| CLIENTS.ACCT.PREFILL | ProductionCdRenewPct |
| CLIENTS.ACCT.PREFILL | BrokerNetImpact |
| POLICIES.ACCT.PREFILL | ProducerType |
| POLICIES.ACCT.PREFILL | ProducerCreditNewPct |
| POLICIES.ACCT.PREFILL | ProducerCreditRenewalPct |
| POLICIES.ACCT.PREFILL | NetImpact |
| SALES | ProducerType |
| SALES | ProdCreditPct |
| SALES | ProdCreditAmt |
| SALES | NetImpact |
| PREMIUMS | ProducerType |
| PREMIUMS | ProdCreditPct |
| PREMIUMS | ProdCreditAmt |
| PREMIUMS | NetImpact |
|
Area |
Defect ID |
Release Notes |
|---|---|---|
| Accounting | DS325 |
Adjustment UTMs will now display the period end-date, if a prior date is used in Accounts Receivable Adjustments. (DE10614) |
| Accounting | DS5873 |
The Combined Cash Receipts Report will no longer lock all records and cause system issues when run for a large date range. (DE35296) |
| Auto IDs | DS323 |
The Kentucky 50 Auto ID Card will now prefill the Agency Phone Number plus the Carrier Address. (DE10632) |
| Auto IDs | DS437 |
The Indiana 50 Auto ID Card will now correctly pre-fill the Agency Phone and the Address. (DE5088) |
| Auto IDs | DS1148 |
The Missouri Acord 50 Auto ID Card will now correctly update the Carrier Address. (DE14467) |
| Auto IDs | DS9665 |
The second Insured Address will now update all Auto IDs, where the second Address line is supported. (DE6132) |
| Auto IDs | DS9666 |
The Florida 50 Auto ID will now update the Fleet Indicator, when selected on the vehicle page. (DE12451) |
| Auto IDs | DS9667 |
The Nevada 52 Permanent Auto ID is now the default card generated for Nevada vehicles. (DE17715) |
| Auto IDs | DS9763 |
The California 51 Auto ID will now update the Insurance Company Street Address, City, State and ZIP. (DE4661) |
| Download | DS404 |
Commercial Umbrella Underlying Coverages are now properly updated when downloading a Renewal transaction. (DE9604) |
| Download | DS9916 |
A Workers Compensation update in Company Download will correctly update the percent or factor for Experience Modification, as well as for the coverages that update to the Charge/Credit grid in the Workers Comp Underwriting page. (DE44018) |
| Forms | DS5792 |
Vertafore eForms will now go to the Vertafore Viewer in the order they are selected. NOTE: The ACORD 125 and 127 will continue to be at the top of the order until all forms have been converted to the newer process. (DE34864) |
| Integration | DS4811 |
A certificate issued from a policy that has a numeric policy number, will now show "active" in InsurLink. (DE29577) |
| Integration | DS10408 |
Coverages, Categories, and Cancellation Reasons will now export to BenefitPoint upon making a change to the Description and clicking "Save" from Generic Codes Maintenance. (DE45075) |
| Integration | DS10548 |
SurePath (Tinubu) will no longer be in error when creating a policy that has agency-defined mandatory fields. (DE46488) |
| Invoicing | DS349 |
An error will now display on invoicing using Policy Multi that has a dated-off Transaction Code and Payee. (DE10537) |
| Invoicing | DS7688 |
The Quick button retains additional lines added to a multi-bill invoice. (DE38319) |
| Invoicing | DS7691 |
If there are two bill-tos on an invoice and the first invoice is Saved, clicking "Quick" on the second bill-to will now generate the following error: "The Quick command is not permitted. Click Save to post the second invoice." (DE38322) |
| Invoicing | DS8277 |
Using the Quick button on an invoice to post multiple bill-to invoices will no longer drop the payee code from the SALES record. (DE10613) |
| Invoicing | DS9932 |
The web method for InvoiceInsert on a multiple-payee invoice will no longer calculate the total of Producer Amounts that are greater than the total of Agency Amounts. (DE44016) |
| Invoicing | DS10048 |
Manual changes made to the Invoice Comments field on the Installment tab will now work properly and will be displayed on the printed Invoice. (DE44176) |
| Policy | DS5780 |
A policy created with a department that does not belong to the division will now display the following error: "Department (nn) is not valid for this Division." (DE25690) |
| Policy | DS7597 |
If Allow change of Policy Division? is set to "No" on a Staff Security record, the user will not be able to change the division on the Invoice Data tab. (DE39611) |
| Policy | DS10508 |
The Estimated Annual Premium in the Policy Summary section of the Policy Details page will no longer "pink out" when numbers are entered and the Calc button has been clicked. (DE46173) |
| Policy | DS10542 |
In the Policy Summary section of the Policy Details page, when the amount in Estimated Annual Premium is 1,000,000.00 or greater, and an amount is entered in the Calc field, the new amount is added to the Estimated Annual Premium amount once the Calc button is clicked. (DE46189) |
| Policy | DS10856 |
In the Chrome and Edge browsers, the Drivers and Vehicles page no longer stops responding after exporting drivers or vehicles to Excel. (DE48666) |
If you encounter problems or have questions concerning this release, Vertafore offers the following helpful resources:
-
Search the Knowledge Base on My Vertafore.
-
Create a Case at My Vertafore.
|
|
Watch all demos for 24R1. |