Credential Manager Guide
About this Guide
Use this guide to administer carrier-assigned credentials assigned to your agency users.
To perform these tasks, you must have the appropriate level of Credential Manager access rights.
Only use this guide if you have completed the VSSO onboarding process for Credential Manager. You can also use this information to set up Credential Manager for the first time.
-
Cookie A small amount of data generated by a website and saved by your web browser. Its purpose is to remember information about you.
-
VSSO An acronym that stands for Vertafore Single Sign-On.
-
VSSO Administrator The person or people within your organization that handle management of your Vertafore Single Sign-On products and user accounts.
-
Service Provider A carrier or vendor that can be access in TransactNOW Quick Links or is a partner/carrier for PL Rating or TransactNOW.
Vertafore’s Credential Manager provides centralized carrier-credential management stored securely in the cloud. Credential Manager allows users to maintain a single set of carrier credentials for use by AMS360, PL Rating and TransactNOW from any supported workstation.
Credential Manager allows you to store and manage your carrier credentials in a Vertafore-managed cloud service. The service allows Vertafore products like AMS360, TransactNOW and PL Rating to access carrier credentials from one secure location, which means you’ll no longer need to maintain copies of carrier credentials under multiple products. Once you are VSSO-enabled, you can use Credential Manager exclusively to change or update company credentials in Credential Manager moving forward. Only users who have been given permission to manage carrier credentials can access the product. If users don’t have permission to manage carrier credentials, the VSSO administrator is responsible for managing and updating the credentials for them.
|
Note: Credential Manager is used to manage credentials for AMS360, TransactNOW and PL Rating users. It is not a separate product but is used to maintain credentials in a single management application for its supported products. Before you can add a new, individual user, the user must be configured for VSSO through the VSSO Console. Configuration there includes activating these users for AMS360, TransactNOW and PL Rating. |
Supported Products
Credential Manager is supported through Vertafore Single Sign-On (VSSO) and the following Vertafore products:
-
AMS360 Online (version 7.5 or later)
-
PL Rating (version 3.14 or later)
-
TransactNOW (version 7 or later)
Credential Manager System Requirements
To use Credential Manager, your workstations must meet the following system requirements:
-
Microsoft Windows 7
-
Microsoft Internet Explorer version 8 or 9 (32-bit)
Workstation Installations of TransactNOW
Workstations will have two versions of TransactNOW installed, the original TransactNOW software and the VSSO compatible TransactNOW client version. (Refer to the illustration below see how these files appear in the Install/Uninstall window in the workstation’s Control Panel (Control Panel\Programs\Programs and Features).
Both versions of the software are required. Control Panel shows both:

This section of the guide describes tasks for agency administrators for VSSO and Credential Manager.
The instructions in this section require access to the VSSO Admin Console.
Use the following instructions to set the Permissions option for each user. The three levels of access are:
-
Read only: Read-only access is the default setting for users.
-
Manage Own: Manage-own access allows users to create, delete and edit their own credentials.
-
Manage All: Manage-All access allows users to create, delete and edit their own and other users and groups. This is the setting that provides full rights and access to the Administration tab. This user can also control the service provider list for your agency. Vertafore recommends that you limit full access in your agency.
Select a permissions option for each user in your agency.
Configuration Steps
-
In the VSSO Admin Console, click the Manage Users tab.

-
Select a user from the list under Users heading.
-
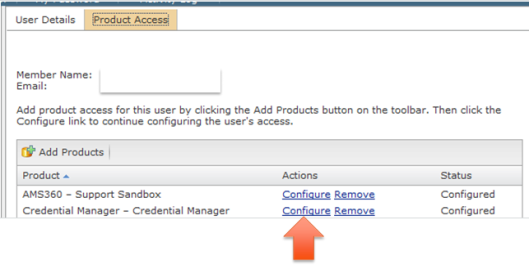
Click the Product Access tab.
-
Click the Configure link next to Credential Manager in the list of products to add. (See the arrow in the illustration below.)
-
When the Credential Manager Configure box opens, the user you chose displays. Set the permissions level for this user by choosing:
-
Read only
-
Read-only access is the default setting for users.
-
Users with read-only access can only view credentials and are unable to change values. When users with this setting attempt to make changes to credentials, a message displays describing the restriction:

-
-
Manage Own
-
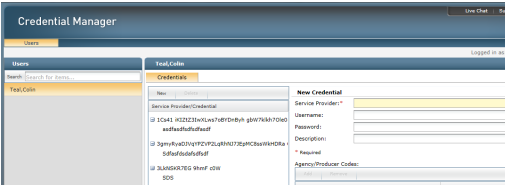
Manage-own access allows users to create, delete and edit their own credentials.

-
The illustration below shows the page a user with manage-own credentials set can use to view and edit credential values.
-
-
Manage All
-
Manage-All access allows users to create, delete and edit their own and other users and groups. This is the setting that provides full rights and access to the Administration tab. This user can also control the service provider list for your agency. Vertafore recommends that only a few be given this level of access.


-
-
Use the instructions in this section to manage credentials assigned to groups of users. This method of assigning credentials can be useful for large agencies with many users who can share the same set of credentials. This feature is optional and not necessary for agencies who prefer to assign credentials to individuals.
Creating a new Group
-
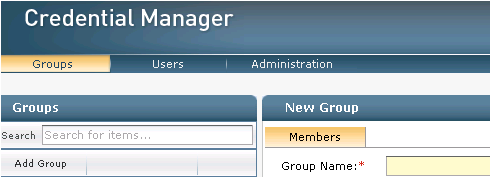
Click on the Groups tab.
-
Click on the Add Group button.
-
Enter a descriptive name in the Group Name field on the Members Tab.
-
When you are satisfied with the name you entered, click Save.
-
Click on the Groups Tab.
-
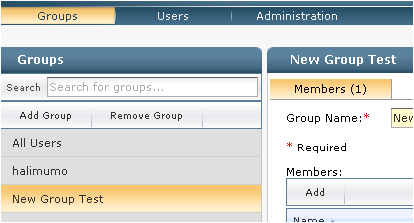
Click on the Group name.
-
Click on the Members Tab.
-
Click on the Add button to select one or more users to add.
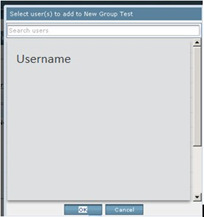
Tip: To select multiple users at once, select a single user by clicking the name. Then, hold down the CTRL (control) button and click on additional names.
-
Click Save.
User Configuration for Credential Manager in the VSSO Admin Console does not impact the user selection for group admin. Any user can be selected as a group administrator.
Use the instructions in this section to assign a group administrator.
-
Click on the Groups tab.
-
Click on the Group name.
-
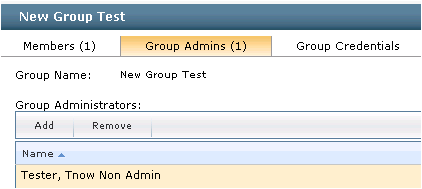
Click on the Group Admins tab.

-
Click the Add button to select user(s) to add to the Group administrators.

Tip: To select multiple users at once, select a single user by clicking the name. Then, hold down the CTRL (control) button and click on additional names.
-
Click OK.
-
Click on the Groups tab.
-
Click on the Group name.
-
Click on the Group Admins tab.
-
Click on the Group Administrator’s name in the list.
-
Click on the Remove button.
-
Click Save.
-
Click on the Groups tab
-
Click on the Group name
-
Click on the Group Credentials tab
-
Click Add Credentials.
-
Select the carrier from the Service Provider drop down list by clicking the down arrow.
If a carrier is not in the list, please check with your agency admin. Service Provider filters may be implemented for your agency.
-
Enter the User, Password and Description to help identify the credentials. Note the required fields indicated by red asterisks. *
-
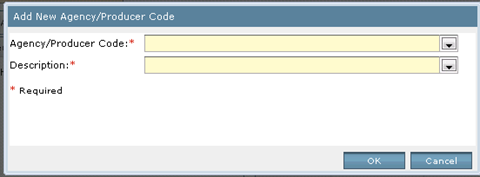
Click Add Code in the Agency/Producer Code area if indicated as required
-
Enter the Agency Code/Pin and a Description or select from the drop down list if the same agency code is used for multiple username/password.
-
Click Save.
-
Click on the Groups Tab.
-
Click on the Group name.
-
Click on the Group Credentials Tab.
-
Select the Carrier Description listed under the carrier name in the Credential Pane.
-
The information will display as currently entered.
-
Update the value needed.
-
Click Save.
-
Click on the Groups Tab.
-
Click on the Group name.
-
Click on the Group Credentials tab.
-
Select the Carrier Description listed under the carrier name in the Credential Pane.
-
Click the Remove Credential button.
-
When prompted to confirm delete, click Yes.
An admin user (Manage All Credentials) has the ability to filter the Service Provider list available to users during the Add Credential process. This will allow only the selected Service Providers to show for the agency.
-
Select the Administration tab in Credential Manager

-
Select the carriers to be displayed for the agency users then click SAVE.
-
Single selections by clicking the carrier then click the SAVE button.
-
Multiple selections
-
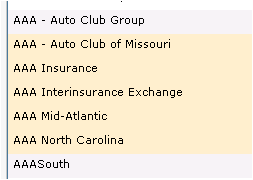
To select multiple carriers sequential in the list, click the first carrier, press and hold the Shift button, click the last carrier in the sequence. This will select all the carriers between the first and last (highlighted yellow below):
-
To select multiple carriers that are not sequential in the list, click the first carrier, press and hold the CTRL button, click each additional carrier in the sequence (highlighted yellow below):

-
-
The resulting list for the user in the Service Provider field when add new credentials will reflect only those carriers that selected in the Administration > Service Provider:
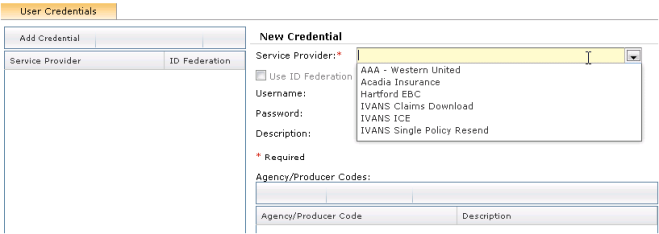
*** When new carriers are release or an agency becomes appointed with a new carrier, administrators must update the My Service Providers List to include this carrier.
Credential Manager can be accessed in each supported application through the following paths:
AMS360 > Toolbox > Credential Manager

PL Rating > Admin > Manage Real-Time Passwords

TransactNOW > Toolbox > Integration > TransactNOW Carrier then select Credential Manager
Use the instructions in this section to manage your own credentials or those of other agency users’, if you have permission.
|
Note: Credentials can be setup for individual users or groups. To manage credential groups, see the Admin Managing Group Credentials section if you have permissions to edit groups. |
Add credentials for an individual user
-
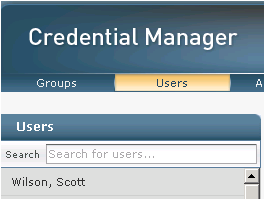
Click the Users Tab then select Users.
-
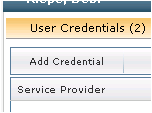
Click Add Credentials from the User Credential tab.
-
Select a carrier from the Service Provider drop-down list.
-
Note that all carriers available in TNOW or PL Rating before will also be listed. If you cannot find a carrier you expect, contact your administrator—the list may have been filtered.
-
If a carrier you expect is not in the list, please check with your agency administrator. Service Provider filters may be implemented for your agency.

-
-
Enter the Username for the carrier website.
-
Enter the Password for the carrier website.
-
Enter a Description to assist the user to know what to select especially if multiple sets of credentials are entered for a specific carrier.
-
Examples: Personal Lines, Commercials Lines, Premium Discounts, TN
-
-
Click on Add Code for the agency code or select one from the list if applicable Required fields are indicated by *

-
Complete the Agency/Producer Code and Description fields
-
Click OK
-
-
Click Save.
-
Repeat the process for additional carriers.
Edit credentials for a specific provider
-
On the Users tab, select the user
-
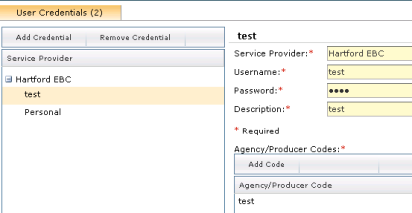
Select the specific credential set/carrier in the User Credentials list by clicking on the description under the carrier name. This will bring up the credentials to be edited.
-
Once changes are made, Click Save.
Delete existing carrier credentials
Please note that this action is final. You will need to re-enter values deleted in error.
-
On the User tab, select the user.
-
Select the specific credential set/carrier in the User Credentials list by clicking on the Carrier Description listed under the carrier name.
-
Click the Remove Credential button.
-
When prompted to confirm delete, click Yes.

If the VSSO Admin has setup the user to manage their own credentials, the user can access Credential Manager to update or add carrier credentials. (See above for how to access Credential Manager)
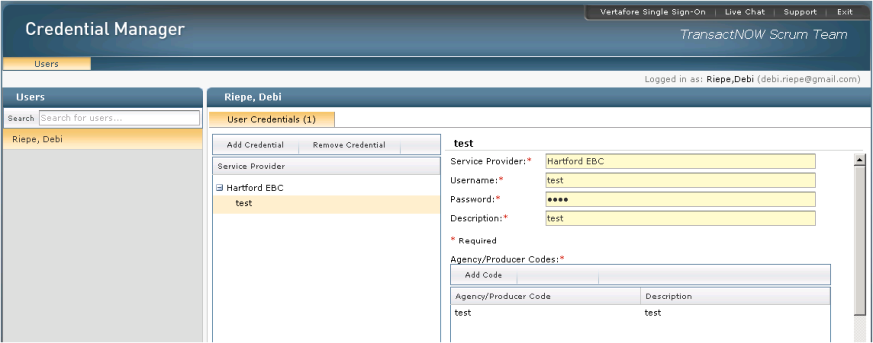
The User Credentials Tab indicates how many credentials are entered by the number listed.
Example shows: User Credentials (1)
To enter a new carrier credentials
-
Click Add Credentials.
-
Select the carrier from the Service Provider List by clicking the drop down arrow.
-
If a carrier is not in the list, please check with your agency admin. Service Provider filters may be implemented for your agency.
-
-
Enter the User, Password and Description to help identify the credentials
-
Required fields are indicated by red asterisks * .
-
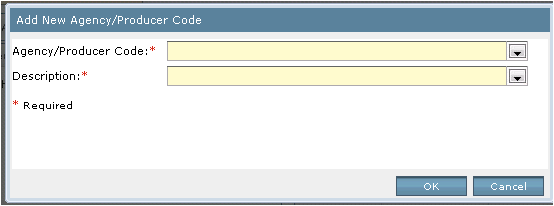
Click Add Code in the Agency/Producer Code area if indicated as required
-
Enter the Agency Code/Pin and a Description or select from the drop down list if the same agency code is used for multiple username/password.
-
Click Save.
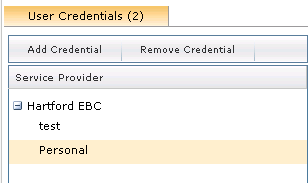
Multiple credentials for one carrier are added by the same new carrier credentials process above. The description should indicate when each set of credentials would be used.
Examples: Personal Lines, Commercial Lines, X Discount.
Edit existing carrier credentials
-
Select the Carrier Description listed under the carrier name in the Credential Pane
-
The information will display as currently entered.
-
Update the value needed.
-
Click Save.
Delete existing carrier credentials
Please note that this action is final. You will need to re-enter values deleted in error.
-
Select the Carrier Description listed under the carrier name in the Credential Pane.
-
Click the Remove Credential Button.

-
When prompted to confirm delete, click Yes.
-
Message displayed “Your credential has pending changes that are invalid. Would you like to fix them now?”
-
Creating or editing a credential without completing the required fields then clicking something else (like NEW) without saving.
-
Resolution: Complete all required fields then click the SAVE button
-
-
Message displayed “ Unable to Save. Please enter information in the mandatory fields.”
-
Attempted to create a group but failed to enter a group name
-
Attempted to save credentials without completing a required field
-
Resolution: Complete all required fields then click the SAVE button
-
If you encounter any problems or have questions about Credential Manager that are not answered by this guide, please contact Vertafore Customer Support by using one of the following methods:

-
Click the Live Chat option in Credential Manager.
-
Click the Support option to access My Vertafore Knowledgebase containing solutions, documentation, and videos or create an open case.
-
You may be prompted to login or create a user if you do not currently have access.
-
Create an open case at https://support.vertafore.com from this guide.
-
Call 800.444.4813 then selections the options for AMS360 or PL Rating depending on the product you access Credential Manager.