
Customize Tiles and Panels
You can move or re-size panels and move tiles to customize your workspace on My Agency Home. You can re-size panels by moving them from one column to another. Four of the My Agency Home tab components can appear as both a tile and a panel. For information about customizing the display of the To-Do list or Message Board panels, see Customize the To-Do List and Customize the Message Board Panel.
- Tiles occupy a smaller space in the Tile Area. The Tile Area is in a fixed location that remains even when you scroll the page vertically. You can scroll horizontally with directional arrows (< >) when the number of tiles don't fit on the page side by side.
- Panels are larger and can be resized and moved about the workspace of My Agency Home. When panels are stacked vertically in a column, the column re-sizes to fit the largest panel. Some panels have a minimum width and shrink only to that limit.
- On the My Agency Home page, in the upper right-hand corner, click your name to open a menu and then click Platform Settings.
-
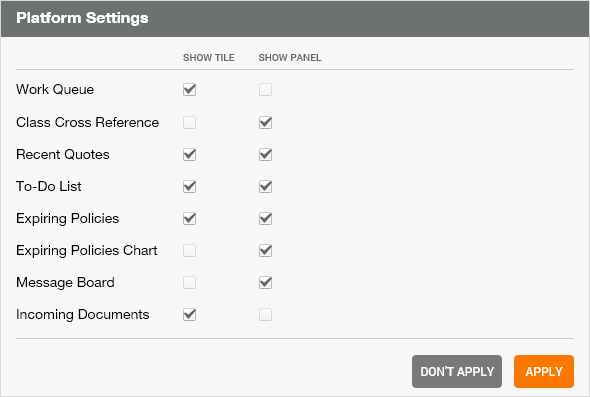
In Platform Settings, select the panels and tiles you want to appear on your My Agency Home page by clicking in the check box next to the options. The panels and tiles do not all display the same way.
- Work Queue—shows only as a tile
- Class Cross Reference—displays only as a panel
- Recent Quotes —displays as a tile and panel.
- To-Do List—displays as a tile and panel
- Carrier Connectivity—displays only as a panel
- Expiring Policies—displays as a tile and panel
- Expiring Policies Chart—displays only as a panel
- Message Board—displays only as a panel
- Click Apply.
Agency Platform allows you to click and drag to move panels and tiles around in the My Agency Home page.
Move a tile from one place in line to another within the Tile Area
- On the My Agency Home page, in the Tile Area, place your cursor over the tile, and once the arrow cursor turns into a multi-directional
 cursor, click and hold down your left mouse button .
 - With your left mouse button depressed, drag the tile to anywhere in the Tile Area.
Move a panel and drop it into one of the two column areas on My Agency Home.
- On the My Agency Home page, place your cursor over the frame of a panel, and once the cursor turns into a multi-directional cursor, click and hold down your left mouse button.
- With your left mouse button depressed, drag the panel to another location in the same column or in another column in the panel area.
To change the height of a panel:
- Move your cursor over the bottom edge of the panel until it turns to a double-sided arrow.
- Click and hold the left mouse button and drag the bottom edge up to decrease the height and down to increase the height.
- When you have the desired height of the panel release the mouse button.
To change the width of a panel:
- Move your cursor over the right edge of the panel until it turns to a double-sided arrow.
- Click and hold the left mouse button and drag the edge left to decrease the width and right to increase the width.
- When you have the desired width of the panel release the mouse button.

|
The panel area of My Agency Home has a maximum width. If you increase the width of a panel and the panel on the right can no longer fit within the maximum width, then the right-hand panel moves to the next row. |
To change both the height and width of the panel at the same time:
- Move your cursor over the bottom right corner or a panel.
- Click and hold the left mouse button and drag the corner out and down to increase both height and width.
- When you have the desired height and width of the panel release the mouse button.
© 2017 Vertafore