Invoice an Installment Plan
Before proceeding, ensure that installment plans have been setup in Data Maintenance Utility.
When a policy is initially invoiced on installments, AIM creates two installment plans:
- Master – The master plan is updated with changes throughout the course of the invoicing life of the policy such as the invoice that is created in a posted status and is transmitted to the retail agent or insured and the invoice to be exported to AIM Accounting.
- Per Transaction – The per-transaction plan is created in a cancelled status, and is created for system purposes only.
Here we address the invoicing of a new business or renewal transaction on an installment plan.
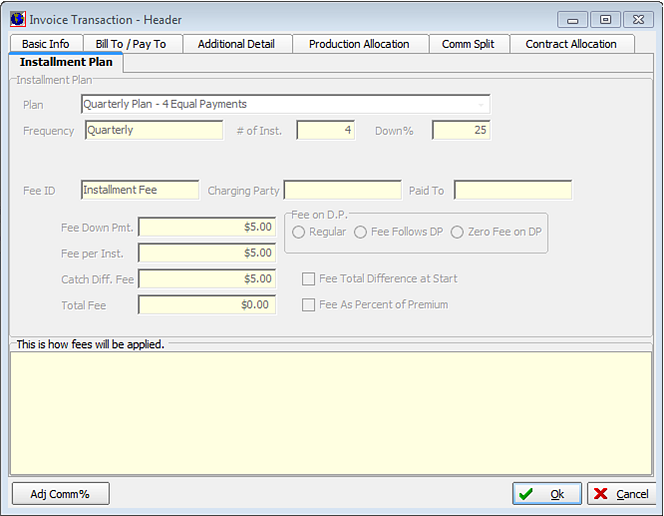
- After binding the submission, in the Invoice Transaction Header dialog box, click the Installment Plan tab.
- In the Plan list, select the desired plan. All remaining boxes are read-only; that is, no changes can be made.
|
If the installment plan you want to use is not available, please contact your System Administrator to have the plan added. Installment plans cannot be created in AIM. |
- Click OK to proceed or click Cancel to abandon the entire invoicing process.

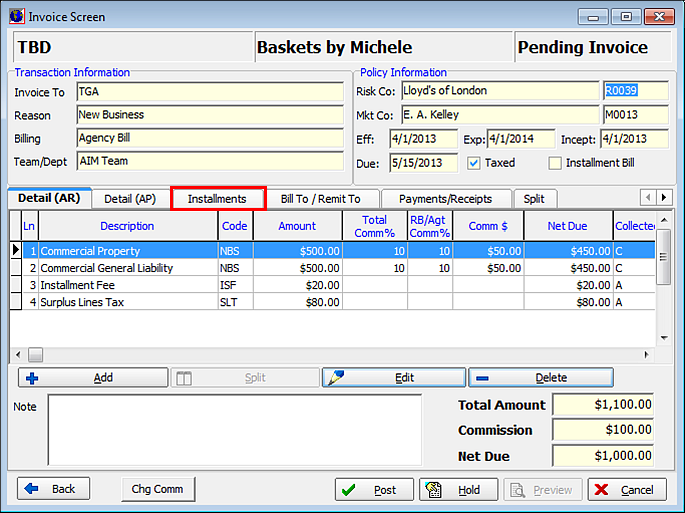
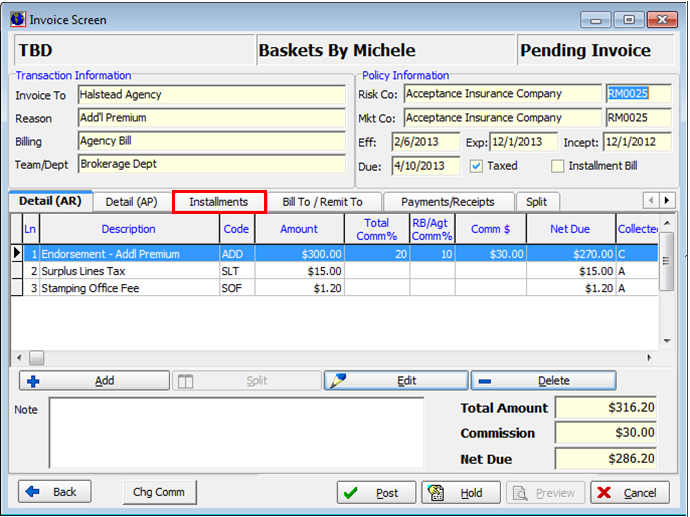
- Click the Installments tab.
The invoice displayed below displays two lines of premium, since premium distribution was used in this example.
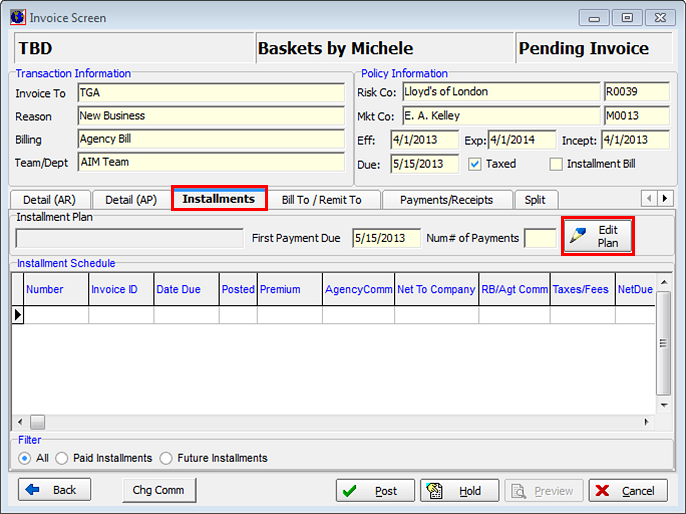
- On the Installments tab, click Edit Plan.
|
If at any point in this workflow you find that you have selected an incorrect plan, you must cancel the invoice and begin again. This can be accomplished through use of the Invoice command on the Policy menu. |
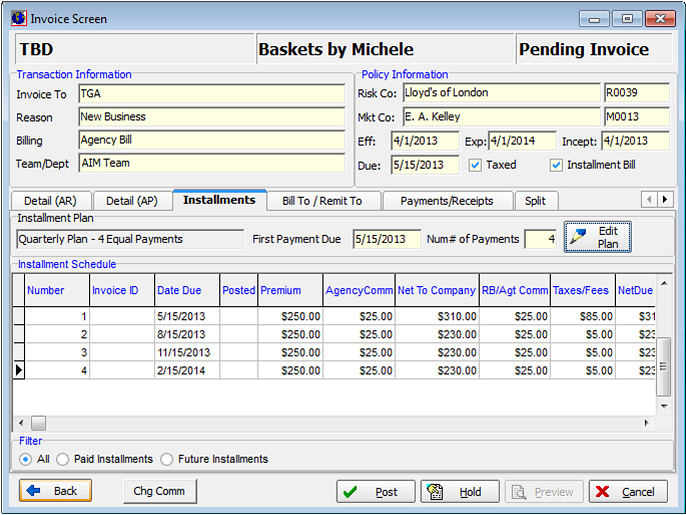
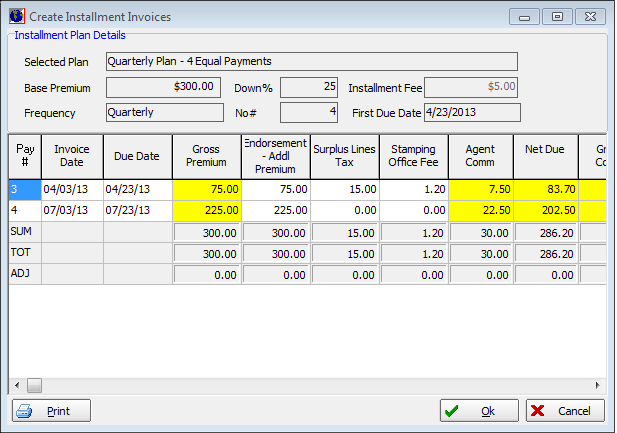
The Installment Plan Details pane, located in Create Installment Invoices displays the currently selected plan. Fields are read-only and cannot be changed.
The grid displays AIM’s automatic calculation of invoice dates, due dates, premiums, taxes and applicable fees. Premiums are broken down by line of business used in premium distribution.

Should any change to the distribution of premiums over the life of the installment plan be necessary, you may revise them by clicking in the appropriate column. Columns highlighted in yellow cannot be changed. Doing so will cause the remaining installment amounts to be automatically re-calculated.
You can change any column that is not highlighted in yellow. Should your changes result in an out of balance situation; the ADJ row of the grid is highlighted in red to indicate where a data entry error may have been made.
Now that you have an understanding of how you can manage installments in Create Installment Invoices, we can continue.
- Click Print to print the installment schedule. Alternatively, you can click OK to continue processing installments or Cancel to abandon the installment changes.
- If you click Cancel, you will be prompted to confirm whether the invoice should have installments removed.

- The Installments tab is now displayed for your final review. If changes are necessary, click the Edit Plan button to return to the Create Installment Invoices screen for edit.
- Click Post to post the invoice.
- Your agency’s memo invoice is displayed. The memo invoice displays the total policy cost, but does not display the installment plan. Transmit the memo invoice as desired.
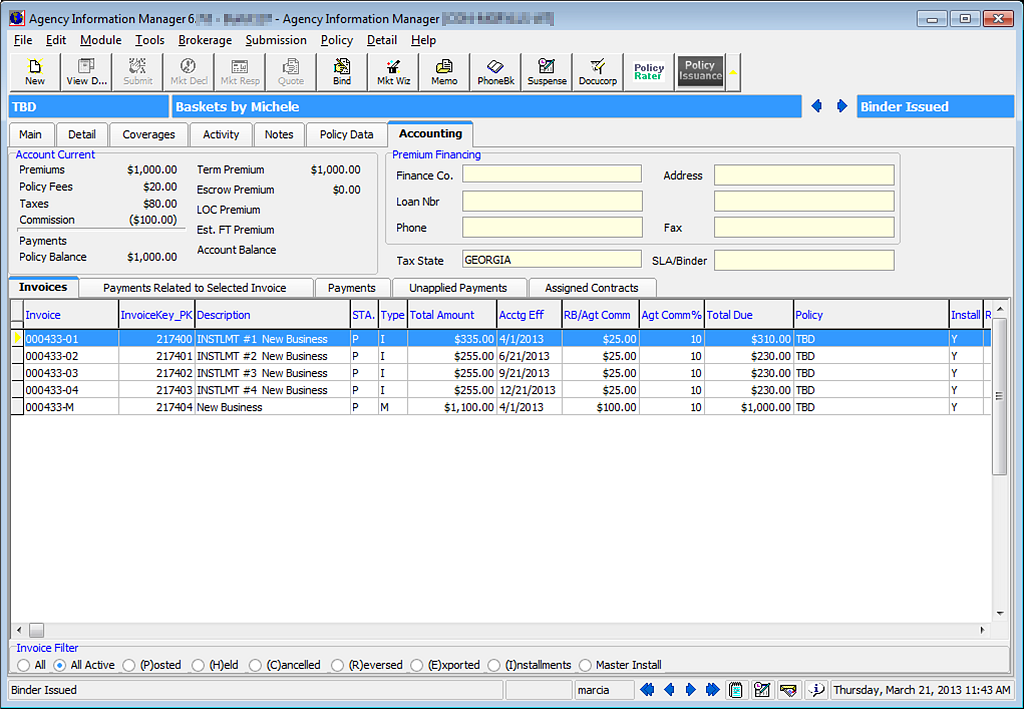
- Click the Accounting tab to view the results of your invoicing. The default view is to display all active invoices.
- To further illustrate master and per-transaction installment plans, select Installments in the Invoice Filter pane located at the bottom of the Accounting tab.
- The originally created installment invoice set is displayed in a cancelled status, and is considered to be the per-transaction installment plan.
- The subsequently created master installment plan, is created in a posted status. This is the installment set that is transmitted to the retail agent or insured.
- To view only the master installment plan, select Master Install in the Invoice Filter pane.
AIM 6.x introduced the ability invoice escrow premium as a separate invoice, which is not usually billed on an installment basis, but it may be managed as such. For additional information regarding the setup and workflow for managing escrow premium, please refer to My Vertafore.
Note that two separate sets of installment plans are created – one for the premium invoice set and one for the escrow invoice set. Should you choose not to invoice the escrow premium on an installment basis, only one invoice is displayed for that escrow premium amount.
Using the installment plan feature of AIM, you can update outstanding, future installments to reflect endorsement premiums as a revised total installment amount.
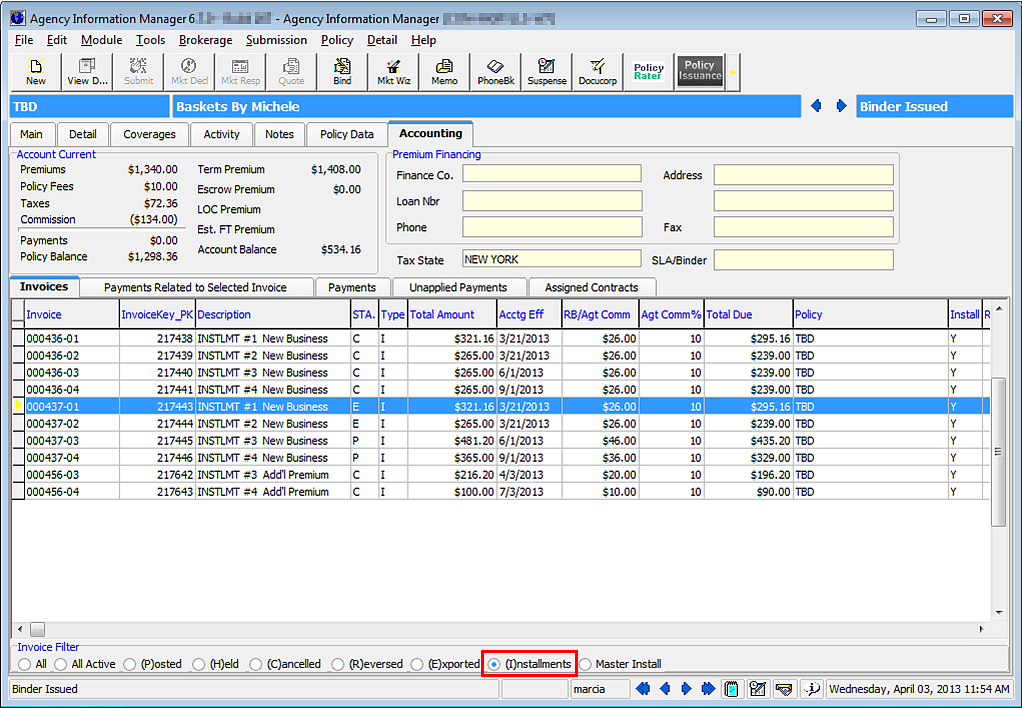
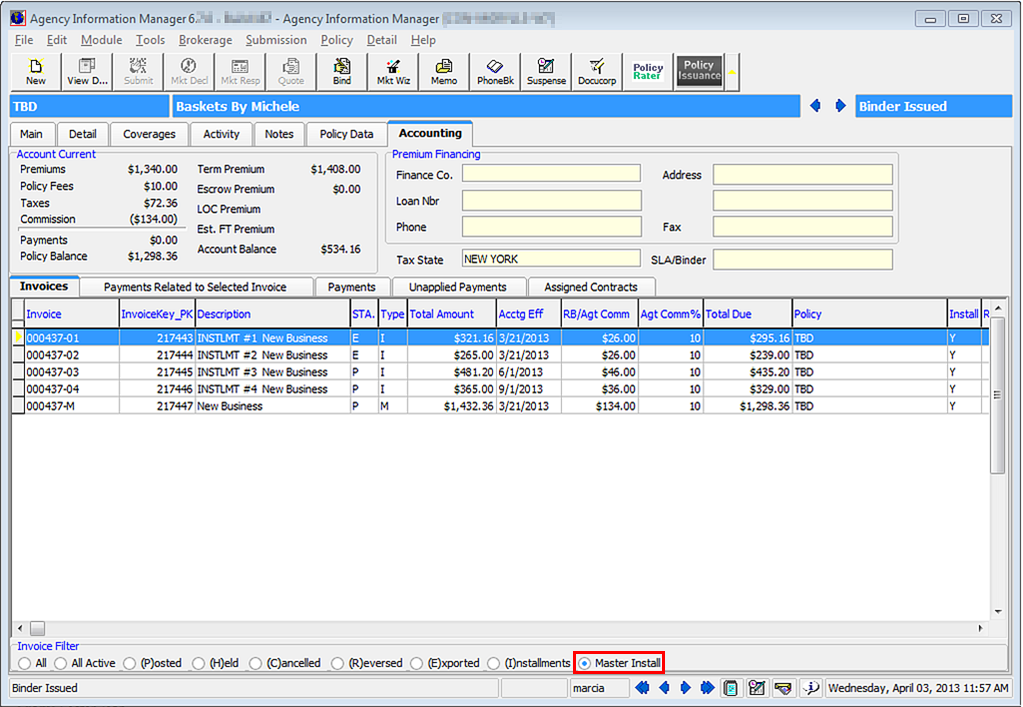
As our example, please refer to the image below.
- The policy was effective December 1, 2012
- The original installment plan was as follows:
- December 1, 2012: Premium of $260, plus taxes and fees of $56.16, plus installment fee of $5.00 = Total $321.16
- March, June & September 2013: Premium of $260 plus installment fee of $5.00 = total $265.00
- The December, 2012 and March, 2013 installments have already been exported to AIM accounting, as evidenced by the E status.
An additional premium endorsement with an effective date of February 1, 2013 has been received.
- According to the company’s accompanying installment schedule, the March, June & September installments are affected by an additional premium of $100 each.
- The date we are actually receiving and processing this endorsement is April 3, 2013, well after the release and due date of the March installment invoice.

- Process the endorsement in AIM.
- When prompted to invoice, click Yes.
- On the Installment Plan tab, located in Invoice Transaction Header, the installment plan that applied originally to this policy is still selected. Click OK.
Note that the installment feature does not provide the ability to change installment plans on a go-forward basis.
- The Invoice Screen dialog box displays the full endorsement premium. Click the Installments tab.
- The Installment Schedule grid is initially empty. Click the Edit Plan button to select an installment plan.
While the Carrier’s schedule displays three installments of $100 each; due February 1, June 1 and September 1, note that AIM only shows two remaining installments available for editing. This is because the March installment invoice has already been exported and released.
AIM calculates the due dates by the parameters set specifically for that carrier in DMU.
- In the Due Date column, edit the due date to June 1, 2013.
Tabbing out of the field will prompt you to calculate the remaining dates.
- Since the first remaining installment must include the 2/1/13 portion of premium as well as the June portion, amend the Endorsement – Add’l Premium column to display $200. Doing so causes the remaining premium to be updated as well.
- Click OK.

- Post the invoice.
- Click the Accounting tab to view the final results.
- Select the Installments in the Invoice Filter pane. The original plan is displayed in a cancelled status. The remaining installments are displayed with a posted status and an installment plan for the endorsement in a cancelled status.
- Select the Master Install in the Invoice Filer pane, to display the currently active invoices in their correct statuses, the original two installments, as well as the upcoming, revised installments.
Once created, changes to installment plans may be managed by the right-click menu. These options are available only for those installment invoices that are in a posted status. Once exported, these options are no longer available.
- Select the posted installment invoice, and then right-click. The right-click menu is displayed.
- Click the Installments option, and choose from the following:
- Adjust Acctg Effective Date – When selected, you can change the accounting effective date of the selected installment only.
- Cancel Pending Installments – Used only when a policy is in cancelled status, this option will REMOVE all outstanding installment invoices. Please refer to Installment FAQs on page 30 for further information.
- Accelerate Pending Installments – When selected, you can change the accounting effective date of ALL pending installments to the current date.
- Reset Pending Installments – When selected, you can change the accounting effective date of ALL pending installments to the current date.
- Mark As Mailed Out – When selected marks the pending installment as having been mailed out, removing it from availability when endorsing the policy and updating installment invoices.

- Why don’t the installment invoice due dates match the installment plan from the Carrier?
Your AIM system has a pre-set calculation of dues dates, based upon your agency’s contract with the carrier. Since AIM does not know that this is an installment plan until such time as you select it, AIM goes by that calculation, requiring you to manage the due dates if they are different. - I endorsed the wrong policy (or the endorsement was incorrect in another way) and now have to cancel it and revert to the old installment plan. How can I manage that?
In the interests of creating a legible audit trail, it is recommended that an offsetting endorsement be entered for the same amount of premium, and installments updated with that offset. - My endorsement has escrow premium. How do I amend the escrow premium installments?
Follow the same steps as outlined for endorsements for the second escrow invoice that will display. Also refer to the Escrow billing section of this document. - My policy is cancelled, and I just invoiced the return premium as a lump sum. How do I remove the installment invoices that are still outstanding?
Use the right-click menu command Cancel Pending Installments to remove the remaining installment invoices.
|
Be certain that the removal of these invoices equals the amount of the return premium involved in the cancellation or you may end up returning too much premium. |