The Account Detail Report command, located on the Reports menu, is used to view and print account data for all agents or an individual agent.
- In the Report Parameters group box, enter the following information:
- Client ID – Enter an agent ID to prepare a report for a specific agent. Leave this field blank to run the report for all agents. Click
 to open the Select Account search dialog box to select an agent from a list.
 - Entity – Enter an entity number to prepare a report for a specific entity. Leave this field blank to run the report for all entities.
- Starting Date – Type or click
 to select a start date for the report, that is, the oldest date on the report (only available when used with the Account Activity option).
 - End Date – Type or click
 to select a start date for the report, that is, the most recent date on the report.
 - Double Space – Select to have double spacing between accounts.
- Show Transaction Detail – Select to view the transaction detail for each account.
- Summary Totals Only – Select to view the report with one line item total for each agent or insured that is selected.
Break By Entity – Select to have the report sorted by both entity and the selection from the Report Sort Order box. The report will be broken down and subtotaled by entity.

- Client ID – Enter an agent ID to prepare a report for a specific agent. Leave this field blank to run the report for all agents. Click
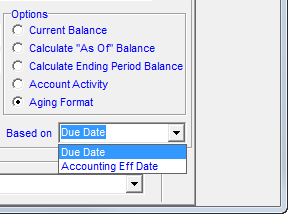
- In the Options group box, select one of the following options:
- Current Balance
- Calculate "As Of" Balance
- Calculate Ending Period Balance
- Account Activity
- Aging Report

When the Aging Format option is selected in the Options group box, you can select whether to age invoices based on their due date to accounting effective date.
- In the Based On list , select either Due Date or Accounting Eff Date.
- In the Report Sort Order list, select one of the sort order.
- Click OK.
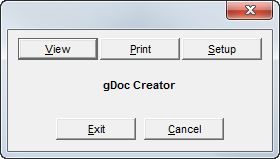
- In the dialog box, click one of the following buttons:
- View – view the report on your computer monitor
- Print – print the report to a printer
- Setup – change the printer setup
- Exit – close the print dialog box
- Cancel – cancel report printing
