The Enter Cash Receipts command is used to record the receipt of payment from a retail agent, insured or third-party source, hereafter referred to as the client.
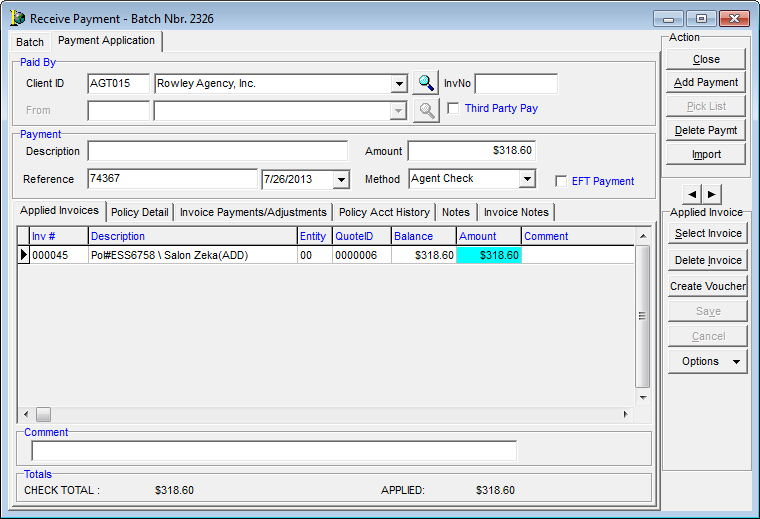
- To create a new batch, click the Payments/Adjustments menu, and then click Enter Cash Receipts.

- To enter a new cash receipts batch, click the New button.
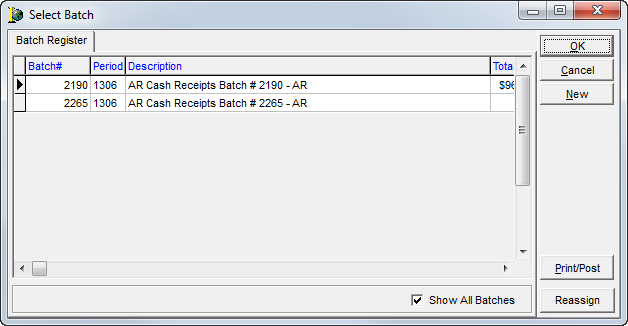
You can use the boxes and buttons described in the table below to manage the batch in the Receive Payment window.
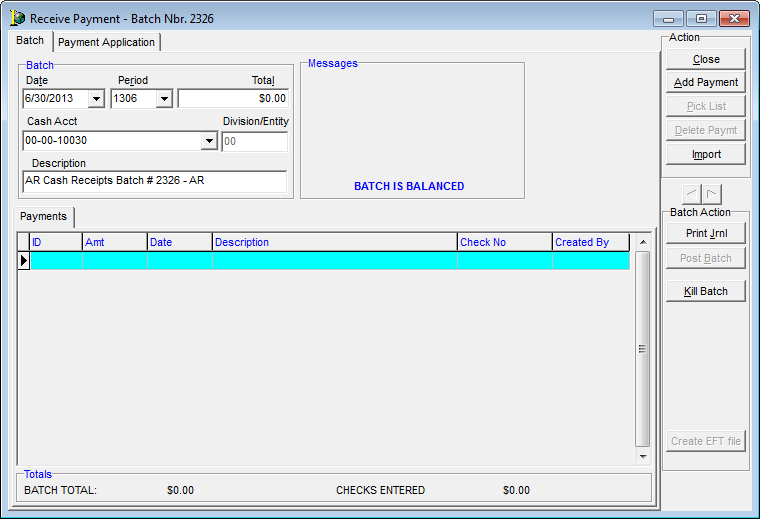
| Box/Button | Description |
|---|---|
| Date | Populates with the current date and can be modified |
| Period | Populates with the current accounting period and can be modified |
| Total | The total of all payments added to this batch |
| Cash Account | Bank account being affected by this cash receipt batch |
| Division/Entity | Entity being affected by this batch |
| Description | System-generated description of this batch and can be modified |
| Messages | System-generated messages indicating whether the batch is in balance or not |
| Close | Closes this payment batch |
| Add Payment | Adds a new payment to the batch by opening the Payment Application tab for editing |
| Delete Payment | Deletes the selected payment from this batch |
| Print Journal | Prints the cash receipts journal which must be completed before the batch can be posted |
| Post Batch | Posts the batch |
| Kill Batch | Cancels the batch |
- Click the Add Payment button to save the previous entry and clear the screen to create another cash entry.
- The Payment Application tab holds the detail of each payment recorded in this batch, including amount, check number, and applied invoices.
Use the buttons and boxes described in the table below to enter payment information.
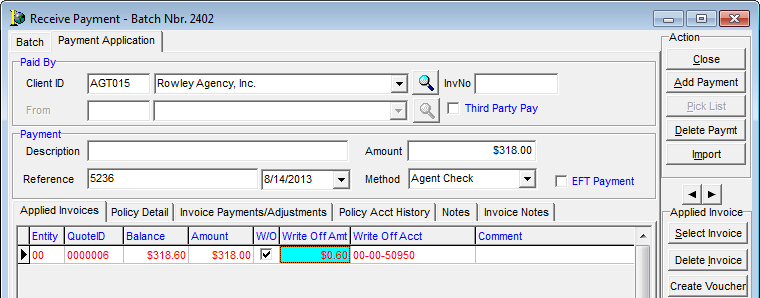
| Box/Button | Description |
|---|---|
| Client ID | The ID number of the retail agent or insured account. Enter the ID if known, or click  or or  for assistance in making the selection. for assistance in making the selection. |
| Invoice Search | Used to search the system by invoice number. Enter the invoice number and press Enter to display the invoice detail on the Applied Invoice tab and populate client ID and name. This can only be used with system generated invoices not converted. |
| From | Becomes available only when the Third Party Pay option is selected. Click  or or  to make your selection. to make your selection. |
| Third Party Pay | Select to indicate whether the payment being recorded has been received from a party other than the agent or insured. |
| Description | A brief description of this payment. The description is displayed in the journal and in lookup screens. Used with unapplied payments |
| Amount | Total amount of the payment. |
| Reference | Used to record the check number or other information used as a reference to this check. |
| Unlabeled list | The check date received by your agency |
| Method | Method of payment, e.g. Agent Check, Money Order |
| Applied Invoices tab | Displays all invoices selected to be paid with this payment, and is used to enter amounts applied to each selected invoice |
| Comment | Displays comments added to a selected invoice in the Applied Invoices tab; also appears on the journal. |
| Totals |
Displays the check total from the Amount field in the upper portion of the screen.
|
| Close | Closes this payment batch |
| Add Payment | Saves the current payment and provides a blank record to add additional payments. |
| Pick List | While the cursor is placed in the box next to the Client ID field, this button is used to view a list of retail agents, insureds, and other client types. |
| Delete Payment | Deletes the currently displayed payment and provides a blank record to allow the addition of additional payments. |
| Select Invoice Button | Displays the Select Invoices dialog box which is used to select invoices to be paid. |
| Delete Invoice | Deletes the invoice selected in the Applied Invoices grid. |
| Create Voucher |
Opens the Instant Voucher dialog box, used to apply a payment to a new submission that does not currently have an invoice associated with it. Used for Cash With App payments only. |
| Save | Saves changes made to the voucher batch |
| Cancel | Cancels changes made to the voucher batch |
| Options Button |
Provides three additional options:
|
| Policy Detail tab | Used to view the policy number, effective date, quote ID, insured and commission rates for the invoice selected on the Applied Invoices tab. |
| Invoice Payments/Adjustments tab | Used to view any payments or adjustments made to the invoice selected on the Applied Invoices tab. |
| Policy Account History tab | Used to view of any transaction that applies to the invoice selected on the Applied Invoices tab. |
| Notes tab | Add or view any notes to this invoice. |
- In the upper half of the Payment Application dialog box, enter the information regarding the payment being processed.
- When complete, click the Select Invoice button.
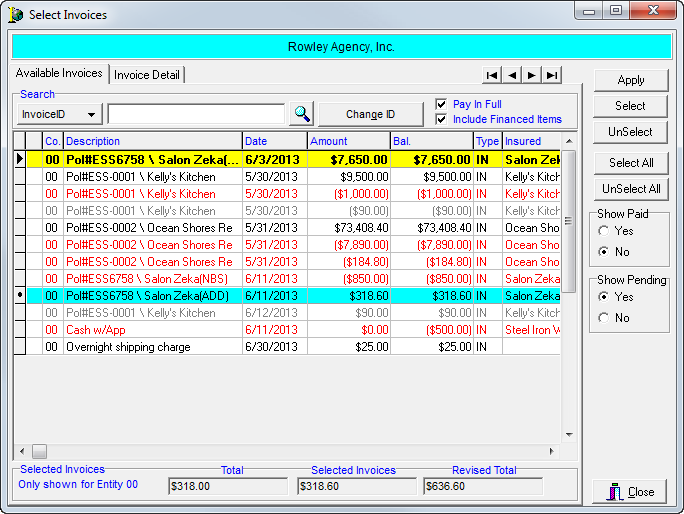
- In the Select Invoices dialog box, select the invoices to be paid using the features described in the table below.
| Feature | Description |
|---|---|
| Yellow highlight bar | Used to determine which invoice the cursor is on when scrolling through the grid. When the invoice has been selected, the highlight bar will turn blue. |
| Available Invoices tab | Holds invoices available for selection and addition to this payment batch. |
| Search Field |
Used to search for a particular invoice. Choose search parameters of:
|
| Change ID |
Used to change the ID to that of another retail agent or insured. An example of use is to select invoices from multiple retail agent accounts in the application of a payment received from a premium finance company. |
| Pay In Full |
If not selected, causes the amount field on the Applied Invoices tab to display zero, alerting the user to enter the amount to be applied to the invoice. If selected, causes the amount field on the Applied Invoices tab to display the open balance of the invoice. This feature, if selected, applies to all selected invoices. |
| Include Financed Items | When selected, causes the display of invoices for policies that have been flagged as being premium financed. |
| Apply | Causes the selected invoices to be pulled into the Applied Invoices tab for payment. |
| Select | Use to individually select invoices for payment. |
| Unselect | Use to remove from selection the selected invoice. |
| Select All | Use to select all invoices available. |
| Unselect All | Use to remove from selection all selected invoices. |
| Show Paid |
If Yes, displays all paid and unpaid invoices in this grid for selection. If No, only unpaid invoices will display for selection. |
| Show Pending |
If Yes, displays all invoices for selection, including those that may have already been selected in another batch. If No, only those invoices that are unpaid (or not selected in another batch) are displayed for selection. |
| Selected Invoices group box | Boxes display the selected entity for this batch, as well as the payment total, total of invoices selected and revised total (difference between the payment total and total of invoices selected). |
| Close | Closes the Select Invoices dialog box and returns the user to the Payment Application tab. |
| Invoice Detail tab | Holds information pertaining to the history of this invoice and policy in both the AIM and Visual Accounting systems. |
| Invoice Payments/Adjustments | Displays any other payments made against the invoice. |
| Policy Acct History | Displays all invoicing activity for the policy. |
| Acct Payments/Adj. | Displays any other payments or adjustments made to the policy. |
| AIM Activity | Displays AIM’s activity log for the policy. |
| Notes | Used to view and add notes that apply to the policy. |
-
Select the Invoices to apply payment to, using the features described above.
|
To select a group of invoices: select the first invoice, and then press and hold the Shift key down and select the last invoice. Doing so selects a block of invoices. To select invoices individually: Press and hold down the Ctrl key while clicking each one, or use the arrow keys to scroll between invoices and the space bar to select them. |
-
When all required invoices have been selected, click the Apply button to return to Payment Application to continue processing the batch.
- Review the invoices selected on the Applied Invoices tab, making changes to the Amount and Comments boxes as required.
Any amount on the check being processed that is not applied to an invoice will display on the lower part of this screen as an unapplied amount. - If it is necessary to add an invoice, click Select Invoice again.
To remove an invoice from this payment, highlight the required invoice and click Delete Invoice.
