Use the Check Preparation command to create check payments to vendors or employees.
- On the Vendor/Payables menu, click Check Preparation.

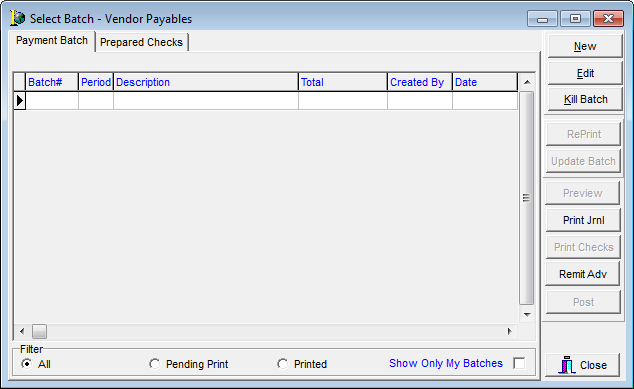
The fields and features of the Select Batch – Vendor Payables dialog box are described in the table below.
|
Field/Feature |
Function |
|---|---|
|
Payment Batch tab |
Holds basic information regarding the selected batch, and can be used to perform actions on the batch. |
|
New |
Enter a new batch |
|
Edit |
Edit an existing batch |
|
Kill Batch |
Cancel the batch |
|
Reprint |
Reprint un-posted checks |
|
Update Batch |
Update the date and period of the selected batch. |
|
Preview |
Preview the printed check |
|
Print Journal |
Print the memo report journal |
|
Print Checks |
Print the check run |
|
Remit Adv |
Print a remittance advice for each check printed |
|
Post |
Post the batch |
|
Close |
Close Select Batch – Vendor Payables |
|
Filter |
Filter the view of check batches. Select from:
|
|
Show Only My Batches |
Displays only those batches associated with the logged in user. |
|
Prepared Checks tab |
View and change status of prepared checks |
|
Reinstate |
Reinstate voided checks before posting |
|
Void Chk |
Void checks before posting |
|
Edit Chk |
Pending further development |
|
Cancel Chk |
Delete the check from the batch |
|
Reset |
Pending further development |
- Click New.
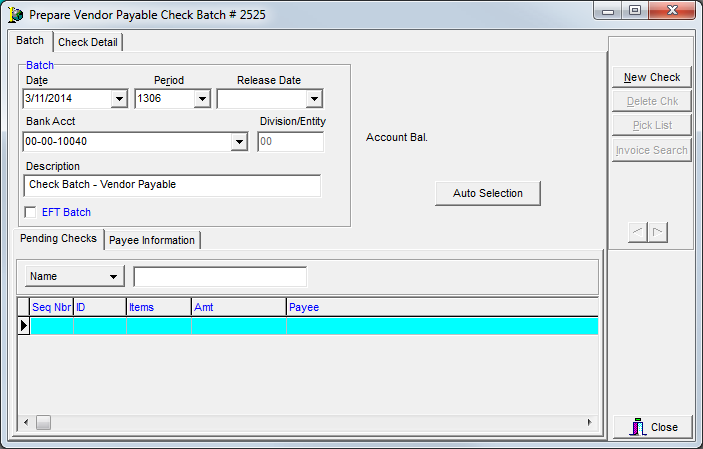
The fields and features of the Prepare Vendor Payable Check Batch dialog box are described in the table below.
|
Field/Feature |
Function |
|---|---|
|
Date |
Populates with the current date and may be modified |
|
Period |
Populates with the current accounting period and may be modified |
|
Release Date |
Denotes the date checks are to be released/printed for internal purposes |
|
Bank Account |
Bank account checks are being drawn against |
|
Division/Entity |
Entity affected by the batch; isolates the invoices |
|
Description |
System generated description of the batch which can be modified. |
|
EFT Batch |
Indicates whether the batch is an electronic funds transfer (EFT) batch. |
|
Auto Selection |
You can use the auto selection feature to select only invoices where the accounts receivable balance is zero. |
|
Pending Checks tab |
Displays checks that are pending issuance |
|
Payee Information tab |
Displays payee information (name, address) for the selected check |
|
New Check |
Add a new check to the batch |
|
Delete Check |
Delete the check selected in the Pending Checks tab from the batch |
|
Invoice Search |
Available for use on the Check Detail tab |
|
Apply Invoices |
Available for use on the Check Detail tab, used to select invoices to be paid by the check |
|
Delete Invoices |
Available for use on the Check Detail tab, is used to remove invoices from a check. |
|
Close |
Close the Vendor Payables Check Batch |
- To add a new check to the batch, click New Check.
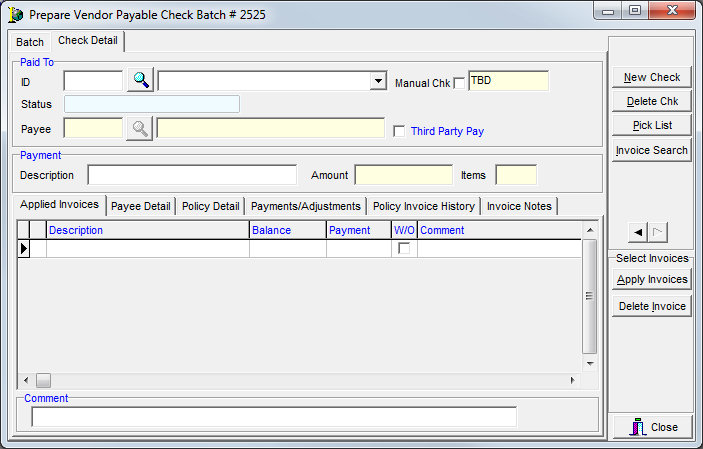
The fields and features of the Check Detail tab are described in the table that follows.
|
Field/Feature |
Function |
|---|---|
|
ID |
The ID number of the vendor. Manually enter the ID if known or select the vendor from the list. Alternatively, you can click the magnifying glass for assistance in making the selection. |
|
Manual Chk |
Select to indicate that the check was manually issued or an electronic transfer. Doing so will activate the adjacent field, allowing entry of the check number. |
|
Status |
Indicates the status of the check. |
|
Payee |
Payee of the check, if different than the company, enabled by selecting Third Party Pay. |
|
Third Party Pay |
Select to enable use of the Payee fields. |
|
Description |
A description of the check |
|
Amount |
The amount of the check. Populates automatically when invoices are selected. |
|
Items |
The number of items included in the check. Populates automatically when invoices are selected. |
|
Applied Invoices tab |
Displays the invoices selected for payment by the check. |
|
Payee Detail tab |
Displays the information for the selected payee (name, address). |
|
Policy Detail tab |
Displays the date the invoice was created/effective and the Quote ID. |
|
Payments/Adjustments tab |
Displays any payment or adjustment history for the selected invoice. |
|
Policy Invoice History tab |
Displays the history of the selected invoice. |
|
Invoice Notes tab |
Used to display, add, and edit notes regarding the selected invoice. |
|
Apply Invoices |
Available for use on the Check Detail tab. Allows selection of invoices to be paid by the check. |
|
Delete Invoice |
Available for use on the Check Detail tab. Allows removal of invoices from the check. |
|
Close |
Closes the Prepare Vendor Payable Check Batch dialog box. |
- On the Check Detail tab, enter information regarding the check being processed.
- Click Apply Invoices.
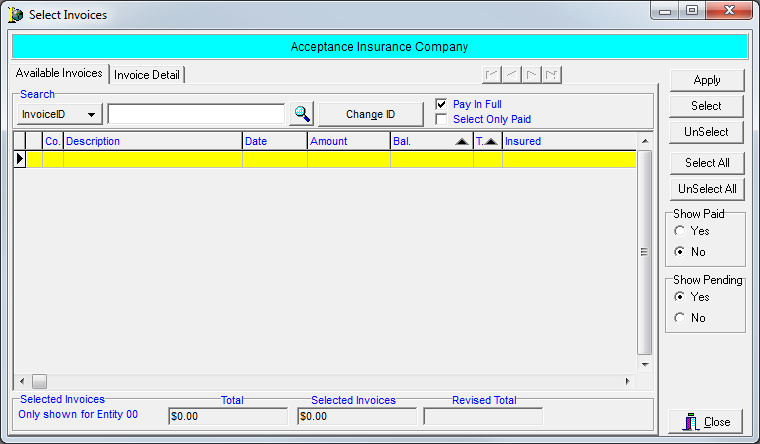
- In the Select Invoices dialog box, select the invoices to be paid using the features and buttons described in the table below.
|
Field/Feature |
Function |
|---|---|
|
Yellow highlight bar |
This bar indicates which invoice the cursor is on when scrolling through the grid. When the invoice has been selected, the highlight bar turns blue. |
|
Available Invoices tab |
Displays invoices available for selection and addition to this payment batch. |
|
Database navigation arrows |
Scroll between previous and next payment entries within this batch. |
|
Search |
Used to search for a particular invoice. Choose search parameters of:
|
|
Change ID |
Used to change the ID to that of another vendor. Example of use is to select invoices from multiple vendor accounts in the creation of one check payment. |
|
Pay In Full |
If not selected, causes the payment field on the Applied Invoices tab to display zero, forcing the user to enter the amount to be paid from the invoice. If selected, causes the payment field on the Applied Invoices tab to display the open balance of the invoice. This feature, if selected, applies to all selected invoices. You can override the payment amount. |
|
Select Only Paid |
Restricts the user from selecting items that have an outstanding Accounts Receivable balance |
|
Apply |
Causes the selected invoice(s) to be pulled into the Applied Invoices tab for payment. |
|
Select |
Use to individually select invoices for payment. |
|
Unselect |
Use to remove from selection the highlighted invoice. |
|
Select All |
Use to select all invoices available. |
|
Unselect All |
Use to remove from selection all highlighted invoices. |
|
Show Paid |
If Yes, displays all paid and unpaid invoices on this grid
for selection. |
|
Show Pending |
If Yes, displays all invoices for selection, including those that may have already been selected in another batch. If No, only those invoices that are unpaid (or not selected in another batch) will display for selection. |
|
Selected Invoices |
Fields display the payment total, total of invoices selected and revised total (difference between the payment total and total of invoices selected) |
|
Close |
Closes the Select Invoices screen and returns the user to the Check Detail tab. |
|
Invoice Detail tab |
Holds information pertaining to the history of this invoice and policy in both the AIM and AIM Accounting modules. |
|
Invoice Payments /Adjustments |
Displays any other payments made against this invoice. |
|
Policy Acct History |
Displays all invoicing activity for this ID |
|
Acct Payments/Adj. |
Displays any other payments or adjustments made to this policy using the selected filter for all, 30, 60, or 180 days. |
|
AIM Activity |
Displays the AIM Activity Log for this policy. |
|
Acct Notes |
Allows the viewing and addition of accounting notes to apply to this Client ID. |
|
Invoice Notes |
Allows the viewing and addition of accounting notes to apply to this invoice. |
|
To select a group of invoices click the first invoice, press and hold the Shift key, and then click the last invoice. To select invoices individually, hold down the Ctrl key while clicking each invoice, or use the arrow keys to scroll between invoices and the space bar to select them. |
- When all required invoices have been selected, click Apply.
- In the Check Detail dialog box, review the invoices selected in the Applied Invoices grid, making corrections to the Comments field as necessary.
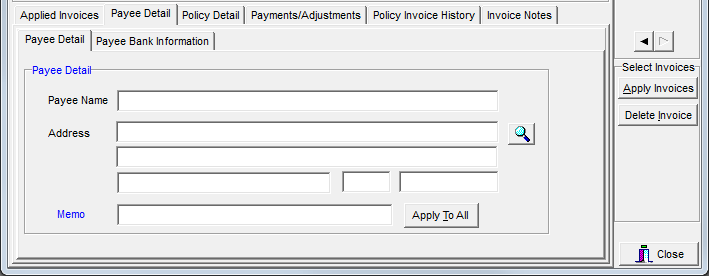
- On the Payee Detail tab, edit the payee’s address. Click the magnifying glass to switch between the physical, mailing, and accounting addresses entered in Data Maintenance Utility.
- If it is necessary to add an invoice, use the Select Invoice feature again.
To remove an invoice from this payment, select a field on the invoice, and then click Delete Invoice. - Click New Check for as many checks that need to be created in this batch.
- When the entire batch of checks has been entered, click Close.
- Click Print Journal.
- In the Batch Journal Report dialog box, click the appropriate button, depending on your needs:
- View – View the journal on your monitor.
- Print – Print the journal to a printer.
- Setup – Select or change the default printer.
- Exit – Close Batch Journal Report.
- Cancel – Close Batch Journal Report.
- Click Print Checks to proceed with the printing of checks.
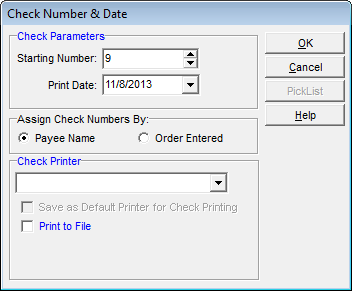
- When you click Print, the Check Number & Date dialog box is displayed. Enter the following information:
- Check Parameters
- Starting Number – starting check number
- Print Date – date printed on the check
- Assign Check Numbers By – select either Payee Name or Order Entered
- Check Printer – click to select the printer
- Save as Default Printer for Check Printing – saves the selected printer as the default printer for printing checks
- Print to File – prints checks to a file
- Check Parameters
- Click OK to proceed with printing or click Cancel to abandon the printing process.
- Click the RePrint button if you need to reprint checks.
- Double-click the applicable checks. The checks to be reprinted are displayed in red.
- Click OK.
- In Check Number & Date print dialog box select Reprint with Existing Check Numbers.
This option is used to reuse original check numbers. This feature is only available once checks have been printed and prior to the posting of the check batch.
|
To amend the date, accounting period, description or bank account for this batch, click the Update Batch button. This feature is only available prior to the posting of the check batch. |
- If desired, click the Remit Adv button to print a remittance advice to accompany each check.
You will be prompted to print the remittance advice if there are more invoices applied to the check than can display on the check stub. - If you click Yes, you can:
- Designate whether all advices should print or only those that exceed the check stub length.
- Choose whether the page number should re-start for each payee or whether the pages should be numbered consecutively.
- Click OK to print checks, and then click Post to finalize the batch.