Agency Setup - Accounting Options

You can set default accounting options that apply to the agency.

To set accounting options:

  1. Open the Agency Setup form as described in Agency Setup.
  2. Expand the Accounting Options section, and then enter the following information.

Accounting Basis

Select whether your agency accounting basis is Cash or Accrual. For additional information, see Choosing the Cash or Accrual Accounting Method. Vertafore also recommends that you consult your agency accountant. AMS360 defaults to Accrual basis accounting.


Once an Accounting option is selected and accounting information has been entered, you cannot change the accounting basis.

Receivable Aging Categories

Aging categories are the number of days old "buckets" for reporting your receivables open balances. Set up the day range categories most useful to your agency. For example:, (0-15), (16-30), (31-45), (Over 45). Fill in Category 1-3 as appropriate for your agency.


Notice as you change the number of days in the To fields, the From fields dynamically change to that same number of days +1. This ensures balanced aging categories with no missing days.

Fiscal Year's Beginning Month

Select the first month of your agency's fiscal year from the list. For example, if the agency is on a calendar year, select January. Check with your agency's accountant if unsure.


This setting cannot be changed once there are accounting transactions in the system.

Set Small Balance Threshold to

The dollar amount entered represents the maximum invoice balance, which employees with appropriate security, can write off through the Receipt process.

Number of Days to Invoice in Advance of the Invoice Effective Date:

This number specifies when the system generates and posts Customer Center Billed (Agency and Direct) invoice transactions, in advance of their effective dates. This allows you to print, send, and/or collect these premiums in a timely fashion.

This value can be set to any number the agency chooses. Common choices to bill in advance are 30 or 45 days.

Example:

Set the number of days to bill in advance to 30. Based on the current system date, when Daily Process is run, any invoice with an effective date equal to or less than 30 days in the future will post and print. Any invoice more than 30 days in the future will not.

For the occasional invoice that requires posting and printing more than the number of days to bill in advance, such as certain types of bonds, use the Post Future Invoice option.

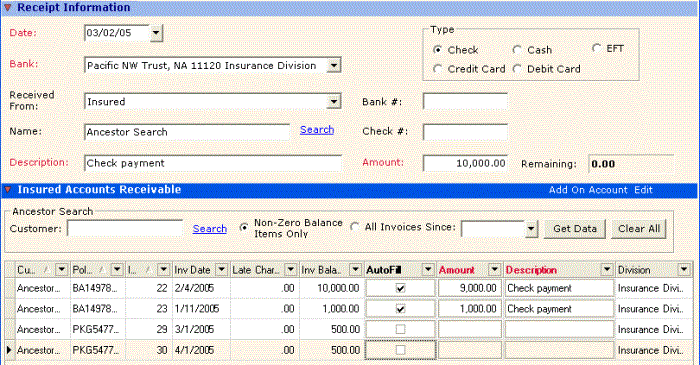
Automatically apply receipts to oldest invoices

Allocates an Amount entered into the Receipt Information section of the Receipts form automatically in the Insured (or Broker) Accounts Receivable grid based on the oldest Invoice Date.

If this option is active, tabbing out of the Amount field applies the payment amount to the Invoice Balance with the earliest Invoice Date. Amounts matching Invoice Balances are applied until the receipt amount is exhausted.


The default method (option unchecked) allows you to allocate payments to specific invoices by selecting the AutoFill box on a row or by typing the desired Amount and Description in the grid. This method is recommended if agency policy is to apply customer payments as directed by the insured.

Example:

Option is Active (checked in Agency Setup)

On tabbing out of the Amount field, $1000 was applied to Inv Date 1/11/05. Remaining $9,000 was applied to next oldest invoice (Inv Date 2/4/05).

Default setting (Automatically apply option is unchecked)

In this example, tabbing out of the Receipt Information Amount field caused no automatic distribution. The user then clicked the AutoFill box on Invoice #22, Inv Date 2/4/05, to match the invoice identified by the customer with payment.

Display Financial Center items as summary

If this option is selected, certain Financial Center summary items (Unbilled Policies, Unreplaced Binders and Invoices to Print) display either Yes (such items exist) or No (none exist). The option defaults as checked.


Unchecking the option causes the system to count how many of each item exists in the system and displays the resulting number. Depending on how large the count is, this selection may result in slower performance when opening the Financial Center.

Divisional Control

When agencies merge or form cluster alliances, the ability to maintain different Charts of Accounts and/or Fiscal Year Ends for each entity can be important. Use the Divisional Control group in this section to activate these features.

You must have security authorization for all divisions to set these options.

You cannot alter fiscal year ends for an existing Division. When a new division is added with a different Chart of Accounts you can remove authorization for existing Divisions to use a particular GL account, if desired. See Chart of Accounts Setup for more details.

The following options are available in the Divisional Control group:

  • Use Chart of Accounts by Division: If this option is selected, the Divisions(s) Authorized to Use GL# subsection appears in the Chart of Accounts form to allow association of general ledger accounts with a particular division. You cannot use this option if you choose to use Interdivision Accounting as all division will use the same Interdivision transfer account. This option in Agency Setup defaults as unchecked and is not a required field. If this box is not selected, the Chart of Accounts is controlled at the Agency level only and all divisions must use the same chart of accounts. You cannot use this option if you are using Interdivision Accounting.
  • Use Different Late Charge Options by Divisions: When this option is selected a the Late Charge Options section appears in Business Unit Setup > Division.
  • Use Different Fiscal Years by Division: If this option is selected, the following fields become available:

Select the Division to use for Date List Selection in Reporting and Center Views: Choose the division to display in all Center Views.

Division Beginning Month (in the Business Unit Setup form): This field allows you to assign a different beginning month than the Fiscal Year's Beginning Month as entered in the Agency Setup - Accounting Options section. To use this option do the following:

In Agency Setup

  1. Select the Use Different Fiscal Years by Division box.
  2. Select the appropriate division from the list.

In Business Unit Setup

Select the appropriate fiscal year beginning month from the Division Beginning Month list.
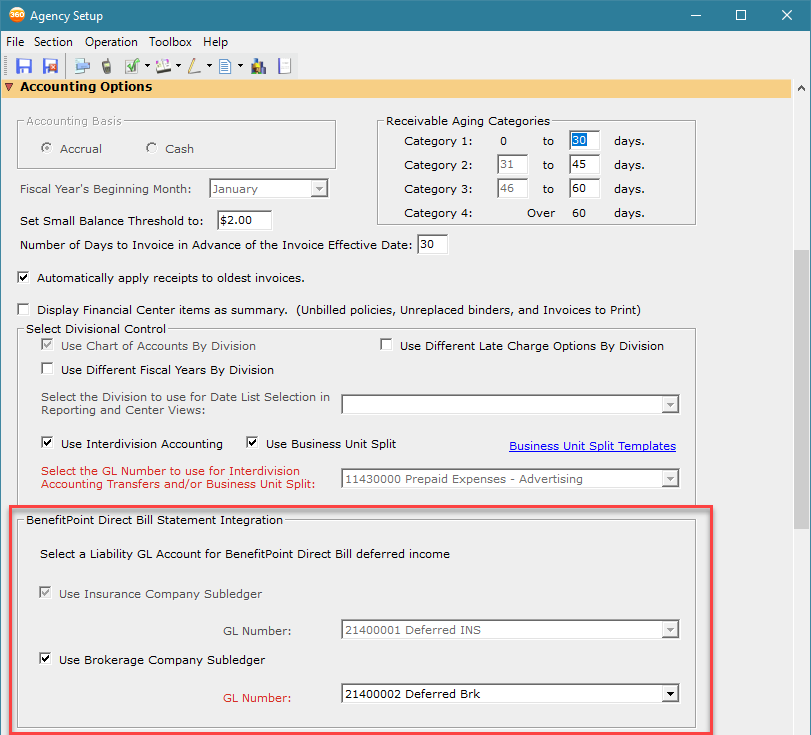
  • Use Interdivision Accounting: Select this option to enter one cash receipt for Customers in multiple divisions. Using this option posts the receipt to the division for the bank account you are using and the Interdivision Transfer account you select. For more information see Workflow: Setting Up and Using Interdivision Accounting for Customer Cash Receipts.
 

Only users with Full Access to the "GL Dropdown Include Inter-Divisional GL Number" security task will see the Interdivisional GL account in GL account drop-downs anywhere in AMS360.

  • Use Business Unit Split: Select this option to use the Business Unit Split feature, which allows you to split line of business commissions and fees within a division and between different divisions.
 

When using the Business Unit Split feature you cannot select the Use Chart of Accounts by Division option above.

  • Business Unit Split Templates: Click to open the data entry form where you can set up Business Unit Split Templates. The active templates become available for use in Policy and Invoice transactions.
  • Select the GL Number to use for Interdivision Accounting: When you select Use Interdivision Accounting or Use Business Unit Split this list becomes available. Choose the General Ledger Number to use as a transfer account for all divisions. Once you post a receipt with Interdivision Accounting entries or a commission with a Business Unit Split, the field becomes unavailable and cannot be changed.
 

The account number that you select must be a detail account in the Balance Sheet account number range (10000 - 39999). You must first set up the account in Chart of Accounts Setup.

BenefitPoint Statement Integration

For agencies that currently use the BenefitPoint integration, they are now able to set up and select a GL account of their choice that will be used exclusively for deferred revenue created by direct-bill invoicing for a future-dated policy from BenefitPoint.

  • This account will be non-editable after it has been used

  • Agency setup for this feature can be found in Admin > Edit Agency > Accounting Options > BenefitPoint Statement Integration

SETUP

  1. Navigate to "BenefitPoint Statement Integration" in the Admin Center under "Edit Agency > Accounting Options"

  2. Check the applicable checkbox to select a GL number from the dropdown (see criteria below):

    • GL number must be in the 20000000's

    • Must be a "Detail" GL account

    • The GL account must be unused in the entire system

    • The GL account must not already be a system GL

    • Must be a level 4

    • Must have the respective Company Type Subledger selected for the GL number (Insurance versus Brokerage Company)

  3. Select a GL account from the drop-down menu

    • This account cannot be changed once the GL account number is used in a financial transaction

  4. Save and close

Late Charge Options

The system assesses late charges during Daily Process on the last day of the fiscal period. The default option is Do Not Generate Late Charges. The available options are as follows:

  • Do Not Generate Late Charges: Daily process does not generate late charges to customer accounts receivable.
  • Generate Late Charges on a Percentage Basis: Use this option if you wish to calculate your customer late charges based on an annual percentage rate.
  1. Type the Number of Days Before First Late Charge is assessed.  Based on the invoice date, a late charge is assessed when the age of the invoice is at least one day greater than the number of days entered in this field.
  2. Type  the Annual Percentage Rate you wish to charge your customers. When late charges are applied, this percentage rate is divided by 365, times the number of days old.
  3. Type the Minimum Late Charge Threshold. A late charge is not assessed if it's calculated balance is equal to or less than the dollar amount entered.
  • Generate Late Charges on a Flat Rate Basis: Use this option if you wish to apply a flat dollar amount to your customer's invoice balance when they are greater than the Overdue Amount Threshold.
  1. Type the Periodic Flat Rate. This is the flat dollar amount applied to the customer's invoice balance, when it is greater than the amount entered into the Overdue Amount Threshold.
  2. Type the Overdue Amount Threshold. When the customer's invoice balance is more than the amount entered, the Periodic Flat Rate is assessed.
  • Number of Days Before First Late Charge: Fill in the number of days old you want an invoice balance to be before you charge the first late charge.
 

This field is disabled if the Do Not Generate Late Charges option is selected. If not selected then the number of days default is 30.

  • Late Charge Message on Statements: The message typed in this field appears on All Customer Statements (Ex: A late charge will be assessed on all balances over 60 days).

Binder Post Method

This option determines when a binder invoice posts to the general ledger, payables, income and expenses. Invoices will not pull to account current and/or commission statements until the binder policy transaction has been replaced, regardless of the binder post method selected. The available options are as follows:

  • Post Expense on Effective Date: This binder option posts the payables, income and expenses on the invoice effective date whether or not a Replace Binder action has taken place on the policy.
  • Post Expense After Replaced on Later of Effective or Replace Date: This binder option posts the payables, income and expenses only after the policy binder transaction has been replaced, on the later of the effective or replace date.

Commission Parameter Ranking

This option allows you to identify how you want to rank Agency and Employee/Broker (Production) commissions. The rankings determine which rate the system uses if an agency or direct bill invoice matches on more than one commission parameter.

Agency commissions must be entered by writing company therefore Writing Company is, by default, ranked #1 and cannot be changed. The other categories in the Agency commissions group can be ranked as desired.

The parameters in the Employee/Broker group can be ranked in any order you desire.

Example:

Set up rankings for Company A to:

  • Writing Company (1)
  • Type/Line of Business (2)
  • Company Plan (3)
  • Transaction (4)
  • State (5) (Company only)

As part of Company Setup, you then enter commission rates of:

  • 10% for the Line of Business = Burglary
  • 12% for Transaction = New Business

When you enter New Business for a Burglary policy, the system finds a match on Burglary (10%) and on New Business (12%). Since you ranked Line of Business higher than Transaction, the 10% rate would be used.

Producer Payable and Expense Allocation for Broker Business

This gives you the option to track the producer expense along with your agency expense, payable accounts, or with your broker expense accounts. You have two options to select from: 

  • Post Payable and Expense Amounts to Broker Business GL System Accounts.
  • Post Payable and Expense Amounts to Agency Business GL System Accounts.

What's Next?

Do you want to enter additional information in the Agency Setup  form? See Agency Setup for more information.

Related Topics Link IconRelated Topics


© 2024 Vertafore