AMS360 2018 R2 Release Notes
We are pleased to release AMS360 2018 R2. With each release, we are improving and updating AMS360 to provide you with the best possible experience.
To print this topic in its entirety, in the upper-right corner of this Help page, click Expand all , and then click Print
 .
.
Required
Minimum workstation requirements as shown in the AMS360 2018 R1 Online Configuration Guide (Doc ID:14400) on My Vertafore. You must be registered with My Vertafore and signed in to access this document.
Supported
Browser
- Microsoft Internet Explorer 11 (32-bit) with default settings
- Microsoft Edge
- Google Chrome
Operating Systems
- Microsoft Windows 7 (32-bit and 64-bit)
- Microsoft Windows 8.1 (32-bit and 64-bit)
- Microsoft Windows 10 (32-bit and 64-bit)
Microsoft Office
- Office 2013
- Office 2016
.Net
- .NET 4.7 (required)
For more information about AMS360 recommended and supported configurations, see the Supported Configurations Matrix (Doc ID: 12604) on My Vertafore. You must be registered with My Vertafore and signed in to access this document.
Microsoft Office
- Office 365 (32-bit)
- We only support Microsoft Word, Excel, and Outlook locally.
XPS message
Microsoft has changed the way that they are giving customers the XPS viewer which is used for some functionality in eForms manager.
Depending on the build number of the OS that you have, you may need to install the new viewer. Click here for more details.
-
You will receive the following error message when the system is logging an activity using print functionality vs. fax or email.

AMS360 Message
We value your feedback to ensure we are working on what is most important to you. If you have an idea to improve the product, you can suggest and vote on product enhancement requests on Vertafore Ideas. On My Vertafore, click Submit Idea in the upper right corner of the page. We appreciate your input to help us provide you with the highest quality product.
For more information on using Ideas, please see the following documents. You must be registered with My Vertafore and signed in to access these documents.
• Ideas Overview (Doc ID: 13054)
• How to Submit Ideas (Doc ID: 13049)
• What are the statuses in Vertafore Ideas? (Doc ID: 13055)
What's New
Administration Enhancements
Before
You could not merge duplicate customers.
Now
You can merge customers that may have been entered twice in your management system.
Information on Merging
AMS360 administrators should be aware of the following details before attempting to merge customers:
-
There are security items for both Merge Customer and Merge results.
-
Only standard customers can be merged. Prospects, suspects, or multi-entity customers (master or sub-customers) cannot be consolidated.
-
Merging customers is a single-user process. If more than one user is logged into AMS360, a message appears and prevents the merge from processing.
-
You cannot merge a customer if there is suspended billing on that customer.
-
All accounting and policy information is moved from the source customer (that is, the customer being merged from) to the target customer (the customer being merged to).
-
Once a merge has been completed, the source customer no longer exists in the system.
|
SalesTrack has a merge feature which will work if one of the two accounts in SalesTrack is not synced with AMS360. If the two Accounts in SalesTrack are already synced to AMS360, we suggest you deactivate the source customer in AMS before the merge. This will deactivate that customer in SalesTrack. |
How To Merge Customers
-
In the Administration Center, under Merge on the left-hand side, click Merge Customer.
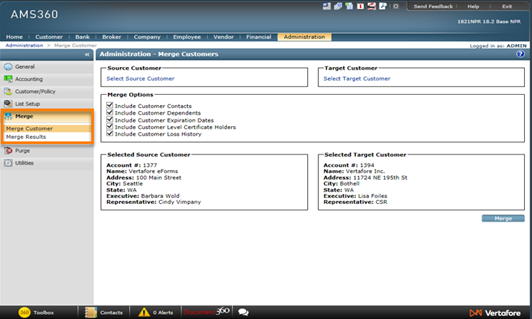
Merge Customer Tab
-
Click Select Source Customer to choose the customer that you are merging from.
-
Click Select Target Customer to choose the customer that you are merging to.
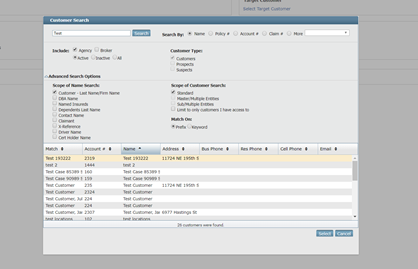
Select Target and Source Customer
-
Under Merge Options, click the corresponding checkbox for any of the options that you would like to be applied as part of the merge process. Choosing to include these options might lead to duplicate data on the target customer after the merge process is complete. The available options are:
- Include Customer Contacts
- Include Customer Dependents
- Include Customer Expiration Dates
- Include Customer Level Certificate Holders
- Include Customer Loss History
-
Once the source and target customers have been chosen, you can review the information in the Selected Source Customer and Selected Target Customer sections to confirm that the correct customers have been selected and that all details are accurate.
-
When ready to proceed, click Merge.
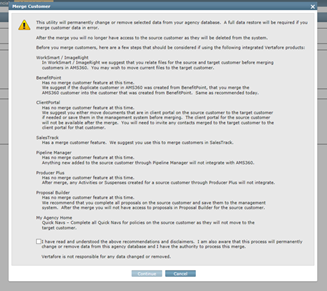
Disclaimer for Merging Customers
-
A disclaimer appears to notify you that this action permanently changes or removes selected data, and that data for the source customer is deleted from the system. Included in the disclaimer is helpful information on how this will affect our other integrated products. After reviewing this information, click the disclaimer checkbox and then click Continue to proceed with the merge process, or click Cancel to exit back to the Merge tab.
|
You might receive a Merge Blocked message when attempting to merge customers. This message means that another user is logged into the system. You will need to wait for that user to exit AMS360 to commit the merge. |
You can review merges that have been processed by returning to the Merge menu and clicking Merge Results. From this screen, you can view the details of each previous merge, including the source customer, target customer, and the date of the merge.
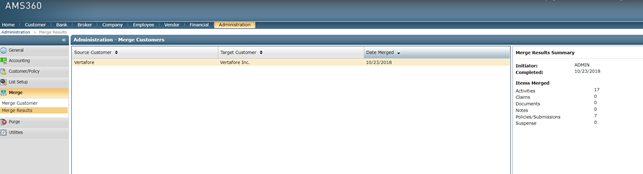
Merge Results
SalesTrack Experience
|
Before
Employee business unit access was assigned by checking or unchecking access to every available business combination in the single grid provided in Employee setup.
Now
You have a new way to assign employees to business units by creating groups.
|
How to Utilize Business Unit Access Setup
|
An employee can only belong to ONE group. |
In the Administration center, under General, click on Business Unit Setup.
The Business Unit Access Setup page includes a grid with a listing of all the groups that are built out based on prior business unit definitions for your agency. As part of the upgrade to AMS360 18R2, the business group names have been created for you. Please feel free to rename these groups to something more meaningful to your agency.
Each group lists the various units that fall under it, along with the employees that have been assigned to that business unit – if only a single unit/employee is listed under a group, the grid shows the name; if multiple units/employees are listed under a group, the grid displays the number of units/employees instead.
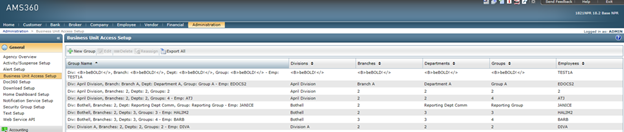
Business Unit Access Setup
Five actions are available to take on this page:
-
New Group: Click this option to create a new group. First, enter a Name for the new group. Then, you can either copy the access rights of an existing group by choosing an option from the Copy Access from drop-down, or select the access rights individually from the listing of all business units.
If you choose to copy an existing group's access rights, the listing shows which divisions/branches/etc. the group includes. You will then need to add or remove selections, as no two groups can have the same access.
Click Save to create the new group.
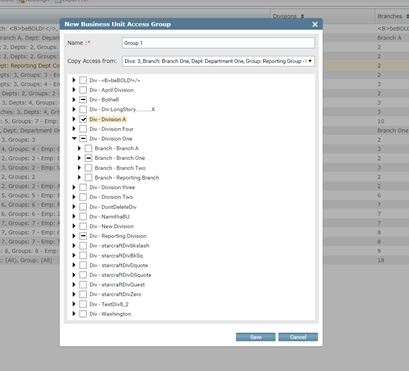
Create New Group
-
Edit: With a group selected, click this option to edit the access rights of the group. Again, you can either copy the access rights of an existing group by choosing an option from the Copy Access from drop-down, or select the access rights individually from the listing of all business units.
You can also use this option to rename a group at any time – note that each group name must be unique.
Click Save to save any changes to the group.
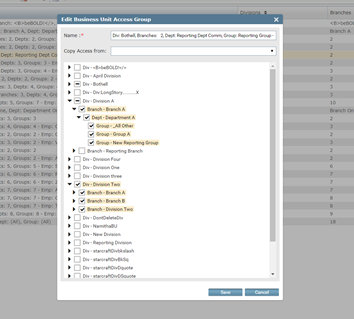
Edit Group
-
Delete: Click this option to delete a selected group. You cannot delete a group until all the employees in that group are removed. A pop-up will appear to confirm this decision.
-
Reassign: If you would like to reassign an employee from one group to another, select the group that the employee is be moved to and click Reassign. The pop-up that appears shows the employees that are already assigned to the chosen group in the top field, and a listing of all employees that are available to be reassigned in the bottom field.
You can either search for an employee directly by entering a name in the Available Employees for Assignment field, or scroll through the employee listing. Click the checkbox to the left of any employee that you would like to move to the group and then click Assign. Multiple employees can be reassigned at the same time.
Once all desired assignments have been made, click Save & Close to save the changes.
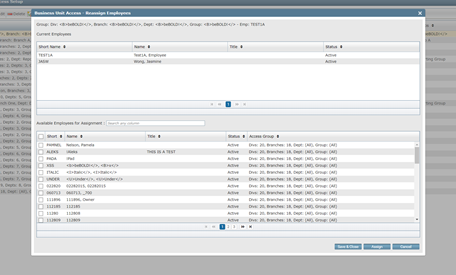
Reassign an Employee
- Export All: Click this option to export the data that appears in the main grid on the Business Unit Access Setup page to an Excel file.
Before
Download information was included under the System Configuration Options, and AMS360 supported a single IVANS account.
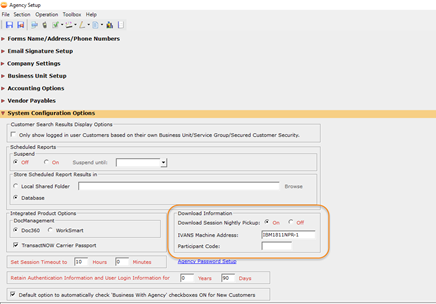
Agency Setup – Download Information (Before)
Now
Agencies that have multiple business unit entities (divisions, branches, etc.) can now have multiple IVANS accounts included in a signal download session. The new AMS360 Download Setup feature in the Administration center now includes download options that were previously on the Agency Setup winform, along with additional controls to support multiple IVANS accounts and credentials.
|
Agencies with multiple databases will continue to operate in the same manner with regards to IVANS accounts. |
Agency Setup
-
The screen below shows the Agency Setup screen as it looks in 18R2. Notice the download options have been removed.
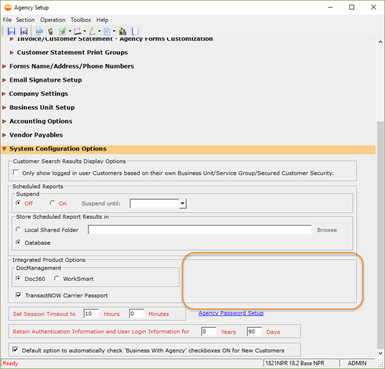
Agency Setup (NOW)
Download Setup
Entering Multiple IVANS Accounts
To enter the IVANS accounts that are in use across your agency:
-
In the Administration center, under General, click Download Setup on the left-hand side.
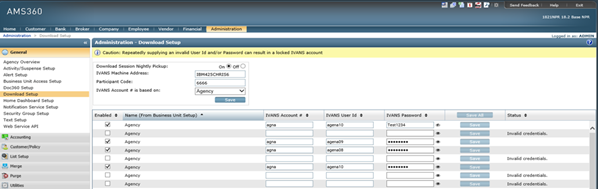
Administration – Download Setup
-
At the top of the Download Setup page, you can apply some general settings for all the IVANS accounts you will be entering. Those settings include:
- Download Session Nightly Pickup: Set to On or Off depending on whether the agency is ready to enable nightly IVANS pickup. When set to Off, no pickup will occur across the agency regardless of the details entered in the grid.
- IVANS Machine Address
- Participant Code
- IVANS Accoung # is based on: Choose the appropriate option from the drop-down. By default, Agency will be selected.
-
Click Save at the top of the Download Setup page to save the options selected within the group.
You can also choose a different option from the IVANS Account # is based on drop-down and click Save to change the business units available in the grid below. This action delivers a pop-up detailing that the action removes the current settings on the page and sets the Download Session Nightly Pickup option to Off.
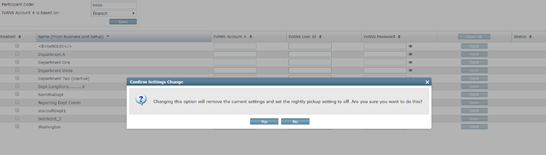
Confirm Settings Change
-
Enter the IVANS credentials (IVANS Account #, IVANS User ID, and IVANS Password) for each business unit entity. Click the Enabled checkbox for each business unit that you would like to be part of the nightly pickup.
-
Click Save to save individual IVANS account details, or click Save All to save all of the information entered on this page.
- If a row is set to Enabled and all the credentials fields are filled, a blank Status means the credentials were validated and saved successfully.
- If the Status changes to Invalid credentials, that means the credentials entered were incorrect. You can re-enter the credentials and click Save again, but avoid making three incorrect attempts as that is the threshold which will lead to a locked IVANS account. You can click the eyeball icon next to the IVANS Password to toggle whether the information entered in that field is visible.
- If a row is not set to be enabled for the nightly pickup, you can still click Save to store the IVANS credentials, but it won't be activated until you click the Enabled checkbox.
|
This feature enables business unit entities to use the same IVANS Account, User ID, and Password, if needed. Business unit security still applies with this feature, so employees will only be able to access items from the IVANS account assigned to their respective business units within the Assign Customers/Policies data entry. |
Before
The Audit Trail Utility allowed you to track changes to client, policy, and claim information.
Now
The Audit trail Utility has been enhanced to included additional capabilities in 18R2 that allow your agency to comply with New York Cybersecurity regulations.
The Audit Trail Utility can now be run to track changes to:
-
Bank Access
-
Business Unit changes
-
Claims accessed
-
Policies accessed
-
Secured Customers changes
-
Employee Security Groups changes
The audit trail also allows you to report on not only what information changed, but also who was responsible for changing the information.
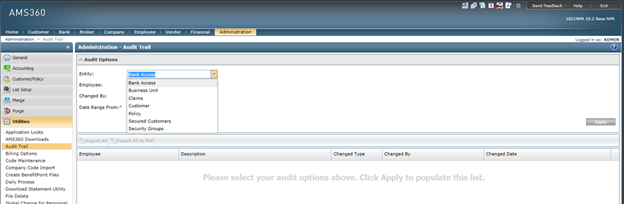
Enhanced Audit Utility Trail Functionality
To simplify creating a hard copy report, we have added the ability to print the grid contents to a .pdf file. This report shows any system changes, security access changes, and records that have been changed or accessed.
To print the .PDF audit trail report:
-
Enter the necessary information in the Audit Options section and click Apply. Every record that fits the search criteria displays in the grid below.
-
Click Export All to PDF to export all the records listed in the grid to a .PDF.
Audit Trail Report PDF Print
Accounting, Customer/Policy Enhancements
Before
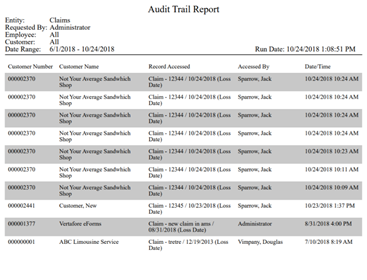
Invoice messages could only be setup on an agency basis.
Now
You can have Invoice messages set up by division/branch business units, enabling a default message for each unique division/branch combination.
To create a new Invoice message:
-
In Administration center, under General click Text Setup.
-
Click New in the top-right corner of the window.
-
In the text type drop-down menu, select Invoices - Message.
-
Select a division and/or branch in the drop-down menus. You can also select (All) to have the invoice message apply to all divisions and/or branches.
-
The division/branch pull from business unit setup; the branch drop-down menu only displays if it is turned on for Business Unit Setup.
Select a Division and/or Branch
-
Click the Active checkbox for the message to show in the invoice data entry and the classic Invoices report.
-
If desired, click the checkbox next to Set as Default. This makes the invoice message auto populate for the selected division and/or branch.
-
There can only be one default message for each division/branch combination. If the division and branch is set to (All), no other default messages can exist.
-
Click Save and Close.
|
These Invoice messages only apply to the divisions and/or branches the logged-in user has access to edit. |
To utilize the Invoice message
-
Open a customer, then click into a policy.
-
Click Create Invoice.
-
Under the Message section, the Invoice Remittance message auto-populates if there is a default, or you can manually select a message from the Remittance Message drop-down.
The Invoice Remittance message is also on invoices within Classic Reports.
-
From the Toolbox, click Classic Reports.
-
Click Invoice.
-
The Invoice Remittance message will auto-populate if there is a default, or you can manually select a message from the Remittance Message drop-down.
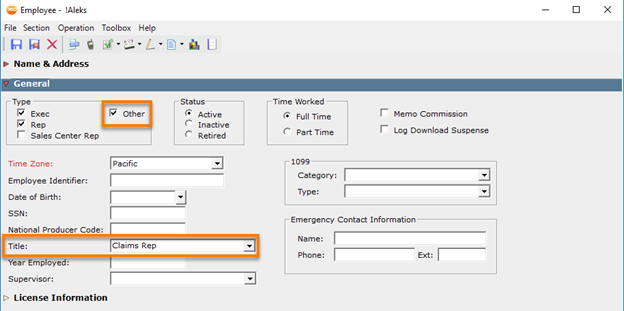
Before
The available Employee Types were Exec, Rep, and Sales Center Rep. The employee title field character limit was 17.
Now
There is now an Other Employee Type. The employee title field character limit has also been increased to 64 characters, to accommodate more detailed titles for these Other employees.
To access this option:
-
Navigate to an employee.
-
Click Employee Overview.
-
Click Edit Employee.
-
Under General, in the Type box, there is now an Other option.
Employee: Other Type
The Employee Type and Title are shown in many areas of AMS360, including:
-
Customer Service Group setup
-
Customer Overview
-
Customer search results grid
-
The .csv file for the Classic Customer report and MAR Customer Analysis report.
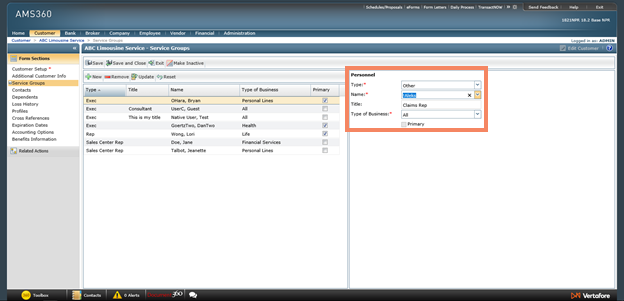
Customer: Service Groups

Customer: Customer Overview
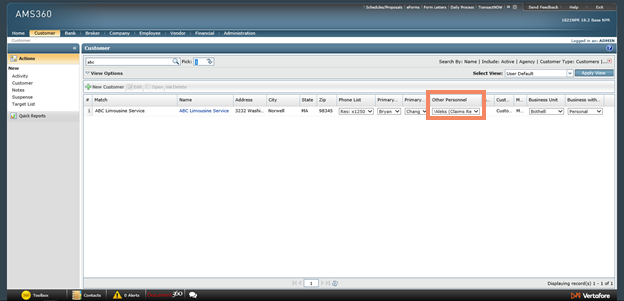
Customer Search Grid
Before
The Commercial Supplemental Names Section did not contain all the fields that are included in the ACORD 125 Commercial Insurance Application. In addition, the Overflow for Commercial Supplemental Names (OFAPPINF) only contained Name, Type, and Entity Type Information. Finally, SSN# and FEIN# for Commercial Supplemental Names did not exist.
Now
By adding new fields to the Commercial Supplemental Names section of the policy, you can store more comprehensive data and fill more information to the ACORD 125 Application.
-
Fields that have been added include:
-
# of Members and Managers
-
Web Address
-
FEIN #
-
SSN #
-
NAICS #
-
SIC #
-
GL Code #
-
Mailing address (Address 1, Address 2, City, State, Zip Code)
-
Residence Phone # was removed from the grid
-
FEIN # was added.
-
-
New fields can be imported into and exported from AMS360.
-
New fields are mapped to the ACORD 125 and ACORD 125 FL.
-
The Additional Named Insureds Overflow form has been replaced with a new Supplemental Names overflow.
To view the added fields:
-
Open a policy.
-
Expand the Commercial Supplemental Names section.
-
Click New or Edit to view the additional fields.
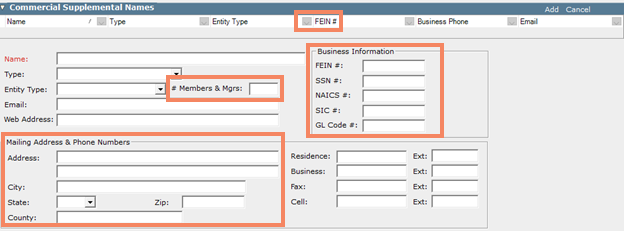
Commercial Supplemental Names (Now)
-
New Overflow created (OFAPPINFCNI) that includes information in a similar format as the ACORD 125 and ACORD 125 FL forms.
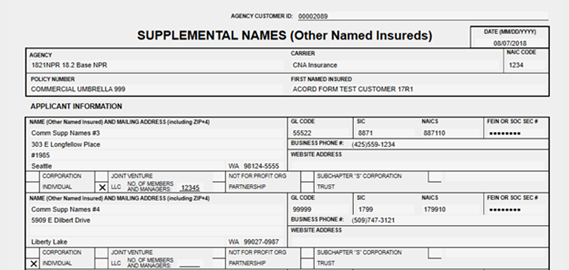
OFAPPINF (Now)
-
The ACORD 125 and 125 FL forms have a single field for the FEIN or Soc. Sec #, the form mapping will plug the FEIN # when data exists in both fields.
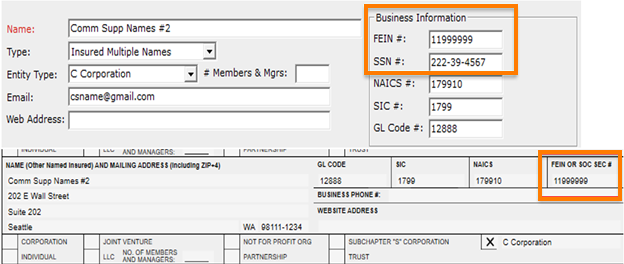
FEIN and Social Security #
Before
To view certain fields or information, you had to navigate to the Additional Customer Info screen.
Now
We added FEIN#, SIC, NAICS, and GL Code fields for the First Named Insured on the Dec Page View. Now, you won’t have to navigate to the Additional Customer Info screen to get this information.
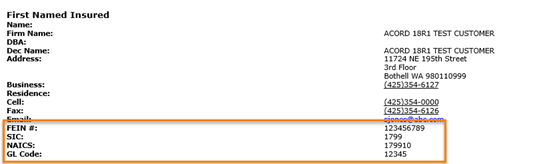
New Fields in Dec Page View
Before
You did not have the option to exclude Personally Identifiable Information (PII) for your insureds on the Dec View page.
Now
You can exclude PII information on the Dec View page. A new policy view option hides/shows designated PII on the Dec View page for display and print functionality.
-
This option is checked by default.
-
Fields that will be hidden/shown include:
-
FEIN#
-
SSN#
-
DOB
-
Driver’s License Number
-
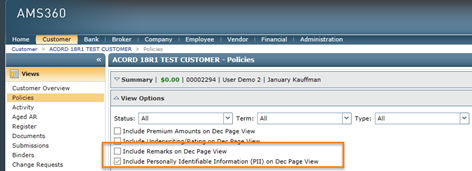
Hide/Show PI
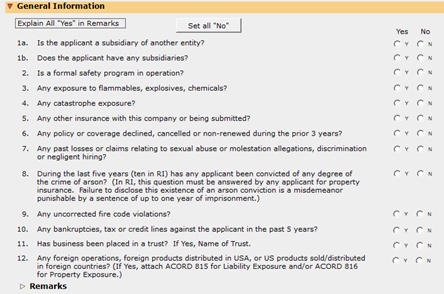
Before
Questions 9 and 10 were not mapped to the form from the UI. Questions 13, 14, and 15 were not included in the UI.
General Information (Before)
Now
A new General Information section reflects page 3 of the ACORD 125 and 125 FL (2016/03) versions of the Commercial Insurance Application - Applicant Information Section.
-
Remarks have been copied to the new section during upgrade. If data in the Remarks is specific to any General Information question, you should enter the data under the appropriate question.
-
Delete the obsolete data from Remarks.
-
The Any other insurance with company? policy information is mapped to the form from the Other Insurance with Company section as shown below.
-
Data does not currently Download/Import to the General Information Questions.
-
The Y/N answers Export.
To view these changes:
-
Open a policy.
-
Expand the 125, 130 Applicant information / Locations section.
-
Expand the General Information subsection.
General Information (Now)
Other Information
|
These Invoice messages only apply to the divisions and/or branches the logged-in user has access to edit. |
Before
You could not append new description content to an existing activity.
Now
You can append new description content to an existing activity, while maintaining the read-only nature of existing activity detail.
The option to add new description content to an activity is a secured item. Administrators can choose which user groups have access to this functionality. By default, only the AMS360 Owner group will receive full access to the feature upon release.
-
New descriptions added to existing activities have a system generated date-time stamp that indicates the user who made the edit, and the date and time when the edit was made.
-
The user cannot edit existing (saved) description text.
-
Currently, Attachments cannot be appended.
To access this view:
-
Under Views, click Activity.
-
Select an Activity.
-
Click Append Description. A new window is launched for your input.
View Activity: Append Description
Append Description
-
The appended description is placed inside the read-only Description text area with a system-generated date/time stamp.

Read-only Description text area
-
When the View Activity window is closed, the Description field within AMS360’s Activity View continues to display the original non-appended text.
Before
You could not import/export the Additional Insured and Waiver of Subrogation for your Certificate Holders on a customer.
Now
The fields in the Additional Insured and Waiver of Subrogation have been added to the Data Schedule Import/Export capability. You can now import/export the Additional Insured and Waiver of Subrogation for your Certificate Holders on a customer.
New fields have also been added to the Permanent Customer Certificate Holders Template.
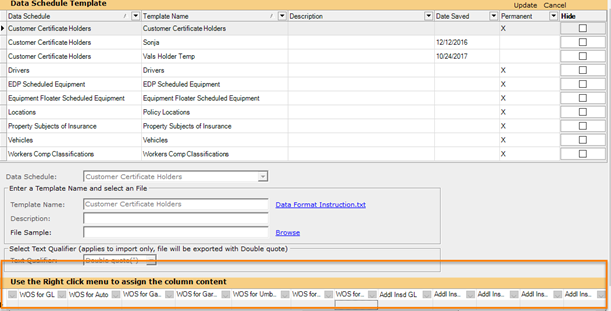
Data Schedule Template
To view these imported and exported fields:
-
In the Customer center, under Actions > Certificate Holder click Setup.
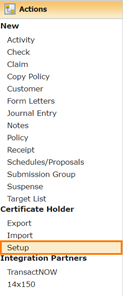
Customer Holder Setup
-
Choose a Customer Certificate Holder and click Edit.
-
The Additional Insured and Waiver of Subrogation options can now be exported and imported in, based on the Data Schedule templated.
-

Additional Insured and Waiver of Subrogation
-
To export the data, click the Data Schedule Export button.
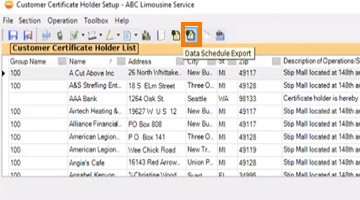
Data Schedule Export
eForms Setup
Before
You could not include the Job # and Job Type on the Certificate of Liability description of operations section.
Now
A new option has been added to eForms Setup data entry in the Administration center. This enables you to choose to include the Job # and Job Type to be mapped to the ACORD 25 (2016/03) version of the Certificate of Liability form.
This setup option defaults to unchecked.
-
To include this information, click the Include Job # and Job Type on Certificate of Liability checkbox in eForms Setup. When selected, the Job # and Job Type will print first in the Description of Operations field on the Certificate of Liability.
|
For an agency to make use of this new feature, it does need to be turned on. |
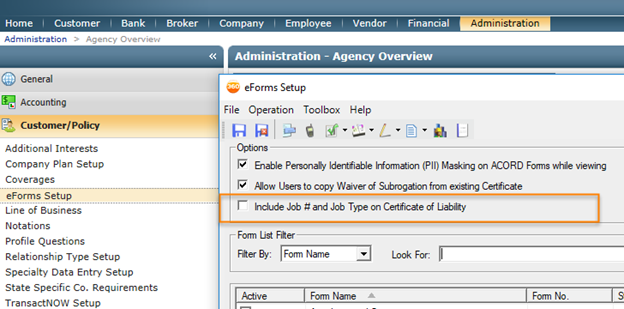
Include Job # and Job Type
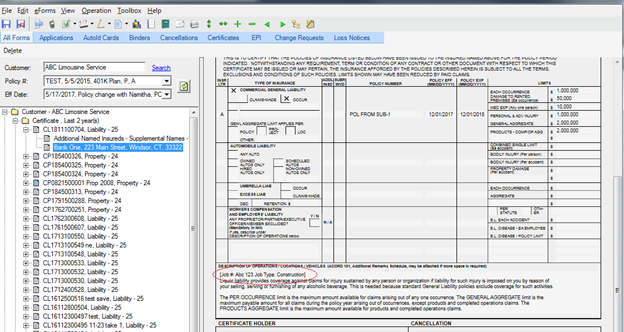
Certificate of Liability: Job # and Job Type
Before
Job # and Job Type were not included in the Refine Certificate Folder view or the Description of Operations.
Now
Job # and Job Type can now be added in the row description within the tree by updating the Refine Certificate Folder view.
To do this:
-
Launch eForms Manager.
-
Click View, and select Refine Certificate Folder.
-
Click the Job # and Job Type checkboxes. The folder will then be refreshed to include this information.
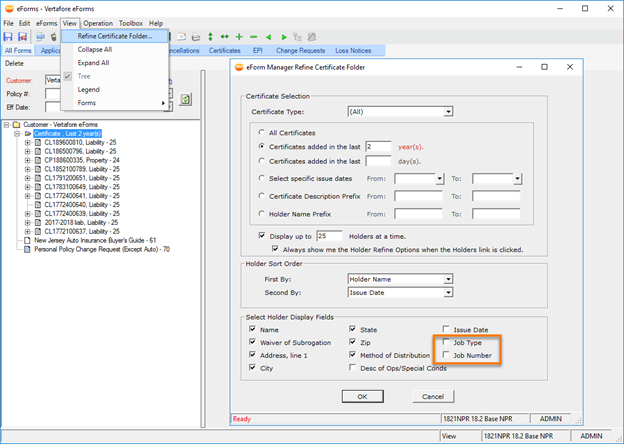
Refine Certificate Folder: Job Type and Job Number
You can also include the Job # and Job Type within the Description of Operations/Locations/Vehicles field.
-
Within eForms Manager, right-click a certificate. Click Add/Edit Holder.
-
Under the Additional Information section, add a Job Type and Job #.
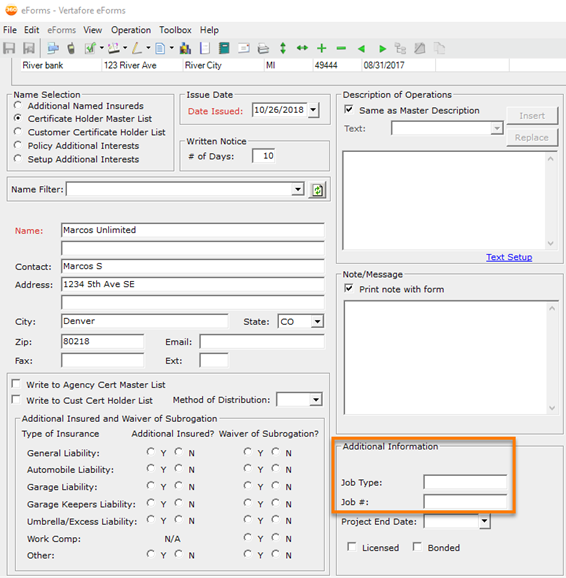
Additional Information
-
Click Save.
-
Click Create/Refresh forms.
-
The description of operations will show the Job Type and Job # followed by the description of operations text.
Before
ACORD Forms used to be printed first, followed by Overflows. They were not in a sequential order, and they could not be saved in a single PDF.
Now
Forms and Overflows are arranged in order within a single .pdf. You have the option to create a single .pdf file or individual .pdf files. Attachments are included in the .pdf if they are printable.
This means you can create one .pdf per certificate holder; when you send the .pdfs to your insured, they can print a specific certificate, rather than all of them. The .pdfs will also print in correct order:
-
Attachments such as Excel Spreadsheets or .csv files will be copied as files into the output folder.
-
When faxing: Items that are printable but can't be written to .pdf will appear at the end of the fax job.
To print forms with overflows/attachments and save as separate PDFs:
-
Launch eForms Manager for a customer.
-
Click the Print button.
Print Button
-
Choose the Form, Overflow Pages, and Attachments.
-
If you want a single .pdf, leave Create separate PDF file(s) unchecked; if you want separate .pdf files click the Create separate PDF file(s) checkbox.
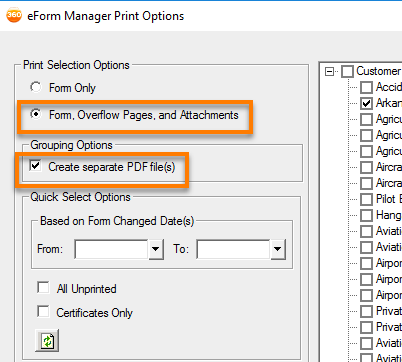
Print Selection and Grouping Options
-
Click Save as PDF.
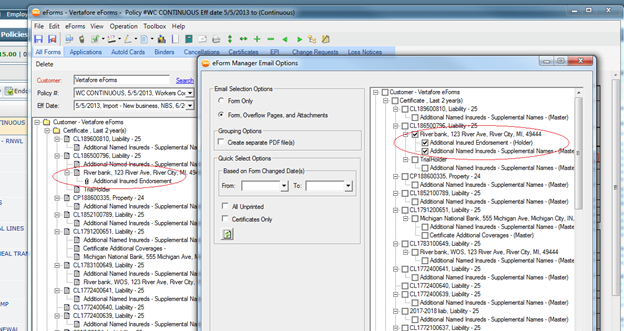
eForm Manager Email Options
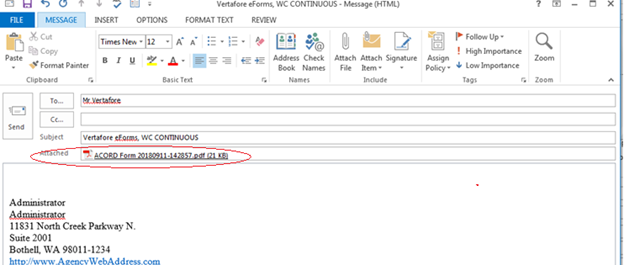
Email: ACORD Form Attachment .pdf
Download/Integration Enhancements
Before
In 18R1 we added the ability to exclude a policy transaction, but the report did not reflect this.
Now
Download Report will now reflect a status of Excluded for the transaction, as well as a count of those that are excluded from download.
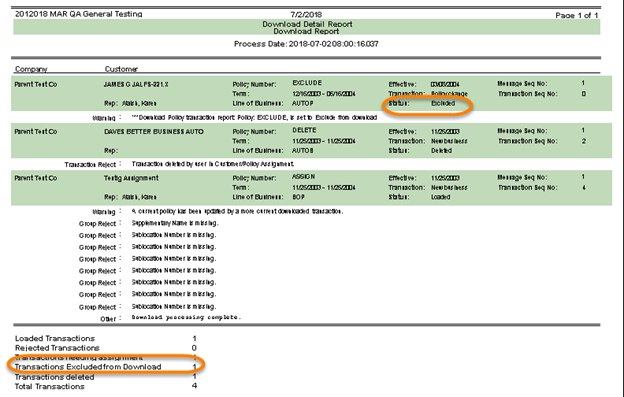
Download Detail Report
Before
Agencies found it difficult to determine what customer and/or policy to assign downloaded accounting transaction items to.
Now
The download Customer/Policy assignment page grid has been enhanced for accounting transaction, which include:
-
Amount
-
Sequence Number (Seqno)
-
Sort Number (SortNo)
-
Commission Transaction Number (CommTranNo)
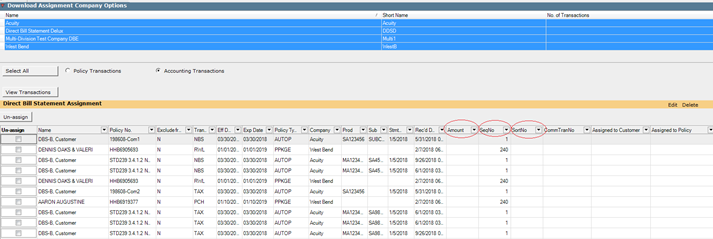
Customer/Policy assignment
-
Fixed an issue with the claims download report showing a reference ID for the claims reported by person rather than a name.
-
Now correctly show download policy changes that remove a line of business as “DNLD/Partial Cancellation.”
-
Fixed an issue with claims download where multiple transactions in one batch file were not loading to AMS correctly.
-
Marital Status of drivers now update when they are downloaded with personal umbrella.
-
When plugging Specific Job Description to the ACORD 147, we now plug the full description.
-
Fixed an issue with homeowners not saving when an HO07 was selected.
-
Fixed an issue with policy compare showing locations on a Commercial Umbrella that was downloaded as being added and deleted when they were not.
-
Certified Office 365 (32- bit only) with Word and Excel 2016 installed locally.
-
Increased performance in the following areas:
-
Customer
-
eForms Manager
-
App Preview
-
Policy compare
-
Async Server – Reports
-