AMS360 18R1 Accounting Guide
The new acquisition feature allows you to track acquired books of business and analyze revenue that is associated with that book over a period of time.
Categories for acquisitions are defined at an agency level and assigned to individual customers. To ensure acquisition types cannot be altered once entered, security measure can optionally be set to view only for the acquisition field.
Follow the steps below to setup acquisition types and assign those types to customer accounts. Review the changes made to reports for information on how to extract useful information so that you can tell how this new book impacts your agencies bottom line.
Acquisition Setup
Note: To complete these steps you must have authorization to access the Administration center in AMS360.
-
From the Administration Center, click List Setup and Acquisition from the left-side navigation menus.
-
The Acquisition form displays. Click New to enter a new acquisition code and description. When you are done, click Add and Save and Close the form.
Note: Once saved, acquisition types cannot be deleted, however, they can be marked as ‘inactive’.
Your new acquisition type is now ready to be assigned to a customer.
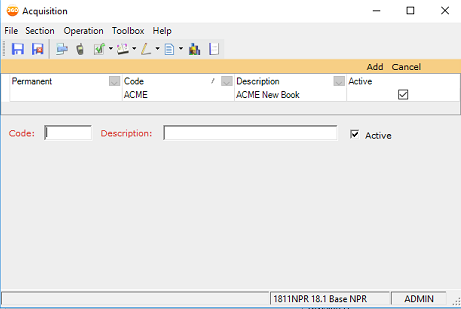
List Setup – Acquisition
Acquisition (Customer level)
- From the Customer tab select a customer and click Customer Overview under the Views section and click Edit Customer in the top left.
- The Customer Setup form displays.
- Assign an acquisition type for the customer by dropping down the Acquisition list box and selecting the appropriate type. (example below)
- Save and close the form to continue.
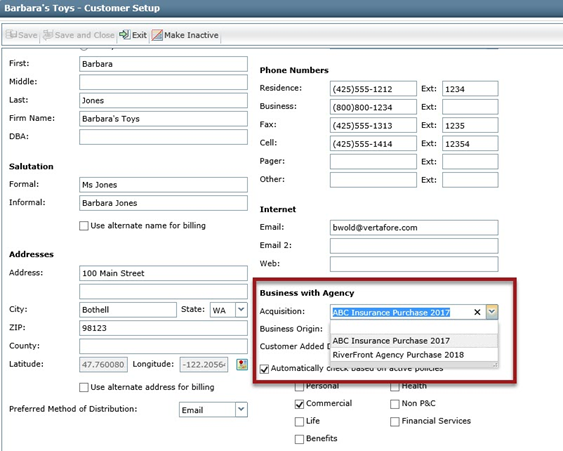
Acquisition Type example
Acquisition (Security Setup)
Optionally, you may set the security for the Customer, Acquisition field so that it is ‘View Only’ once the customer information has been saved.
Note: These steps require that you have access to the Administration Center and Security Group Setup.
To secure the customer field:
-
From the Administration Center, click the General tab, then click Security Group Setup from the left-side navigation menus.
-
Highlight the Group you would like to modify and click Edit.
-
From the Secured Item List, click Feature – Customer Setup; Task – Acquisition and change the Access level to ‘View Only’
-
Update the grid view and close the form. You have now changed the acquisition access level so that group of users can enter a new acquisition type for a new customer but, they cannot change the acquisition type once the customer has been saved.
Target Lists
Target List filter criteria has been modified to allow you to pull a list of all customers that have been assigned to a particular Acquisition Type.
To do this:
-
From the Home Center, click Target Lists under the Views column.
-
Next, click New Target List in the top left corner of the grid.
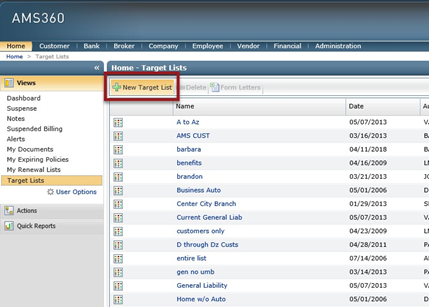
Home Center - Target Lists
-
The target list form displays. Select your filter criteria, including the acquisition type you are targeting on, and process the list as you normally do.
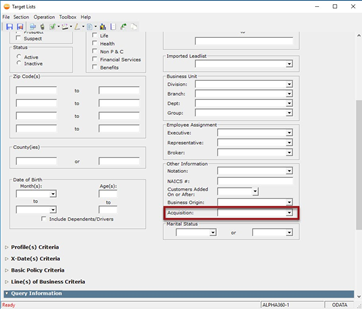
Target List – Customer filter criteria
Once you are ready to review your results, export the file by clicking on the Export icon or from the menu click on File and Export.
A new column, Acquisition, has been added to the export file.
Classic Report – Customer List
The CSV export layout has been modified to include the new acquisition column.
Simply select the Customer List report and instead of printing the report, click on File and Create CSV. The report will then display in Excel giving you access to all customer data.
Business origin allows tracking of revenue generated by an agency-defined source of the business at the customer and/or policy level. With business origin, you have the option to set up employee/broker commission splits based on the origin of business. Automatic plugging of those commission amounts at the time of billing ensures that your employees are receiving the correct commission amounts.
AMS360 comes with 3 pre-defined business origins (Organic, Referral, Transfer) for your use or you can define origins specific to your agency. Follow the steps below to setup business origin types and, optionally, associate commission amounts to those types. Once the setup is complete, we’ll walk you through the use of the new fields and review changes made to reports for business origin tracking.
Business Origin Setup
Note: To complete these steps you must have authorization to access the Administration center in AMS360.
- From the Administration Center, click List Setup and Business Origin from the left-side navigation menus.
- The Business Origin form displays. Click New to enter a new business origin code and description. When you are done, click Add and Save and Close the form.
Note: Once saved, business origin types cannot be deleted; however, they can be marked as "inactive."
Your new business origin type is ready to be assigned to a customer/policy or if employee/broker commissions differ based on the business origin, you can setup commission splits to be automatically applied during policy billing.
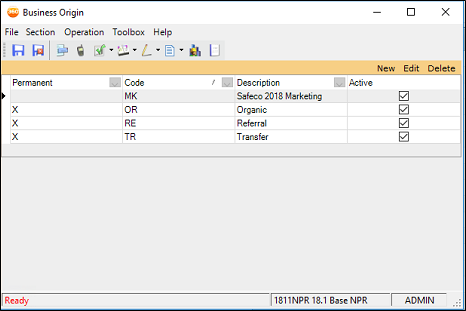
List Setup – Book of Business
Business Origin Setup - Agency/Employee Commission Ranking (Optional)
As part of the commission structure definition, employees and brokers can now have commissions associated with agency business origins.
Note: To complete these steps you must have authorization to access the Employee/Broker center in AMS360.
-
From the Employee or Broker Center, select the employee you would like to define business origins commissions for.
-
Click on Employee Overview under the Views column.
-
Click Edit Employee and expand the Commission Setup section.
-
From the grid menu, click New.
- Select the appropriate Business Origin from the drop-down list and enter the commission structure for the employee/broker.
Note: If there are multiple employees that have the same split definition, you can copy commission from one employee to another using the Copy Commission link.
- Once defined, Save and Close the form.
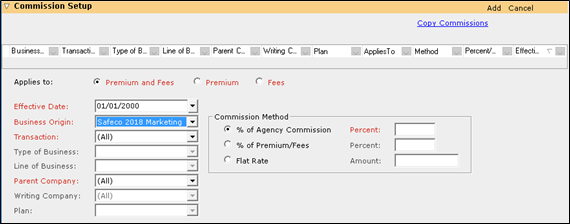
Employee – Commission Setup
Business Origin Setup - Agency Commission Ranking (Optional)
If you are associating employee/broker commissions to a business origin, you can adjust your Commission Parameter ranking to look for the existence of Business Origin in the appropriate order for your agency.
Note: To complete these steps you must have authorization to access the Administration center in AMS360.
- From the Administration center, click Edit Agency.
-
Expand the Accounting Options and verify that the appropriate Commission Parameter Ranking is correct for your new business origin types.
Note: We have defaulted the first employee/broker commission search to be on Business origin. If the system does not find a business origin defined for the billing transaction it will then skip to the 2nd ranked item, and so forth.
- Save and Close the form to have your changes take effect.

Agency Commission Ranking
Business Origin (Customer and Policy level)
Once defined, business origins are entered at the customer level, and defaulted from there to any new policies that are written. Once defaulted at the policy level, they can be changed.
Note: Security access to this feature is granted through the Business Origin security item for Customer Setup and Policy.
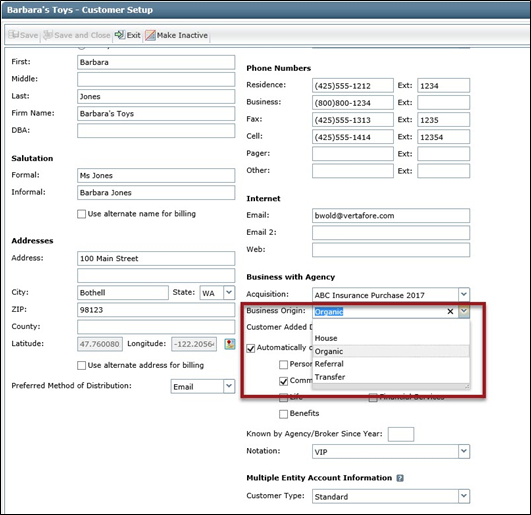
Customer Information – Business Origin
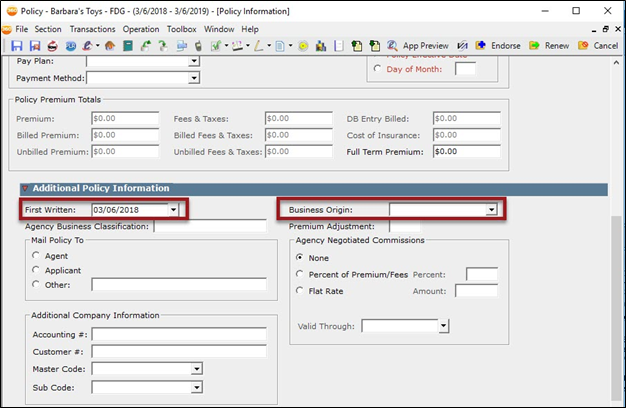
Policy Information – First Written and Business Origin
Note: First Written field has also been added to the Additional Policy Information section of this form. First Written defaults from the customer, date added field but it can be changed. This field is included in the CSV layout for the Customer List.
Business Origin (Reports)
Target Lists
The Target List filter criteria has been modified to allow you to pull a list of all customers that have been assigned to a particular Business Origin Type.
To do this:
- From the Home Center, click on the Target Lists under the Views column.
- Next, click on New Target List in the top left corner of the grid.
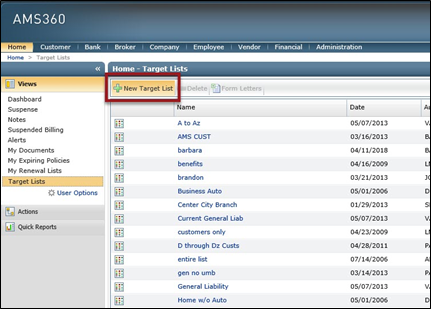
Home Center - Target Lists
- The Target List form displays. Select your filter criteria, including the business origin type you are targeting on, and process the list as you normally do.
- Export the file by clicking the Export icon or from the menu by clicking File and Export.
A new column, Business Origin, has been added to the export file.
Classic Report - Customer List
The CSV export layout has been modified to include the new business origin column.
Simply select the Customer List report and instead of printing the report, click on File and Create CSV. The report will then display in Excel giving you access to all customer data.
My Agency Reports (MAR) - VSSO enabled, online agencies only
The Customer Analysis, Book of Business and the Production reports have all been updated with the Business Origin type.
To gather insights into the revenue that is being generated by a specific origin of business, the Production Analysis and/or the Book of Business reports can be run to show current revenue amounts for any defined type.
You will now have access to new report enhancements:
- Client Relationship Revenue Report
- Customer Net Balance
- Broker Net Balance
- Finance company Net Balance
- Finance company Aged A/R
- Relationship Revenue
- General Ledger
- Download Report Enhancements
- Customer Aged A/R Enhancements
- Book of Business Enhancements
- Broker Aged A/R Enhancements
- Download Detail enhancements
- Customer Analysis Enhancements
Invoice in-line and remittance area messages can be pre-defined for an agency and then selected from a drop down list when creating individual invoices or batch printing invoices. This saves time and reduces the potential for typos when sending customer facing documents.
Invoices - Message Setup
Message setup is available for in-line and remittance area messages. Follow the steps below to define standard messages for your agency.
Note: To complete these steps you must have authorization to access the Administration center in AMS360.
- From the Administration Center, click General and Text Setup from the left-side navigation menus.
- The Text Message form displays. Click New to enter a new message.
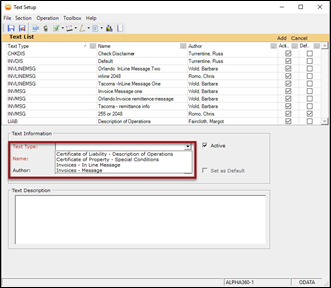
Administration Center - Text Setup form
- Next in Text Type, select:
- Invoices - In-Line Message from the Text Type drop down to enter an invoice message that displays in the body of the invoice along with the invoice transaction information.
- Invoices - Message from the Text Type drop down to enter an invoice message that displays in the lower section (remittance area) of the invoice. This area is above the agency/division information and next to the total section.
- Enter a description of the invoice message in the Name field.
User Tip: When entering multiple messages of the same type, enter a description in the Name field to help the end user select the appropriate message. For example, if you have multiple divisions that might have different remittance information, include the division name as part of the description.
- Next, enter the complete text of the message in the Text Description area. If you are using tabs to simulate a column display, you may need to adjust the spacing from the Description field to the actual printed invoice form as proportional spacing may be misaligned from one control to the other.
Note: If you have the agency or business unit option set to show future installments on the invoice, you will be limited to 4 lines of additional remittance area text. If you remove the option to include future installments, you can enter up to 7 lines of remittance area text.
-
If you would like this message to automatically default, check the Default checkbox. When you are done click Add and Save and Close the form.
Invoice – Report, Print Options
The Invoice report now allows you to select the Invoice – Message (Remittance message) from a drop down list.
To access the message:
-
From the Toolbox, click on Classic Report and Invoices.
-
The report selection screen displays. Select the Message from the drop down list box.
Note: The message can be edited prior to printing.
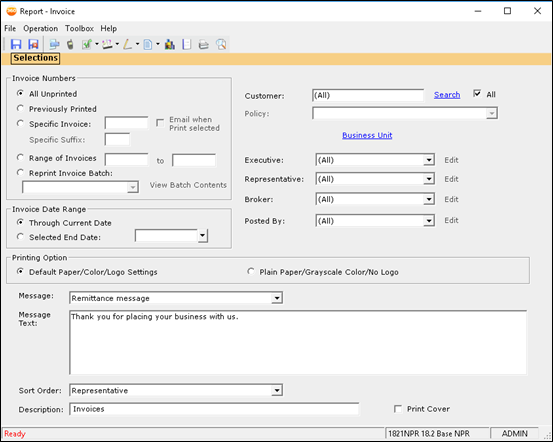
Invoice Report Selection form
Invoice - Billing, Create, and Print
The message section of the Standard Invoice form has been updated to include the Remittance Message along with the In-Line Message. Both message areas can be populated by selecting a pre-defined message from a drop down list.
Once the message is selected, it can be edited.
Follow the steps below to access the Standard Invoice, Message section.
- From the Customer Center, click on a customer Policy #.
- On the policy form, expand the Transition Premiums/Billings tab.
- From the policy billing transaction area, click Create Invoice.
- Expand the Invoicing tab and click on Create Invoice.
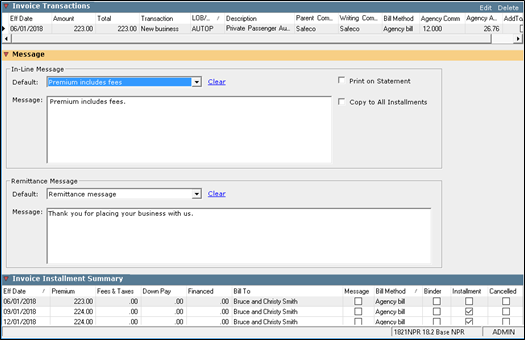
Billing – Invoice Transaction form
- Expand the Message section and select the appropriate message(s) from the drop down list. If you have established default messages, they will plug for you.
- Process the invoice as you normally would.
Invoice - Register Views, Preview, and Print
Since the invoice message area typically is selected at the time invoice batches are printed it is not saved with the actual invoice view in AMS360. This makes viewing an already existing invoice and printing/emailing from that view, a bit different than the original invoice creation and batch printing processes.
Follow the steps below to include remittance messages on an invoice that has already been created (posted).
- From the customer’s invoice or register view, click on the invoice link. The invoice, preview form displays.
- Click the Add Message icon in the Preview form header.
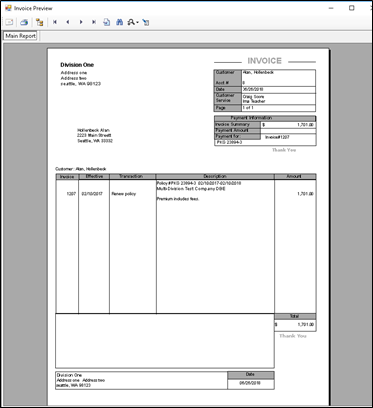
Register – Invoice Preview
- Next, select your message from the drop down list or type in your message and click OK.

Invoice Preview – Invoice Message form
The invoice preview screen refreshes with your changes. You can now print or email the form to the insured.
The Chart of Accounts setup has been enhanced to allow sub-ledgering by insurance, finance or brokerage companies for any new, detail general ledger accounts. Identifying the appropriate company during transaction processing helps organize your general ledger accounts and makes transaction tracking much easier for accountants and bookkeepers.
Follow the steps below to setup a new General Ledger account that requires sub-ledgering by company (insurance, brokerage or finance).
Note: To complete these steps you must have authorization to access the Chart of Accounts setup in AMS360.
-
From the Administration Center, click the Accounting tab and then Chart of Accounts from the left-side navigation menus.
- Click on New to enter a new detail account that you would like to require sub-ledger by company (Insurance, Brokerage or Finance).
- Once you have entered the appropriate GL Number and Description, select the other options that are applicable and then check which company type you would like the sub-ledgering to be by.
- Click Add to update the grid and Save and Close.
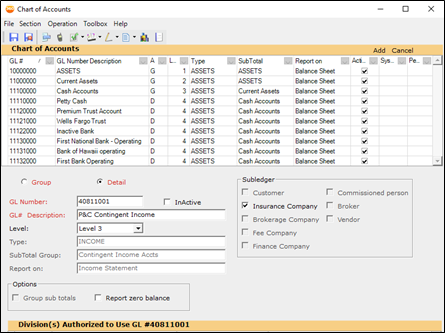
Chart of Accounts – Setup
With the Producer Expense Tracking Option, you now have a choice to track producer expenses for brokered business along with your standard producer agency expense/payable accounts or as part of broker expense/payable accounts.
Currently in AMS360 all broker business is expensed to Broker Business GL System Accounts. For those producers involved in both broker business and standard agency business, expense accounts are split between two different GL accounts (Agency and Broker). To simplify reporting, all expense and payables for these producers can be directed to post only to the Agency Business GL System Accounts.
Follow the steps below to change your system posting option.
Note: To complete these steps you must have authorization to access Agency Setup in AMS360.
- From the Administrator Center, click on the Agency Overview tab and click Edit Agency.
- Expand the Accounting Options section and scroll to the Producer Payable and Expense Allocation for Broker Business group box. Select the appropriate option from the selections.
Note: Changes to the posting code will take affect from this point on. No migration of data from one system account to another will occur.
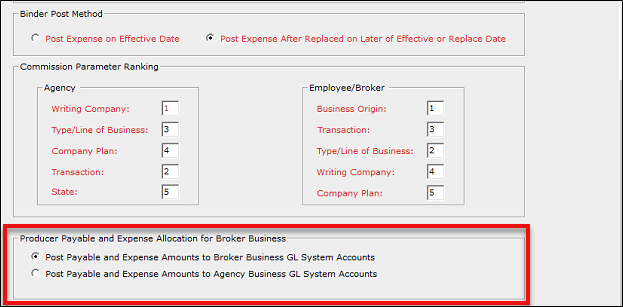
Agency Setup – Accounting Options section
Account Current Register and Detail Grid Changes
The Account Current register view is now enhanced to display the person that created or last changed the statement detail.
Once a statement is opened you can now link directly to the account’s customer or policy to view related information and view the receivable balance if the detail row is for a financed policy. The Account Current Statement report’s CSV file layout has also been updated to include the financed company’s receivable balance.
To see the new updates, follow these steps:
Note: To complete these steps you must have authorization to access Company, Account Current Statements
- From the company center select a company. Next, click on Register to view all statements for the company. Notice the new Created/Changed By column.

Company – Register View
Note: For all records prior to the 18R1 update, that are 90 days old, the name of the individual running daily process displays as the Changed By person. That is because during the archive process (which runs as part of daily process) AMS360 updates the Changed By field to be the person running daily process. After you update to 18R1, Daily process will retain the last Changed By person, allowing you to see the correct responsible party in the register view.
For all Download Direct Bill Entry Statements, you will notice DBO as the Created/Changed By person as the AMS360 system creates these statements.
- Click on the Type link to display the detail rows. Here you can view:
- Customer link
- Policy link
- Additional Personnel column
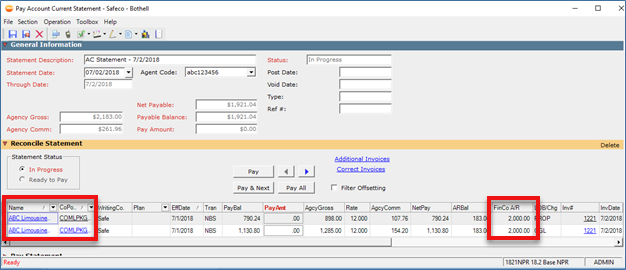
Account Current Statement
Direct Bill Entry Statement - Register and Detail Grid Changes
The direct bill statement grid has been enhanced to allow the executive name to be changed along with the commission percentage directly from the grid. You can also change the agency commission percentage. A new column has been added to indicate whether there are additional personnel on the policy. These time-saver enhancements are shown below.
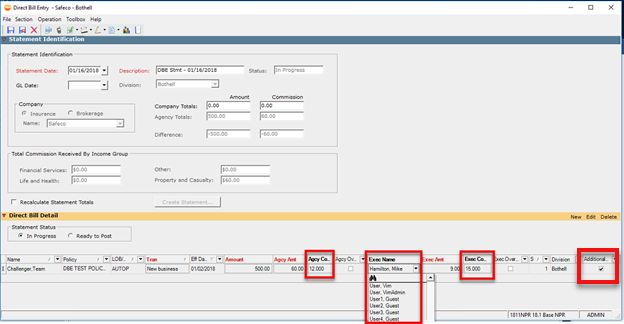
Direct Bill Entry Statement
Direct Bill Entry Statement - Copy
The copy Direct Bill Entry Statement feature saves you time by copying all transaction rows entered on a previous statement. Once the statement is copied, adjustments to the statement can be made prior to posting.
The copy feature can be done from the Company or the Financial Center.
Note: To complete these steps you must have authorization to access Company and/or Financial Centers and Direct Bill Statement Entry.
- From the Company Center, select a company that you have created digital bill entry commission statements for and click the Register View from the left-side navigation menu.
- Notice the Copy Direct Bill icon on the left-hand side under the Actions column for each Direct Bill Entry Statement.
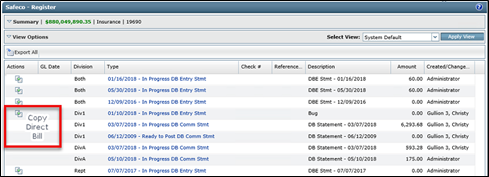
Company Register
- Click the Copy Direct Bill icon; this opens the Direct Bill Entry form.
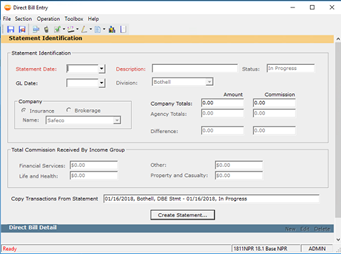
Direct Bill Entry form
- Select the statement header information as you normally do. Next, verify that the statement you are copying transactions from is accurate. Click Create Statement to make a copy of all transaction rows for the new statement.
- You can make adjustments or delete any transaction rows on your new statement. When you are finished, you can set the statement Ready to Post and post your transactions.
User Tip: The copy statement process is also available from the Financial Centers, Direct Bill view. To complete copy, simply select the Direct Bill Entry Statement row and click the Copy Direct Bill Entry button in the grid header. The copy feature is only available for direct bill entry statement types.
The ability to attach activities and documents (as part of an activity record) is now available for the Financial Center. Two new views have been added to view and retrieve activities/documents along with a new action for entering activities. These options are also available from the other activity entry and view areas of the system.
Follow the steps below to add a new Activity and access Activities/Documents from the Financial Center.
Note: To complete these steps you must have authorization to access the Financial Center and Activities and Documents.
- To enable the Views for a user, click on the Financial Center and User Options under the Views navigation menu.
- Add Activity and Documents under ‘Selected Views’ for the user. Click Update and Save and Close the form.
You will now see two new menu items for Activity and Documents under the View menu.
- Click on Activity to view the activity grid, and from this grid, click New Activity.
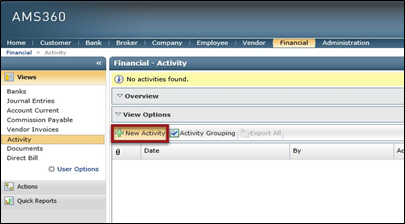
Financial Center – Activity form
-
Enter the activity detail you would normally do. If there are attachments, drag and drop the attachment or click on Attachments and enter the appropriate information on the Attachment screen.
- Click Save and Close when you are done.
User Tip: Financial Center Activities do not require an entity name to be entered. They are only associated with the Center. Wherever you can enter or view an activity, you will be able to select ‘Financial’ and enter/view financial activities and documents as long as you have been granted security for these features.
If there are multiple invoice numbers that print on a single invoice page, the system will not display the invoice number in the customer header area. This reduces the confusion on what invoices are included in the customer balance.
Estimated revenue tracked at the policy level will now update when transactions come in from download.
The Accounting Assignment Winform now provides two fields to help orient the user around the data, those are:
- The Stmt Date column will display the "Account Date" if provided by the carrier/company in AL3 6DBC06 (or 6DBC02).
- The Rec'd Date column the date the data loads into the AMS360 Agency's database.
The Accounting Assignment Winform has been updated to provide the following new columns:
- Prod (master) and Sub codes have been added to help identify the appropriate agency/division for this transaction.
- The logged-in user only sees rows that the user is configured to see/access.
- Stmt Date (Statement Date), which is the date the statement was created by the carrier, has been added.
- Rec'd Date (Received Date), which is the date this transaction was processed and no policy was found to match or relate to.
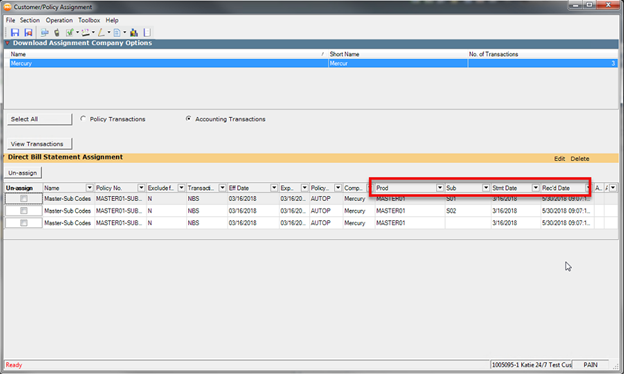
Customer/Policy Assignment