AMS360 2019 R2 Release Notes
We are pleased to release AMS360 2019 R2. With each release, we are improving and updating AMS360 to provide you with the best possible experience.
To print this topic in its entirety, in the upper-right corner of this Help page, click Expand all , and then click Print
 .
.
Required
Minimum workstation requirements as shown in the AMS360 2019 R1 Online Configuration Guide (Doc ID:15470) on My Vertafore. You must be registered with My Vertafore and signed in to access this document.
Supported
Browser
- Microsoft Internet Explorer 11 (32-bit) with default settings
- Microsoft Edge
- Google Chrome
Operating Systems
- Microsoft Windows 7 (32-bit and 64-bit)
As Microsoft will discontinue support for Windows 7 as of January 2020, we will plan on discontinuing support for Windows 7 with the AMS360 20R2 release.
- Microsoft Windows 8.1 (32-bit and 64-bit)
- Microsoft Windows 10 (32-bit and 64-bit)
Microsoft Office
- Office 2016 (32-bit)
- Office 2019 (32- and 64-bit)
.Net
- .NET 4.7 (required)
For more information about AMS360 recommended and supported configurations, see the Supported Configurations Matrix (Doc ID: 12604) on My Vertafore. You must be registered with My Vertafore and signed in to access this document.
Microsoft Office
- Office 365 (32-bit)
- We only support Microsoft Word, Excel, and Outlook locally.
XPS message
Microsoft has changed the way that they are giving customers the XPS viewer which is used for some functionality in eForms manager.
Depending on the build number of the OS that you have, you may need to install the new viewer. Click here for more details.
-
You will receive the following error message when the system is logging an activity using print functionality vs. fax or email.
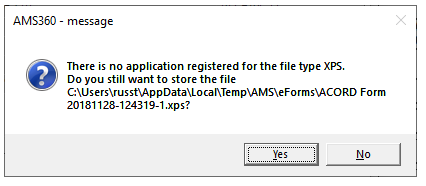
AMS360 Message
We value your feedback to ensure we are working on what is most important to you. If you have an idea to improve the product, you can suggest and vote on product enhancement requests on Vertafore Ideas. On My Vertafore, click Submit Idea in the upper right corner of the page. We appreciate your input to help us provide you with the highest quality product.
For more information on using Ideas, please see the following documents. You must be registered with My Vertafore and signed in to access these documents.
• Ideas Overview (Doc ID: 13054)
• How to Submit Ideas (Doc ID: 13049)
• What are the statuses in Vertafore Ideas? (Doc ID: 13055)
What's New
New for 19R2: Client Portal is now called InsurLink in your Customer and Admin center – stay tuned for exciting news with our 20R1 release for Client Portal and InsurLink.

Insurlink logo
AMS360 Customer Center
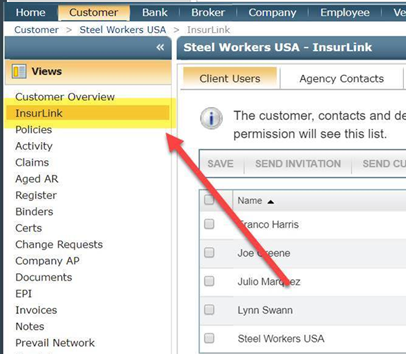
Customer Center: Insurlink
AMS360 Admin Center
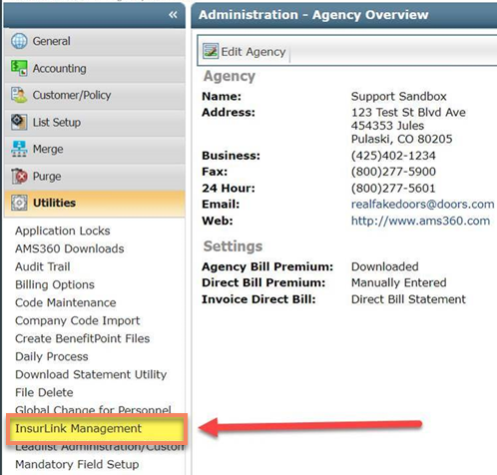
Admin Center: Insurlink
Administration
Before
The Company, Vendor and Broker centers allowed users to type the Payee and address directly into the check. Only Company had a grid for multiple addresses. You could type over the payee name and address on the check form.
Now
The Company, Vendor, and Broker centers now have grids for the multiple payee names and multiple payee addresses. These can be selected by drop-down lists on the check form. Security now is in place to give permission to you to be able to type over the payee name and address.
FEATURE DETAILS
-
Edit Company
-
New grid for Payee Names with a checkbox for the default address.
-
Company address grid has a column for Is Payee for those addresses that will show in the check payee address drop-down list.
-
-
Edit Vendor and Broker
-
Overview has a new grid for Additional Addresses
-
New grid for Payee Names with a default checkbox (defaults to overview)
-
New grid for Payee Addresses with Is Payee checkbox for addresses that will show in the check form drop-down box for the check payee address
-
-
Check Payee Name and Address Security
-
Only users with permission may type over the payee name and address on a check form.
-
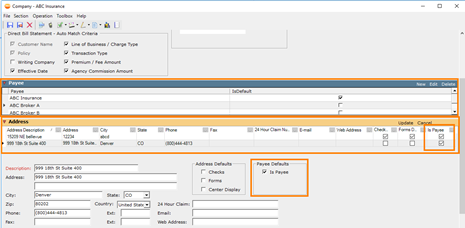
Company: Payee and Address
Company
-
In the Company Center, select a Company. Then click on Company Overview on the left hand side.

Company Overview
-
Click on Edit Company.

Edit Company
-
In the Company Winform you can add Payee Names and Addresses by clicking on New and entering the name/address info. You will then select which addresses are Payee Addresses.
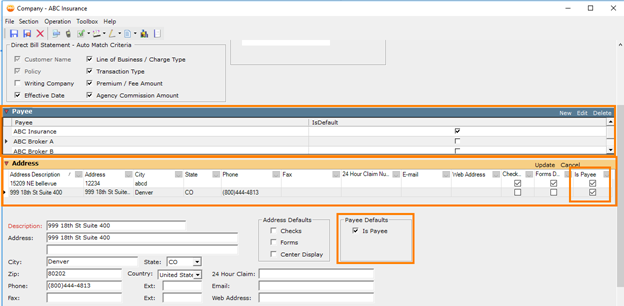
Company: Payee and Address
Broker
-
In the Broker Center, select a Broker. Then click on Company Overview on the left hand side.

Broker Overview
-
Click on Edit Broker.
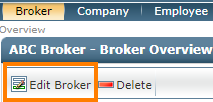
Edit Broker
-
In the Broker Winform you can add Payee Names and Addresses by clicking on New and entering the name/address info. You will then select which addresses are Payee Addresses.
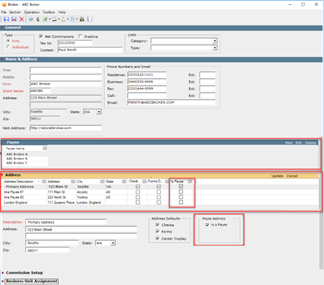
Broker: Payee and Address
Check
-
In the Broker Center, select a Broker. Then click on the Actions tab on the left-hand side and click on Check.
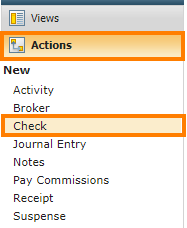
Broker: check
-
You will notice the new section for multiple payee names and addresses.
-
If the Edit Check Payee security is View Only, then the Pay to the Order of and Address fields will be not editable
-
Employee, Insured and Other as Pay To types will not have multiple Payee and Payee Address selections
-
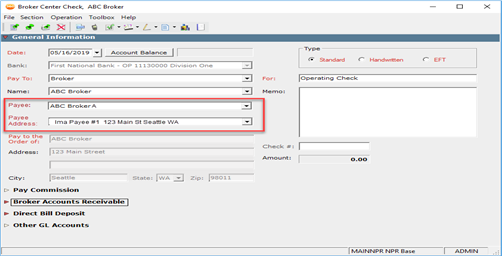
Vendor: Payee and Address
VENDOR
-
In the Vendor Center, select a Vendor. Then click on Vendor Overview on the left hand side.
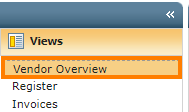
Vendor Overview
-
Click on Edit Vendor.
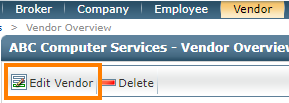
Edit Vendor
-
In the Vendor Winform you can add Payee Names and Addresses by clicking on New and entering the name/address info. You will then select which addresses are Payee Addresses.
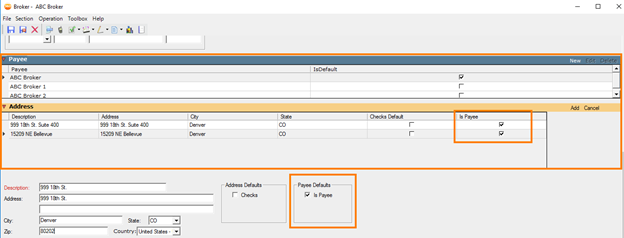
Vendor: Payee and Address
NEW SECURITY AUTHORIZATION
-
Specific users may be added to a security group that is given access to type over the Pay to the Order of and address fields on a check.
-
New Security Authorization Item for Edit Check Payee and Address
-
Full Access
-
View Only
-
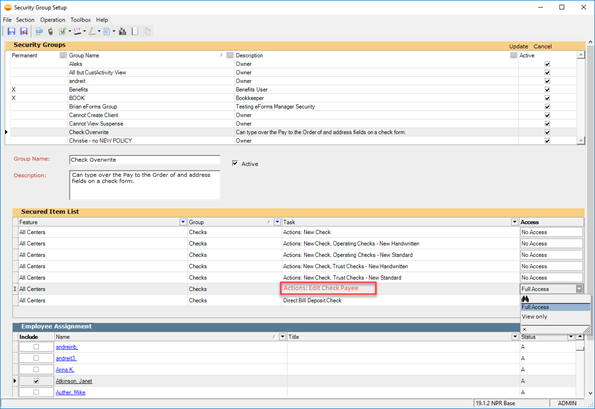
Security Group Setup
Before
BenefitPoint and some sensitive form letter recipient options could not be controlled by the agency.
Now
Both items are now securable.
FORM LETTER CATEGORY
-
In the Administration center, click on Security Group Setup on the left-hand side.
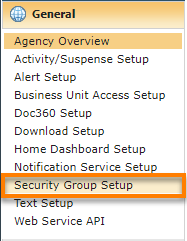
Security Group Setup
-
In the Security Group Setup winform click on Edit. Then click on the Task drop down and you will notice that you can set the Access status for multiple tasks.
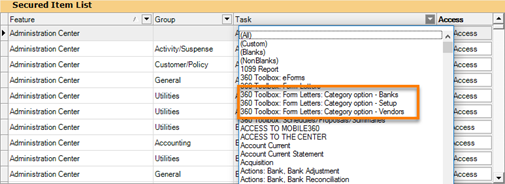
Task Access
BENEFIT POINT INTEGRATION
-
In the Administration center, click on Security Group Setup on the left-hand side.
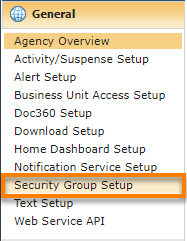
Security Group Setup
-
In the Security Group Setup winform click on Edit. Then click on the Group drop down and click on 360 Toolbox.
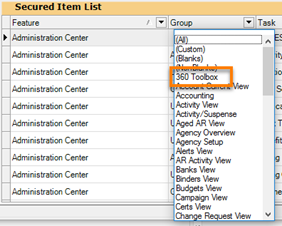
Group: 360 Tool Box
-
Here you will see the option to grant access to Benefit point in the Tool box Integration.

Benefit Point Integration Access.
-
If you grant access to Benefit Point Integration you will see it in the Toolbox.

Toolbox: Benefit Point Integration
Before
There is no way to open a Company file in WorkSmart from AMS360.
Now
You have the ability to navigate to a specific Company, open the Register view, and open the Company WorkSmart file by clicking this button.
ADMIN SETUP
-
In the Administration center, click on Edit Agency.

Edit Agency
-
Find the System Configuration Options drop down, then check the box next to WorkSmart. Then click Save.
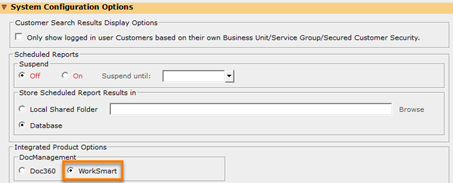
System Config. Options: WorkSmart
OPENING WORKSMART
- In the Company center select a company. Under the Register view (the default view) you will notice the WorkSmart button. Once you click on the button you will see your company file in Worksmart.
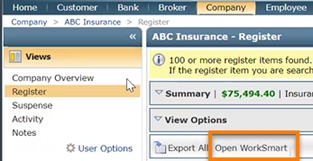
Open WorkSmart
Policy Service Enhancements
Before
Agencies needed to be able to tie a customer referral to an individual or entity and location.
Now
You will now be able to connect individual/entities, locations and customers together in the customer setup screen.
FEATURE DETAILS:
-
Referral Name: You will be able to add referral names to a list
-
Referral Location: You will be able to add referral locations to a list
-
Customer Setup: You will be able to select from a drop down list, a referral name for the person or entity and the location of that person/entity who referred the customer to them.
REFERRAL NAME AND LOCATION WERE ADDED TO THESE REPORTS:
-
Classic and MAR - Production Analysis
-
Classic and MAR - Book of Business
-
The Referral Name and Referral Location were added to the Merge Field Editor tree for use in Form Letters and Schedule and Proposals
SETTING UP REFERRALS IN THE ADMIN CENTER
-
In the Administration Center, click on List Setup on the left hand side then click on Referral Name.
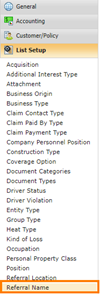
List Setup: Referral Name
-
In the Referral Name winform click on New and enter your info into the code: and description: boxes. Then click on Add.
-
The Code name is limited to 5 characters.
-
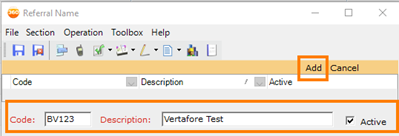
Referral Name: Add
-
You will now see your newly created code and description. From here you can continue to add referrals, when finished click on Save & Close.

Referral Name
-
To create a Referral Location you can follow the same steps from Referral Name and Location.
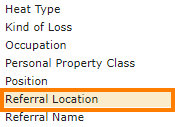
List Setup: Referral Location
|
Once you click Save, you will not be able to delete a referral. At this point you will only be able to inactivate the referral by unchecking the box next to the referral. |
USING THE REFERRALS IN THE CUSTOMER CENTER
-
In the Customer Center, choose a customer and click on Customer Overview on the left-hand side.
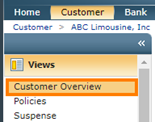
Customer Overview
-
Click on Edit Customer.

Edit Customer
-
Scroll down and you will see the Referrals section, choose a Name and Location from the drop down. Click on Save.
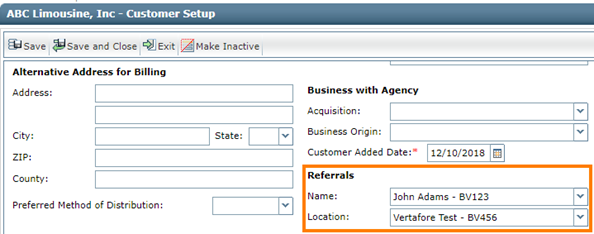
Customer Setup: Referrals
Before
Agencies need to know the Issue State for a policy, if the writing company is Admitted or Non-Admitted (Carrier Status), and if the policy is Reinsurance.
Now
You will be able to assign the Carrier Status to a writing company, and identify a policy’s issue state and if it is Reinsurance. With this information being readily available on the policy, it will enable you to better server your customer.
- The fields pictured below will appear in the MAR -Book of Business report.
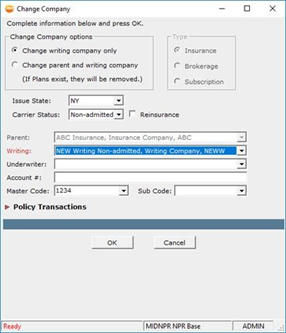
Issue State, Carrier Status, and Reinsurance
CARRIER STATUS SETUP BY WRITING COMPANY AND STATE
-
Select a State and click Edit to see the companies.
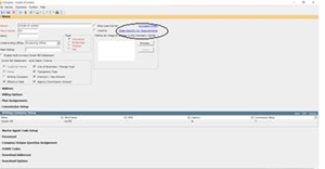
Select a State
-
Select either Admitted, Non-Admitted, or blank from the new Carrier Status column drop-down.
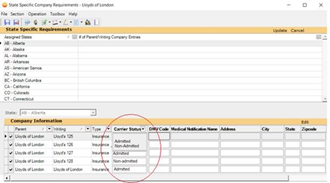
Admitted, Non-Admitted, or Blank
-
Click Update to save.
Before
International phone numbers were tracked in domestic phone number fields making it hard to differentiate between International and domestic entities.
Now
We are adding two International phone number fields, country dialing code fields, extension fields and phone type fields to the following areas in the UI:
-
Bank Account Setup
-
Broker Address
-
Broker Name and Address
-
Company Address
-
Customer Setup
-
Customer Contacts
-
Customer Dependents
-
Employee Name and Address
-
Policy First Named Insured
-
Policy Personal Co-Insureds
-
Policy Commercial Supplemental Names
-
Policy Contacts
-
Vendor Name and Address
-
Vendor Address
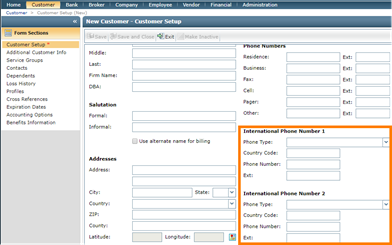
Customer: International Phone Numbers
|
Note: The Dial Code section is a free form text box that allows up to 10 characters. The Telephone number field is also free form and allows up to 20 characters. |
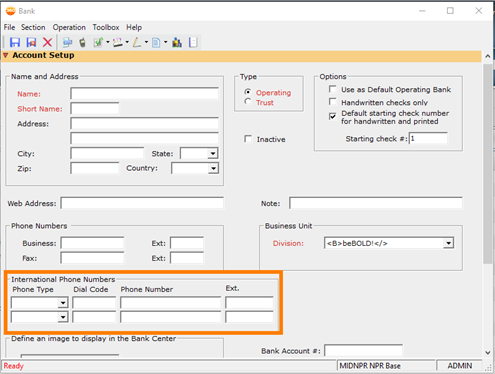
Bank: International Phone Numbers
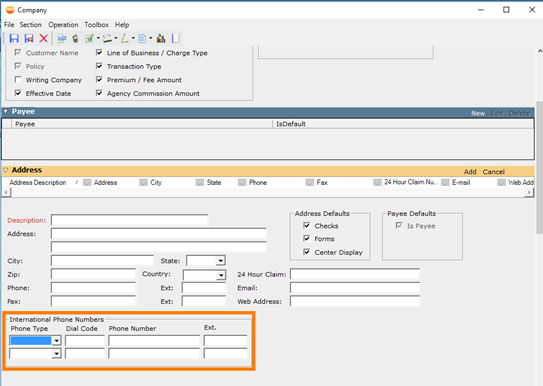
Company: International Phone Number
Before
Country Codes and International Addresses were tracked in domestic Address fields making it hard to differentiate between International and domestic entities.
Now
We are adding a Country Code drop-down which does not allow you to select a State or Canadian province in addition to a foreign country. We are adding this drop-down to the following areas in AMS360:
-
Bank Account Setup
-
Broker Name and Address
-
Broker Address
-
Company Address
-
Customer Setup
-
Customer Contacts
-
Company Address
-
Writing Company
-
Employee Name and Address
-
Policy First Named Insured
-
Policy Personal Co-Insureds
-
Policy Commercial Supplemental Names
-
Policy Contacts
-
Policy Commercial Locations
-
Vendor Name and Address
-
Vendor Address
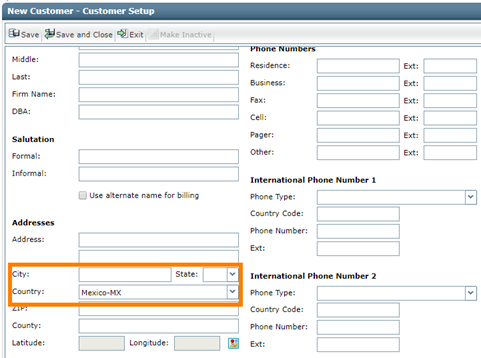
Country Codes: Customer Set Up
|
The Country Codes will not be map to ACORD forms. |
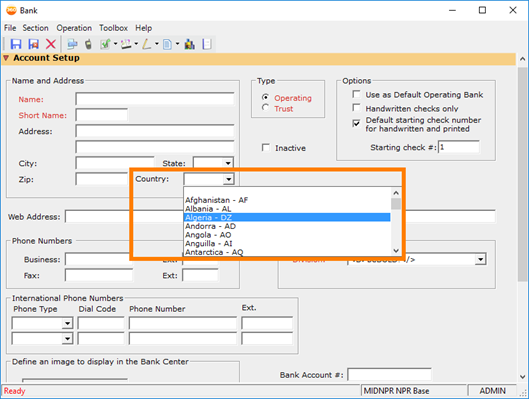
Country Codes: Bank
COUNTRY CODES BUSINESS RULES
-
If you select a State/Canadian Province and try to select a Country that is not the United States or Canada, then the State drop-down will clear out automatically.


Country Codes: Business Rules
-
If you have a country selected that is not the United States or Canada, and select a state or Canadian province then the Country drop-down will select the U.S. or Canada automatically.


Country Codes: Business Rules
Before
You could only cycle through Activities using Next/Previous buttons by using the Activity View, Activity Grouping feature.
After
The Next/Previous buttons are now available when opening an individual activity. This provides viewing convenience no matter the user workflow.
The Next/Previous buttons will cycle through activities with respect to current View Filters. Next/Previous will only cycle through a maximum of 100 activities, which is consistent with the View capacity as well.
-
In the Customer center, select a Customer and click Activity in the Views section.

Views: Activity
-
Click the Date of one of the Activities. You will notice the Next/Previous buttons are now visible in the View Activity window. You can now cycle through your activities using the Next/Previous Buttons.

Activity: Date
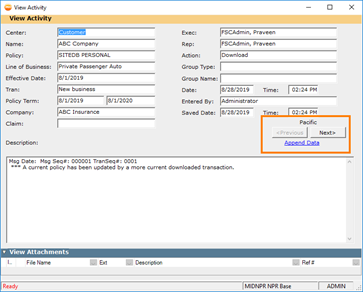
View Activity: Next/Previous
Before
When you were in Outlook, you could not create activities and suspense related to your email.
Now
You will now be provided with a feature that will allow you to create activities and suspense related to that email while in Outlook.
When you receive an email from a Customer, Customer Contact, Employee, Company or Vendor whose email is in AMS360, the Outlook Add-In tray will open allowing you to create an activity or an activity and suspense within AMS360. The name will be followed by the center that the email is found in. If an email has multiple names in AMS360, you use the drop down box to select the correct name – center that you want to create the activity for.
-
This feature is also available for outgoing emails
-
This feature will allow users greater efficiency and time saving steps by being able to address an email as it comes in instead of having to go into the system to take care of the activity

Outlook Add-in
SETTING UP OUTLOOK
-
In the Administration Center, click on the Utilities view on the left-hand side and then click on AMS360 Downloads.
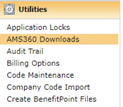
Utilities: AMS360 Downloads
-
At the bottom of the page you will notice the Outlook Add-in Section. Click on the AMS360OutlookAddin.msi download. Once downloaded, open and install the feature.

AMS-Outlook download
|
Close and re-open your Outlook browser so you can activate your new Outlook Add-in. |
-
When you open outlook you will now notice that the Add-in feature will appear below personnel that are registered as a Customer, Employee, or Vendor in AMS360.

Outlook Add-in
-
Enter the description of your Activity or Suspense and then click Save.
-
When you go back into AMS360 you will be able to see the new Activities/Suspense’s you created in Outlook.

Activities: E-mail In
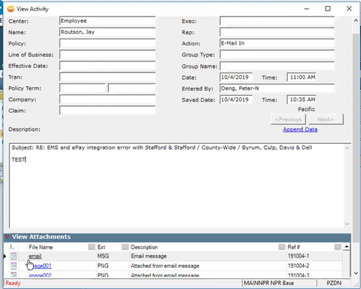
Activity from Outlook
Before
Agencies couldn’t track production credit for specific personnel.
Now
The new AMS360 Production Credit feature will provide you with the ability to assign 100% of the agency revenue to producers (or 200% when including reps).This will apply to policies and service agreements.
On a policy or service agreement, there is the option (setup for a division) to track agency revenue earned in a grid for Execs/Brokers and a separate grid for Representatives. The Production Credit grids are below the Personnel grid. The user will distribute 100% of the agency revenue to the Execs and Brokers and 100% to the Reps (or leave it blank if prefer to not use it.)
FEATURE DETAILS
-
In Agency setup for each Division, the user will enable Production Credit to allow a division to utilize the Production Credit feature
-
In the policy or service agreement, changes to the Personnel grid will update the Production Credit grids
-
The user will edit the allocation percent in the Production Credit grids. Assign 100% for Execs and Brokers, and 100% for Reps
-
On an invoice, you can edit the production credit percent or the amount and the other will auto-adjust accordingly
-
After posting the invoice, the GL posting Status column will identify the Production Credit rows which behave like a memo field and do not create a payable
-
All methods of Direct Bill will include Production Credit grids for tracking personnel revenue earned
-
Global Personnel Change will include a Production Credit update
-
A new Production Credit report will track by the revenue earned by personnel
BUSINESS RULES
-
Changing the Division setting for Production Credit will affect policies and service agreements created on or after the change date
-
The Production Credit allocation must be either zero percent (not allocating any Production Credit) or 100%
ADMINISTRATION DIVISION SETUP
-
In the Administration center in the Agency Overview section, click Edit Agency.

Edit Agency
- Click the Business Unit Setup dropdown, and then click Business Unit Setup.
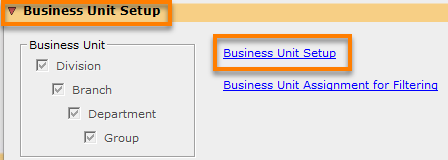
Business Unit Setup
-
Choose the division you would like to enable Production Credit on, and then click Edit.

Business Unit Setup: Edit
-
Check the box next to Enable Production Credit. When you do you will receive a new below message. Finally, click Update at the top of the winform and Save and Close your Agency Setup Winform.

Enable Production Credit
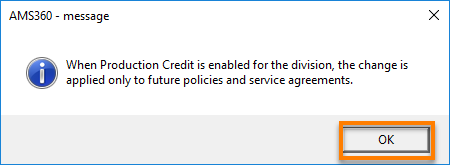
Production Credit message
PRODUCTION CREDIT – POLICY
-
In the Customer center, select a Customer. In the Policies section, click New Policy.
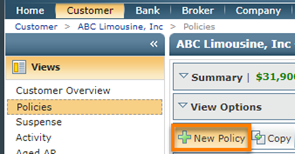
New Policy
-
Enter the info for your policy and click Ok.
-
In the Policy winform, click the Basic Policy Info dropdown.

-
Scroll down and click the Personnel dropdown to reveal the Production Credits section.
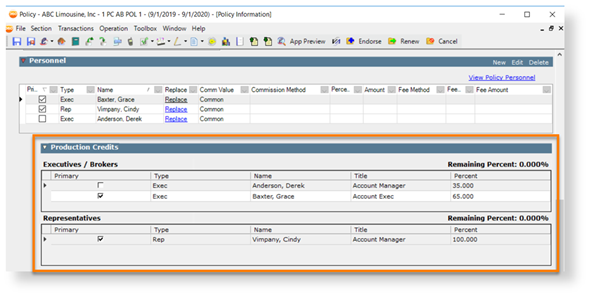
Policy: Production Credit
-
From here, you can type the Percent amount in both the Executive/Brokers and Representatives sections. It’s important to note that you can only assign either 0% credit or 100% credit in each section. You have the ability to split the 100% in any way as long as the Remaining Percent equals 0.000%.
-
You will see the production credit in Red if you have any remaining percent leftover and you will not be able to continue.
-

Policy: Production Credit
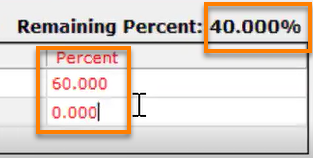
Remaining Percent
-
You can either Save and Close or begin the steps to create an Invoice with Production Credit.
PRODUCTION CREDIT – INVOICE
-
In your Policy winform, scroll to the Additional Policy Information section and enter your Commission info.
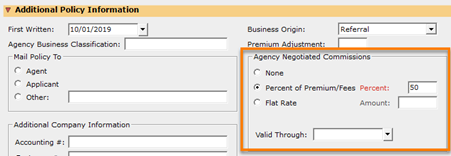
Commission Info
-
Scroll down and click the Transaction Premiums/Billing dropdown. Scroll down again and click Create Invoice.
-
In the Standard Invoice winform, highlight your invoice transaction and then click Edit.

Standard Invoice: Edit
-
Here you have the ability to adjust your production credit as the amount each personnel can receive. When you are ready, click Post.
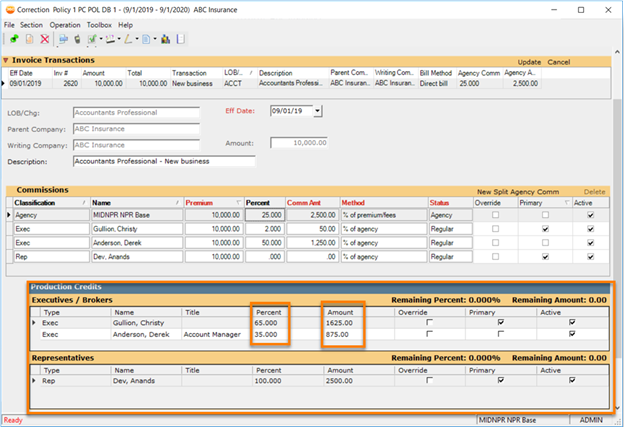
Production Credit: Invoice
PRODUCTION CREDIT – REGISTER VIEW
-
In the Customer center, select a Customer. In the Register section, expand the policy you created with Production Credit, and then click the View General Ledger postings button.

View General Ledgers
-
In the GL Postings winform, you will now notice that the status column will indicate if the policy features Prod Cred (Production Credit).
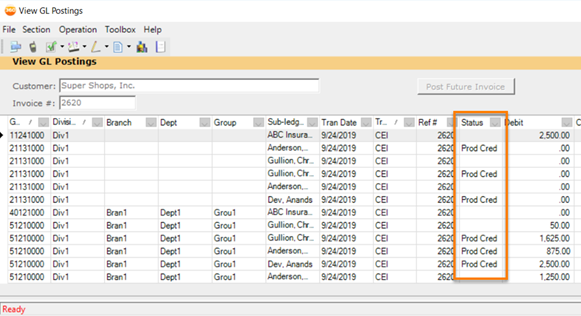
GL Postings: Status
PRODUCTION CREDIT – DIRECT BILL
-
In the Customer center, select a Customer. In the Policies section, click New Policy.
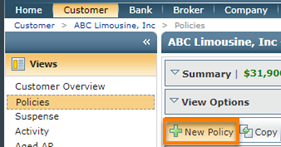
New Policy
-
Enter the info for your policy and click Ok.
-
Next, in the Policy winform, scroll down to Line of Business and Add a Line of Business, then click Add.

Line of Business
-
In the Policy winform, scroll down to Transaction Premiums/Billing and enter a Transaction Premium, then click Edit. Finally, click Update.

Transaction Premiums
-
Scroll up to the Basic Policy Info section. Now scroll to the Additional Policy Information section and enter your Commission info.
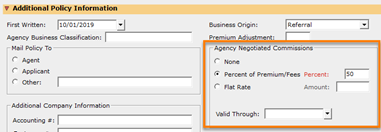
Commission Info
-
Scroll down and click the Personnel dropdown to reveal the Production Credits section. This time click New to add personnel.

Personnel: New
-
Add the personnel info and click OK.
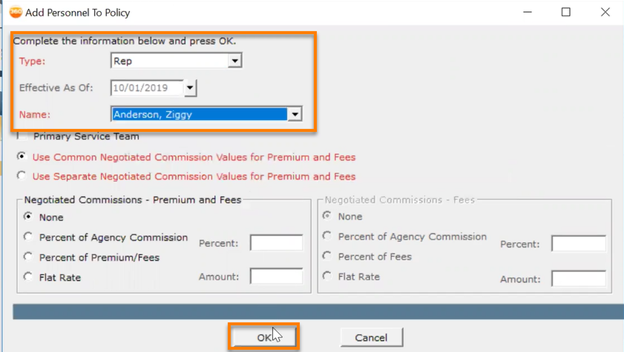
Add Personnel
-
You will notice your new personnel and can assign Production Credit accordingly. You can add as many personnel as you want. Click Save and Close when ready.

Production Credits
-
Navigate to the Company Center, then select a company. In the Actions view, click Direct Bill Entry.
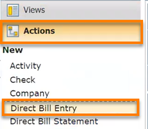
Direct Bill Entry
-
Enter the relevant info in the Direct Bill Entry winform, and then click Create Statement.
-
Under the Direct Bill Detail dropdown, click New.

Direct Bill Detail: New
-
Choose Policy System under Find Policies from, type the name of the company you are using, and then click Search.

Direct Bill Detail: Find Policies
-
Click the relevant customer and then hit Select.
-
You will now be able to select the appropriate Policy # and Transaction Premium.

Policy # and Tran Premium
-
If you scroll down, you will now be able to see the Production Credit info.

Production Credit
- When you are ready, scroll back up and click Add, then click Ready to Post. Finally, when you are finished, click Post.

Direct Bill Detail: Add

Direct Bill Detail: Ready to Post
PRODUCTION CREDIT – SERVICE AGREEMENT
-
In the Customer center, select a Customer. In the Service Agreements section, click New Service Agreement.
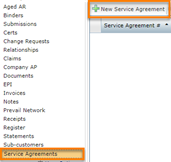
Service Agreements
-
In the New Service Agreement winform, fill in the required info and click Save.
-
Expand the Service Personnel dropdown to see the production credit section.
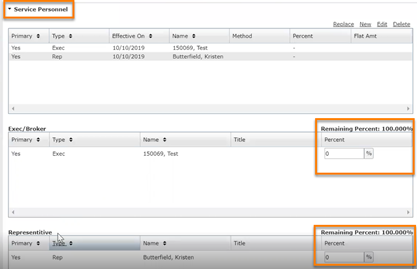
Service Agreement: Production Credit
-
From here you can add, edit or delete your executives, brokers and representatives on your service agreement. You can also assign production credit by clicking the Percent box.

Production Credit
-
Scroll up and click Create Invoice to make any final adjustments on your invoice. Click Post to finish your Service Agreement.

Create Invoice
Production Credit Report
-
Open up Classic Reports, search for and click the Production Credit report.

Production Credit
-
Fill in the relevant information in the Production Credit winform, then click Generate. You will be taken to the Production Credit Report in Excel.
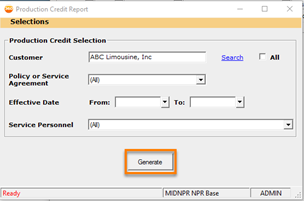
Production Credit Report
Before
You could create a new policy with inactive business units and/or personnel without being warned. Unless you are diligent about checking for inactive entities, this could lead to inaccurate information on the policy record.
Now
AMS360 will automatically check for inactive business units and personnel when you attempt to create a new policy record. If an inactive business unit or personnel is found, you will be forced to choose a new active entity before proceeding with the creation of the new policy.
Two new UI components are included in the Create New Policy winform:
-
Business Unit (Division, Branch, Department, Group)
-
Personnel (Executive, Representative, Broker)
The business unit and personnel information are first pulled from the Customer that the policy is being created under. Then, AMS360 evaluates the entities to check if they are active. You will then be able to modify the business unit or personnel information prior to policy creation. The user’s choices will persist in the basic policy information.
-
In the Customer center, select a Customer and click New Policy.

New Policy
-
When you enter the data of the required fields, you will notice that any time you proceed with an inactive entity, the field will become blank. You will not be able to continue until you enter an active field.
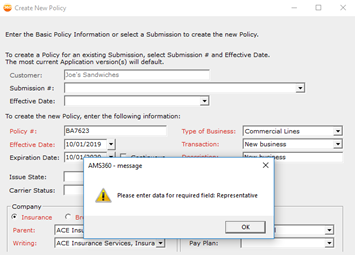
Required Field Warning
Before
When copying, renewing, or rewriting a policy with inactive additional personnel associated, the new policy record that was created would contain inactive additional personnel. This would lead to stale and inaccurate data being carried over multiple policy terms unless the agency was diligent about checking their data.
Now
Agency administrators have a new configuration that enables them to enforce a rule to automatically remove inactive additional personnel from new policy records as a result of a copy, renew, or rewrite transaction. This will help agencies maintain clean and accurate data.
NEW POLICY CONFIGURATION OPTION IN ADMINISTRATIVE CENTER
Agency admins will see a new left-hand navigation menu item under the Customer/Policy section called Policy Configuration. This new tab will display a page containing a checkbox that allows the user to turn this new rule on or off. The default for the new configuration is false, so if agencies take no action, functionality will continue to work as it does today. If the agency admin sets the new configuration to true, the rule will be enforced for the entire agency and all policy transactions. This new configuration is secured with a secured item.
-
Click into the Administration center. Click Customer/Policy on the left-hand side of the screen, then click Policy Configuration.
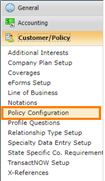
Policy Configuration
-
Check the box to Remove inactive additional personnel, then click Save.

Policy Configuration: Remove inactive personnel
EXPERIENCE WHEN PERFORMING A TRANSACTION ON A POLICY
When the rule is enforced at the agency level, and an agency employee performs a transaction on a policy (copy, renew, rewrite), they will be presented with a dialogue message that indicates inactive additional personnel have been removed from the new policy record. The dialogue message goes into detail to list the name of the additional personnel that were removed. The user only has the ability to close the dialogue message, and does not have the ability to revert action or override the rule.
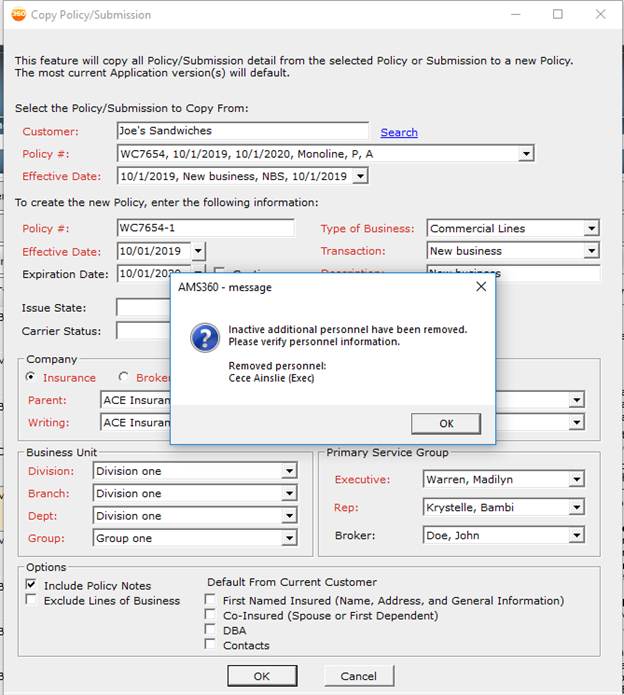
Inactive additional personnel
Before
When downloading transactions or new business that would result in a new policy record getting created in AMS360, the download process would allow new policy records to be created with inactive business units or primary personnel. This resulted in agencies retaining inaccurate data when using download.
After
Given the agency configures download to perform this check, AMS360 will identify any download that will result in a new policy record being created with an inactive business unit or primary personnel and send this download to the Assign winform. The user then has the opportunity to see which business unit or personnel entity was inactive and choose a new active entity.
NEW POLICY CONFIGURATION OPTION IN ADMINISTRATIVE CENTER
The Policy Configuration page will contain a new option. The agency can choose to check this new option in order to enable the new logic during the download process. Leaving the box unchecked (the default state) will retain current AMS360 functionality.
-
Click into the Administration center. Click Customer/Policy on the left-hand side of the screen, then click Policy Configuration.

Policy Configuration
-
Check the Do not download polices with inactive entities box, and then click Save.
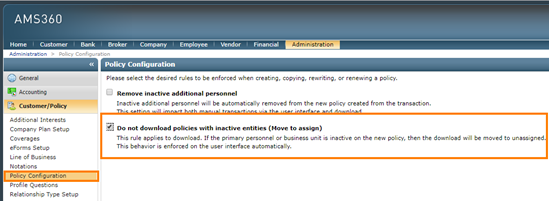
Policy Configuration: Do not download inactive entities
-
If the configuration option is selected, new fields will be available in the Assign winform.
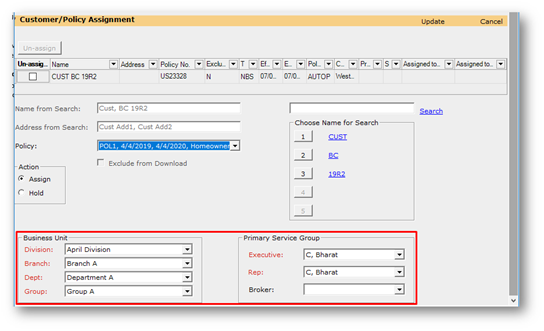
Assign Winform: New Fields
-
If an entity is inactive and a download gets sent to assign, the corresponding drop-drown list will be blank.
-
For example: In the case below, the downloaded policy was sent to assign because the Exec is inactive in AMS360 and the user must select an active Exec before downloading the policy. You will only be able to choose from a list of Active Executives.
-
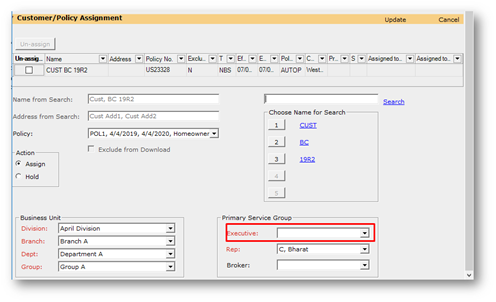
Assign Winform: Inactive User
|
Note: If there are no inactive entities on the downloaded policy, the download will not be sent to assign. If a new policy record is not created from the download, the download will not be sent to assign. The Download report in Classic Reports and My Agency Reports will contain entries when AMS360 catches downloads that will result in policy records being created with inactive entities. These entries notify you that an inactive entity was identified during the download. |
Before
The Service Agreements total contract value estimation was not being written in the revenue recognition report, this lead to large amounts of negative unbilled revenue.
Now
Service Agreement total contract value estimations will be written to the report, this will lead to accurate calculations.
-
Open up Classic Reports, search for and click the Revenue Recognition – Employee Benefits report.
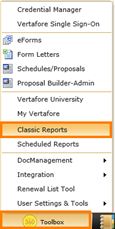
Classic Reports
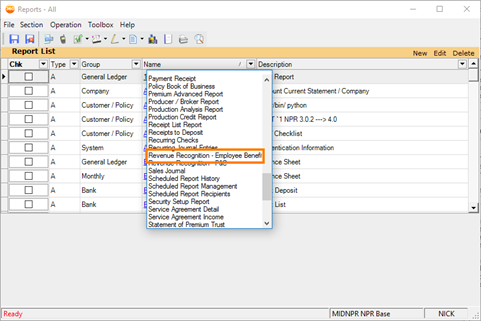
Revenue Recognition – Employee Benefits
-
In the Revenue Recognition – Employee Benefits winform, enter the data you want to show up in the report and click on Generate.

Generate
-
Once you are in Excel, navigate to the Editable Revenue Recognition Report tab.

Revenue Recognition Report (Edit)
-
This report will now feature any service agreements that fell during the time period you selected.
-
You will also notice that we modified the Estimated Annualized 12 Months Revenue column (AB).
-
The amount in these fields come from the Service Agreements in AMS360.
-
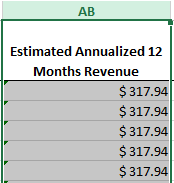
Estimated Annualized 12 Months Revenue
NEW STATUS TYPES
-
You will now have more options when selecting a Status type on a Service Agreement.
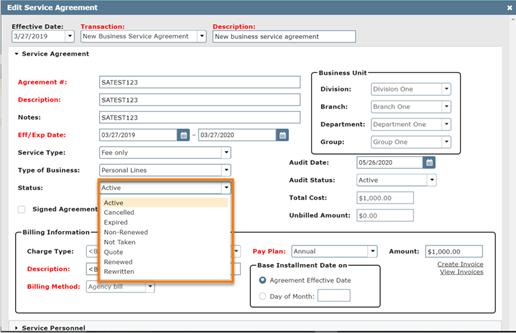
Service Agreement: Status
ENDORSE
-
You will now have the ability to endorse a Service Agreement.
-
Once in the Customer Center, navigate to the Service Agreements section, click and highlight a service agreement and then click on Endorse.
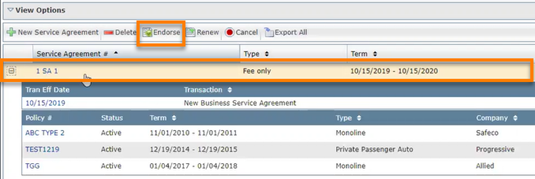
Service Agreement: Endorse
-
Enter a Transaction type, Effective Date and Description for your Endorsement. Finally click on OK.
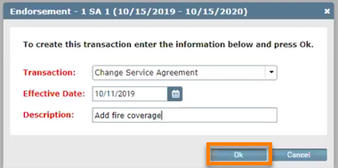
Service Agreement: Endorse
RENEW
-
You will now have the ability to renew a Service Agreement.
-
Once in the Customer Center, navigate to the Service Agreements section, click and highlight a service agreement and then click on Renew.
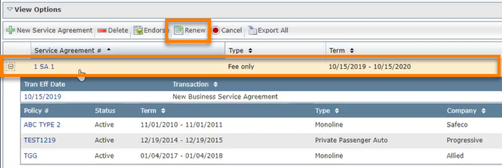
Service Agreement: Renew
-
In the Renew Service Agreement winform, you will see that the Eff/Exp Date auto populates with the next calendar years info. Fill in the rest of the relevant info and click on Save & Close.
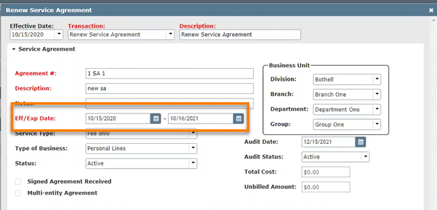
Service Agreement: Renew
CANCEL AND REINSTATE
-
You will now have the ability to cancel or reinstate a Service Agreement.
-
Once in the Customer Center, navigate to the Service Agreements section, click and highlight a service agreement and then click on Cancel.
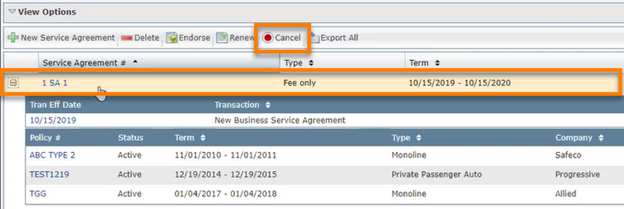
Service Agreement: Cancel
-
Enter a Transaction type, Effective Date and Description for your Cancellation. Finally click on OK.
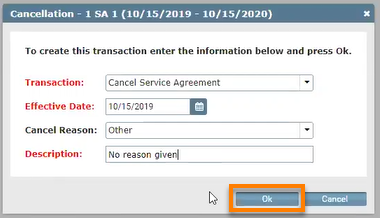
Service Agreement: Cancel
-
To Reinstate a canceled Service Agreement, click and highlight the canceled service agreement then click on Cancel.

Service Agreement: Reinstate
-
In the cancellation winform you have the option to choose Reinstate Service Agreement in the Transaction drop down. Enter an Effective Date and Description for your reinstatement. Finally click on OK.
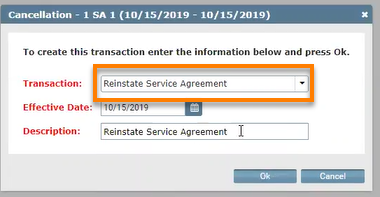
Service Agreement: Reinstate
ACORD
Before
When you copied a holder from the winform toolbar on the Holder Detail winform, waivers of subrogation, attachments, and the method of distribution for the holder were not copied to the new holder record.
Now
All three pieces of information will now be copied over to the new Holder. You will have the choice to copy attachments and the Waiver of Subrogation choices. In agency configuration, if your agency disables the opportunity to copy waivers of subrogation, you will not have this opportunity when copying holders from the toolbar.
-
In the Customer center, search and select a customer. Then, select a policy.
-
Click on the eForms Manager drop down and click on eForms Manager.
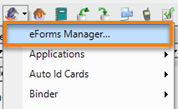
eForms Manager
-
Right click on an eForm and then click on Add/Edit Holder.
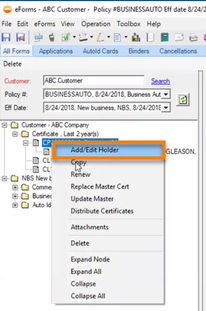
Add/Edit Holder
-
Click on the new Copy Holder button on the toolbar.

Copy Holder
-
You have the option to include Copy Waiver of Subrogation Selections and Copy Attachments. When ready, click OK.
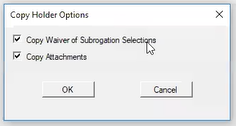
Copy Holder Options
Before
When you would go into the ACORD 140 Commercial Property under Additional Underwriting and select Heating Boiler on Premises and then select the dial button as yes the form would show an X in the Heating source box when it should have been putting an X in the Boiler box.
Now
The ACROD 140 will now show an X in the boiler field.
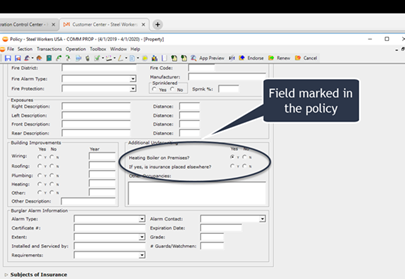
ACORD 140: Field Marked
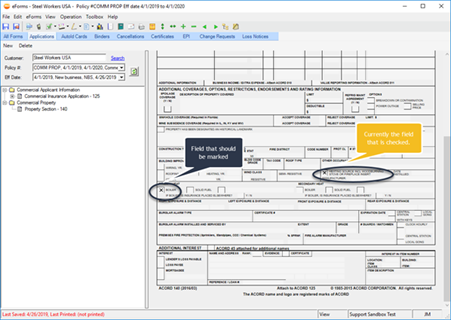
ACORD 140: Update
Now
This new form was developed in response to a Notice of the State of California, Department of Insurance.
This Notice requested the cessation of collection of responses regarding Disability and Age on ACORD Form 130.
Now
ACORD has updated the ACORD 130 FL (2019/07).
UPDATES TO FL ACORD APPLICATION:
-
New ACORD Logo: ACORD Explanation of Changes 06-30-2019
-
Page 3 of 3, delete Any Person…. Under the Law on the top of the page and added:
-
THE FILING OF AN APPLICATION CONTAINING FALSE, MISLEADING, OR INCOMPLETE INFORMATION PROVIDED WITH THE PURPOSE OF AVOIDING OR REDUCING THE AMOUNT OF PREMIUMS FOR WORKERS' COMPENSATION COVERAGE IS A FELONY OF THE THIRD DEGREE, PUNISHABLE AS PROVIDED IN S. 775.082, S. 775.083, OR S. 775.084.
-
Page 3 of 3, delete the Notary Public Signature on the bottom of the page and add for both the owner/officer signature and producer’s signature section: Under penalties of perjury, I declare that I have read the foregoing document and that the facts stated in it are true.
-
Added: “Incorporated by Reference in Rule 69O-189.003” above ACORD 130 FL (2019/07) on each page of the form.
-
Revise Copyright dates to 2019 and date of Form.

ACORD 130 for FL
Before
The ADOT code was not required on ACORD 50 AZ Auto Id Cards.
Now
Arizona has new laws on the books about the ADOT code being required to be listed on the ID cards. Each company has their own ADOT code. In the Auto Id Card form the number is the DMV #.
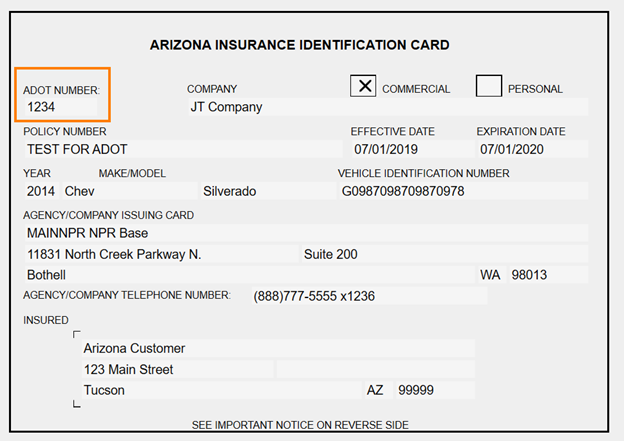
ACORD 50 AZ Auto ID Card
Now
ACORD has updated the ACORD 50 TXAUTO ID Card.
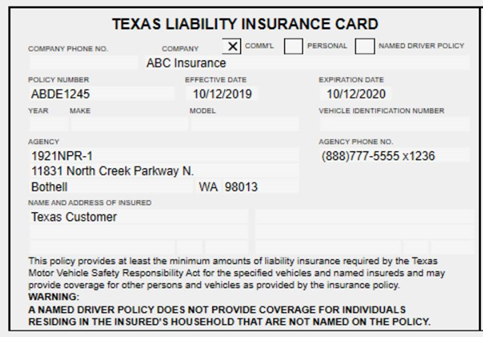
ACORD 50 TX Auto ID Card
Accounting
Before
Journal entries can only be made between GL accounts within a single division
Now
You now have the ability to move funds between agency divisions. This feature is another step towards inter-divisional accounting support.
BUSINESS RULES:
-
This functionality introduces changes to the Other GL Accounts section in the Journal Entry winform
-
The main business unit division at the top of the Journal Entry winform acts as the ‘Source’ Division, meaning where the money is coming from
-
The division selected in the Other GL Accounts voucher acts as the destination division, meaning where the money is being routed to
-
Journal Entry credits and debit balances still need to equal 0 in the Journal Entry winform
-
Business unit security continues to be enforced
-
This functionality applies to Journal Entries in all centers
JOUNRAL ENTRY ENHANCEMENTS
-
In the Financial Center, click on the Action view on the left-hand side and then click on Journal Entry.
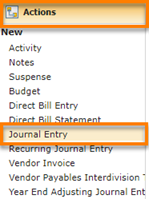
Journal Entry
-
In the Journal Entry Winform, create a New GL Account.

New GL Account
-
You can now transfer money between divisions within your agency by transferring money in the GL account. From the GL# dropdown, select and account.
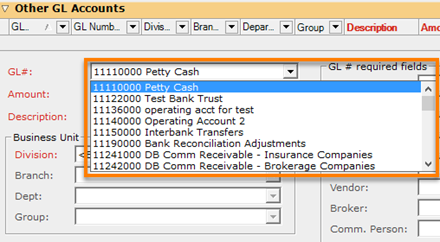
GL# Dropdown
-
Enter the amount, description and then choose the division you want the money transferred to. Finally, click on Add.
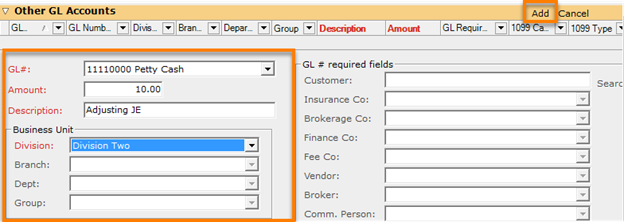
Adding a GL Account

New GL Account
-
You’re credits and debits must balance out to zero in order to post this Journal Entry.
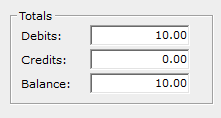
Journal Entry Balance
-
Create another New GL Account. Then Select the previous GL# from the dropdown, and enter the amount from before with a ( - ) sign. Finally select the division that your previously moved money from and click on Add.

Adding a GL Account
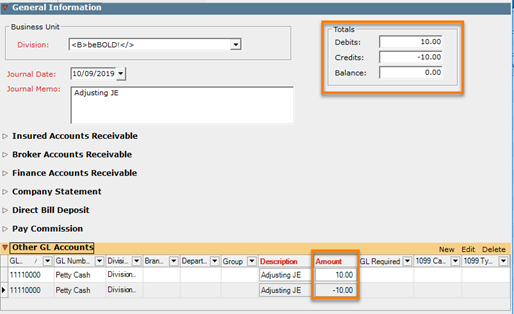
Balanced GL Account
-
You can now Post your Journal Entry.
Reporting
Before
The current revenue recognition report is tailored to direct bill use cases, specifically in regards to services based revenue (ie. Employee benefits).
Now
The P&C revenue recognition report is now tailored to agency bill use cases where all revenue is considered 100% binding revenue, recognized when the policy becomes effective.
HIGHLIGHTS
-
Secured using a new secured item
-
Available as an Excel export from Classic Reports winform
-
Contains various filtering capabilities including Date, Business Unit and Line of Business filtering
-
Ability to export editable or locked sheets alongside a cover sheet
-
Report displays results at a policy transaction level. If a single policy contains multiple lines of business, then multiple rows will be present on the report.
-
Report results display some basic policy information such as customer name, business unit, policy number, effective date, expiration date, line of business, and estimated revenue
-
User has the ability to specify a date to run the report against. Policy records with an effective date between the specified date and January 1st of the prior year will be returned
-
Business unit splits are supported
-
Report displays the billed revenue and unbilled revenue dollar amounts per policy transaction
-
Report contains logic to provide totals for billed and unbilled revenue
CLASSIC REPORTS
-
Open up Classic Reports, search for and click the Revenue Recognition –P&C report.

Reports: Revenue Recognition P&C
-
Fill in the relevant information in the Revenue Recognition winform, then click Generate.
-
You can include non-premium transactions (agency fees) by checking the box.
-
You also have an option to make the excel sheet locked or editable and can include a cover sheet.
-

Revenue Recognition P&C
COVER SHEET
-
You’ll notice the Date and Time of the report as well as the Agency’s Name.

Revenue Recognition P&C: Excel
-
Next you’ll see the Prior Calendar Year and the Current Calendar Year up to the current date of the report.

Revenue Recognition P&C: Excel
LOCKED REPORT
-
This is a protected sheet that cannot be edited.
-
Filtering and editing is not possible in this sheet
-

Revenue Recognition: Locked Sheet
EDITABLE SHEET
-
This sheet has the same info as the above report except you have the ability to filter and make edits.

Revenue Recognition: Editable Sheet
-
3. Columns A-K is your classic report info.
-
1 row per transaction
-
Column K is where you will find Estimated Revenue info (This info is populated in the Policy Transaction Premiums section)
-
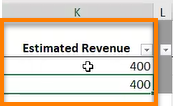
Estimated Revenue
-
Columns M and N represents all billed and unbilled revenue associated to transactions on policies effective in the prior year.
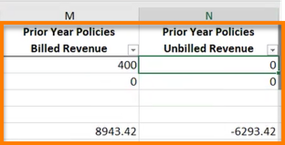
Billed & Unbilled Revenue: Prior
-
Columns P and Q represent all billed and unbilled revenue associated to transactions on policies effective in the current year.
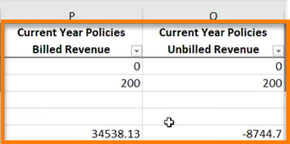
Billed & Unbilled Revenue: Current
-
Columns S and T represent all billed and unbilled revenue associated to transactions on policies effective in the prior and current year.
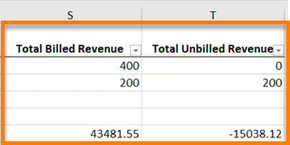
Total Billed & Unbilled Revenue: Prior to Current
|
Example: Assume we have a policy term that runs from 11/01/2018 to 11/01/2019, and the P&C report is run for 10/01/2019. All billed revenue will be logged in the Prior Year Policies Billed Revenue column because the policy is effective 11/01/2018, even though some revenue may have been billed in 2019. |
Before
Agencies were lacking common filtering mechanisms in the Future Invoices Report.
Now
Three new filtering capabilities have been introduced: Line of Business, Agency Fee, and Installments.
-
This logic applies to both the CSV report and the Crystal report
-
The default states for the three different filters added are different per filter:
-
For the Line of Business filter, the default is that all lines of business will be included in the report.
-
For the Include Agency Fees filter, agency fees will be included by default (no change from AMS360 19R1 behavior). The checkbox is set to true by default.
-
-
For the Installment Invoices Only filter, the default is that both installment invoices and non-installment invoices will be included (no change from AMS360 19R1 behavior). The checkbox is set to false by default.
-
The Crystal reports cover page and the CSV report will contain updated filter information to include the new filter choices
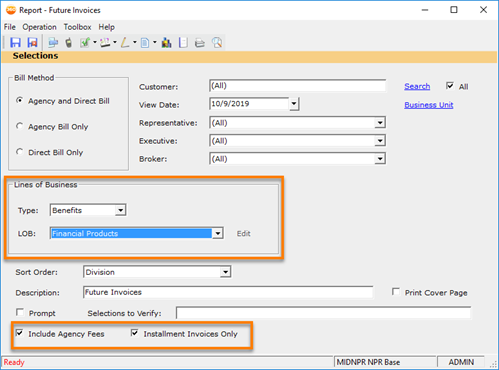
Future Invoices: New Filters
NEW CLASSIC REPORT FILTERS
-
Open up Classic Reports, search and click on the Future Invoices report.

Future Invoices
-
You will notice that you can now filter your invoice by Line of Business, you have the option to include/exclude agency fees, and you have the ability to show/hide installment invoices.
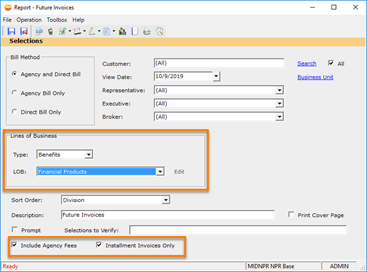
Future Invoices: New Filters
Before
When running the Cash Receipt Journal report from Classic Reports, a user could not filter by the receipt payment type.
Now
A user can return receipts of a specified type and produce a more granular Cash Receipt Journal report.
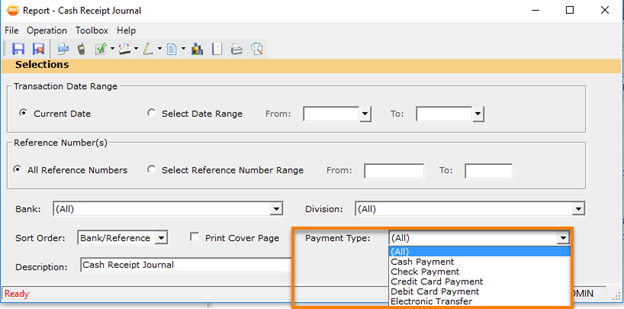
Report: Cash Receipt Journal: New Filters
-
This new filter is functional for the Crystal and CSV output of the report, and the user’s filter choice will be listed on the report cover sheet.
PAYMENT TYPE FILTER OPTIONS:
-
(All) – This is the default option and will return all types in the report
-
Cash Payment
-
Check Payment
-
Credit Card Payment
-
Debit Card Payment
-
Electronic Funds Transfer (EFT)
Before
There was no way to track International entities in AMS360 reporting. All of our List reports utilized an outdated version of Crystal Reports
Now
These reports are being converted to Open XML, instead of crystal reports, and the data is being added for International Phones, Country Codes, Referrals, Payees and a column denoting if the entity is International. You will still be able to export to CSV, but no new data was added to this method of exporting reports.
-
Bank List
-
Int'l Phone 1 & 2
-
Int’l Country Dialing Code 1 and 2
-
Country
-
International Column
-
-
Broker List
-
Int'l Phone 1 & 2
-
Int’l Country Dialing Code 1 and 2
-
Country
-
International Column
-
A Second Sheet for Payees/Addresses
-
-
Company List
-
Int'l Phone 1 & 2
-
Country
-
Payees
-
-
Customer List
-
Int'l Phone 1 & 2
-
Int'l Country Dialing Code 1 and 2
-
Country
-
International Column
-
Referral Name
-
Referral Location
-
-
Employee List
-
Int'l Phone 1 & 2
-
Int'l Country Dialing Code 1 and 2
-
Country
-
International Column
-
-
Vendor List
-
Int'l Phone 1 & 2
-
Int'l Country Dialing Code 1 and 2
-
Country
-
International Column
-
A second sheet for Payees/Addresses
-

Bank List Report
EXPORTING REPORTS WITH INTERNATIONAL DATA AND PAYEES
-
Click on Classic Reports in the Toolbox on the bottom left.
-
Click on one of the reports listed above to generate an XML report with International Data and Payee information.
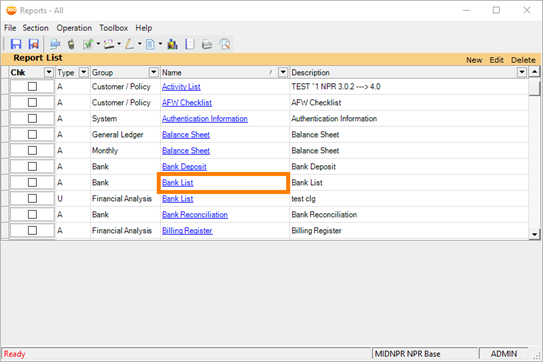
Reports: Bank List

Bank List Report
COMPANY REPORT
The Company Report is a new report that has all the information from the previous company "list" report but with many new additions:
-
Main Report
-
Int'l Phone
-
Country
-
International Column
-
-
Addresses (separate sheet)
-
Int'l Phone 1 & 2
-
Int'l Country Dialing Code 1 and 2
-
Country
-
International Column
-
-
Writing Companies (separate sheet)
-
Country
-
International Column
-
-
Master/Sub code (separate sheet)
-
Personnel (separate sheet)
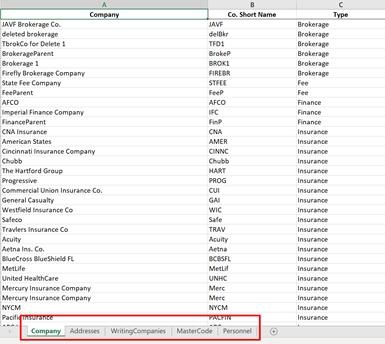
Company report
|
Note: If agency users are part of a permanent Security Group in AMS360 that cannot be modified, the group will need to be copied into a non-permanent group before access can be modified. Please contact support for assistance setting up new Security Groups. |
|
|
From here you can click Save, but once you do it will not be possible to remove the attachments that were just added. Before you click Save, be sure about what attachments are getting added to your activity. |
Before
The Service Agreement Detail report did not contain the Customer Number.
Now
Service Agreement Detail (Classic Report) now has a column that displays Customer Number.

Customer # column
-
From AMS360, click the Toolbox and then click Classic Reports.
-
Click the Name drop-down and scroll down to click Service Agreement Detail.

Service Agreement Detail
-
Fill in your info and click on Generate. You’ll now see a new column in your report for Customer #.
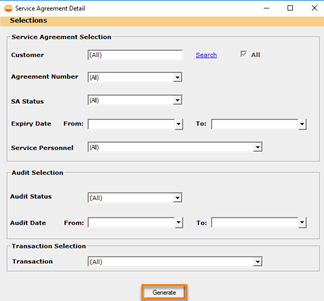
Service Agreement Detail: Generate
Before
When running the Employee List report, you could not see information related to User Access Type, SSO Status, or Employee Id. This led to agencies struggling to keep track of which users were VSSO enabled and which were utilizing full licenses.
Now
Five new columns have been added to the Employee List report in AMS360 Classic Reports to help agencies identify license information for employees.
NEW COLUMNS ADDED:
-
Access Type
-
O = Online
-
S = Service Only
-
-
SSO Status
-
R = Registered
-
U = Unregistered
-
P = Pending
-
-
Business Unit Access Group
-
Displays the full business unit information for the employee
-
-
Employee Id
-
Entered Date
ACCESSING THE NEW COLUMNS
-
From AMS360, click the Toolbox and then click Classic Reports.
-
Click the Name drop-down and scroll down to click Employee List.
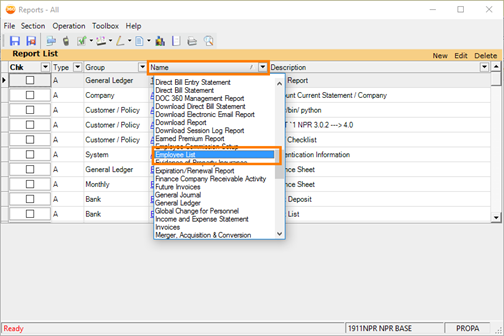
Employee List
- Once Employee List is selected, check the box next to the report. Click File and then click Create CSV.

Employee List: Check Box
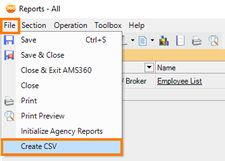
Employee List: Create CSV
- Once generated, you will be able to scroll over and see the new columns added.

Employee List: New Columns
WSAPI Change
Before
A user making a WSAPI 2.4 request to create or update a policy record could not successfully set or change the Business Origin value.
Now
A user making a WSAPI 2.4 request to create or update a policy record can successfully set and update the Business Origin value on the policy.
The Business Origin property in the request body takes a string value and is an optional field
-
The string must be a valid Business Origin Code. The valid Business Origin codes can be retrieved from the existing WSAPI 2.4 service to GET List Setup codes.
-
If the Business Origin code fails validation, then the request will fail and the policy will not be created or updated
-
The Business Origin needs to be ‘Active’ in the system
-
Exception: If the user is making a PUT request and not changing the Business Origin value, then it is OK if the value is ‘Hidden’ in AMS360
-
-
Example Below: On the left, you will find an attribute named BusinessOrigin in the <Policy> section. On the right is a response code sent back indicating that the policy was successfully updated
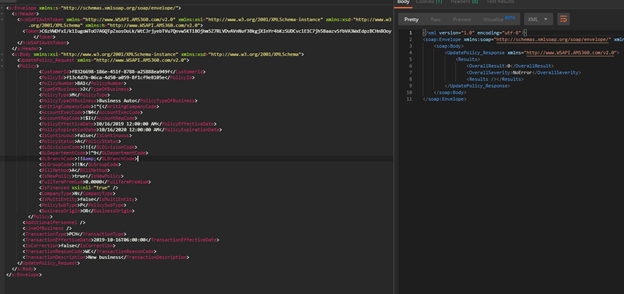
Business Origin Code
|
BenefitPoint will need to uptake this change before any functional changes can be realized in the BenefitPoint product. |
-
Performance fixes
-
Classic reports – Exp/Renewal, PA, PBOB, Income/Expense
-
Suspense view in the home center
-
Policy Assign
-
MAR reports
-
API calls
-
-
Customer Statement duplicating information
-
Master certificate Description of Operations – If unchecked and you remove the text still showed
-
Loading Forms issues – Created some better error messaging.
-
We will continue work on creating better error messages
-
19R2 Service Pack 5 (2020)
-
The Representative did not carry through on AFW_PolicyPersonnel during the Copy/Renewal process
-
Production Credit Percentages for Primary Exec & Rep did not carry over when copying a policy with Production Credit
-
Allow changes to user licenses when all available licenses are allocated
-
Unable to Renew Policy for large policies in some cases
-
Changed International Column values from T/F to Y/N for the Customer List report
-
AMS360 17R1 Client - Customers were stuck on the page "Connecting to local Services.."
-
Billing Charges kept being deleted after 19R2 Service Pack
-
The Revenue Recognition report contained many repeated rows, this lead to the report not running
-
Automated Distribution was pulling merge fields incorrectly
-
Production Credit enabled Direct Bill Entry with multiple policies, the remaining amount did not reflect the database agency commission percent changes
-
Automated Document Distribution was failing
-
Security Issue - Users were sometimes able to create/renew/rewrite policies without security access
-
ACC was pulling the wrong Agency if the Agency Number contained more than two digits after a dash "-"
-
Incremental ETL Releases now Supports New Agencies Enabling ETL
-
Revenue Recognition P&C Report: Future unposted invoices will not be included in the Billed Revenue columns
-
Global Change were removing Installments from the Billing Register
-
Some BenefitPoint statements were showing as partially posted in AMS360
- In the MAR Production Analysis report, the invoice for the GL Month field was reporting the inaccurate month
19R2 Service Pack 6 (2020)
-
When a policy is assigned to a new division, the production credit setting should reflect the new division
-
Cache issue - Value in the Division dropdown was not correct after updating in the Business Unit setup
-
A user, who did not have access to create a New Company per security settings, was still able to create a New Company in some cases
-
The Production Credit for Subscription Companies was not allowing different splits for different subscription companies (0 or 100)
-
For Direct Bill Entry, adjusting the Agency Income from the grid did not adjust the Production Credit as it should have
-
For Direct Bill Statement, adjusting the Agency Income from the grid did not adjust the Production Credit as it should have
-
For Direct Bill Entry, the Production Credit was not pulling the correct data to the subsequent statement using “Find Policies by Prior Statement”
-
For Direct Bill Entry, additional Production Credit lines from a previous policy were remaining when switching between transactions
-
Lockbox -The Multi Entity payment matching master customer was incorrect when only 1 sub-customer existed
-
Global Change was not able to complete successfully for policies with production credit
-
Incremental ETL releases did not support enabling ETL for new agencies causing incorrect zero value reports
-
When applying a check or receipt to the interdivision general ledger account, the voucher was blank on the posted check or receipt
-
The Bank Deposits quick report was not showing deposits made directly against the interdivision GL
-
You could not allocate a receipt using Lockbox when AR was set to Track Receivables at Sub-Customer and the receipt amount was full Pay
-
We added a Proposal Builder integration enhancement to share EmpCode and AgencyNo data
19R2 Service Pack 7 (2020)
-
The OK and Cancel options were missing in the Renew/ReWrite Winforms in the 19R2 release for some users with very low screen resolution settings
19R2 Service Pack 8 (2020)
- Personnel who did not have Production Credit were receiving a credit amount
- We added an update for penny rounding on Production Credit for invoices
- The Revenue Recognition Report was not running to completion for some large databases
- The OK and Cancel options were missing in the Renew/ReWrite Winforms in the 19R2 release for some users with very low screen resolution settings
- AMS360 was unable to locate image data for attachments
19R2 Service Pack 9 (2020)
-
Representative did not carry through on AFW_PolicyPersonnel during the Copy/Renewal process
-
Production Credit Percentages for Primary Exec & Rep were not being carried over when copying a policy with Production Credit
-
The Copy/Renew Production Credit Commission splits were wrong
-
Incorrectly Copying Policy Personnel Commissions
-
A person's drivers license was not saving when added to dependents
-
Vertafore Messenger was unable to match messages on multiple contacts
-
The Revenue Recognition report was not running to completion
-
The Additional Interest Type & Vehicle Body Type Form was unable to load
-
The Division list was not populated in the Word add in DocDesigner
-
New authorization has been allowed in EMS for 19R2 by adding AFW_AppAccessToAgency table
-
In the Download-Policy Assign Winform on the Search Section, we were seeing Code in the section bar
-
In Code Review, the ONS stopped processing B&B Notifications
19R2 Service Pack 10 (2020)
-
The Continuous Policy was showing an expiration date on invoices
-
Vertafore Messenger was unable to match messages on multiple contacts
-
The type of business was not saving on Service Agreements
-
The Check Voucher description was incorrect for the Fee Company Account
-
Customer statements were displaying the times of the policies
-
The AMS360 and ImageRight integration was not working for certain customers
-
The Billing Register was not reflecting Invoice Corrections
-
The Invoice Printout/Preview was duplicating information when there had been a change in Invoice Messages
19R2 Service Pack 11 (2020)
-
The Sales Center Rep was not retained on some of the download transactions
-
The service groups from the Customer Setup were being pulled into the renewed policies
-
The customer statement report was showing 01/01/9999 rather than continuous
-
My Agency Reports - The General Ledger field in the Production Analysis Report invoice was reporting an Inaccurate Month
19R2 Service Pack 12 (2020)
- Type of Business - Specific Primary Exec and Rep were not pulled from Customer Service Group setup.
- The Broker did not carry over from Submission to Policy.
- There was an age calculation/rate issue with PS Equine.
- There was an error when importing or exporting AL3 files and AL3 contained 5GNA.
- Future installments did not print on invoices printed in batches.
- Full-term increased premium alerts did not trigger for some downloaded policies.