
Add Custom Fields
You can add Custom Fields to Activity log subjects, Carrier contacts, Account Summary, and Account Contacts and Service Info pages within BenefitPoint. This topic describes how to create custom fields.
Custom fields are created by the Broker Admin. You must have this role and the permissions to create custom fields before proceeding.
- Using the You are logged in drop-down list select Broker Admin.
- Click Customize in top navigation menu.
- Using the Select Customization Area drop-down list, select one of the following areas: Account Summary, Activity Log, Carrier Contacts, Account Contacts, Service Info, and Plan/Product Info.

|
You cannot add a custom field to the Home Page Tabs. |
- Select Standard or Custom Fields in the drop-down list that appears next. The Customize page appears.
- Got to Tasks, and select Add Custom Section. The Add Custom Section appears.
- Choose the applicable selections for Account Classification and Section Name and click Save.
- Your Custom Field will appear in the bottom of the Custom Fields page.
- In the appropriate Custom Field go to the Action drop-down list and select Add Custom Field. The Add Custom Field page appears.
- Enter the Field Label, select Required, and choose the Field Type. These selections will appear as the page when its finished.
- You should now see the field Label Name below the custom field, check mark the Field Label name and click Preview.
- If there are no changes, click Finalize.
Once finalized, the field will appear in the section you choose and be ready for use.
Custom Activity Log Subjects
Activity Log Subjects allows you to customize the subjects that appear in the drop-down for users who track account activity. Subjects are used to categorize an Activity Log Record. For example, a firm can have a custom subject called “Green Apple” and then custom fields that will only appear once “Green Apple” is selected on the record.
The Activity Log provides the ability to track conversations, Requests, issues, steps taken, resolutions and time spent to manage accounts better by creating a history of service activity. It allows for better account or marketing group management by creating a history of service activity for each account or marketing group. It can be used to communicate with team members regarding ongoing, long-term issues and to house information conveniently in one place, accessible by all team members.
- Log on to BenefitPoint as a Broker Admin.
- On the top navigation bar, click Customize.
- In the Select Customization Area, from the first drop-down select Activity Log. A second drop-down appears.
- Select Custom Fields.
- Click Tasks and select Add Custom Section.
- Select the Activity Log Subjects.
- Enter the Section Name.
- Scroll the Custom Fields list and locate the field you just added.
- From the Action drop-down list select Add Custom Field.
- Enter the Field Label, for Required, choose Yes or No.
- Select Field Type. Depending on your selection, more options will appear.
- Complete the section and click Save.
To customize Activity Log subjects in the Subject drop-down:
- Log on to BenefitPoint as a Broker Admin.
- On the top navigation bar, click Brokerage Info.
- On the top navigation submenu, click Activity Log Subjects.
- Scroll to the Add Activity Log Subject section.
- Enter a Name for the subject.
- Click Save. Subjects are added to the list in alphabetical order.
To modify a customized Activity Log subjects in the Subject drop-down:
- Log on to BenefitPoint as a Broker Admin.
- On the top navigation bar, click Brokerage Info.
- On the top navigation submenu, click Activity Log Subjects.
- From the top navigation menu, click Brokerage Info.
- From the Brokerage Info submenu, click Activity Log Subjects.
- Click the Name of the appropriate Activity Log Subject.
- Enter a new name for the subject.
- Click Return. Subjects are displayed in the list in alphabetical order.
To inactivate existing Activity Log subjects in the Subject drop-down:
- Log on to BenefitPoint as a Broker Admin.
- On the top navigation bar, click Brokerage Info.
- On the top navigation submenu, click Activity Log Subjects.
- From the Select List View drop-down, select Inactive and click Update to view all inactive Activity Log Subjects.
- Click Activate next to the appropriate subject.
To inactivate existing Activity Log subjects in the Subject drop-down:
- Log on to BenefitPoint as a Broker Admin.
- On the top navigation bar, click Brokerage Info.
- On the top navigation submenu, click Activity Log Subjects.
- Click Inactivate next to the appropriate subject.
Activity Log Custom Templates
- Log on to BenefitPoint as a Broker Admin.
- On the top navigation bar, click Customize.
- Using the Select Customization Area drop-down select Activity Log. A second drop-down appears below.
- Select Custom Templates. A list of all templates appears.
- To add a template mouse over Tasks and click Add Template. The Add Template page appears.
- Complete the Record Summary and Record Details section.
- Click Save.
- Scroll the Custom Templates list and locate the field you just added.
- From the Action drop-down list select Edit.
- Click Tasks and click Add Activity.
- Complete the Add Activity page.
- Click Save. Repeat Step 10, until all activities are added.
- Click Save.
- On the Customize Templates page, find the active template (in black) that you want to edit.
- From the Action drop-down list select Edit. The edit template page appears.
- Scroll down to the Activities section.
- In the Move column, click the orange arrows to move the activity to the order you want.
- Click Save.
When you want to allow other users to access a template:
- On the Customize Templates page, select the option next to the orange draft template. If there are several you want to activate, you can select them all.
- Scroll down and click Finalize. The templates are now active.
- On the Customize Templates page, locate the template you want to inactivate.
- From the Action drop-down list select Inactivate.
- Scroll down and click Finalize.
Carrier Contacts Custom Fields
- Log on to BenefitPoint as a Broker Admin.
- On the top navigation bar click Customize.
- From the Select Customization Area choose Carrier Contacts. The Customize Carrier Contacts page appears.
- Click Tasks and select Add Custom Section.
- Enter a Section Name and click Save. Customize Carrier Contacts page appears.
- Locate the field you just added.
- From the Action drop-down list select Add Custom Field.
- Enter the Field Label, for Required, choose Yes or No.
- Select Field Type. Depending on your selection, more options will appear.
- Complete the section and click Save.
- Locate the custom field you just added.
- Select the field and click Finalize.
- Log on to BenefitPoint as a Broker Admin.
- On the top navigation bar click Customize.
- From the Select Customization Area choose Carrier Contacts. Customize Carrier Contacts page appears.
- Locate the custom field.
- From the Action drop-down list select Inactivate.
Account Custom Fields
- Log on to BenefitPoint as a Broker Admin.
- On the top navigation bar, click Customize.
- In the Select Customization Area, from the first drop-down select Account Summary. A second drop-down appears.
- From the second drop-down, select Custom Fields. The Customize Account Summary page appears.
- Click Tasks and select Add Custom Field.
- In the Account Classification box select Group, Individual or Marketing Group or to select all click CTRL and select all three options.
- Enter a Section Name.
- Click Save. The section is saved and appears in the Custom Fields page.
- Scroll the Custom Fields list and locate the field you just added.
- From the Action drop-down list select Add Custom Field.
- Enter the Field Label, for Required, choose Yes or No.
- Select Field Type. Depending on your selection, more options will appear.
- Complete the section and click Save.
|
|
All fields not finalized will appear in Orange, indicating they are still in drafts stage. |
- Log on to BenefitPoint as a Broker Admin.
- On the top navigation bar click Customize.
- From the Select Customization Area choose Account Contacts. The Customize Carrier Contacts page appears.
- Click Tasks and select Add Custom Section.
- Enter a Section Name and click Save. Customize Carrier Contacts page appears.
- Locate the field you just added.
- From the Action drop-down list select Add Custom Field.
- Enter the Field Label, for Required, choose Yes or No.
- Select Field Type. Depending on your selection, more options will appear.
- Complete the section and click Save.
Service Info Custom Field
- Log on to BenefitPoint as a Broker Admin.
- On the top navigation bar click Customize.
- From the Select Customization Area choose Service Info. A second drop-down appears.
- Select Custom Fields. The Customize Service Info page appears.
- Click Tasks and select Add Custom Section.
- Enter a Section Name and click Save. Customize Service Info page appears.
- Locate the field you just added.
- From the Action drop-down list select Add Custom Field.
- Enter the Field Label, for Required, choose Yes or No.
- Select Field Type. Depending on your selection, more options will appear.
- Complete the section and click Save.
- Log on to BenefitPoint as a Broker Admin.
- On the top navigation bar click Customize.
- From the Select Customization Area choose Service Info. A second drop-down appears.
- Select Account Team Roles. The Customize Account Team Roles page appears.
- Click Task and select Add Account Team Role. The Add Role page appears.
- Enter a Role Name and click Save. The role now appears in the Account Team Roles list.
- Log on to BenefitPoint as a Broker Admin.
- On the top navigation bar click Customize.
- From the Select Customization Area choose Service Info. A second drop-down appears.
- Select Account Team Roles. The Customize Account Team Roles page appears.
- Locate the role you want to inactivate.
- From the Action drop-down list select Inactivate.
Plan Info Custom Fields
- Log on to BenefitPoint as a Broker Admin.
- On the top navigation bar click Customize.
- From the Select Customization Area choose Plan/Product Info. A second drop-down appears.
- Select Custom Fields. The Customize Service Info page appears.
- Click Tasks and select Add Custom Section.
- Select the Account Classification.
- Enter a Section Name and click Save. Customize Plan/Product Info page appears.
You determine which fields are required on the Account Summary and can disable non-required BenefitPoint fields to ensure your data standards are followed by all users.
- Log on to BenefitPoint as a Broker Admin.
- On the top navigation bar click Customize.
- From the Select Customization Area choose Plan/Product Info. A second drop-down appears.
- Select Standard Fields. Another drop-down appears.
- Select Plan or Product Info. The customize plan info page appears.
- Each Field Label can either be Required, New, Replacement, Renewal and Prospective.
|
|
You can determine if a field is required by origination reason. If a plan is added as New, then field A will be required. |
- Click Save.
- To disable a field remove all check marks from the columns and click Save.
|
|
If there is already data saved in a Standard Field, when you disable the field, the saved data is view-only moving forward (not deleted). If you later re-enable the Standard Field, the saved data is once again editable. |
Once saved, the Required Standard Fields are immediately required in order to save the page and the disabled Standard Fields are immediately view-only when editing the Account Summary page.
Origination Reason Qualifiers help your firm further describe the type of New Business you received. It could be New because you won the BOR or it could be New because you sold a new line of coverage.
- Log on to BenefitPoint as a Broker Admin.
- On the top navigation bar click Customize.
- From the Select Customization Area choose Plan/Product Info. A second drop-down appears.
- Select Plan or Product Info. Another drop-down appears.
- Select Origination Reason Qualifier. A list of Origination Reason Qualifiers appears.
- Click Tasks and select Add Origination Reason Qualifier. The Add Qualifier page appears.
- Enter the Origination Reason Name and click Save.
- Check mark Require Origination Reason Qualifier on Add/Edit Plans and Products, per your business need.
- Click Save again.
- Log on to BenefitPoint as a Broker Admin.
- On the top navigation bar click Customize.
- From the Select Customization Area choose Plan/Product Info. A second drop-down appears.
- Select Origination Reason Qualifier. A list of Origination Reason Qualifiers appears.
- Locate the item you want to inactivate.
- From the Action drop-down list select Inactivate. The item is now disabled.
- Click Save.
When you inactivate an Origination Reason Qualifier, it will no longer be available to select when a user is adding a plan.
BenefitPoint - Broker Content Extract (BCE) Considerations
If your firm uses cancellation IDs from the BCE for other external systems or processes, be aware that the following is true when you also use the new custom cancellation reasons feature:
- The “common” reasons will be copied to a new table with different IDs. The old IDs will also be copied for reference purposes.
- Each firm has its own copy of the “common” reasons, with unique IDs from other firms.
- BCE will show the reason’s description and IDs in the same fields but with the new IDs.
- BenefitPoint Web Services have changed to include an additional field for custom reasons and will expect new IDs. A new method has been added to retrieve a map of description to new ID. The call will fail if the old reason filed is used.
- Mapping data will be provided in BCE that maps new ID to description.
- TAM and Sagitta cancel-code mappings must be updated. This can be done by saving the mapping screen - this must be done to map the new reasons anyway).
With the Custom Cancellation Reasons firm setting enabled, you can add your own reasons for use in your firm’s plans and products.
Broker administrators can follow the steps below to create custom cancellation reasons:
- Click the Customize tab on the Broker Administrator home page.
- Select the Plan/Product Info option from the first drop-down list.
- Select the Customize Reasons option from the second drop-down list.
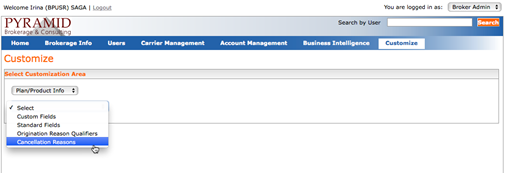
- Click the Add Cancellation Reason from the Tasks menu.

- Type your new reason in the dialog box.

- Click Save.
Broker administrators can edit custom cancellation reasons:
- Click the Customize tab on the Broker Administrator home page.
- Select the Plan/Product Info option from the first drop-down list.
- Select the Customize Reasons option from the second drop-down list.
- From the list of cancellation reasons, click the Action drop-down menu in the line with the reason you intent to edit.
- Select Edit to display the Edit Custom Cancellation Reason dialog box.

- Click Save.
- Log on to BenefitPoint as a Broker Admin.
- On the top navigation bar click Customize.
- From the Select Customization Area choose Plan/Product Info. A second drop-down appears.
- Select Cancellation Reason. A list of all Cancellation Reasons appears.
- From the Select List View filter choose Inactive. A list of all inactive reasons appears.
- Locate the item you want, from the Action drop-down list select Activate.
When you inactivate a Plan/Product Cancellation Reason, it will no longer be available as an option for users to choose when cancelling a plan or product.
- Log on to BenefitPoint as a Broker Admin.
- On the top navigation bar click Customize.
- From the Select Customization Area choose Plan/Product Info. A second drop-down appears.
- Select Cancellation Reason. A list of all Cancellation Reasons appears.
- Locate the item you want to inactivate.
- From the Action drop-down list and select Inactivate.