Attachments
You can attach files at the account level and further define the attachment by assigning the file to a specific activity log record, plan, or request. You may assign files from within Attachments or from within Activity Log, Plans, or Requests. BenefitPoint attachments are limited to 5 Mb per attachment.
- On the top navigation bar, click Accounts.
- Locate the account you want.
- From the Action drop-down and select Attachment to verify and update files associated with the account.
- Click Upload. The Add Files window appears.
- Click the Add Files button or Drag and Drop your files to the Upload Files window.
|
|
Drag and Drop attachments is only available in Internet Explorer 10 and 11. If you are on Internet Explorer 9, you will see the previous functionality. |
- Enter the appropriate Description, and select a Type from the drop-down for each file added.
- Click the Add Label field, a list of available labels appears. Select one or more labels.
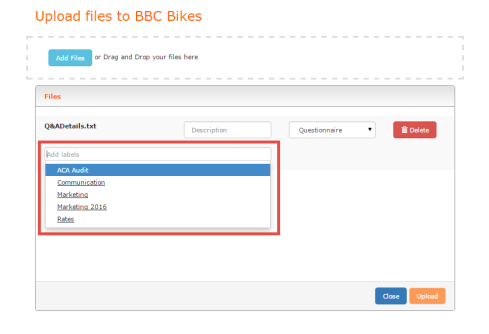
|
|
You must have customized labels to apply labels to your attachments. See below for information on adding custom labels. |
- Click Upload.
- When the files are uploaded click Close.
- Log on to BenefitPoint as a Broker user.
- On the top navigation bar, click Accounts.
- Select the appropriate account.
- Click the Go To list , and then, in the Action list click Attachment.
|
|
You can attach a document in any of the following file types in BenefitPoint:
|
- In the Description field enter a brief description.
- In the Type list select the type, and then click Add.
- In the Filename field, click Browse and locate the file on your computer.
- Select the file, and then click Open.
- Click Attach.
- In What do you want to do next? select Assign Attachments.
- Click Next. The Attachment information page appears.
- In the Label Assignments section, from the Available Label box choose the applicable label and move it to the Selected Labels box.
- In the Assign Attachment section, assign this attachment to an Activity Log Record, Plan, or Request.
- Click Save or Save & Return. The page refreshes to display Attachments List where you can view the list of current account attachments or add a new attachment to the account.
|
|
If you are unable to save an attachment, please ensure you have the appropriate permissions. If you have the appropriate rights and were able to save the documents before, please Create a Case in My Vertafore to investigate the issue. |
- Open an account.
- On the top navigation menu, click Attachments.
- In the attachment that you want to assign, click Details.
- On the Attachment Details page enter description in the Notes field.
- In the Assignment list located in the Assign Attachment section, select the appropriate assignment for the attachment.
- Click Activity Log Record to assign this attachment to a specific activity log record.
|
|
If you are not sure of the record number, you can assign the file from within the Activity Log, making it easier to identify the record. |
- In the Record Number field, select the specific record number for the assignment.
-
Select Plan to assign this attachment to a specific plan.
- Select the plan type and plan for the assignment.
-
Select Request to assign this attachment to a specific request.
- In the Request field, select the specific request number for the assignment and select what the attachment applies to:General - applies to the entire request.
- Click Save. The page will refresh and the new assignment is displayed in the Assignments section at the bottom of the page.
You can add or remove multiple assignments for a single attachment.
- On the top navigation menu, click Attachments.
- Locate the attachment to multi-assign, and then click Details.
- In the Assign Attachment section, make your assignment selection and their related fields.
- Click Save.
The page refreshes to reflect the new assignment. - In the Assignments section, click Expand. All assignments associated with the attachment appear.
- If you want to delete an assignment, click Delete Assignment.
- Click Return.
You can search for attachments within an account using the Select List View filters.
- Open the Attachments page within an account.
- In the Select list View section, use any of the filters to narrow your search results. You can narrow search results using the Status, Description, Type (document type not file type), Assignment, Filename, Attached By, and Date filters.
- Click Update for a filtered result.
You can also sort the attachments by clicking the column heading. BenefitPoint remembers the selected sort for attachments within the session. The sort order is not be retained once you log out and log back in.
You can directly attach documents to a BenefitPoint through the Outlook Plug-in.
- In Outlook open the email with the attachment.
- On the Outlook ribbon click the Save to BenefitPoint icon.

- In Email Attachments page select the attachment and click Upload Selected Attachments And Continue.
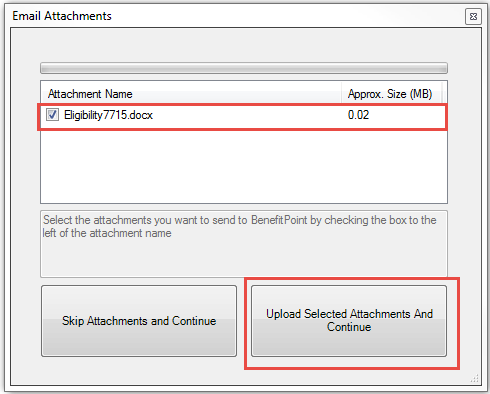
The plug-in loads BenefitPoint within Outlook.
- Select the Region, Office, Classification, Type, Status and Account. The Action drop-down appears.
- From the Action drop-down list select where you want the attachment added. The following options are available:
- Add Account Attachments
- Add Activity Log Record
- Add Activity Log Record with Attachments
- Update Activity Log Record
- Update Request
- Add Plan Attachments
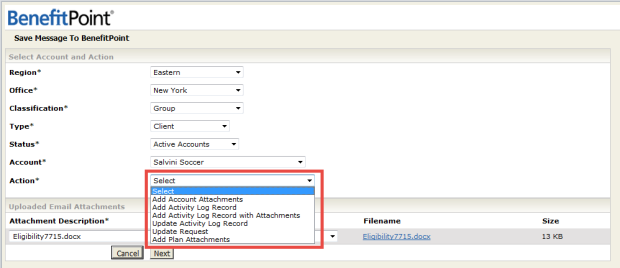
- Next select the Attachment Type and click Next.
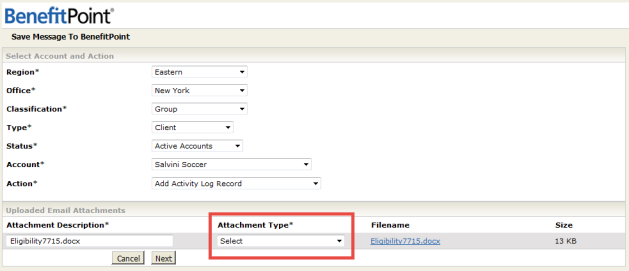
Based on your selection in the Action drop-down and Attachment Type, the next page appears.
Complete all the required pages.
- Log on to BenefitPoint as a Broker Admin.
- On the top navigation bar click Customize.
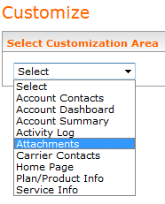
- From the Select Customization Area drop-down choose Attachments. The Attachment Label page appears.
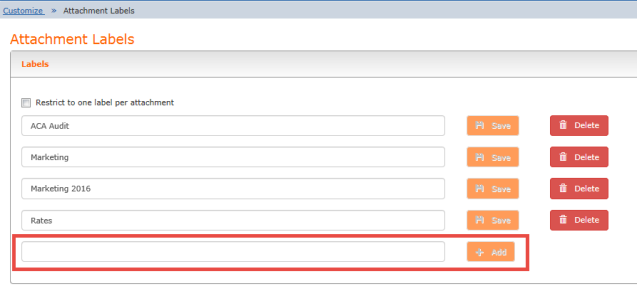
- Enter the Label name, the + Add button is now enabled.

- Click +Add. The label is saved. Another label field appears below.
- Continue the steps above until all Labels are added.
- Log on to BenefitPoint as a Broker Admin.
- On the top navigation bar, click Customize.
- From the Select Customization Area drop-down choose Attachments. The Attachment Label page appears with a list of Labels.
- Edit or change the label you want. The Save and Cancel button is enabled.
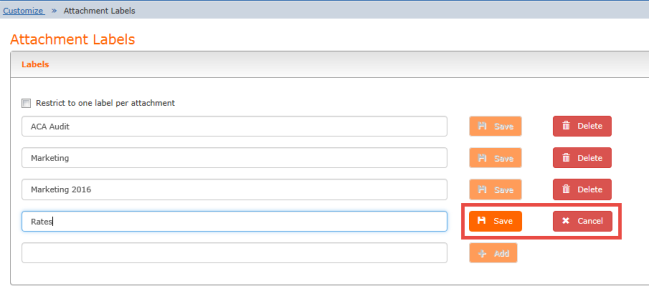
- Click Save.