Working with Carriers
From time to time, you will need to manage the carriers that you work with. Below we show you some tasks commonly associated with managing carriers.
This functionality is performed by Vertafore support. A broker administrator must Create a Case in My Vertafore requesting to add a carrier administrator.
- Log on to BenefitPoint as a Broker Admin user.
- On the top navigation bar, click Carrier Management.
- On the Carrier List page, in Search Carriers field, enter the carrier you want to add, and then click Update.
This confirms that there is not an existing carrier listed. If no carriers are found, scroll down to the Add Carriers to Carrier List section. - Enter the From and To dates in the mm/yyyy format, and then click Update.
- In the Available Carriers section select the carrier you want and click the right arrow to move to Selected Carrier section.
- Click Add Carriers to Carrier List.
- Click Save.
The Existing Business, New Business, Renewals fields default to All. You then have the option to choose All, None, or Selected.
Click here to see the video topic on Add or Remove Carrier.
BenefitPoint provides a test carrier in the Carrier List. Add it to the Available Carrier/Vendor list to make it available as an option in drop-down menus. The test carrier must be added to the Commissions Paid by List for RTM administration and to post Carrier Statements.
Follow the steps for adding for adding a carrier above to add the test carrier. Use the test carriers available.
- Log on to BenefitPoint as a Broker Admin user.
- On the top navigation bar, click Carrier Management.
- On the top navigation submenu, click the Commissions Paid By.
- In Search Carriers field, enter the carrier you want to add, and then click Update.
- This confirms that there is not an existing carrier listed. If no carriers are found, scroll down to the Add Carriers to Carrier List section.
- In the Available Carriers section select the carrier you want and click the right arrow to move to Selected Carrier section.
- Click the Add Carriers to Carrier List link in orange.
The following fields automatically default to All: Existing Business, New Business, & Renewals. - You have the option of choosing: All, None, & Selected.
- Click Save.
- Log on to BenefitPoint as a Broker Admin user.
- On the top navigation bar, click Carrier Management.
- In the Search Carriers field enter the carrier you want to remove, and then click Update.
- In the search result select the carrier you want.
- Change the columns Existing Business, New Business, Renewals to None.
- Click Save to remove the carrier.
- Log on to BenefitPoint as a Broker Admin user.
- On the top navigation bar, click Carrier Management.
- On the top navigation submenu, click Commissions Paid By.
- In the Search Carriers field enter the carrier you want to remove, and then click Update.
- In the search result select the carrier you want.
- Change the columns Existing Business, New Business, Renewals to None.
- Click Save to remove the carrier.
When a carrier changes their name, BenefitPoint allows you to keep the existing name for auditing and historical data purposes. To have the carrier with the new name, you can request a new Carrier Addition to BenefitPoint. For more information see the section below.
Complete the Request New Carrier Addition Form and save this form to your desktop. Log on to My Vertafore to create a case for carrier addition. Attach the completed form to the case. Please allow up to ten business days for inclusion into the BenefitPoint product library.
- Log on to BenefitPoint as a Broker Admin user.
- On the top navigation bar click Carrier Management.
- Click Plan Types.
Locate appropriate plan type to be added or removed. - Click the Carriers list and choose one of the following:
- None: This designation prohibits the selected plan type from being available to any carrier in the carrier list. To disable a plan type from being used when creating any plan/product, select None.
- All: This designation allows the selected plan type to be available for all carriers in the carrier list.
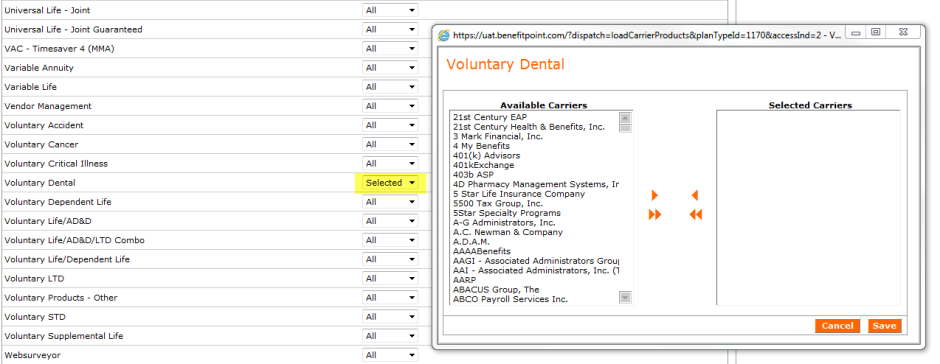
- Selected: This designation allows the selected plan type to be available only for specified carriers.
When you choose Selected a page with list of all Available Carriers appears.
Choose the carriers from Available Carriers section and move to the Selected Carriers section, then click Save.
Now scroll down to the bottom of the page and click Save.
Notice, a List Box appears for selected options. Click the list to view or further edit the selected carriers.
- Log on to BenefitPoint as a Broker user.
- On the top navigation bar, click Carrier Contacts.
A list of all carriers appear. - To add a carrier contact, on the right side of the page click Tasks, and then select one of the following:
- Add My Contact – Only the user that created the contact can view the contact details.
- Add All Contact – All users can view the contact information.

|
Vertafore recommends using Add All Contact. |
- In Contact Information, click the Carrier field, and then select the carrier.
- Enter the carrier contact information.
The First Name, Last Name and Email fields are required. You should complete other appropriate fields as needed. - In In-house Parameters, select the size in the Group Size field.
- In Contact Details, make the appropriate selections in the Contact Assignment, Plan Type, Market Size, and Supported Territory fields.
- In the Division field, located in Firm Contact Assignment, select the division.
This is a required field. - Click Save & Return.
- Log on to BenefitPoint as a Broker user.
- On the top navigation bar click Carrier Contacts. A list of all carrier with contacts appear.
Locate contact you want to delete. - From the Action drop-down list select Delete.
- A confirmation page appears, click Yes.

|
If the confirmation page does not appear, ensure your pop-up blocker is turned off. You must click Yes in the confirmation page to delete the contact. |
Plan Contacts
If carrier contacts vary at the plan level, you can set up Plan Contacts. You can add a plan contact by copying a carrier contact from All Contacts or by adding a new contact. BenefitPoint recommends populating your plan contacts list by copying contacts from All Contacts for easier contact maintenance.
- Log on to BenefitPoint as a Broker user.
- On the top navigation bar, click Accounts. A list of all accounts appears.
Locate the account you want. - From the Action drop-down list, select Plans. A list of all plans appears.
Locate the plan you want. - From the Action drop-down list, select Plan Contacts.
- Click Tasks and select Add Plan Contact.
- In the Contact Information section, use the Carrier drop-down list to select a carrier for the contact.
- Enter all the appropriate fields.
- Click Save & Return.
- Log on to BenefitPoint as a Broker user.
- On the top navigation bar, click Accounts. A list of all accounts appears.
Locate the account you want. - From the Action drop-down list, select Plans. A list of all plans appears.
Locate the plan you want. - From the Action drop-down list select Plan Contacts.
- Click Tasks and select Add from All Contact.
- Use the Select List View filter to make your selection and click Update. A list of contacts appear below. Locate the contact you want to add.
- From the Action drop-down list select Add to Plan Contact. The page refreshes.
The contact will now appear in Plan Contacts page. A check mark appears before the carrier name to indicate, the contact is added from All Contacts.
- Log on to BenefitPoint as a Broker user.
- On the top navigation bar click Accounts. A list of all accounts appears.
Locate the account you want. - From the Action drop-down list select Plans. A list of all plans appears.
Locate the plan you want. - From the Action drop-down list select Plan Contacts.A a list of all plan contacts appears.
- In the Delete column, check mark the appropriate contact you want to delete.
- Click Delete.
- A confirmation page appears, click Yes.
You can now force Carriers to login for Request Reports and Attachments. This is a Firm Setting that Customer Support can turn on for your agency. To enable this setting Create a Case in My Vertafore.