Purge Accounts
Use the Purge Accounts function to periodically delete inactive account data and comply with your firm's data retention policy. To use Purge Accounts, the following requirements must be satisfied:
- The Purge Accounts firm setting activated by Vertafore Support.
- The individuals who will perform purge functions must be assigned as a Broker Admin user with access to all regions and offices.
|
Before you proceed with Purge, please be aware that once the purge is run, reversing or restoring your account data is not possible. Purged account data is irretrievable. Please use this feature with extreme caution. |
Once Support turns the firm setting on, Broker Admins with the appropriate permissions will see the Purge Accounts button under Account Management.
Click the image to change its size.
BenefitPoint only allows you to permanently eliminate inactive accounts.
From the accounts in your system that are inactive and have an inactive date, you can then further limit the selection of accounts through optional parameters that will help avoid inadvertently purging accounts that you should have kept.
Optional parameters in support of the Purge Accounts feature include:
| No current plans or products | Selecting No current plans or products means no in-force, continuous, or pending plans or products based on their effective dates, renewal dates, and cancellation dates will be selected. |
| No open activity log records | This refers only to Activity Log Records that have a status of Open. This parameter ignores open Activities or Activity Log Records with any other status (including N/A) when selecting account for purge. |
| No posted revenue as of or after (date) | You will only see this option if your firm is using revenue tracking. This setting helps ensure that you don't accidentally purge and delete accounts when you recently received revenue from clients. |
| No open invoices | This setting only applies to firms using Agency Bill functionality (integrated with Sagitta). If there is a bill to address for another client not included in the purge, the account is ineligible even when selected for purge. |
| No expired no action plans or products | This setting allows users to exclude any accounts that have plans or products that were allowed to expire (move into archive) without being canceled, renewed, or replaced. |
Important Notes About Purge
- Once a purge is performed there is NO way to get the data back.
- We are only purging the BenefitPoint database. There are no integration capabilities with this function.
- If there are any invoices on an account selected for purge that uses another account for a bill to address, that selected account cannot be purged unless that other account is being purged at the same time.
- Only Broker Admins with Access to all Regions/Offices can be granted the Purge Permission.
- For GA firms, we do not yet offer a purge on agencies or agents.
- Purge cannot be performed on Marketing Groups.
- If a standard split has a purged account as selected for assignment, we will remove the account from the assignment. If the assignment on the standard split was only for that account, we will remove the assignment.
- After a report is run and saved, the results that contain account information can exist on the BBI server for up to 90 days. Report results remain on the server after the account is purged or until a user manually deletes the report.
- Purged accounts will continue to appear in the Recently Viewed list until the user logs out.
Purging accounts in BenefitPoint is performed from the Account Management (formerly Account Upload) menu.
Use the following steps to Purge Accounts once your firm setting has been enabled and your broker admin has been granted the Broker Admin permission.
- Log in as a Broker Admin.
- Click Account Management from the main menu.
- Click Purge Accounts to open the Purge Accounts list page.
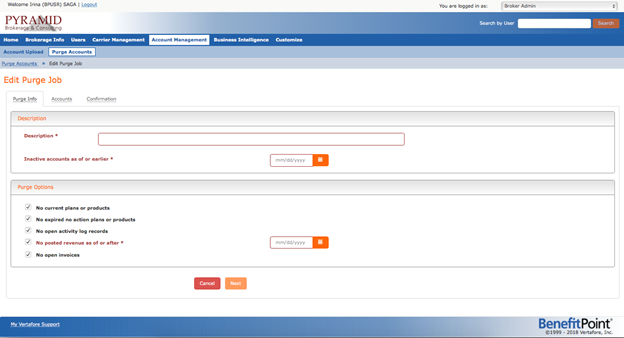
- Click the Tasks icon and select Purge Account to open the first tab of the Edit Purge Job page: Purge Info.
Click the image to change its size.
- In the Description section:
- Enter a description that will help you identify this job in a list of purge jobs.
- Select a date from the calendar drop-down or enter one in the box. BenefitPoint will include inactive accounts up to and including the day you selected for the purge.
- In the Purge Options section, select filters to further narrow your list accounts for purging:
- No current plans or products—with this option, no in-force, continuous, or pending plans or products based on their effective dates, renewal dates, and cancellation dates will be selected for purge.
- No open activity log records—with this option, the system filters out accounts with open activities or activity log records.
- No posted revenue as of or after—with this option, accounts associated with any recent revenue recently collected by your firm will not be purged. (This option is only available if your firm uses BenefitPoint Revenue Tracking.)
- No open invoices—with this option, accounts associated with clients in Sagitta with open Agency Bill bill-to addresses will not be available for purge. (This option is available only for firms using BenefitPoint integrated with Vertafore Sagitta.)
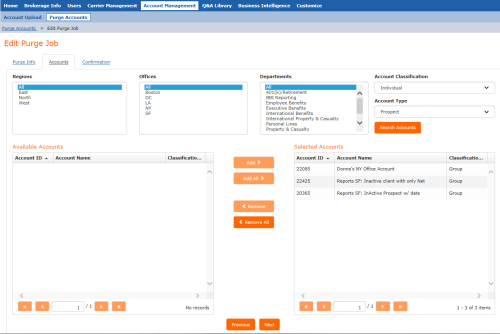
- Click Next to open the second tab of the Edit Purge Job page: Accounts.
- Use the on the page to locate and display accounts in the Available Accounts panel.
- Select accounts in the Available Accounts panel by using the provided to move one, many or all accounts over to the Selected Accounts panel.
- When you are satisfied with your choices in the Selected Accounts panel, click Next.
Click the image to change its size.
The Confirmation tab of the Edit Purge Job page displays details about your purge job, including the parameters you chose when setting up the record on the first tab. It also displays the list of accounts selected for purging. If you like, you can save the report to Excel for further review.
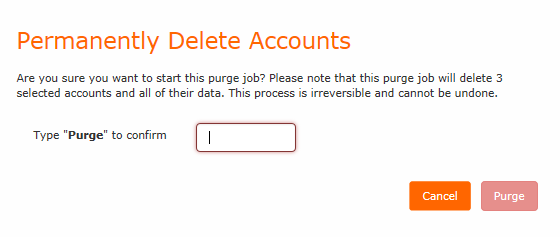
- Once you are absolutely confident that you have the appropriate list of accounts to purge, click Confirm. The system displays the final warning message that instructs to type the authorization code in the confirm entry box.

- When ready, type Purge in the entry box.
- Then click Purge.
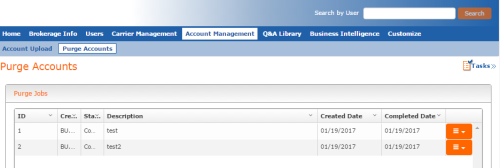
To see the statistics of a purge, you can go to the Purge Accounts page and click View from the Tasks icon.
Use the View Excel link to view the information in an Excel format.
You can see details of who created the purge and various statistics about the task as shown in the illustration below. Notice that the record lists the selection parameters used to perform the purge.
Click the image to change its size.

