You do not have to settle for where ImageRight places the Desktop menu bar and the toolbars, nor do you have to settle for the appearance of these items. In this topic, we are going to take a look at the tools you can use to customize the menu bar and toolbars.
If the toolbars and menu bar are not locked in place, you can:
- Move them to a new location by dragging the move handle (the series of small dots). If you drag a toolbar or the menu bar to the edge of the screen, it will dock in place.
- Drop the menu bar or toolbar anywhere on the Windows desktop, and it will float.
- Close
a floating toolbar by clicking
 .
. - Return a toolbar or menu bar to a docked state by double-clicking its title bar.

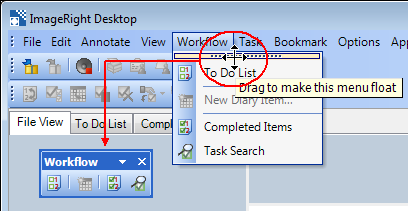
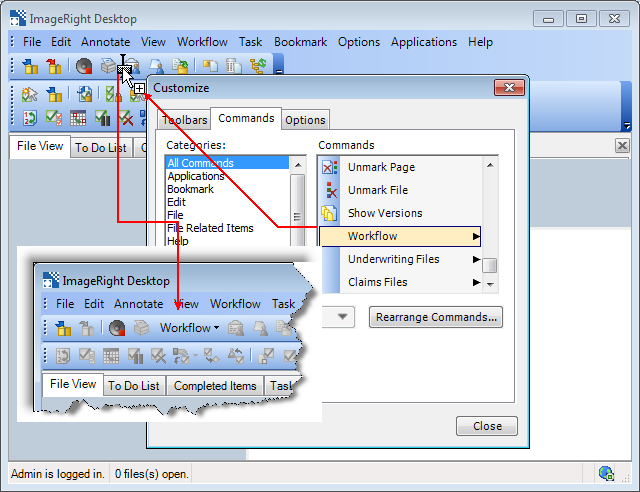
In addition to moving the menu bar to a new location, you can also move individual menus to a new location. In our example, we used the move handles to drag the Workflow menu to a new location. When you move a menu, a corresponding toolbar is created, but the original menu is not changed. You can create toolbars in this manner even if the menu bars and toolbars are locked in place as explained later.
If you want to prevent movement of the menu bar and toolbars, you can lock them in place. Simply right-click the toolbar area and click Lock the Toolbars on the menu. The items are locked when the move handles disappear and a check mark appears next to Lock the Toolbars.
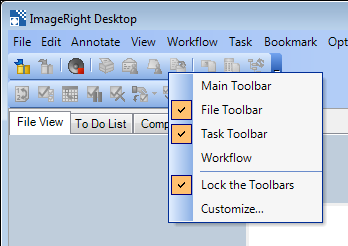
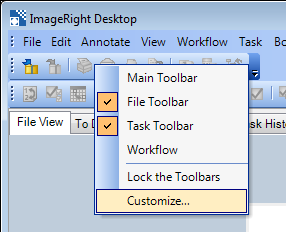
You can display ImageRight toolbars any time you want by right-clicking the toolbar area and selecting the names of the toolbars in the list that you want to display. A check mark next to a toolbar (File Toolbar in our example) indicates it will be displayed. To hide a toolbar, simply click it again to remove the check mark.
There is another way that you can display or hide toolbars.
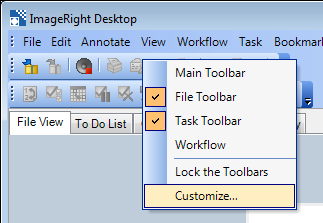
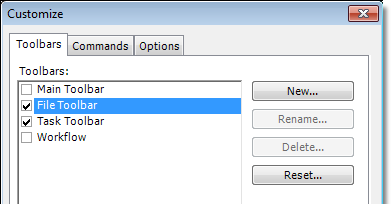
- Right-click the toolbar area and click Customize on the menu.
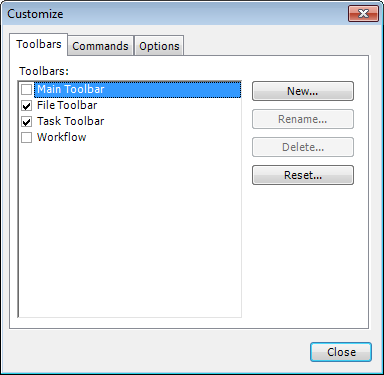
- Click the Toolbars tab if it is not already displayed.
- Click an item in the list to select it or clear the selection. The items with a check mark will be displayed.
- Click Close to save your changes.
Now we will look at the options you can use to control the size of the icons on the toolbars and the behavior of the menu items. Start by opening the Customize dialog box (right-click the toolbar area and click Customize on the menu).
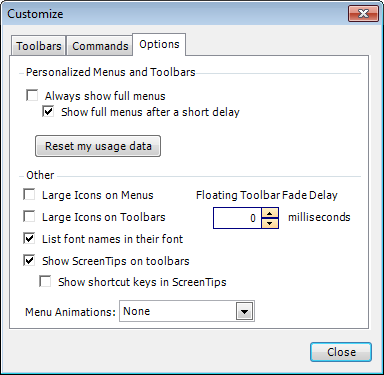
- Click the Options tab, if it isn't already displayed, and select the
options you want based on the descriptions that follow.
- Always show full menus – All menu choices will be displayed. If not selected, the most recently used commands will be displayed first.
- Show full menus after a short delay – The full menu will be displayed after a short delay. To display the full menu no matter how long you wait, uncheck this option.
- Reset my usage data – Clear the memory of the menu commands that you use to reset the display of recently used commands.
- Large icons on menus – All the icons on the menus will be large.
- Large icons on toolbars – All the icons on the toolbars will be large.
- Show ScreenTips on toolbars–A brief description will appear when your mouse pointer hovers over an icon.
- Show shortcut keys in ScreenTips–Existing keyboard shortcuts will be displayed along with the description.
- Menu animations – Apply one of four animation effects to menus. Effects are applied when you expand a menu.
- Floating toolbar fade delay – Type or select the amount of time that will pass before floating toolbars fade from view. When you move the mouse pointer to a faded toolbar, it becomes available. Set the value to 0 to prevent floating toolbars from fading.
There are other ways to customize the toolbar and menu bar. You can follow our guidelines in the next topics to customize toolbars to meet your needs.
Adding a Command to a Toolbar
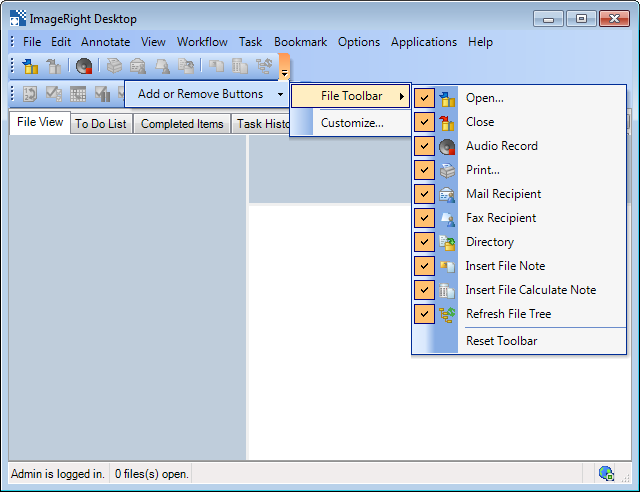
You might find there is a command that you use often that should appear on a toolbar. Using the Add or Remove Buttons functionality is the easiest way to add buttons to a toolbar.
- Click the down arrow at the far right side of any toolbar. Then point to Add or Remove Buttons to display a list of toolbars.
- Point at the toolbar that you would like to change to display a list of buttons.
- If you want to add a button that does not currently appear, click it to place a check mark next to it. If you want to remove a button, click it to clear its check mark.
If you need to customize a toolbar in ways that the Add or Remove Buttons command cannot accommodate, you can work within the Customize dialog box. We will explain how to add a command to an existing toolbar, and then we will explain how to create a new toolbar.
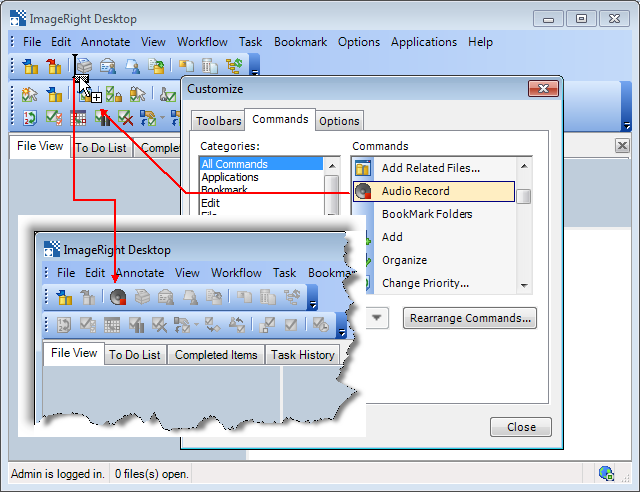
- Right-click the area next to the toolbar and click Customize.
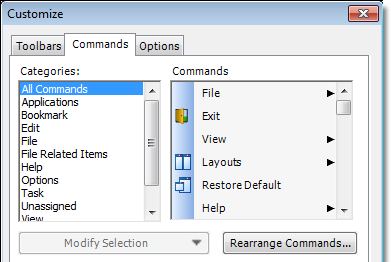
- Click the Commands tab in the Customize dialog box if it is not already displayed.
- You can select an item in the Categories list to filter the commands displayed under Commands. In the Commands list, locate the command that you would like to add to the toolbar, Audio Record in our example.
- Drag the command to the toolbar and drop it where you would like it to appear, as indicated by the black line.
- Click Close to save your changes.
- To remove a command, open the Customize dialog box, and drag the command off the toolbar and drop it on the dialog box.
By following the earlier steps, you can also add menu commands to a toolbar by making one adjustment, as shown in our example. You drop the menu or command on the toolbar where you want it to appear.
Adding a New Toolbar
In other areas, we explain how to modify toolbars that already exist. However, there is yet another way to customize toolbars – creating your own. You might want to create a toolbar that is associated with specific tasks. This way, you can leave the existing toolbars alone and avoid confusing people who do not understand why the buttons look different.
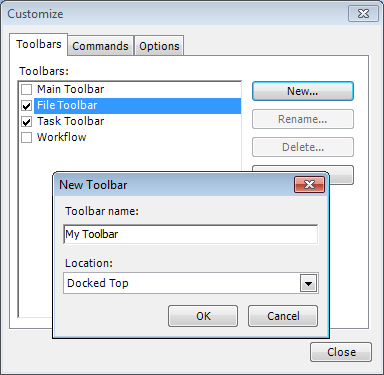
- Right-click the toolbar area and click Customize to open the Customize dialog box.
- Click the New button to open the New Toolbar dialog box.
- Type the name of the toolbar in the Toolbar name box.
- In the Location list, select the place you would like the toolbar to be docked.
- Click OK to save your changes. Click Cancel to return without saving changes.
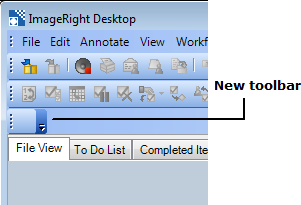
- The new toolbar will be added to the screen. You can now add commands as explained in Adding a Command to a Toolbar.
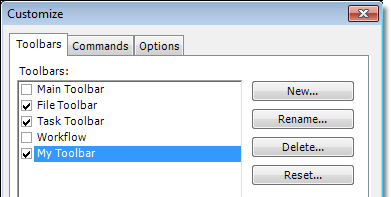
- If you
open the Customize dialog box again, you will see your toolbar in the
list. If you select the toolbar, you can use these buttons:
- Rename – Change the name of the toolbar. When you click the button, the Rename dialog box will be displayed. Type the new name and click OK to save your changes.
- Delete – Remove the toolbar, making it no longer available.
- Reset – Reset the toolbar to a blank state.
Modifying the Appearance
The commands you can add to a toolbar may or may not come with their own button icons. If an icon does not exist, the text can be quite long. If you want to change the appearance of a toolbar icon or a menu command, you have options.
You can:
- Edit the text for brevity or clarity.
- Create a button yourself, from scratch.
- Copy and adapt an image from another button.
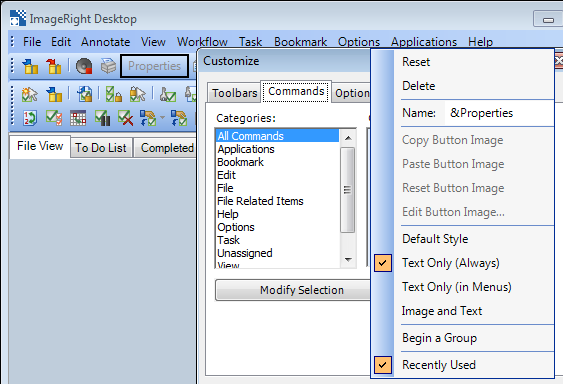
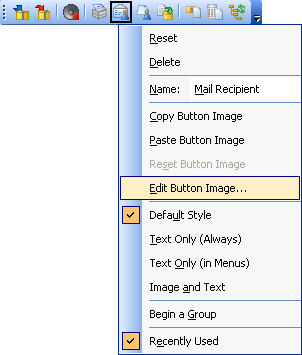
These options and others are available on the Customize menu. To display the menu, make sure the Customize dialog box is open, and then right-click the button or command that you want to change. As an alternative, you can select the item and click Modify Selection. The description of the menu items below should be helpful in finding the commands that you need. Later, we will explain some steps for making actual customizations.
|
Command |
Function |
|---|---|
|
Reset |
Return the selected button (with or without text) or command to its default look |
|
Delete |
Remove the selected item from the toolbar or menu bar |
|
Name |
Change the name (text displayed) of the selected item by typing the new name in the box |
|
Copy Button Image |
Copy the image on the selected button to the Clipboard |
|
Paste Button Image |
Apply (paste) a copied image to the selected button |
|
Reset Button Image |
Return the selected button image (with no text) to its default look |
|
Edit Button Image |
Modify the image to create a custom look |
|
Default Style |
Display the default style of the item |
|
Text Only (Always) |
Display only the text description |
|
Text Only (in Menus) |
Display only the text even when an item with an icon is added to a menu |
|
Image and Text |
Display an icon and the text in the Name box |
|
Begin a Group |
Add a line to divide items logically (into groups) |
If you want to edit the text of a menu item that you placed on a toolbar, right-click the button or menu item. Next, click in the Name box on the menu, type the new name, and press Enter.
You can assign a Windows access key to a menu command. An access key can be used to select a menu command by pressing Alt+single letter. For example, to open the Edit menu, press Enter.

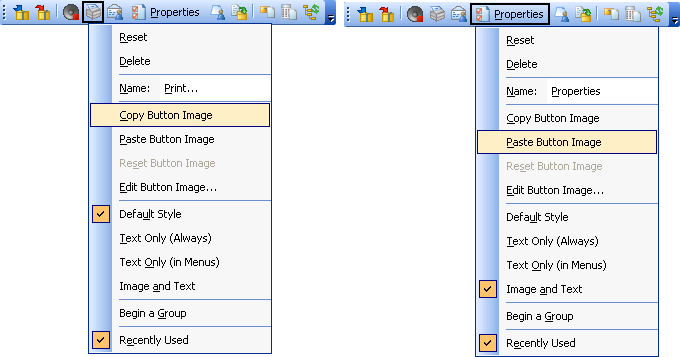
You can copy an image and paste it onto any toolbar button or associate it with a menu item. In our example below, we are going to assign the Print icon to the Properties command. While this is not a real-life example, we are using it just to explain the steps.
- Make sure the image you want and the menu item where you want to put that image are both visible.
- Right-click the toolbar button you want to borrow or adapt and click Copy Button Image on the menu (left portion of the screen capture).
- Right-click
the menu item on which you want to paste the image and click Image and
Text, as indicated by
 in the
right portion of the screen capture. This ensures there is room for both
the icon and the text.
in the
right portion of the screen capture. This ensures there is room for both
the icon and the text. - Right-click the menu item and click Paste Button Image.
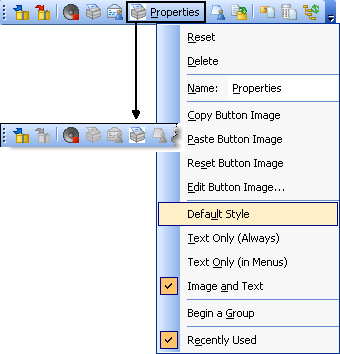
- In some cases, both an image and text are associated with an ImageRight command. If ImageRight displays both, and you do not want to see the text, right-click the button and choose Default Style.
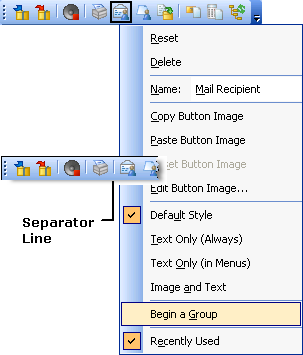
If you want to group toolbar buttons logically, you can add a separator line between them, making them easier to understand and use. Right-click the icon to the right of where you want the line to appear and click Begin a Group. A line is placed between the two buttons.
Using the Clipboard, you can copy any bitmap image and paste it on a toolbar button, including images created in programs such as Microsoft Paint, by following these steps:
- Open a graphics program and create or open the image you want.
- Select all or part of the image and copy the selection to the Clipboard.
- Switch to ImageRight and open the Customize dialog box as explained earlier.
- Right-click the button where you want to use the image.
- Choose Paste Button Image.
Be aware, however, that most images created elsewhere are not designed for use on tiny, square toolbar buttons. You will have the best results with images designed for a similar use.
It is possible that you still do not have the right image for your custom icon. In that case, you can create it yourself or better yet, adapt if from an existing image that is close but not quite right.
If you have an image you can use as a starting point, follow these steps.
- Open the Customize dialog box as explained earlier.
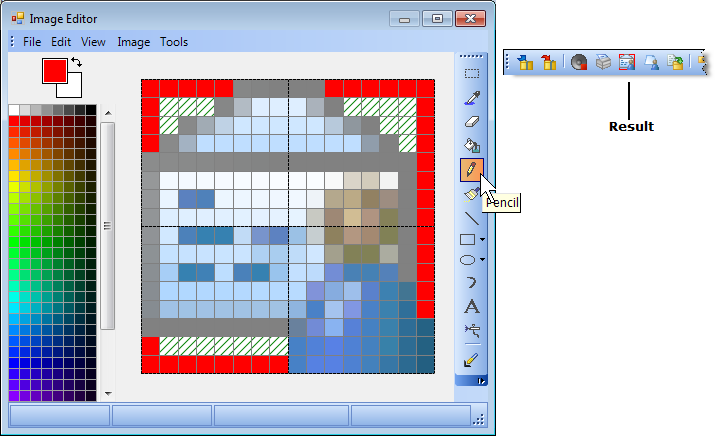
- Right-click the button and choose Edit Button Image to open the Image Editor.
- If you selected a button with an image, that image appears enlarged. If the selected button has no image at all, the display will be blank.
- Now you can add or erase lines and colors from the picture. To choose a color, click its square in the colors area on the left side of the window. To add the color to the image, click a tool on the toolbar on the right side of the window, and then drag that tool across the individual pixels you want to color. In our example, we selected the red color and added a box around the icon using the Pencil tool. The tooltips will help you identify the function of the tools on the toolbar. As an alternative, you can expand the Tools menu and select a tool.
- To erase an existing part of the image, click on the Eraser tool and drag it across the individual pixels. If you make a mistake, you can press Ctrl+Z or expand the Edit menu and click Undo to reverse the change.
- When you
are finished, click
 and save the changes when prompted.
If you want to reverse saved changes, you can use the Reset command. Simply
right-click the button and click Reset on the menu.
and save the changes when prompted.
If you want to reverse saved changes, you can use the Reset command. Simply
right-click the button and click Reset on the menu.
This is painstaking work, which is why you are better off starting with an image that can be adapted, rather than working from scratch.
We have only touched on the many capabilities in Image Editor, but you should have a general understanding of the tools that you can use to change images. If you experiment with the tools and the commands on the menus, you should be able to easily modify or create button images to meet your needs.
Resetting and Rearranging Commands
At some point, you may want to remove the customization you applied to a toolbar or menu, or you may want to rearrange the commands on a menu.
- Open the Customize dialog box.
- Select the toolbar in the list on the Toolbars tab and click Reset. Alternatively, you may right-click the toolbar and click Reset on the menu.
- Click OK when prompted to confirm the reset.
- To rearrange commands, click the Commands tab followed by the Rearrange Commands button.
- In the Rearrange Commands dialog box, select either the Menu Bar or Toolbar option, and then select the menu or toolbar you want to arrange in the appropriate list. The related commands will appear in the Commands pane.
- Select the command to be moved and click the Move Up and Move Down buttons on the right side of the window as needed. The Modify Selection button opens a list of commands that can be used to modify the appearance of the selected item. For more information regarding these commands, see Modifying the Appearance.

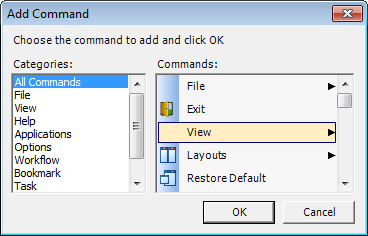
- Click Add to open the Add Command dialog box. You can select commands to be added to the menu or toolbar in the Commands list. Click OK to save your changes.
- Click Close in the Rearrange Commands dialog box to save your changes or Reset to reverse any changes you make.
Copying or Moving Commands
You have learned how to add items to a toolbar, how to copy and edit an image on a button, and more, but what about moving a button itself. With the Customize dialog box open you can:
- Drag a button from one toolbar to another.
- Copy a toolbar button by pressing Ctrl while you drag the item from one location to another.
- Move an item within the same toolbar by dragging it to its new location.
|
Be careful when dragging built-in buttons off a toolbar. If you are not careful, it's easy to lose commands that you really need. |