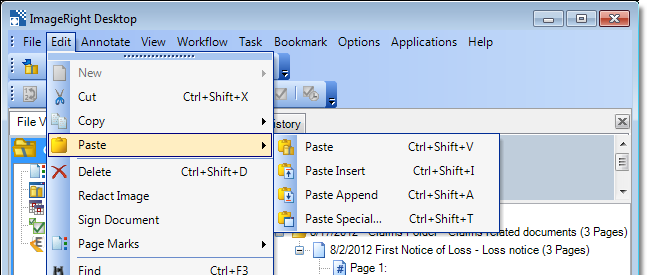
You can use the paste commands to add folders, document, pages, images, etc., that have been cut or copied from an ImageRight file into a different location in the same or a different file.
- Paste – Pastes the cut or copied folder or document into the selected file or folder.
- Paste Insert – Pastes the copied or cut page before the selected page in the destination document. Select the page in the new location that should appear after the one being moved, and then click Paste Insert to add the cut/copied page before the selected page.
- Paste Append – Pastes the cut or copied page after the page selected in the destination document. Select the page in the new location that should appear before the one being moved, and then click Paste Append to add the cut/copied page after the selected page.
- Paste Special – Pastes the cut or copied folder, document, or page in the current file, a new file, an existing file, or a new temporary file based on settings that you configure.
The Paste, Paste Insert, and Paste Append commands are straightforward, but the Paste Special command needs a bit more explanation. In our example, we are going to explain how to use the Paste Insert command. You can easily modify the steps and use the earlier descriptions to apply the features of the paste commands that meet your needs. Later we will explain in more detail how to use the Paste Special command.
|
When you use the Paste, Paste Insert, and Paste Append commands, there is one requirement. The file type and document type related to the original item must be compatible with the file and document type in the destination (location where the item will be pasted). |
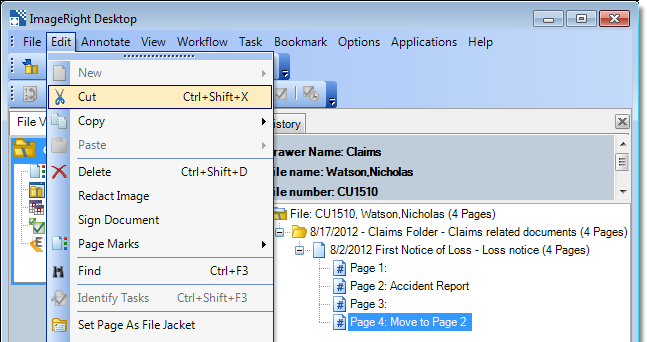
- Cut or copy a page in an ImageRight file. (In our example, we cut page 4 because we want to move it to before page 2.).
- Select
the destination in the current ImageRight file (page 2 of the same file
in our example) or a different file and do one of the following:
- On the Edit menu, point to Paste. Then click Paste Insert (select the command that meets your needs).
- Right-click the selected item, point to Paste, and then click Paste Insert.
- Use the keyboard shortcut next to the command.
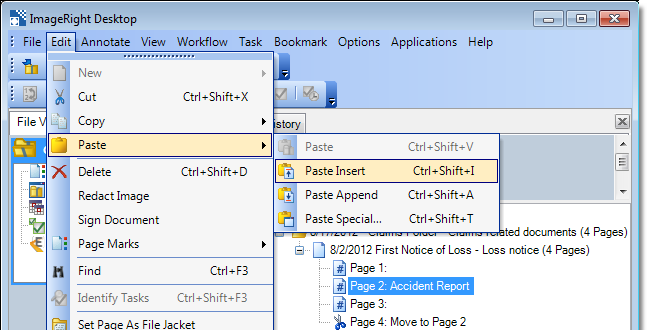
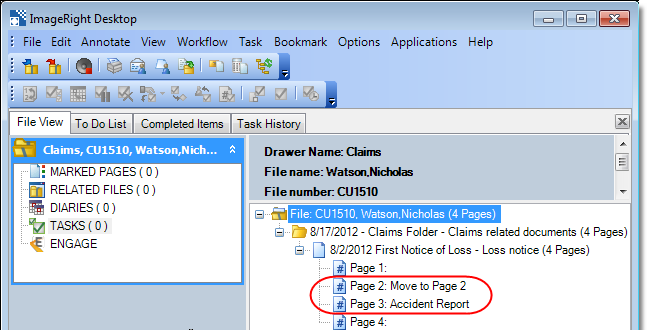
- The page numbers are adjusted automatically, and the page being moved is inserted before the selected page. Notice that the page number of the accident report changed to 3.
Paste Special
Now that you have an understanding of the basic paste commands, we will move on and explain the Paste Special command, which provides a good deal more functionality. In our example, we used the Physical Copy command, but our steps can also be applied to items when the Cut command or a different copy command is used.
- With
the item (cut) copied, do one of the following:
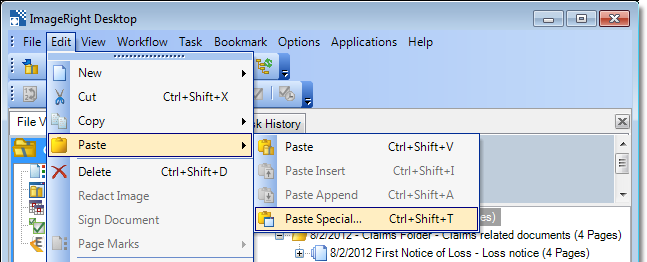
- On the Edit menu, point to Paste, and then click Paste Special.
- Press the keyboard shortcut (next to the Paste Special Command).
- Right-click the selected item, point to Paste, and then click Paste Special.
- In the
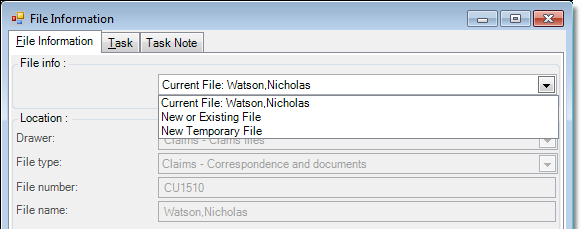
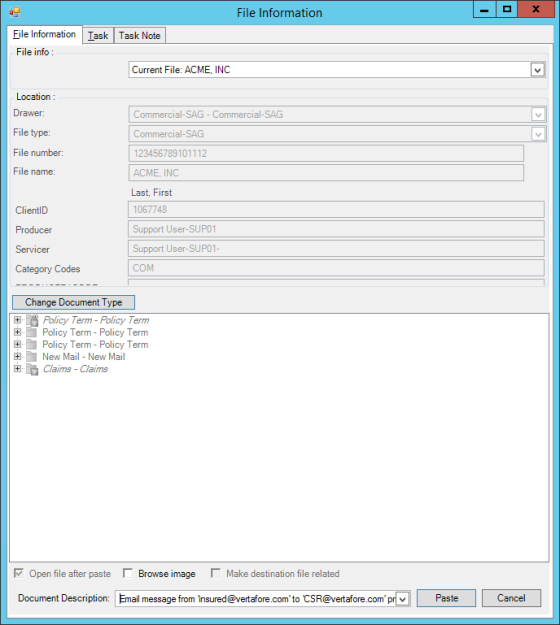
File Information dialog box, select the destination for the item.
- Current file
- New or existing file
- New temporary file
- If you select Current file, certain file options, for example, drawer and file type, will be unavailable.
- If you
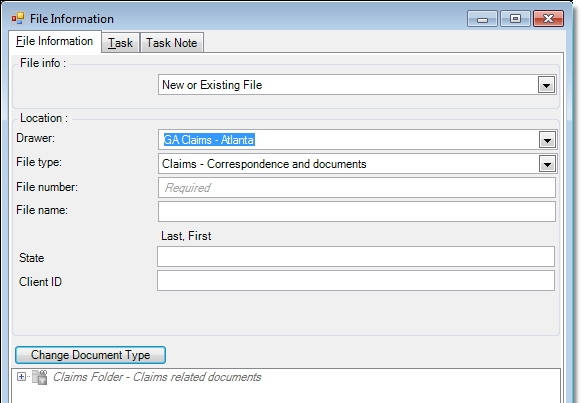
select New or Existing File or New Temporary File, you must select or
enter the file location information listed below that will be applied
to the item.
- Drawer
- File type
- File number (File number is unavailable if New temporary file is selected.)
- File name (File name is unavailable if New temporary file is selected.)
- Attributes (State and Client ID in our example are defined as custom data in our file structure.)
- The items
being pasted will be compared to the file structure of the destination
automatically.
- If the document type being moved is allowed in the destination file and folder, the file tree area under the Change Document Type button will be unavailable. This means that the items will be added to the file structure without making any changes. If there are multiple matching folders and document types, the source documents will be added to the first occurrence of both.
- If the document type is not allowed in the destination file and folder, the file tree area will be available, and you must change the document type of the source document to a type that is allowable in the destination file, as explained next.
- You can
change the document type of any documents that you are moving if needed.
You may want to change the type by choice, or you may have to change the
type because the current type is not allowed in the destination folder.
- Click the Change Document Type button to enable the file tree in the lower portion of the pane if it is not available.
- Click
 or
or  as needed
to expand the file tree.
 - Locate the folder type or level and then the document type that you want to assign to the source document.
- Select
the destination document type in the appropriate file level, indicated
by
 .
. - When you click Paste as explained later, the document being moved will be added to the file structure at the selected folder level as the selected document type.
- If you
elect to place the items being moved into a new or existing file or a
new temporary file, the options below will be available for your use.
- Open file after paste – The file will be opened in Desktop for you to view and work with as necessary when the paste operation completes.
- Make destination file related – A related files relationship will be created between the source file and the destination file.
- For ImageRight version 6.7 or later users, the ability to update the document description during paste or paste special has been added. Either enter the desired information in the Document Description field or select a previously entered description by clicking the drop-down.
- Click Paste when all your selections are complete to complete the operation. Click Cancel to return and halt the operation.
|
Folder types in which
repeatable folders can be created are identified with |
Creating a Task
You can create a task on an item that is being moved using the Paste Special command as explained earlier.
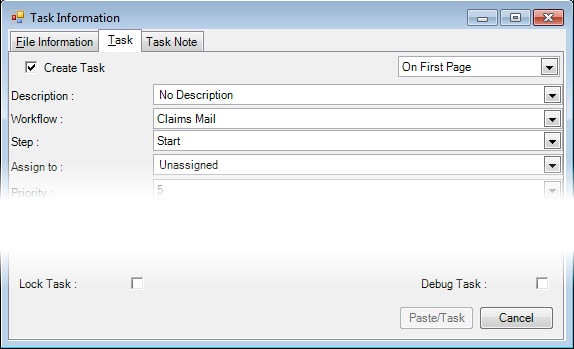
- Click
the Task tab, and then Select the Create task option, indicated by
 .
. - Enter
(select from the lists) the following information:
- On first page – To create the task on the first page of the document.
- On the document – To create the task on the document, not just a single page.
- Description – The text description that will be associated with the task and displayed in the navigation pane. As an alternative, you may click the arrow and select a predefined description.
- Workflow – The workflow in which the task will be created.
- Step – The workflow step in which the task will be created.
- Assign to – The name of the person, group, or role to which the task will be assigned..
- Priority – The order of importance assigned to the task (0 – highest to 9 – lowest).
- Lock task – The file will be opened and the task will be locked after you click Paste/Task.
- Debug task – The task can be used for testing workflow changes. This option is typically used by the person who maintains your organization's workflows. Tasks will be added to the workflow and can be processed without affecting actual production workflow tasks, reporting, etc.
- You can
add a note (optional) to the task if needed.
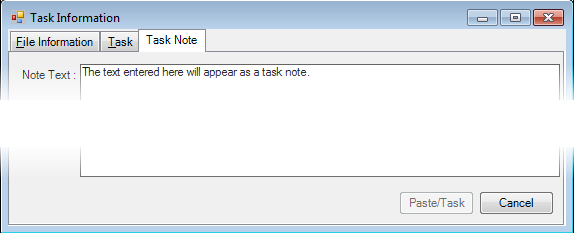
- Click the Task Note tab.
- Type the text of the note in the Note Text pane.
- Click Paste/Task to complete the paste special process and create the task and task note.
