AMS Word Processing and Proposals Guide v5 (64-bit)
About this Document
This guide provides information on the tasks needed for a successful installation and personalization of the AMS Word
Processing and Proposals product as well as providing information on how to use this product with Sagitta. This guide consists of the following topics:
-
Installing the AMS Word Processing and Proposals Product
-
Personalizing the AMS Word Processing and Proposals product
-
Using the Administrator
-
Using AMS Word Processing with Sagitta
-
Using AMS Proposals with Sagitta
SOFTWARE REQUIREMENTS
-
Sagitta Server - Version 7.2 or higher
-
Sagitta Word Processing and Proposals Version 5
-
64-bit Microsoft Office Client Install per Workstation (Not Office 365 Web-Only)
HARDWARE REQUIREMENTS
-
Workstation: Meets the minimum hardware requirements for running Sagitta.
-
File Server: The file server needs a shared directory to allow access to the agency database, form letters, and proposal pages.
-
All users of the AMS Word Processing and Proposals product must have access to the same file server. If your remote sites are connected via WAN, there is no need to make any changes.
-
If you have separate LANs, the AMS Word Processing and Proposals product must be loaded for the server side of each LAN.
QUESTIONS ABOUT THIS RELEASE
If you encounter problems or have questions concerning this release, Vertafore offers the following helpful resources:
-
Search the Knowledge Base on My Vertafore.
-
Create a Case at My Vertafore.
Before you can successfully use the AMS Word Processing and Proposals product, you need to complete the following tasks:
-
Run the Server Installation on the file server from which the MS Word documents are shared
-
Run the AMS Word Database Conversion Utility on the file server for existing AMS Word v4.0.0.0 databases
-
Run the Custom Client Installation
-
Personalize Sagitta before using the product.

|
AMS Word Processing and Proposals Version 4 will automatically update to Version 5. Earlier versions may require their manual removal prior to installation. |
-
Close all applications on your workstation.
-
Copy the AMS Word 5.1.2.0 release files to a network share.
-
Go to the release path in Step 2 and double-click to open the AMSWordServerInstall.exe file in the WPPServer folder.
-
If a User Account Control displays this message — "Do you want to allow this app to make changes to your device?" — click Yes.
-
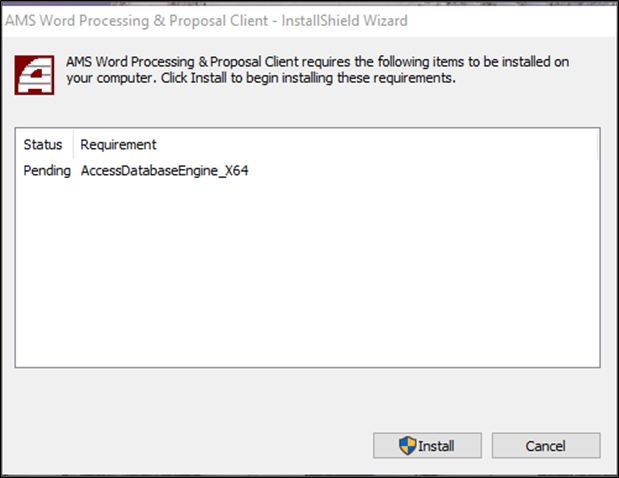
5. The following prompt may display if the server does not have the required AccessDatabaseEngine_X64 installed.
If the prompt does not display, continue to Step 11.
-
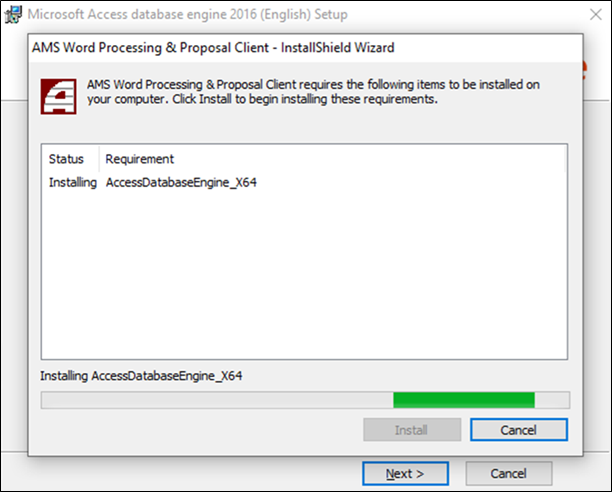
Click Install. The Microsoft Access Database Engine 2016 (English) Setup window will display under the AMS Word Processing Server Install window.
-
Bring the window to the front by clicking next to the Next button.
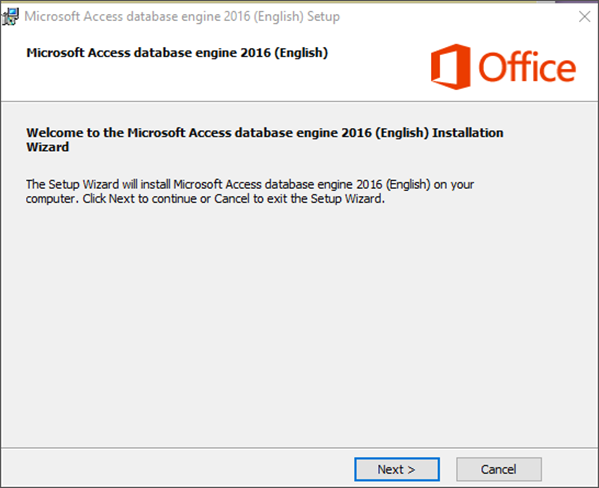
-
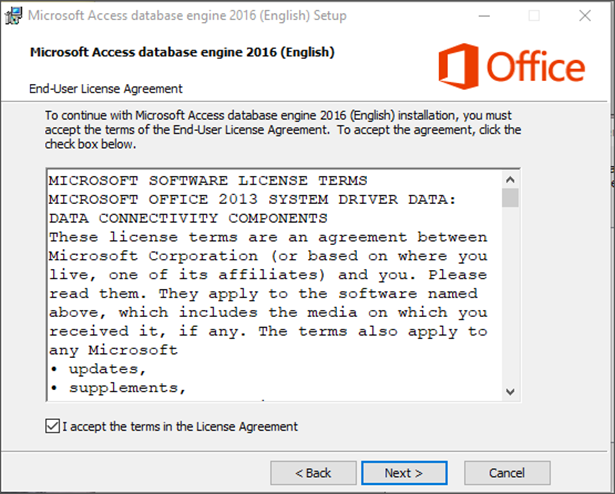
Click Next. The End-User License Agreement displays.
Check the box, I accept the terms in the License Agreement.
-
Click Next.
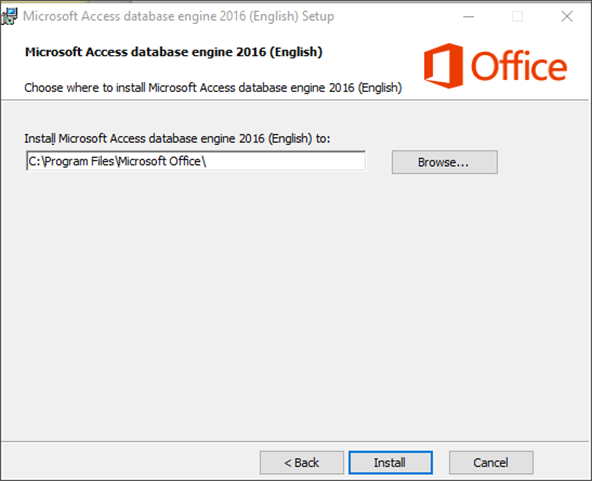
-
The path will be filled. Click Install.
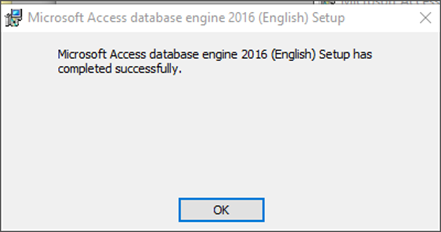
-
Click OK. The AMS Word Processing Server Install page will display.
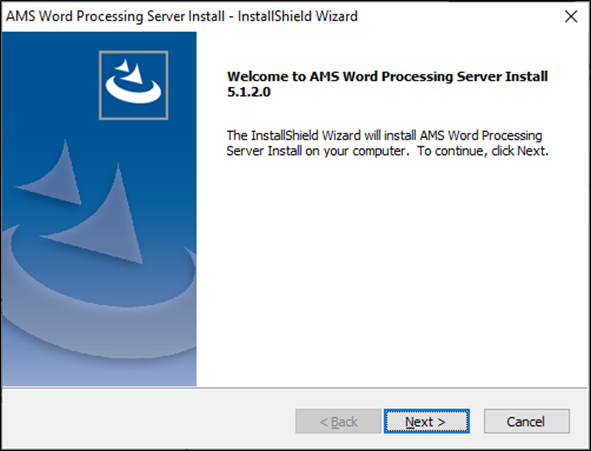
-
Click Next.
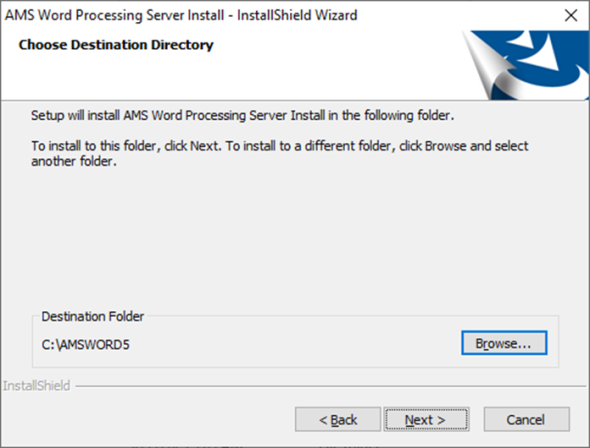
At the Choose Destination Directory page, the path is automatically determined based on the web server‘s registry if you have a prior version of AMS Word Processing and Proposals installed.
If you are installing AMS Word Processing and Proposals for the first time, the default Destination Folder location is F:\AMSWORD5. This folder must be shared for any AMS Word users.
If desired, click Browse to install to a different folder. Make a note of your Destination Folder as you will need this information later in the installation process.
-
Click Next. The Setup Type page appears.
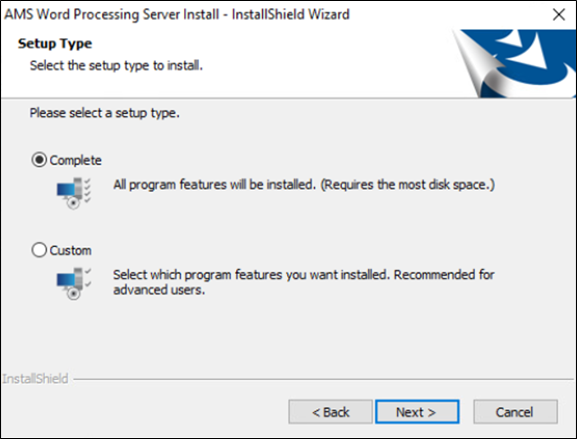
Only select the Custom setup if there is a need to individually install a server component (e.g., for troubleshooting, etc.).
-
Select Complete setup type and then click Next.
-
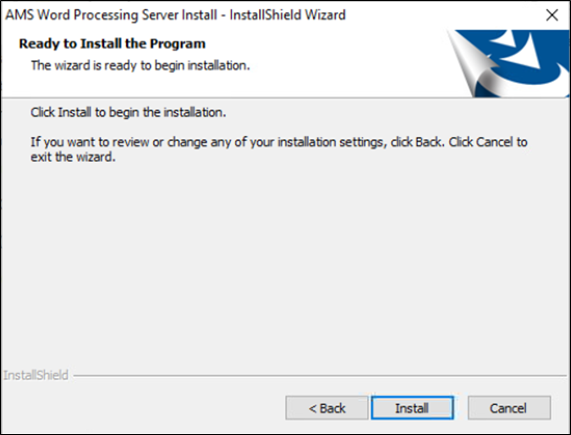
On the Ready to Install the Program page, click Install to begin the installation.
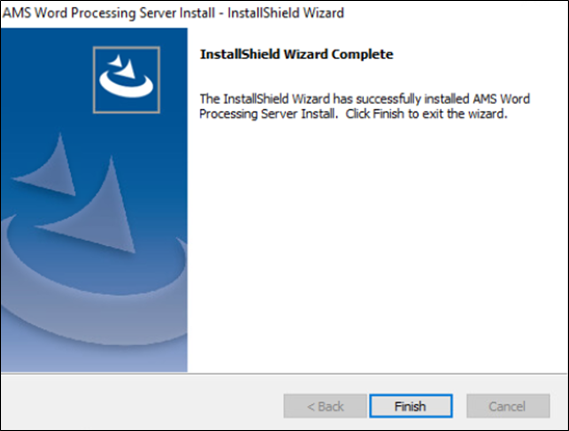
At the Setup Status page, you will see the progress of the files being installed, followed by the InstallShield Wizard Complete page.
-
Click Finish to complete the installation.

|
If your agency is new to AMS Word, this step is not required. Continue to the next section, Load the AMS Word Processing and Proposals Client Install. |
If your agency uses the existing AMS Word v4.0.0.0, run the Conversion Utility to update the PROPOSAL.mdb database. This process will be performed once.
Pre-Conversion
-
Download and run the Microsoft Access Database Engine 2010 Redistributable for the AccessDatabaseEngine_X64.exe.
-
If the 2016 version is already loaded, do not uninstall it; itwill be used after the first conversion.
-
-
This step is required for converting your classic database and will replaced after the first conversion runs.
-
To improve the performance of the conversion:
-
Review the template folders and remove all obsolete templates.
-
Copy the folder AMSWORD/TEMPLATE from the shared drive to your local drive.
-
This conversion will convert 100 .doc template documents per minute. To calculate your conversion length, count the number of .doc template documents and multiply by one minute to find the total length.
Running the Conversion
-
Go to the server location of the AMS Word Utility folder, e.g., F:\AMSWORD5\Utility
-
Right-click to open the DatabaseConversion.exe file select "Run as Administrator."

-
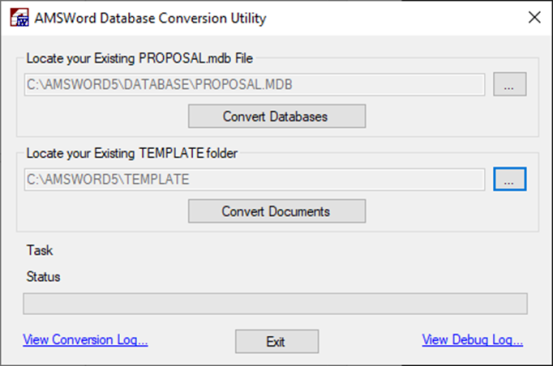
The AMS Word Database Conversion Utility will be displayed.
-
The files AMS_NEW.mdb and PROPOSAL_NEW.mdb are created in the AMSWord\Database folder with today’s date and time.

If AMS Word 5 was installed to a new folder instead of into the existing AMS Word folder, it is necessary—before running the conversion—to go to the 4.0 AMS Word\Database folder, copy the Ams.mdb and the PROPOSALmdb files, and paste them into the 5.1 AMS Word\Database folder. This process will overlay the new files with the same name created during the Conversion process.
Go to the 4.0 AMSWORD\TEMPLATE folder and copy all templates to the 5.1 AMS AMSWORD\TEMPLATE folder. This will ensure your templates are available in 5.1.
-
-
Click the … button under the heading Locate your Existing PROPOSAL.mdb File and navigate to the PROPOSAL.mdb file, e.g., F:\AMSWORD5\DATABASE\PROPOSAL.mdb
-
Click Convert Databases.
-
The conversion runs and shows the message Finished Conversion tasks completed when it is complete.
-
Go to Add/Remove Programs; click on the Microsoft Access database engine 2016 and click Modify.
-
Select "Reinstall or Repair Microsoft Access database engine 2016 (English) to its original state" and click Next.
-
Click "Detect and Repair errors in my Microsoft Access database engine 2016 (English)" and click Install.
-
Locate your Existing 4.0 TEMPLATE folder and copy the folder to a computer that has Microsoft Word loaded on it.
-
On the computer where you copied the TEMPLATE folder, go to the location of the AMS Word Utility folder from Step 1. e.g., F:\AMSWORD5\Utility.
-
Right-click the DatabaseConversion.exe file and select "Run as Administrator."
-
The AMS Word Database Conversion Utility will be displayed.
-
Click the … button under the heading Locate your Existing PROPOSAL.mdb File and navigate to the PROPOSAL.mdb file. e.g., F:\AMSWORD5\DATABASE\PROPOSAL.mdb
-
Click the … button under the heading Locate your Existing TEMPLATE Folder and navigate to the Template folder. e.g., F:\AMSWORD55\TEMPLATE.
-
Click Convert Documents.
-
The conversion will then run, displaying the message Completed document conversions and updates when it is finished.

There are two log files included on the conversion page to provide additional information once the conversion is run. If the logs are opened before the conversion is run, the following error will be displayed: The conversion/debug log file does not exist at F:\AMSWORD5\DATABASE\PROPOSAL.MDB. You must run the conversion first.
-
View Conversion Log: Select to display a text list of items converted items.
-
View Debug Log: Select to display a debug log in the default application for text files.
-
-
Click Exit.
-
If you copied the AMSWORD/TEMPLATE folder from the shared drive to your local drive, copy the AMSWORD/TEMPLATE/Converted folder back to your shared drive folder AMSWORD/TEMPLATE.
-
On your server, remove the Microsoft Access Database Engine 2010 Redistributable from your "Programs and Features" control panel
-
Find the entry for Microsoft Access Database Engine 2016, select it, and then click Modify.
-
On the Office setup dialog, select "Reinstall or Repair" and click B.
-
On the next screen, click Detect and Repair… and then click Install.
-
This concludes the steps necessary to perform the database conversion on your AMS Word database.
Post-Conversion
All Proposal Templates that are .doc (Microsoft Word 97 – 2003 Document) have now been converted to .docx (Microsoft Word Document).
-
Go to the AMSWORD/TEMPLATE/Converted folder and move the newly converted .docx to the Template folder. Vertafore recommends removing .doc template documents from the Template folder.
-
Go to the AMSWORD/TEMPLATE/Converted/AMSEXAMP folder and move the newly converted .docx to the TEMPLATE/AMSEXAMP folder. Remove .doc template documents from the TEMPLATE/AMSEXAMP folder.
-
Go to the AMSWORD/TEMPLATE/Converted/PROPOSAL folder and move the newly converted .docx to the TEMPLATE/PROPOSAL folder. Remove .doc template documents from the TEMPLATE/PROPOSAL folder.
-
Repeat this process for any other sub-folders in the Converted folder.
Each workstation that uses the AMS Word Processing and Proposals product must perform a Custom Client Setup.
-
Close all applications on your workstation.
-
Locate and open the AMSWordClientInstall.exe file.
This file can be found in the \AMSWord\Utility folder on your shared network server, or in the AMSWord 5\Workstation folder of the release package.

An error will be displayed if 32-bit Office products are installed. Uninstall the 32-bit product and re-run the client installation.
-
The installation will look for AccessDatabaseEngine_x64.exe. If this is not found, it will be installed before the AMS Word Client installation begins.
-
The following prompt will appear: AMS Word Processing & Proposal Client requires the following items to be installed on your computer. Click Install to begin installing these requirements. If either of the following prompts are displayed, click Install.
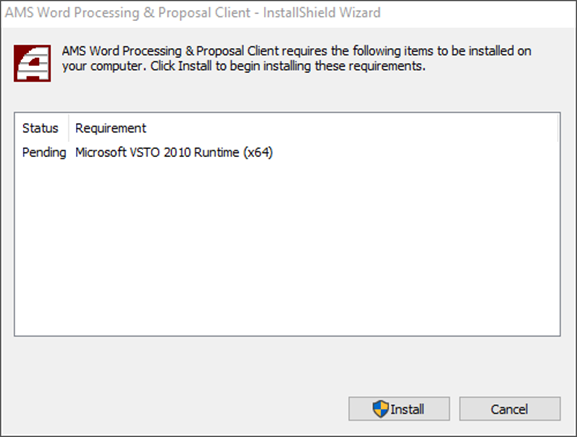
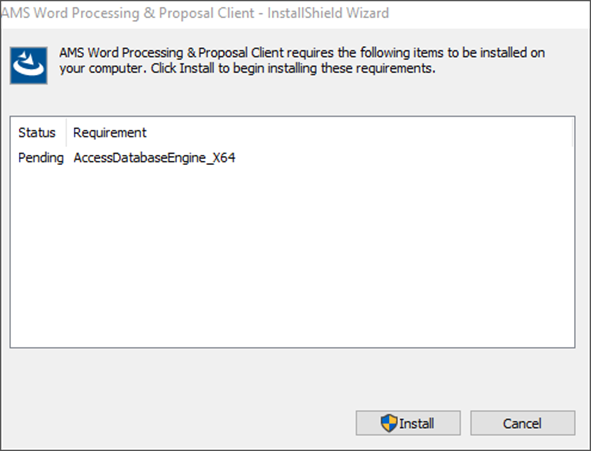
Click Install
A welcome page will be displayed. Click Next.
At the End-User License Agreement, click I accept the terms in the License Agreement.
Click Next.
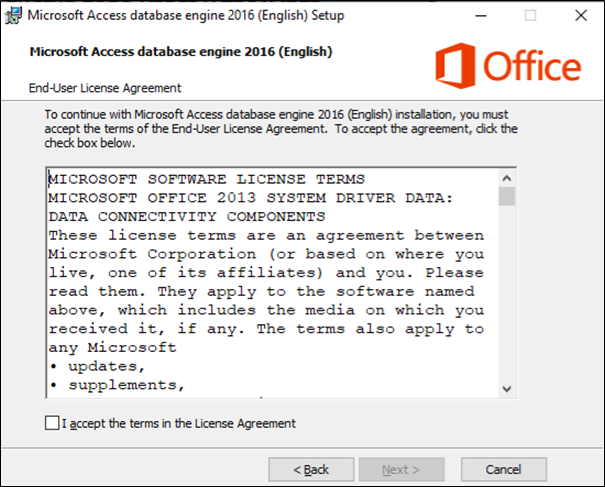
The Install Microsoft Access database engine page will open, and it defaults to the location of Microsoft Office.
Click Install.
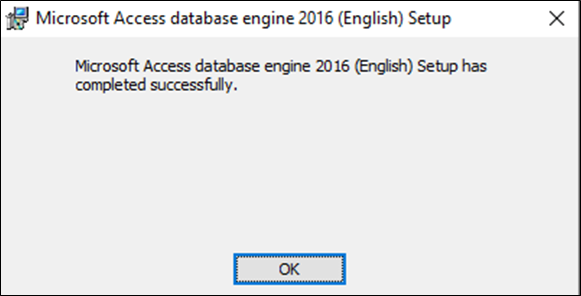
After installing, the following completed page will be displayed:
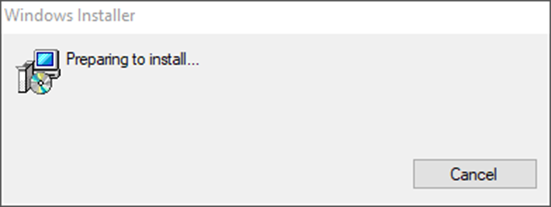
The Preparing to Install page will be displayed:
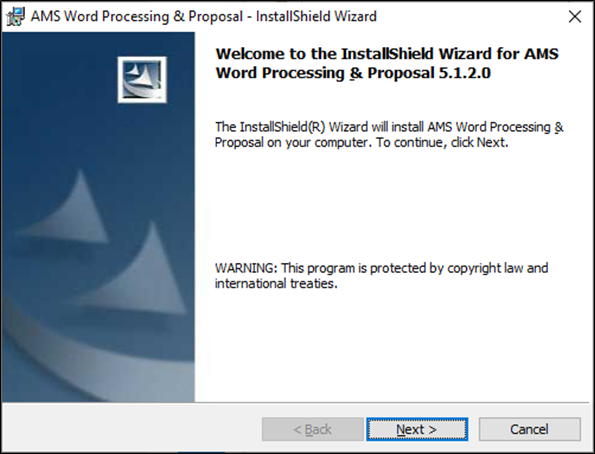
The dialog Welcome to the InstallShield Wizard for AMS Word Processing and Proposal Client will be displayed.
-
Click Next.
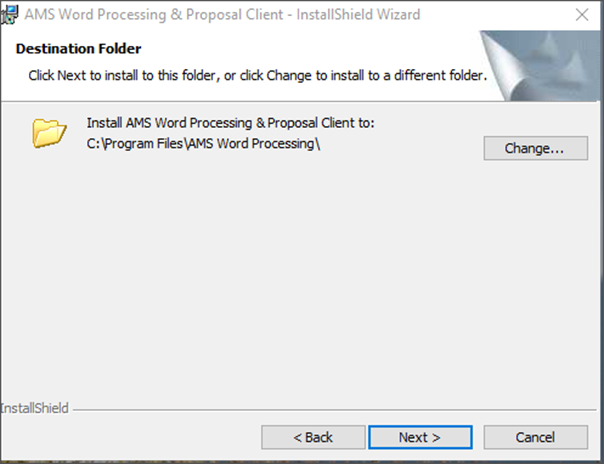
If you are installing AMS Word Processing for the first time, the default Destination Folder location is C:\Program Files\AMS Word Processing
If desired, click Change to install to a different folder.
-
Click Next.
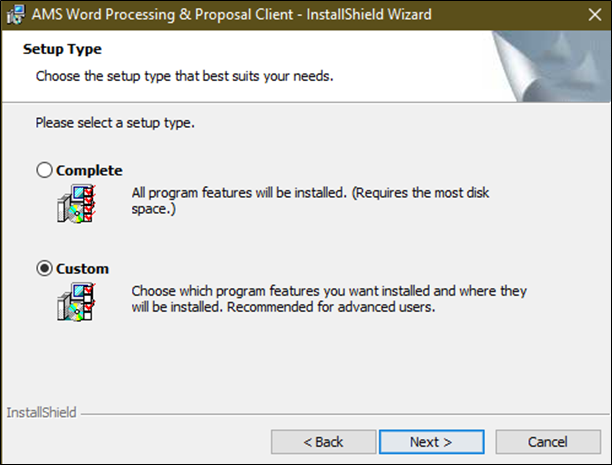

You should not change the setup type from Custom to Complete, unless Sagitta Customer Service has instructed you to do so.
-
Select Custom and then click Next.
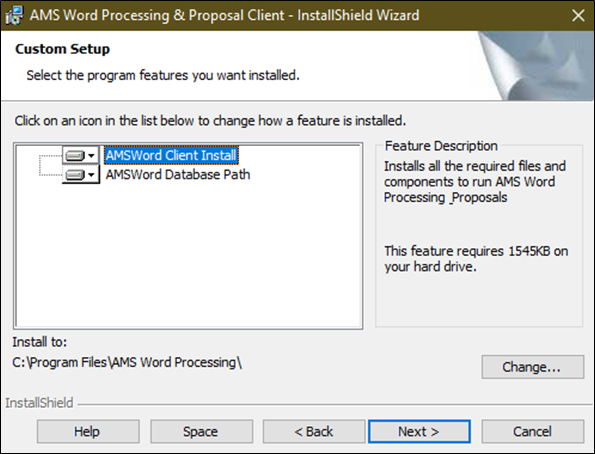
-
Select AMS Word Database Path.
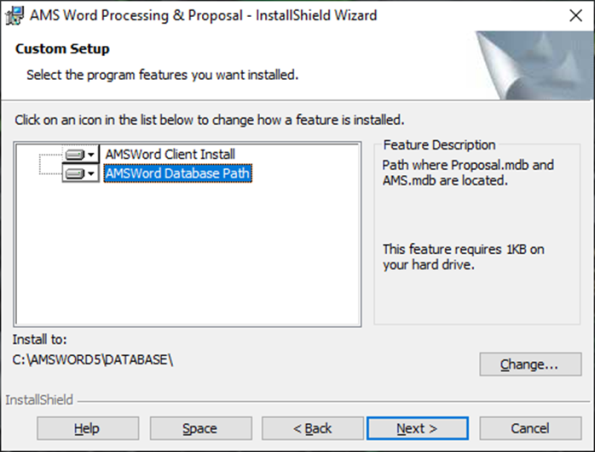

The AMSWord Database Path will not display mapped network drives when AMSWordClientInstall is run as administrator. Run the client install without selecting Run as Administrator.
The AMS Word Database Path Install to: is automatically determined based upon the workstation‘s registry.
If you are installing AMS Word Processing and Proposals for the first time, the default Install to:
location is C:\AMSWORD5\Database. If desired, click Change to select a different location.

IMPORTANT This folder should match the folder chosen as the Destination Folder during the Server Installation and must include the Database folder.If, for example, you changed the Destination Folder to K:\AMSWord\East\, during the Server Install set the Client Install location to: K:\AMSWord\East\Database
-
Click Next. The Ready to Install Program page will appear.
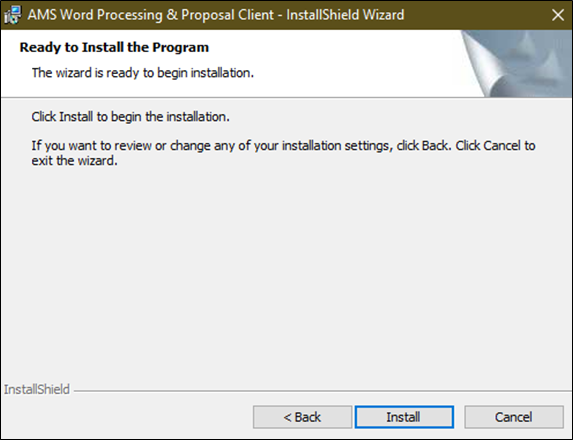
-
Click Install to begin the installation.
At the Setup Status page, you will see the progress of the files being installed, followed by the
InstallShield Wizard Complete page.
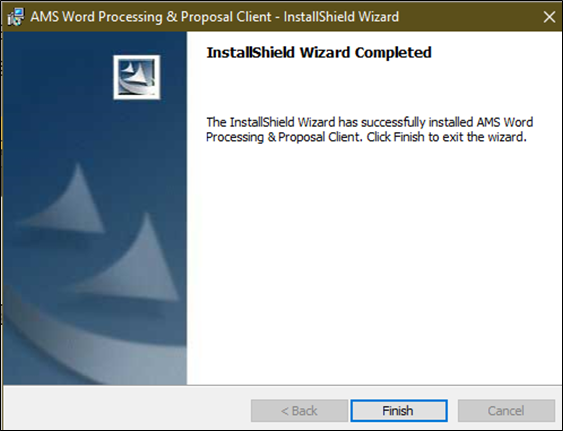
-
Click Finish to complete the installation.
Following the client installation, the AMS Word Processing and Proposals Setup page is displayed upon the first time the user initiates AMS Word (i.e., creates an AMS Word document or proposal, or opens the AMS Word Processing Administrator).
-
Database folder: Navigate to the shared location of the AMS Word Database folder. Click the PROPOSAL.MDB
-
Temporary Folder: Defaults to the Temp folder for that user on their local drive
-
Click Save when finished.

-
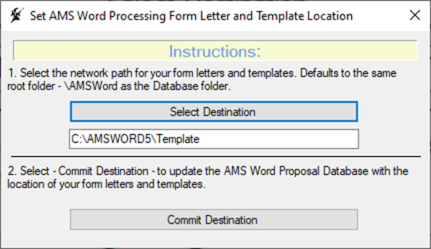
The AMS Word Processing Form Letter and Template Location page is displayed.
-
Follow the instructions on this page to navigate to the folder for shared form letters and templates.
-
Click Commit Destination when finished.

|
A flag is set when this personalization page is completed, so that it does not run each time AMS Word is initiated. If there is a need to re-run this process, go to the Utilities folder inside the AMSWORD folder in the shared network location, and then double-click Wizard.exe. |
Before you can use AMS Word Processing and Proposals, you must perform the following two functions:
-
Set up the WORD97 product on the Import/Export Personalization page
-
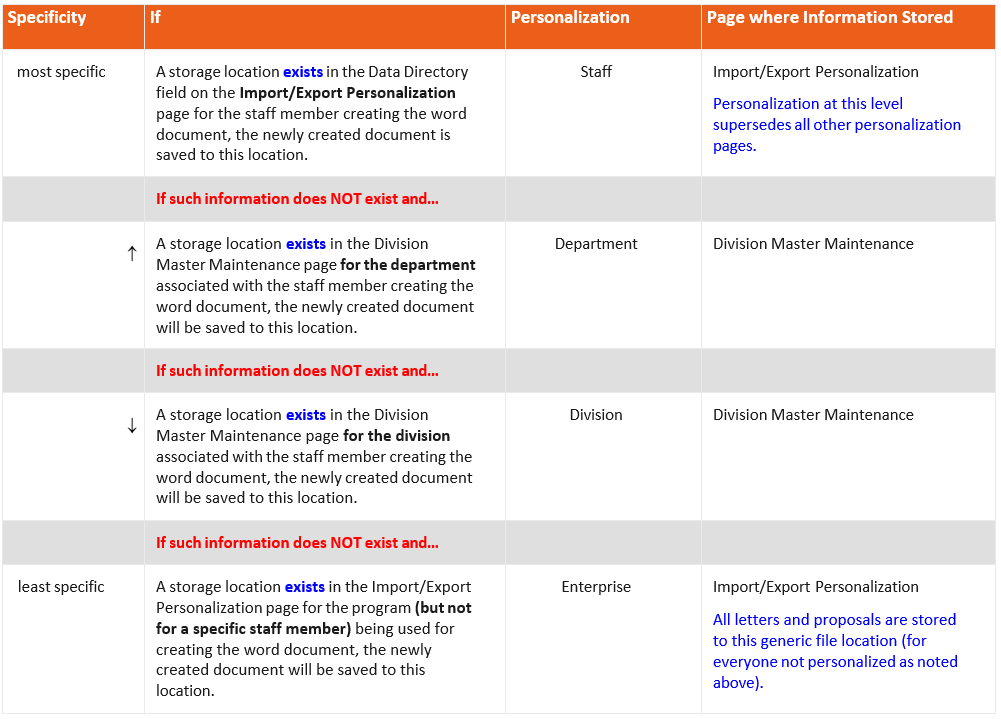
Determine the location to be used to store saved AMS Word Processing form letter and proposal documents. The location is defined in the Import/Export Personalization and/or Division Master Maintenance pages. Sagitta uses a set of hierarchy rules to determine the storage location. Refer to the next page for more information on Document Storage Hierarchy Rules.
To export data from Sagitta using AMS Word Processing and Proposals, enter the following values in the Export Information section of the Import/Export Personalization page to support the WORD97 product. For information to access the Import/Export Personalization page, refer to Sagitta Online Help.
|
Field |
VALUE |
|---|---|
| Program ID |
Type the first page ID you wish to personalize:
|
| Staff ID |
Press Enter to leave blank and associate this information with every user, or enter a Staff ID for each Staff member in turn (complete a new page for each staff member). Leave blank if the same program directory path is where documents will be stored for all staff. |
| Product | WORD97 (as shown — all caps, no space) |
| Opts | Leave blank |
| Target Data Src Shared? | Leave blank |
| Target Data Src | Leave blank |
| Data Directory | Enter the path and directory to be used as the default storage location for Sagitta documents. This is usually a network directory where documents can be shared. |
| File Mask | Leave blank |
| Program Dir | Leave blank |
| Program | Leave blank |
Document storage rules are as follows:
On the Role-Based Security page, you will find an AMS Word Processing section. The fields in this section are used to enable or disable the "Save As" feature of AMS Word Processing and Proposals, and also to enable or disable the Document Location fields on the Division Master Maintenance page.

SaveAs for Letters
| Blank | Allows you to use Save As while in an AMS Word Letter document. |
| Yes | Allows you to use Save As while in an AMS Word Letter document. |
| No Access |
Does not allow you to use Save As while in an AMS Word Letter document. If Blank, the Save As menu option is grayed out in Word and is therefore unavailable for use. |
SaveAs for Proposals
| Blank | Allows you to use Save As while in an AMS Word Proposal document. |
| Yes | Allows you to use Save As while in an AMS Word Proposal document. |
| No Access |
Does not allow you to use Save As while in an AMS Word Proposal document. If Blank, the Save As menu option is grayed out in Word and is therefore unavailable for use. |
Prompt for Copy / Replace for Letters
| Blank | While in an AMS Word Letter document, you are prompted to Copy or Replace the original document when using Save As. |
| Yes | While in an AMS Word Letter document, you are prompted to Copy or Replace the original document when using Save As. |
| No Access |
While in an AMS Word Letter document, you will not receive the prompt to Copy or Replace the original document when using Save As. The original document is still linked to Sagitta, and a copy of the original is created. |
Prompt for Copy / Replace for Proposals
| Blank | While in an AMS Word Proposals document, you are prompted to Copy or Replace the original document when using Save As. |
| Yes | While in an AMS Word Proposals document, you are prompted to Copy or Replace the original document when using Save As. |
| No Access |
While in an AMS Word Proposals document, you will not receive the prompt to Copy or Replace the original document when using Save As. The original document is still linked to Sagitta, and a copy of the original is created. |
Division / Dept Personalization
| Blank | You are not able to edit the Activities Word Document Location and the Proposals Word Document Location fields on the Division Master Maintenance page. |
| Yes | You can edit the Activities Word Document Location and the Proposals Word Document Location fields on the Division Master Maintenance page. |
| No Access | You are not able to edit the Activities Word Document Location and the Proposals Word Document Location fields on the Division Master Maintenance page. |
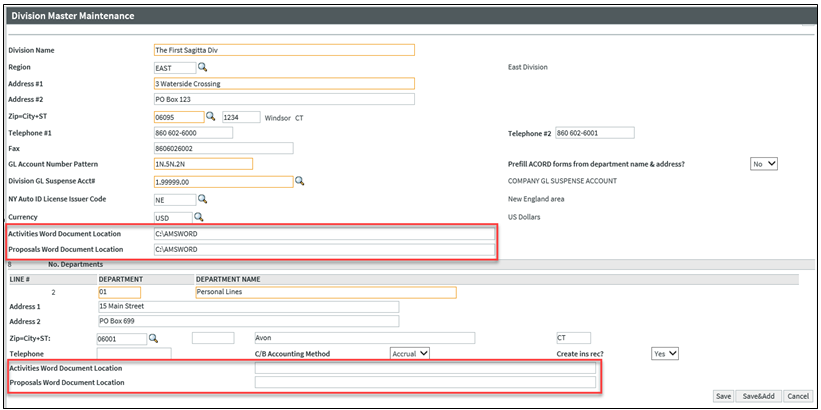
You will find the Activities Word Document Location and Proposals Word Document Location fields in both the Division and Department sections of the Division Master Maintenance page. These fields are used to define the storage location of new AMS Word Processing form letters and proposals.
If the fields appear grayed-out, it is because the Division/Dept Personalization field in Role Base Security is set to "Blank" or "No Access." For more information on enabling these fields, refer to the Personalizing for Role-Base Security topic. For information on accessing the Division Master Maintenance page, please refer to Sagitta Online Help.
|
Division information section |
action |
|---|---|
| Activities Word Document Location |
Enter the path to be used to store a new AMS Word Processing form letter document. |
| Proposals Word Document Location |
Enter the path to be used to store a new AMS Word Processing form letter document. |
|
Department information section |
action |
|---|---|
| Activities Word Document Location |
Enter the path to be used to store a new AMS Word Processing form letter document. |
| Proposals Word Document Location |
Enter the path to be used to store a new AMS Word Processing form letter document. |
If the Activities / Proposals Word Document Location fields are blank and you populate any one of the Word Document Location fields with text and click Save, the following prompt will appear:
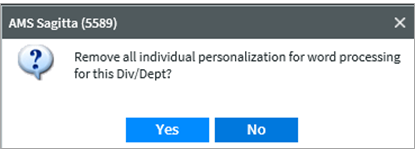
If this message appears, how you answer the question may change the hierarchy of the already established personalization.

The Administrator window is the control center for the AMS Word Processing and Proposals product. Use it to set up and organize templates, folders, standard text, and proposal pages. Once all these elements are created in the Administrator, anyone in the agency who has access to the folders can use their contents to compile a form letter or assemble a proposal and then display and print them as with any other Word document.
This control and flexibility allow you to ensure that all agency correspondence meets your required standards and conforms to the design and characteristics you have established for your documents. The appearance of any letter or proposal produced by the agency will be polished and consistent.
The Administrator also allows you to set up Sagitta merge references that import live Sagitta data from your client and policy database into your form letter or proposal.
Follow the steps below to create a shortcut on your desktop to access the Administrator.
-
From your desktop, navigate to the AMSWORD folder on your shared network drive.
-
Open the AMSWORD folder and right-click on the AMSAdmin.exe file.
-
Select Send To > Desktop. This will create a shortcut to the Administrator on your desktop.

The Administrator is a cross between a file management utility and a word processor.
-
Provides tools to create and maintain documents and folders.
-
Allows you to create and format text.
-
Includes tools for inserting Sagitta merge references.
-
The window has two tabs:
-
Form Letters and Standard Text
-
Proposal Setups and Pages.
-
-
Select the Form Letters and Standard Text tab to open the window you need for creating and maintaining form letters.
-
Select the Proposals SetupsandPages tab to open the window you need for creating and maintaining proposals.

Not every menu item or toolbar button is available for every task. If one is not available, it displays as grayed-out (dimmed) on the page.
-
Continue through the topics for step-by-step procedures on how to set up your form letters and proposals for use in the agency.
As with all Windows applications, there are several options for performing tasks such as page navigation, opening files, or copying pages. This documentation suggests one standard method, i.e., using the menu bar to select a function (for example, Select File > Save.)
As you become more experienced with the program, you will find other methods and shortcuts worth exploring.
-
A primary and notably useful shortcut is the right-click menu.
-
Point to any area of the Proposal window and right-click to display a quick-access menu, which then presents the options for the window area you are using.
-
Keyboard shortcuts such as Ctrl+C for "copy" and Ctrl+V for "paste."
-
Using the drag-and-drop feature to move files and pages from one location to another.
-
If you want to copy an item instead of moving it, hold down the Control key as you drag and drop.
-
When you are building a proposal, double-click a page to add it to your page list.

|
The person who uses the Administrator to build form letters and proposal pages should be an experienced Word user who is familiar with templates, styles, headers, and footers. |

If you are familiar with Microsoft Word, you will note that the Administrator shares some of these same tools. When you hover over an icon, a tool tip appears. A tool tip is a short clue to the purpose of that specific toolbar button.
The buttons available in the Administrator are briefly described below. Refer to Microsoft Word Online Help for detailed information on the most common Microsoft Word icons.
-
Dialog boxes associated with each icon will vary, depending on the tab selected and the task being performed.
-
Not every icon is always available. If an icon appears grayed out, it is not available.
| Icon | Function | Description |

|
New | Depending on the tab selected, opens a new form letter, standard text item, proposal setup, or proposal page. |

|
Open | Open a standard text item or Word document |

|
Save | Save your work |

|
Cut | Cut, or remove, is the first step in moving standard text items, or form letter. The Clipboard function is available for standard text. |

|
Copy | Copy a standard text item or form letter |

|
Paste | Pasting or placing is the second step in moving a standard text item or form letter that has been cut or copied |

|
View Documents as List Only | This feature lets you view all available Proposal pages at one time, without regard to the folder where it is assigned. You cannot add Proposal pages when this view is ON. |

|
AMS Tables and Fields | Opens the Sagitta Database Tables and Fields dialog box |

|
Open Microsoft Word | Use to open Microsoft Word with AMS Word Processing |

|
Preview Form Letters | Use to preview your form letters before you compile them |

|
Compile Form Letters | Open the Compile Form Letters dialog box |

|
Large Icons | Select the largest size for icons in the current list view |

|
Small Icons | Select the smallest size for icons in the current list view |

|
List View | If you only need to see the name of a form letter or standard text item without the information that is displayed in the Detail View, select this option. |

|
Details | If you would like to see a description of a document and the template on which it is based, select this view option. This option also allows you to view the information based on the column sort. To sort a column alphabetically, click on a column header. A second click will reverse the alphabet sort. |

|
Properties | Display the Properties dialog box with some general information regarding the selected item. The Properties dialog box does not appear for standard text. Use it for form letters, proposal setups and proposal pages only. |

|
Bold | Bold highlighted text |

|
Italics | Italicize highlighted text |

|
Underline | Underline highlighted text |

|
Add Bullets to Selected Paragraph | Make a bulleted list from highlighted text |

|
Decrease Indent | Decrease indents on highlighted text |

|
Increase Indent | Increase indents on highlighted text |

|
Add Selected… | Add highlighted text to a form letter |

|
Add All... | Add all the selected items in a standard text window to a form letter |

|
Remove Selected… | Delete standard text items from a form letter |

|
Remove All… | Remove all the items from a form letter |

|
Move Item Up in Order | Change the position of a selected standard text item in a form letter; the selected standard text will take the place of the item immediately preceding it each time you click the icon |

|
Move Item Down in Order | Change the position of a selected standard text item in a form letter. The selected item takes the place of the item immediately below it each time you click the icon. Use these buttons to change the sequence of proposal pages, or to re- arrange scheduled items in a standard schedule. The window menus are one method for navigation and access to different functions of this product and are described in detail here. In addition to these menus, there are separate right-click menus and keyboard shortcuts not described in this guide. |
This section provides information on each of the menu options found on the Administrator menu.

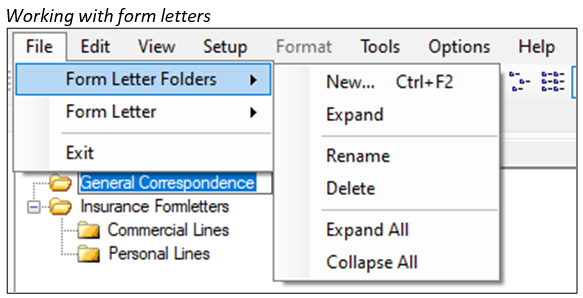
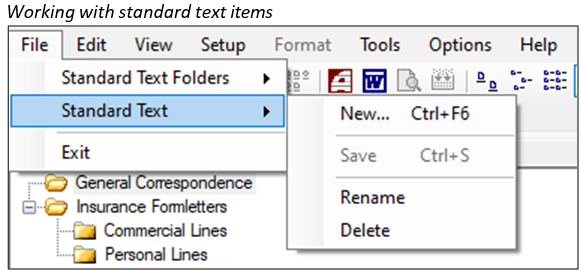
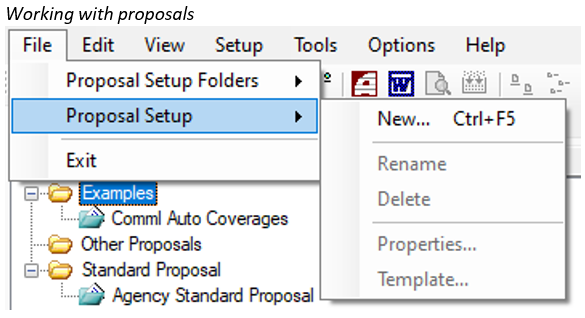
The File Menu
From the file menu, you can:
-
Create form letters and standard text folders
-
Sort folders and exit a document
Items listed on the File menu change according to whether you are working with form letters, standard text, or proposals.
The Edit Menu
From the Edit menu, Windows formatting options are available to change the appearance of standard text.
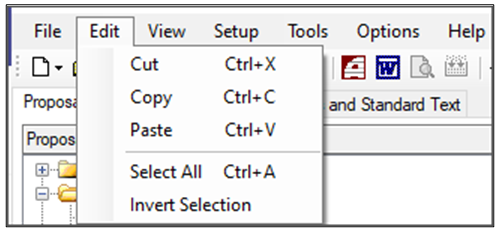
Available options:
| Option | Function |
| Cut, Copy, Paste | Copy or move highlighted text from one place to another within, or between standard text items and form letters. |
| Select All | Highlights all the text displayed in an active pane. |
| Invert Selection | Highlight the items in a pane that are not selected and deselect the items that are highlighted. For example, if you have one item out of three selected in a pane and then click the INVERT SELECTION OPTION, the other two items in the pane are selected instead of the item originally selected. |
The View Menu
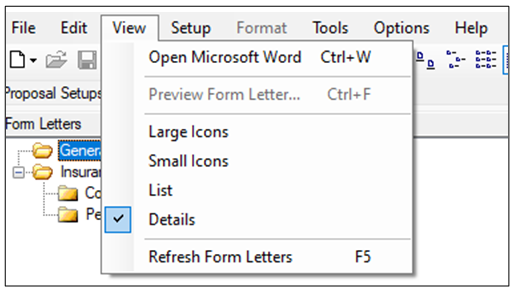
Available options:
| Option | Function |
| Open Microsoft Word |
Open Microsoft Word opens a new session. If Word is already running, this selection will load AMS Word Processing and give you access to Sagitta merge references. It will not change or delete any Word documents that are currently open. |
| Preview Form Letter | Shows the standard text items in a form letter. |
| Large / Small Icons | Select whether you want form letter folders, or standard text folders to display as icons. You can select either large or small icons. |
| List / Details | Select to display folder contents in a List or Detail format. The List option shows only the names of the form letter, or standard text folder. If you are working with form letters, detail information includes a description of the form letter, the name of the template in use, and whether the form letter has already been compiled. If you are working with standard text, details show a description and a reference number. |
| Refresh Form Letters | Allows you to update (or refresh) the Administrator screen. |
The Setup Menu
The Setup menu has three options:
-
Agency Settings
-
Default File Locations
-
Options
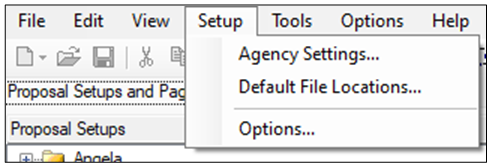
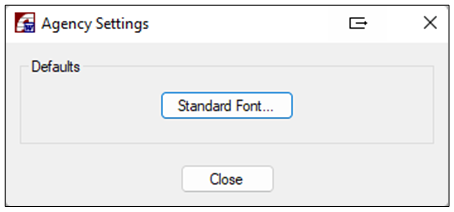
Agency Settings: Opens the Agency Settings dialog box, where you can apply the standard fonts selected.
-
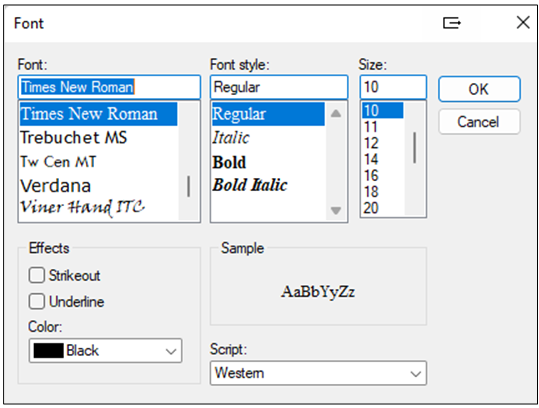
Click Standard Font button to select the agency font used for standard text. The Word Font dialog box appears:
-
Make your selections.
-
Once you click OK, the selections made will apply to standard text created from this point forward. To change the font for existing standard text, select TOOLS > APPLY AGENCY FONT.
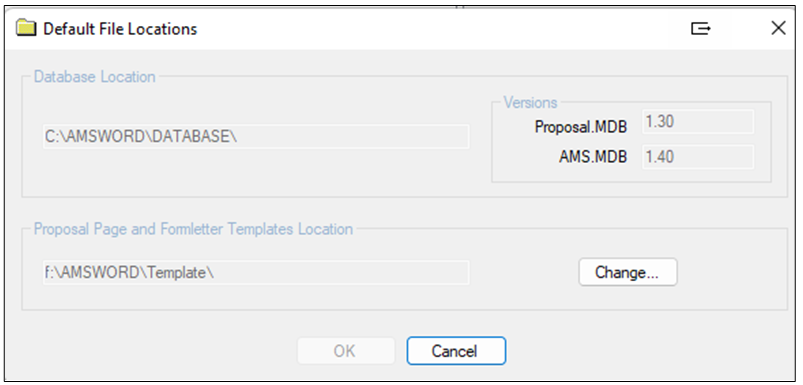
Default File Locations: Displays the database and template file storage locations. When this option is selected, the Default File Locations dialog box opens, showing the folder where the program‘s database is stored. It also shows the location of the proposal page and form letter templates. This information is personalized during the Install process.
Options: Select the level of oversight you want from the system (beginner / advanced). Beginner level provides frequent prompts as you work with the product. As you become more experienced, you can choose to reduce the number of prompts by selecting a different level.

|
The Options level selection applies to an individual workstation only. |
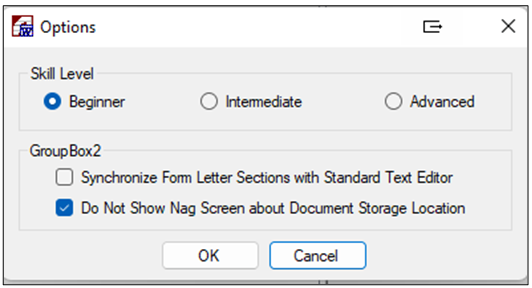
For information on each of the options in this dialog box, see the Options Menu section of this guide.
The Format Menu
The Format menu is available from the Form Letters tab only, not for Proposals. Options can vary based on whether your cursor is on standard text or a schedule.
Standard text:
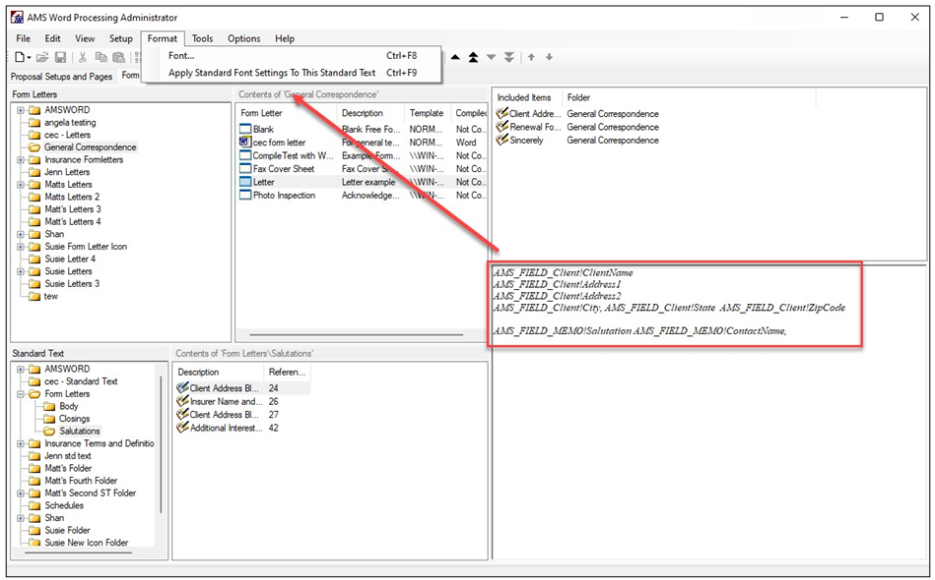
Available options:
| Option | Function |
| Font |
Select Font to display a standard font formatting dialog box where you can select the font type, size, character and so on. Format changes will only affect selected text. |
| Apply Standard Font Settings to this Standard Text | Select Apply Standard Font Settings to this Standard Text to make an immediate change (no Undo) to the displayed standard text. Caution: Do not click this button unless you are sure you wish to make the change. You will need to save any standard text changes that you make. The system does not save standard text changes automatically. |
Standard Schedule (formatting options):
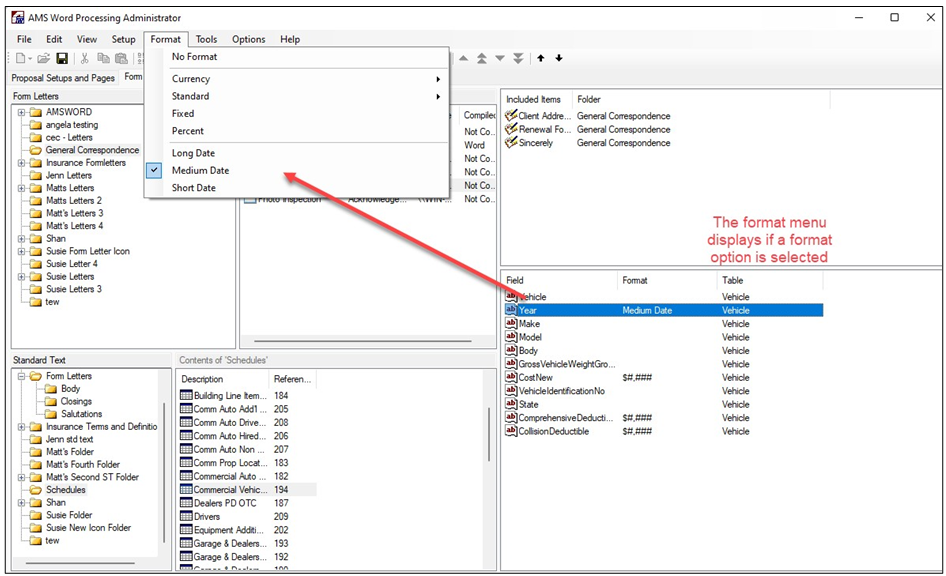
Items entered in Standard Schedules show the format that will be applied next to the field name in the scheduled items list. The item can be changed using the right-click menu.
Format types are selected from the toolbar, and only one format type at a time can be selected. That format type will remain selected until another is chosen. If you do not want a format type, select No Format.
| Format | Data Before Format Applied | Data After Format Applied |
| Currency | 12345 | $12,345.00 |
| Standard | 12345 | 12,345.00 |
| Fixed | 12345 | 12345.00 |
| Percent | .50 | 50.00% |
| Long Date | 01/01/2022 | Saturday, January 01, 2022 |
| Medium Date | 01/01/2022 | 01-Jan-22 |
| Short Date | 01/01/2022 | 1/1/22 |
The Tools Menu
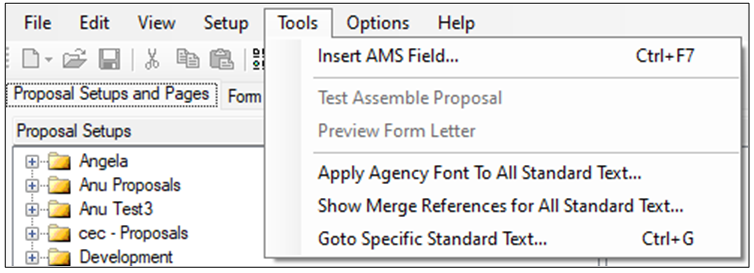
Whether you are on the Proposal Setups and Pages tab or the Form Letters and Standard Text tab, that positioning will determine what options you have available. See the table below.
Proposals:
Letters:
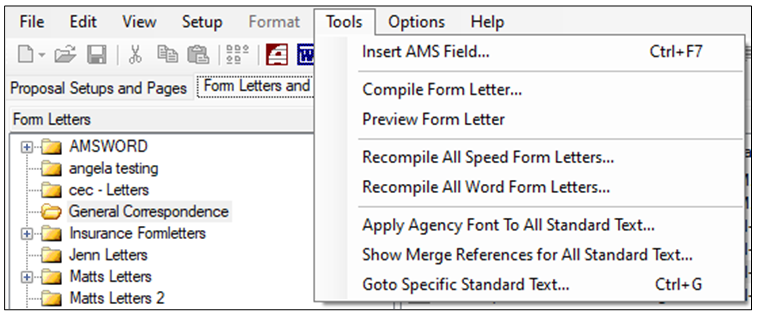
Available options:
| Option / Description | Proposal Setups and Pages Tab | Form Letters and Standard Text Tab | ||
|
Insert AMS Field: A merge field is a marker placed within a text item or schedule that will call live information from your Sagitta database whenever the letter is compiled. |
X | X | ||
|
Compile Form Letter: When a Form Letter becomes a Word document, it goes through a compilation process. This process takes all the parts of a Form Letter (template, standard test, merge references) and puts them together in a finished Word document. |
N/A | X | ||
|
Test Assemble Proposal: Compiles all the pages into a single proposal document and shows you what the sample proposal looks like. |
X | N/A | ||
|
Preview Form Letter: Enables you to preview your form letters before you compile them. |
N/A | X | ||
|
Recompile All Speed Form Letters: Allows you to recompile all letters that were originally compiled using Compile for Speed Data Merge. |
N/A | X | ||
|
Recompile All Word Form Letters: Allows you to recompile all letters that were originally compiled using Compile for Word Data Merge program. |
N/A | X | ||
|
Apply Agency Font To All Standard Text: Looks at all standard text that was created within the Administrator and updates the font to match what is listed in the Setup menu under agency settings, standard font. |
X | X | ||
|
Show Merge References For All Standard Text: Builds a list of all standard text that is attached to form letters within the Administrator. |
X | X | ||
|
Go to Specific Standard Text: A search feature that quickly moves you to a particular standard text within the Administrator by searching on reference #. |
X | X |
The Options Menu
The Options menu offers the following choices:

Available options:
| Option | Description |
| Skill Level |
Skill Levels:
Your selection affects the number and frequency of system prompts and warning messages. At the beginner level, more system prompts are displayed. For example: When you move a piece of standard text from one form letter to another, you would get an “Are you sure?” message. As you become comfortable with the program, select the intermediate and advanced levels to decrease the frequency of system messages. |
| Synchronize Form Letter Sections |
The Synchronize Form Letter Sections allows you to instruct the system to automatically show standard text items in the Edit Window as you click on them. To select this option, select Synchronize Form Letter Sections from the drop-down menu. |
The Help Menu

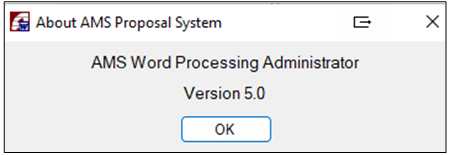
Select About to display the AMS Word Version:
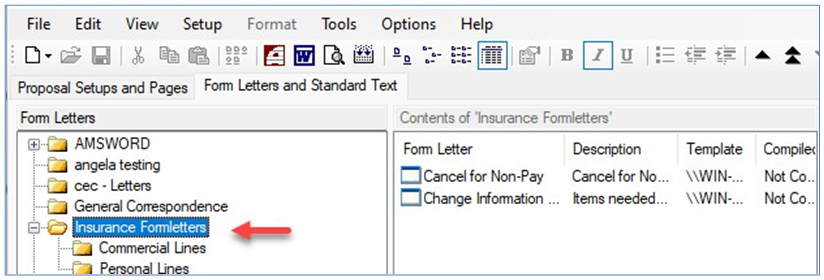
Use the AMS Word Processor Administrator to create folders to organize and hold form letters, standard text items, proposal pages, and proposal setups. Folders are created in one of the left panes on the Proposal Setup and Pages tab or the Form Letters and Standard Text tab.
Folders are not optional, but you are free to decide how to arrange them. For both form letters and proposals, the left panes list the folders that contain all the subsidiary text and other elements of your final documents.
It is helpful to use an easily recognized name for the folder, so you can retrieve information quickly. In our sample below, we have created a folder (top left pane) for Insurance Formletters. Within that folder are two more folders, one for Personal Lines and one for Commercial Lines. You should set up your folders according to your agency's needs.
Adding a Folder
Depending on the type of folder you are creating (to contain form letters, standard text, proposal pages or proposal setups) start from the appropriate tab and pane.
-
Click an insertion point in the appropriate folder area (left pane) and right-click New > Folder.
-
In the dialog box, type a name for your folder and click OK.
-
Make sure the folder is in a logical location. Use the drag-and-drop function to move the folder, if necessary.
-
Repeat the process as necessary to build folders for your Administrator elements. You can add or delete folders, and you can rearrange your folders at any time, using the drag-and-drop function.
Deleting a Folder
Folders must be empty before they can be deleted. To delete, point to a folder, right-click, and select Delete.
Creating, modifying and deleting templates are all tasks that are performed outside the Administrator. If you are an experienced Word user, you can create your own templates from scratch. If you are new to the process, it is quicker and easier to modify the sample templates that come with this AMS product. This will help you to learn more about how templates work.
The easiest way to create a template is to build a Word document with the layout options you prefer (margins, page setup), and then add any text and graphics that would apply to more than one kind of letter. When you have prepared a document with all the elements you want, save it as a .dot file in a shared directory. For more information on creating templates, refer to Word online help.
Word processing setup is the process of preparing and modifying standard form letters that agency staff will use to correspond with clients, insurers, and each other. Once you build the necessary word processing elements, agency employees can use them in conjunction with your templates to generate form letters and proposals—with only minimal typing.
-
All word processing setup functions are performed through the Administrator page, referred to as Administrator. Actual correspondence tasks for your Agency are performed in Microsoft Word.
-
You can create letters directly in Microsoft Word, but any standard form letter should be created using Administrator.
-
Form letters have three elements:
-
Template (created in Word)
-
Standard text
-
Sagitta merge fields
-
| Element | Description |
| Template | A template stores information about a document‘s design elements such as headers, footers, margins, and fonts. A template may include limited text, but it is primarily a way of setting up the look of your documents. It provides an easy way to ensure that your design is consistent from one form letter or proposal to another. Sagitta comes with some sample templates you can modify, or you can create your own in Word. |
| Standard Text |
Standard text items include elements such as salutations and closings. These items can also include body text for different situations such as marketing or collection letters, and insurance terms and definitions. The content of standard text items varies depending upon the purpose of the letter. Standard schedules are standard text items designated as a container for standard text items for a table. You typically use a standard schedule to display all items within a line-item set (for example, Vehicles, Locations, etc.). When you place a reference to the item in a proposal page, standard text, or form letter, the system creates a Word table at that location. Note: The system allows only one table per standard schedule. To maintain a reference number while using a different table, delete all existing fields. You can then attach a different table. Administrator makes it easy to amend text. Once you have built form letters from pieces of standard text, you can later change the text without having to remember every letter in which it was used. The system will automatically update the text item wherever it is used. |
| Merge Fields | AMS Word Processing allows you to insert information from your Sagitta database into documents. You can place merge fields for Sagitta data in a standard form letter or insert client and policy information into documents after the form letter has been compiled. |
This window is comprised of six panes. The top row is used to create and maintain form letters that consist of one or more standard text item. The bottom row is used to create and maintain standard text items.
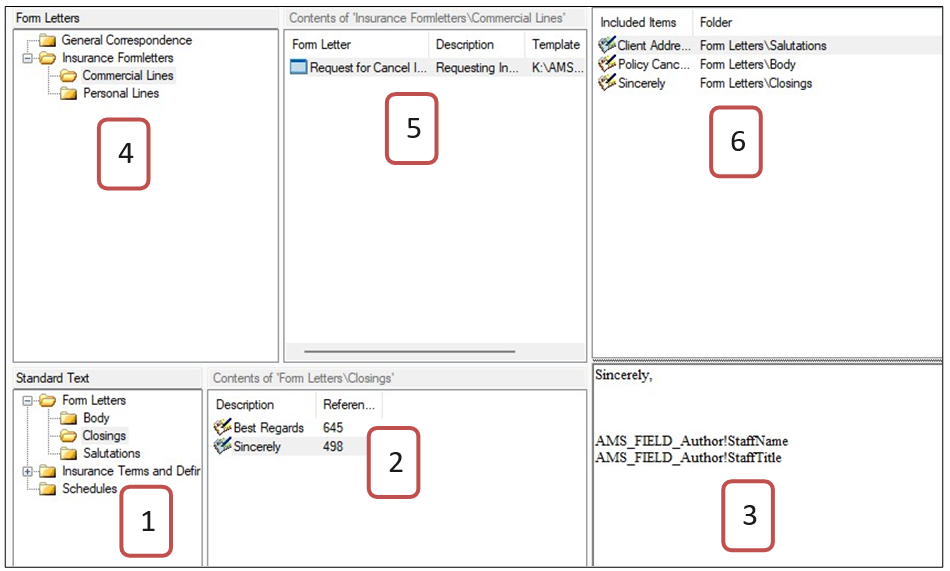
Each pane is described in the following table.
| Pane | Description |
| Pane 1 | Shows standard text folders. |
| Pane 2 | Shows the standard text items in the selected standard text folder. |
| Pane 3 | Edit window, where you create and modify standard text items. |
| Pane 4 | Shows form letter folders. |
| Pane 5 | Shows the contents of the folders, which are form letters. |
| Pane 6 | Lists the standard text items included in the form letter that is highlighted in the second window. |
Standard text items are building blocks for your letters. Once you create them, they can be used in any form letter assembled by anyone with access to the folder. Your text and style will be consistent. Follow the steps below to create your own standard text.
-
In the Administrator, double-click the standard text folder where you want this standard text to reside.
-
From the File menu, select Standard Text > New. The New Standard Text dialog box appears.
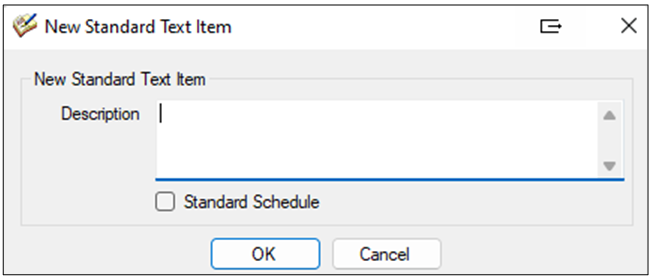
-
Type a Description (which will also be the name of this text item) and click OK. The icon that appears in the pane looks like a blank book. When you save your text, the book will be full.

If you wish to add a new standard schedule, select the Standard Schedule check box. There is no undo feature associated with this selection. If you make a mistake, delete the item, and start over.
The cursor moves automatically to your insertion point in the Standard Text Edit pane.
-
Type your text exactly as you wish it to appear in a future letter.
-
When your text is complete, click the Save button or a different pane in the Administrator window.
-
You can repeat the process until you have created the standard text items required for your form letter.
A merge field is a marker placed within a text item or schedule that will retrieve (call) live information from your Sagitta database, whenever the letter is compiled. The system will display the requested client or policy information in the form letter when it is compiled.

|
Live information means that the imported references will exactly match what is stored in your Sagitta database. As Sagitta data changes, the merge field will retrieve the most current picture of your client / policy information. |
-
To add a merge field to standard text or a schedule, click Tools > Insert AMS field.
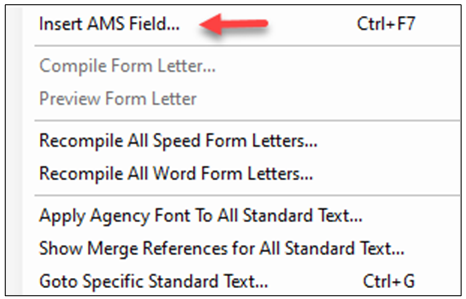
The Sagitta Database Tables and Fields dialog box appears.
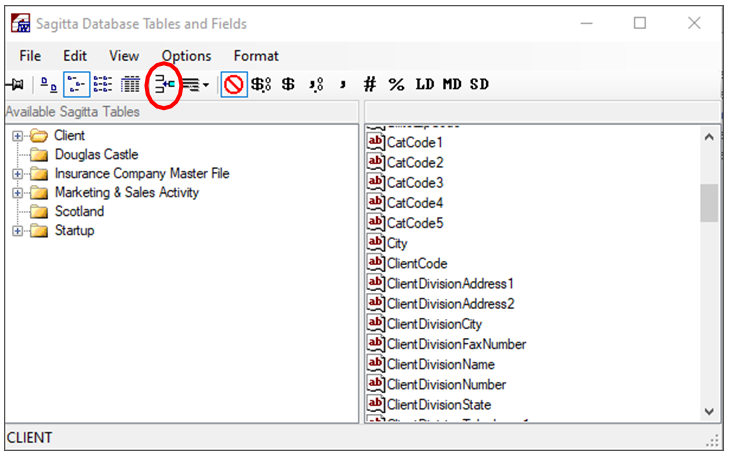
-
The left pane shows your Available Sagitta Table options. Double-click a table item to display the data items available within that table.
-
Select one or more fields in the right pane to insert into your standard text item. Fields are listed alphabetically, so you will need to rearrange them once they are placed into the document. For example, if you did not rearrange the selections shown above the first line would be Address1, then City then Client.
-
When you have selected all the fields you wish to insert at this point in your document, click the Insert Selected Field button.
Sagitta Database Tables and Fields Options Menu
The following options are available from the Sagitta Database Tables and Fields Options menu:
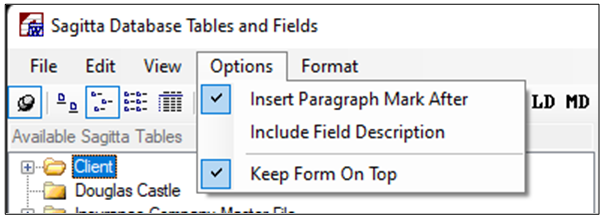
| Option | Action |
| Insert Paragraph Mark After |
If selected, a paragraph mark is placed after the field in the Administrator (pane 3) or when you insert data in the Word document allowing the next field to insert on a new line. For example, if you select this option when you insert multiple fields from the Fields list, it displays as follows:
If not selected, the inserted fields display as follows:
|
| Include Field Description |
When you insert field reference markers in the Administrator (Pane 3), or when you insert data in the Word document, the field name appears before the reference data. If selected, includes the field description. For example. if you select this option when you insert a field from the Fields list, it displays as follows:
If not selected, the inserted field displays as follows:
|
| Keep Form on Top |
If selected, the Sagitta Database Fields and Tables dialog box remains on top of the Administrator window or Word document. If not selected, the dialog box closes. |
Sagitta Database Tables and Fields Format Menu
The following options are available from the Sagitta Database Tables and Fields Format menu:
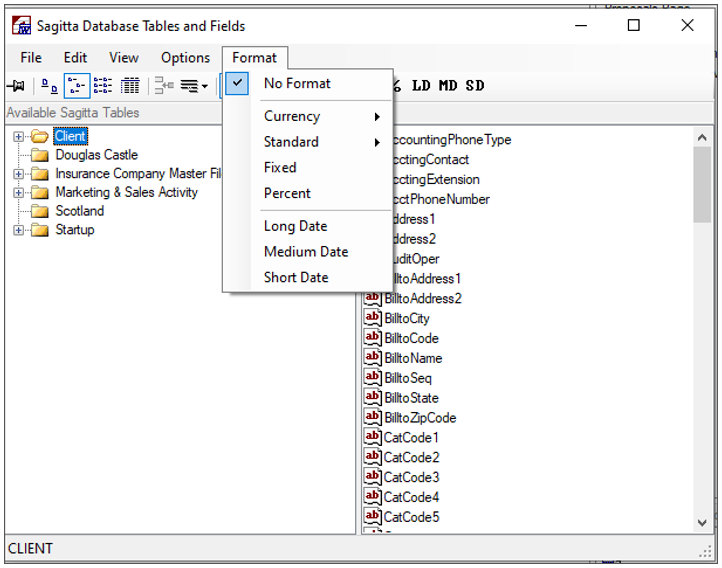
Items entered in Standard Schedules show the format that will be applied next to the field name in the scheduled items list. The item can be changed by using the right-click menu.
| Format | Data Before Format Applied | Data After Format Applied |
| Currency | 12345 | $12,345.00 |
| Standard | 12345 | 12,345.00 |
| Fixed | 12345 | 12345.00 |
| Percent | .50 | 50.00% |
| Long Date | 01/01/2022 | Saturday, January 01, 2022 |
| Medium Date | 01/01/2022 | 01-Jan-22 |
| Short Date | 01/01/2022 | 1/1/22 |
-
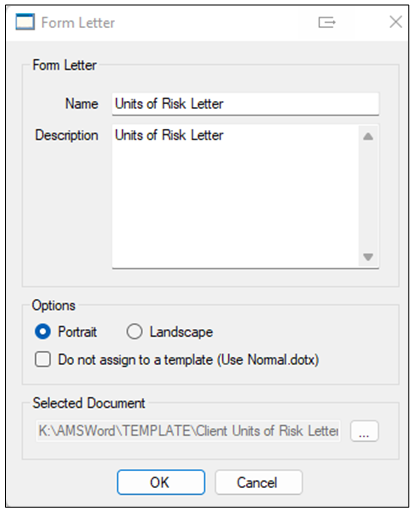
To create a form letter, open the folder where you want the form letter to reside.
-
From the File menu, select Form Letter > New. The Form Letter dialog box appears.

-
Type a name and description for the form letter. This information will appear in the Contents pane.
-
Select portrait or landscape orientation.
-
Select the template for the form letter by clicking on the … (ellipses) under the Selected Document heading.
-
Open the folder and double-click the template to be used for the form letter. You can:
-
Pick a template that meets your requirements for this letter, or
-
Select the Do not assign to a template (Use Normal.dotx) checkbox to use the standard Word template.
-
-
Click OK when you have made your selections.
-
The form letter name and description are listed in the Contents pane. The form letter is set up and ready to use.

|
Form letters point to a template, not to a specific Word document. |
Adding Standard Text Items to Form Letters
1. Double-click the folder that holds the form letter to which you will be adding standard text.
2. Double-click the form letter to which you will add standard text.
3. Open the standard text folder that holds the text you want to add.
4. Click and drag the standard text items you want to include to the Included Items window.
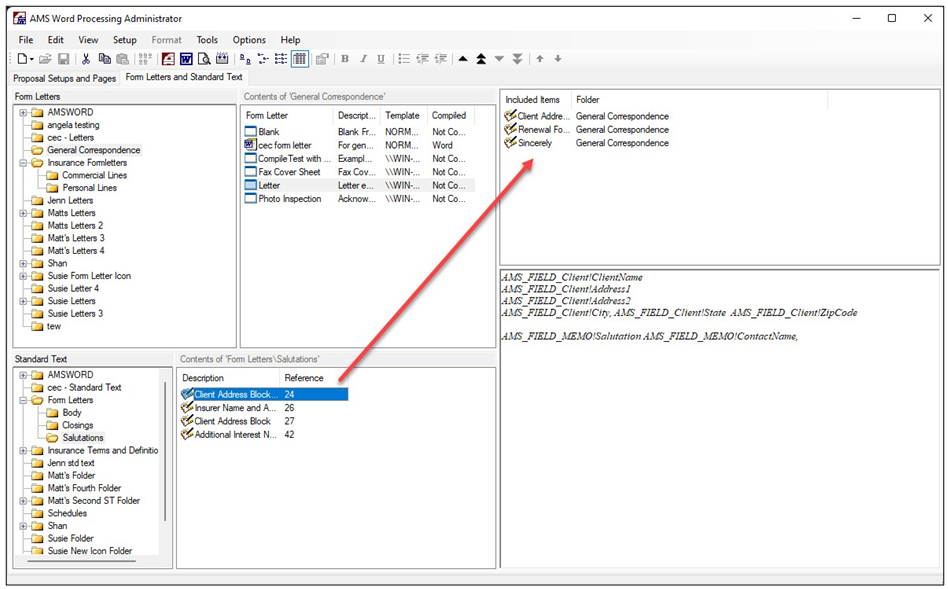
Arranging Standard Text Items Within Form Letters
Once you have included all the elements you want in your form letter, you can rearrange the order in which they will appear in your final letter.
Use the last two arrow keys on the tool bar to move a selected item up or down in the list.
Templates are saved as a .dot file in a shared folder. This folder must be accessible to everyone who needs to use the template.
Text in a Template vs. Standard Text
Any text that is saved as part of a template will appear in every document you create that uses the template. For this reason, text within a template should apply to a broad range of situations (for example, the agency‘s mission statement contained in the footer). If you desire flexible paragraphs that can be used in many different situations, create them as standard text rather than as part of a template.
Form Letter Start Reference
Place the following command in any template to have the system build form letter elements that start from the point where this text string is placed: AMS_FORMLETTER
Shortcut for Inserting AMS_FORMLETTER Text in Documents
The AMS Database Tables and Field File menu includes an Insert Form Letter Start menu item. When you select this item, the system inserts AMSFORMLETTER into a Word document. This option is only visible when accessed through the AMS Word menu.
When a Form Letter becomes a Word document, it goes through a compilation process. This process takes all the parts of a Form Letter (template, standard test, merge references) and assembles them into a finished Word document. This process normally takes place after you select a Form Letter (see Use AMS Word Processing with Sagitta)
You can also compile a Form Letter before you select it. This makes the process of selecting and using a Form Letter a little faster. There are two compilation versions: Word Compilation and Speed Compilation. You can access both methods by:
-
Selecting your Form Letter
-
Clicking Tools
-
Clicking Compile Form Letter
You can compile multiple Form Letters at the same time.
When you compile a Form Letter that uses a template containing a Microsoft Word FILLIN field, the system prompts you for input. Click OK or Cancel to continue. We recommend that you use ASK fields instead of FILLIN fields, which will allow you to avoid the input prompt.
Refer to the sections below to select the compilation method most appropriate for you.
How to Use Compile
-
From the Administrator, select the Form Letter you want to compile.
-
Select Compile Form Letter from the Tools menu. The Compile Form Letter dialog box appears.

-
Click one of the two options (Compile for Data Word Merge or Compile for Speed Data Merge) in the Select Compilation Option section. A radio button indicates your selection.
-
Click OK. The status will change to Completed.
Use this compilation if you have Form Letters that will merge coverage level information (i.e., Locations, Vehicles, Underwriting, etc.) This is the same process that takes place when you select a Form Letter for use as a Word document.
Select the Speed Compile Option when you want to have all data merging processes completed before inserting the text into Word. The option is significantly faster than having Word perform a standard data merge.
What You Gain by Using Speed Compile
-
The Form Letter Compile is completed before the text is inserted into Word. You can view fully compiled text using the Form Letter Preview option.
-
The Form Letter is compiled only once, and only when you click on it in the Selection page.
-
The system retains all Rich Text Formatting.
-
The system also compiles all Standard Text items.
-
The complete Client, Insurer, Policy, MemoAuthor, and Memo data is available, if selected in the Activity Logs & Letters page for Speed Compile.
-
The Speed Compile provides speedier address labels for Clients and Insurers.
What You Cannot Do Using Speed Compile
-
Data Merging in Standard Schedules
-
Error Marking in Merge Fields when you create the Word document. The system simply ignores these errors.
-
Data Merging in Word Templates (.dot)
-
Data Merging in Word story types other than Main text (e.g., footers, headers, etc.) The system does not mark the story type with an error; it simply ignores it.
The Sagitta proposal feature, part of the AMS Word Processing program, allows you to create a library of proposal pages. These pages can be compiled at any time into specific proposals customized for a client‘s requirements.
You can add Sagitta client-and-policy data that will be synchronized with your database information each time you create a new proposal.
You can create different cover sheets for different clients, such as an agency history that applies for all commercial clients and one that applies for all personal clients, a service team list for each client, and so on.
You can create customized templates that accurately reflect your agency’s image.
When you open the Administrator and click the Proposal Pages and Setups tab, the proposal window will appear. This is the control center for defining, creating and organizing all your Word proposal information.
This section looks in some detail at the window, and the function of each area. Continue to the next section for detailed workflow instructions for creating a proposal.
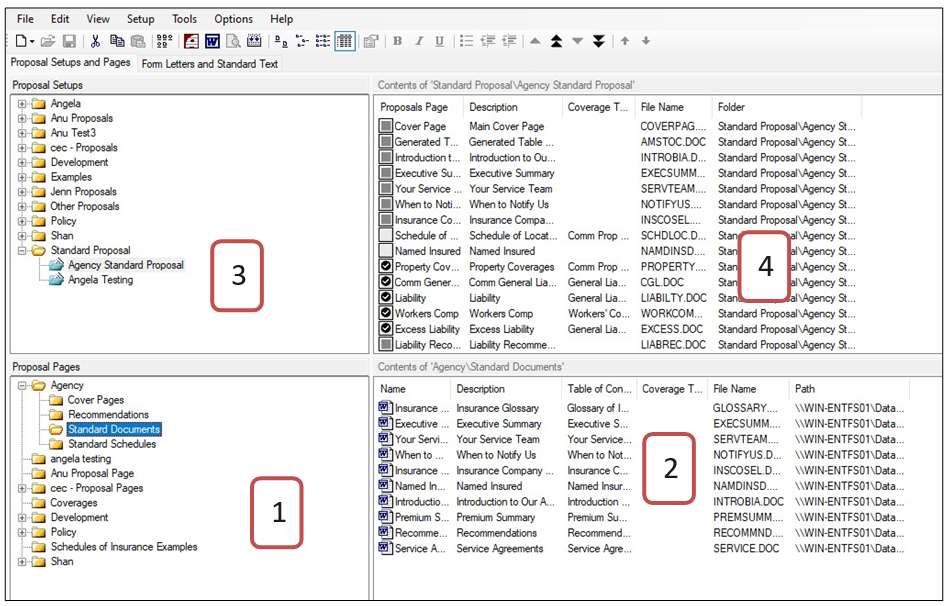
The proposal window is divided into four panes, each with a different function.
Panes 1 and 2 show what is in the Administrator system; they also contain information about specific proposal pages. This is the library of pages from which you can select.
Panes 3 and 4 contain information about the specific proposal you are building.
Pane 1 — Proposal Pages
-
This folder display area organizes the folders that contain your library of proposal pages. You can use any name or organization method that suits your agency's requirements.
Pane 2 — Contents of Proposal Pages Folder
-
This pane displays the proposal pages of a selected folder. Each page references a Word document. These pages form a library from which you can select individual pages to create a proposal.
-
Although each Word document is described as a page, it may contain several actual physical pages.
-
Page information includes a name and a description, plus a table of contents instructions, and whether its use is limited to a specific type of coverage. When you select a page, the complete text of the description is displayed in the status bar at the bottom of the window.
Pane 3 — Proposal Setups
-
Yellow folders in this pane organize and categorize your proposal setups, which are shown with a blue icon. You can use any name and arrange them in any hierarchy or sequence that meets your needs. To rearrange folders, use the standard drag-and-drop method.
-
The blue document icon indicates a proposal setup, which must be in a folder. A gear symbol on the icon shows that a template is attached.
-
There is no limit to the number of setups you can have, or to the number of proposal pages that can be included in a setup.
Pane 3 — Contents of Proposal Setups Folder
-
This pane displays a list of proposal pages that will be used in the specific proposal you are creating. Proposal pages will be assembled in the order you have them listed.
-
Every page listed here is selected from the lower pane (#4) where the library of virtual pages resides.
-
These pages have a status identified by a square icon (black, with an X, or blank). The status for each page in a proposal can be "required," "optional / included," or "optional / excluded."
To change a status, select what you need from the right-click menu, or else click the page and press the space bar to toggle through the various options.
A Proposal Page can reference a new Word document, or it can point to and re-use an existing Word document. Keep in mind that any Word document can be used in many different proposals.
-
Double-click the folder where the new pages will be saved.
-
Select File > Proposal Page > New. The Add New Proposal Page dialog box will appear. This dialog box is used to create a new proposal page and attach it to a Word document.
If... Then... ... the Word document already exists ... select it in the Referenced Document section.
Click GoTo Default Location to access the documents provided with this product.
... you are creating a new Word document ... click the Create New Document check box (Add New Proposal Page section). -
In the Add New Proposal Page section (right section of the dialog box) types a reference name and description (required) for the page you are creating.
If you checked the Create New Document check box, the Reference Name will be the Word file name. Do not use a long name unless your network server can support that format.
-
Select the check box options:
If this is a new proposal page check Create a new document. This function creates both a new Word document and a new proposal page.
If... Then... ... you wish to add a section break / next page before this proposal page ... check Starts a new page.
... you wish to select Portrait or Landscape format ... making that selection here will override the Portrait / Landscape setting associated with the Word document. ... this page will be used as your proposal’s table of contents ... check the box here. ... you want to refer to this page in your proposal’s table of contents ... type the name as it should appear there. This may be the same as the reference name, or it may be different; you may choose either option. ... the page will not be used for policy or coverage data (e.g., a cover page or an executive summary) ... check Not Use Policy or Coverage Data. ... the page will be used for a specific coverage type ... click Use, and then select a coverage type from the list. This will match a policy to the page where the correct coverage type is found. You can only select a coverage type from the list; you cannot type in a coverage type not on the list. ... you are creating a new document ... click a check box in the Base new document on this template section.
The name of the last template you used is displayed. To change templates, check the Prompt for template option. This will open the Select template dialog box where you can select the template you want for your new document. The template sets the first-page orientation.
-
When the dialog box is complete click OK.
If you checked the Prompt for template box, the Select Template dialog box will appear. Word is now activated. This is where you can create the text and database merge references for the proposal page.
If you are creating a new document for the Proposal page, the AMS Word document opens to a blank page, and the Add-ins > AMS menu is added to the Word menu bar.
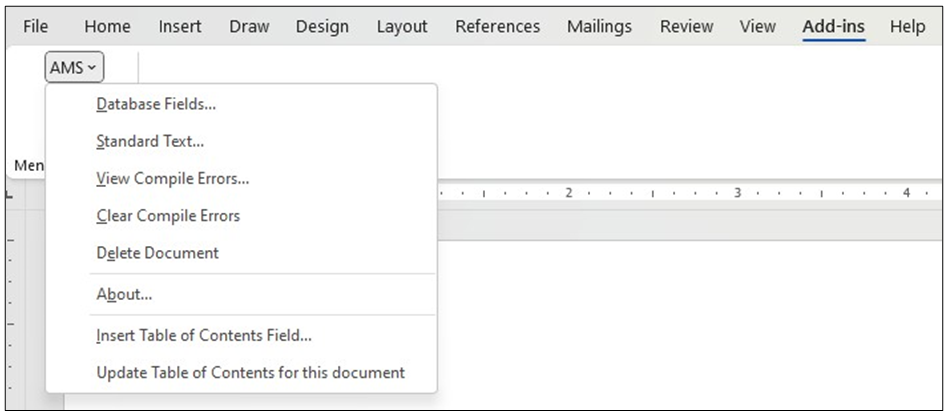
This page is used like any other Word document. You can add, delete and edit text, select styles and formats, and add tables or clip art.
You can also insert:
-
Standard Text that you already created using the Administrator’s Standard Text function.
-
Database fields that will pull Sagitta database information into your proposal.
-
In the document window, click the insertion point for your standard text.
-
Select Add-ins > AMS > Standard Text.
A list of Standard Text folders and pages will appear.
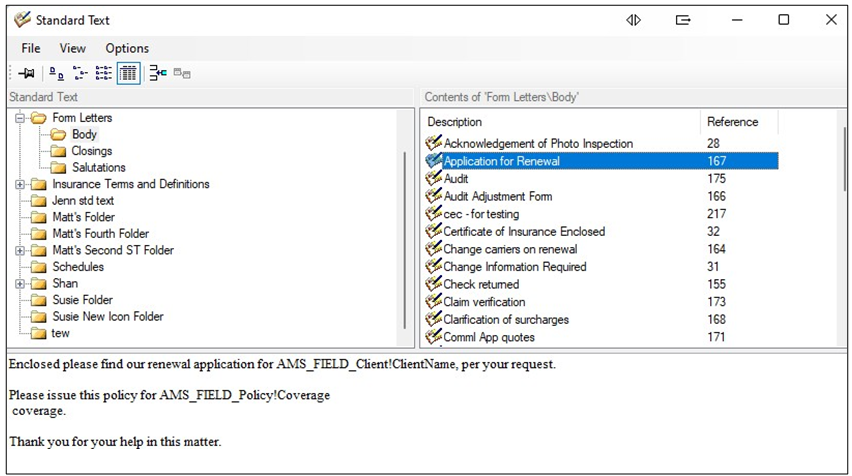
-
Locate and select the Standard Text item you want to insert and then click the appropriate Insert button, or else double-click the item. The selected text is added to the body of your document and can then be edited, if necessary.
There are two options for inserting standard text:
-
Insert the text directly, embedding it in the text. Do this if the text is unlikely to change. Use the Insert Select Field button. You can also double-click on the item or right click and select Insert Text.
-
Insert the text by reference. This creates a tag or marker for standard text you wish to add. Use this option to save time in the future, if a standard text item is likely to change. This selection ensures that the most recent version of a standard text item will always be placed in the proposal. Use the Insert Reference to Text button.
-
-
Continue to insert as many Standard Text items as you need.

|
Standard Text items may already contain the Sagitta database field(s) you need. |
-
In the document window, click the insertion point for your database field.
-
Select Add-ins > AMS > Database Fields.
A list of Sagitta Database tables and fields will appear.
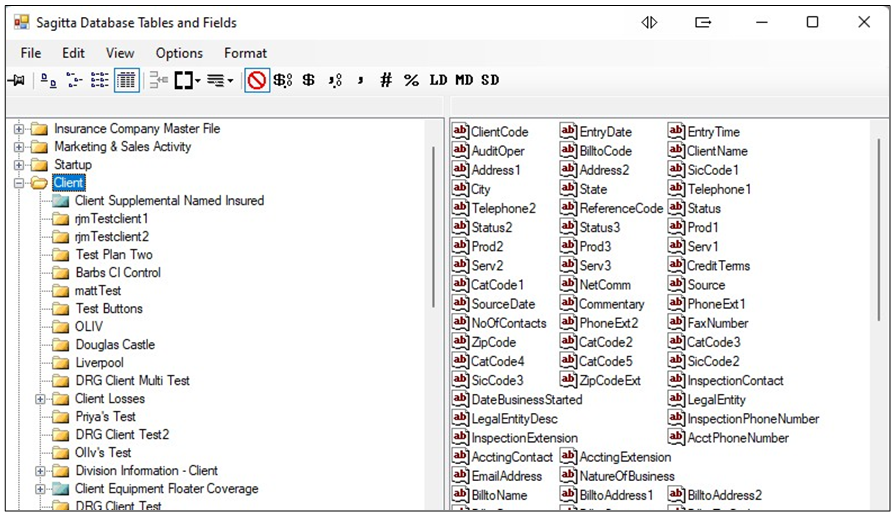
-
To format the Sagitta data when the proposal is assembled, click one of the format buttons on the toolbar. For more information regarding these buttons, refer to the Advanced Proposal Builder section at the end of this chapter.

-
Select a Sagitta table and then click the field name you wish to add to the body of your document.
-
If you wish to add Iterations, click the square bracket button.
 For more information regarding Iterations, refer to the Advanced Proposal Builder section at the end of this chapter.
 -
Click the Insert Item button.

The selected database field is added to the body of your document at your insertion point and can be edited at this point.
Fields are added in a continuous string. You can edit this string like any other type of text (for example, add a paragraph return to create a new line or insert a tab to indent the field).
-
Continue to insert as many database fields as you need.
-
When the document is complete, proofread it and check that everything in the document is correct. You can use Word’s Editor to help with this process.
-
Save the document (use the Save button, or File > Save). The document will be saved as a .doc file.
-
The proposal page is now complete and ready to be added to any proposal you create.
To move a page to another location in the proposal, click and hold the left mouse button; second, drag the page to the correct location and release the button.
To add more than one page at a time, select them in the bottom right pane using standard Windows keystrokes (Shift+Click or Control+Click). Click the "Double Up" arrow to add all the selected pages to your proposal. Note: These pages will be added in the order in which they appear in the list.
To move a page to a different location in the Proposal Page list, click the page and drag it to the correct location.
-
When you are ready to see how the sample proposal looks, select Tools > Test Assemble Proposal. The system will retrieve the default pages you selected and then compile them (in the sequence you listed) into a single proposal document.
The Test Assemble selection is only active if your cursor is in the top section of the window (Proposal Setups or Contents... pane).
-
Look through the proposal and check that everything looks the way you want it to print.
-
If you need to make changes, open the source document, make your edits, and then save the changes before you rerun the test assemble process. Changes made to a test-assembled proposal are not retained.
To return to the source document from a Contents window, first select the document, right-click to see the menu, and then choose Open in Word.
The AMS Proposal system can automatically generate a Table of Contents for your proposal. The Table of Contents generated by the Proposal system is a single level that identifies each inserted Proposal Page that has a corresponding Table of Contents property.
To use this feature, you must set the following properties in the AMS Word Administrator:
-
Check the option box for the Proposal to Generate Table of Contents. This option is set at the time the proposal is created. It can be modified with the Proposal Properties Dialog box. If this option is not set, a Table of Contents will not be created.
-
Designate a Proposal Page that will be used to hold the Table of Contents. Only one Proposal Page per proposal should be designated. The system will acknowledge the first Table of Contents designated Proposal Page it finds. Any subsequent designated Proposal Pages will be ignored. If a designated Proposal Page is not found, a Table of Contents will not be created. If the option to generate a Table of Contents is turned off, pages flagged as a Table of Contents page will be ignored during the Proposal Assembly.
-
Designate the text to be used in the Table of Contents in the Table of Contents Entry field for each proposal page. This field may be left blank; if so, no Table of Contents entry will appear for that page.
Format the style TOC1 with your agency preferences in the global template that will be used to design this Proposal . This style will be applied to the Table of Contents after the document has been generated. The AMS-supplied template, STDPROP.DOT, has a style similar to the Fancy Format used in the Insert Index and Tables Table of Contents tab.
By default, the system automatically provides one level for your Table of Contents, provided the above conditions are in place.
Exception: Proposal Pages that are not marked as starting a new page will have their entries added at the second level. You can, however, manually add additional levels to each section of a Proposal Page that you would like to appear in your Table of Contents.
Technical briefing: The system generates a Table of Contents by inserting a TableOfContents Word Field with the /f switch. This switch instructs Word to generate a Table of Contents based on predefined Table of Contents Entry fields that are located throughout the document. Each Table of Contents entry field has a \l switch, which indicates upon what level to place the Table of Contents entry. You can add as many of these fields to your Proposal Page documents as you wish; they will be found and included in your Table of Contents durin the assembly process. There are two ways to insert a field manually.
[See below]
-
Position the insertion point on the section of the proposal page you want included in your Table of Contents.
-
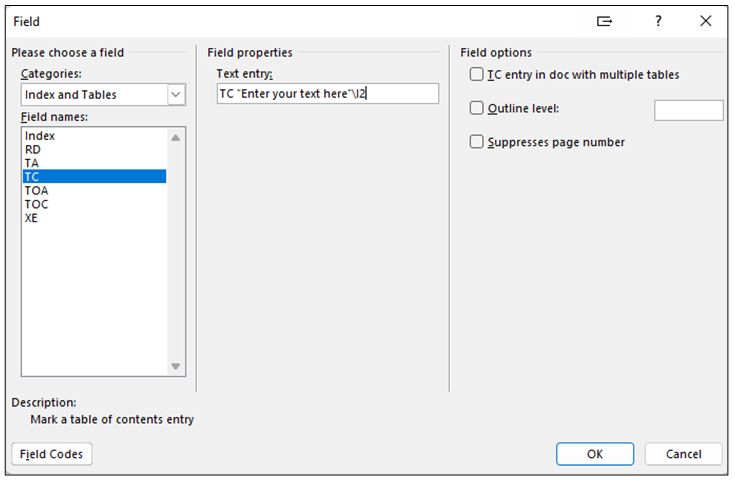
From the Word menu bar, select Insert > Quick Parts > Field. The Field dialog box will appear.
-
Select Field Category, Index and Tables.
-
Select Field Name, TC.
-
Type your text, (do not forget the quotes) and then select your level from the options, or just type it in as shown here (\l2). Your syntax must be exact.
A simplified dialog box has been supplied (accessible from the AMS menu) that makes the same entries as above but eliminates the need to type anything other than the desired text. From the AMS menu, select the Insert Table of Contents field.
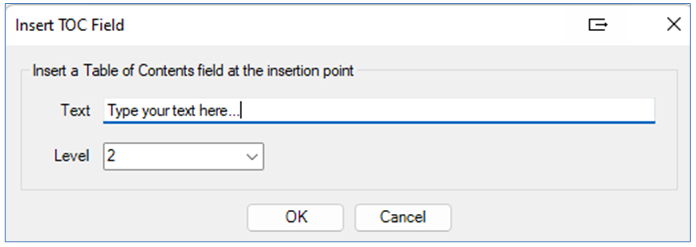
Type the text as you wish it to appear, select the level from the drop-down box, and then click OK.
The Field will be added with the correct syntax. Whichever way you choose, the result is the same; a Word Table of Contents field is added: {TC "Type yourtext here" \l2}.

|
The Table of Contents fields are hidden text. To view them, you must enable the viewing of non-printing characters. |
The AMS Proposal System will ignore any formatting applied to the Table of Contents fields themselves. All formatting is controlled by the built-in Table of Contents styles that are part of Word 97. Word 97 supports up to nine Table of Contents levels, each with a corresponding style: TOC1, TOC2, etc...
To customize the appearance of your Table of Contents, simply modify the built-in styles in the template upon which the proposal will be based. The proposal template designation is made using the Administrator and is indicated at the time the proposal is created. The template can be changed by using the Template dialog box in the Administrator. If no template is designated, the styles will be taken from the normal template of the computer that was used to create the proposal. It is strongly suggested that a global template be used, since this is where your agency can control the appearance of your proposal in its entirety.
If you wish to use Word's other methods of generating a Table of Contents, be sure to turn off the option where the proposal system generates one. No other methods are supported or documented by Vertafore.
The schedule of items that is created because of an AMS Schedule Merge Reference is, by default, placed into a Microsoft Word Table. You can control the appearance of this table by placing the reference inside a table and formatting that table prior to document assembly.
The first two examples show the results of the simplest way to use AMS Schedule references. Example #1 shows what happens to a reference that is not inside a Word table. Example #2 shows a single-cell table that was Auto Formatted with "Classic 2".
The remaining examples show how you can build more elaborate tables that will accommodate all your design needs. Example #3 shows how you can designate your own column headings.
The last three examples, beginning with Example #4, show how additional columns and rows can be added. Example #5 shows the results of Example #4 when the table was improperly set up.
Example #6 shows all the parts working together.
If an AMS Schedule Merge Reference is placed on a proposal page document but is not placed inside a Word table, the table‘s appearance will default to Words AutoFormat table style "Simple 1."
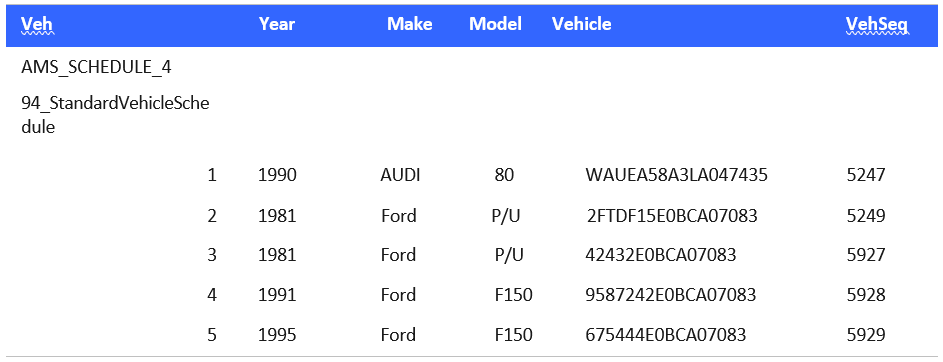
AMS Merge Reference entered a Word document: AMS_SCHEDULE_494_StandardVehicleSchedule.
The table shown below is auto-formatted by using Word's built-in style "Simple 1."

The following example had the auto-formatted "Classic 2 applied." It shows AMS Merge Reference entered as a Word table with one row and one column.
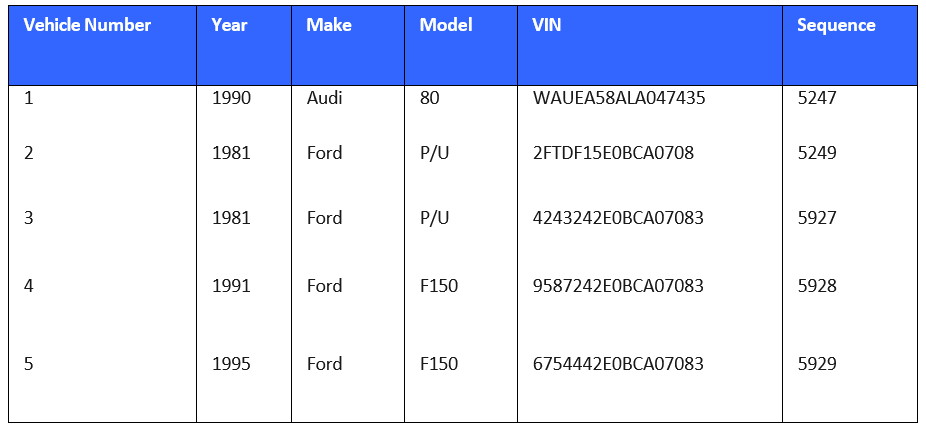
You may have noticed from the first two examples that the column headings were created using the field names from the database tables. You can, however, create your own column headings by placing the merge reference in the first column / second row of an existing table. When the assembly process finds a schedule reference in the first column / second row, the following circumstances occur:
-
It does not disturb the first row.
If the reference was anywhere else in the table, all rows and columns would be deleted and it would then be treated as a single-cell table, as in Example #2.
-
It does not create a row with column heading.
This allows you to use the first row to define your own column headings (or none, if desired). Note also that each cell has been centered.
AMS Merge Reference entered a Word table at the first column / second row.

The resulting table retains the first row and its formatting.
This example shows how the fourth row (and beyond) of the compiled table are untouched by the table-building process, where they can be formatted with merged cells and a mix of styles and formatting characteristics.

|
The third row is the key to this feature. The third row has the same column widths and formatting characteristics as the second row. Consequently, as rows are added, they maintain the desired appearance. The Cost New column is not present in this AMS Standard Schedule. If applicable, you will need to enter this information. Notice that the extra column was not deleted. Note also that the third row has been pushed down, but it is still present. This row can be automatically deleted by entering the word DELETE in the third row / first column. |
AMS Merge Field entered a Word table at the first column / second row, with additional columns and rows added.

The resulting table maintains its additional columns and rows.
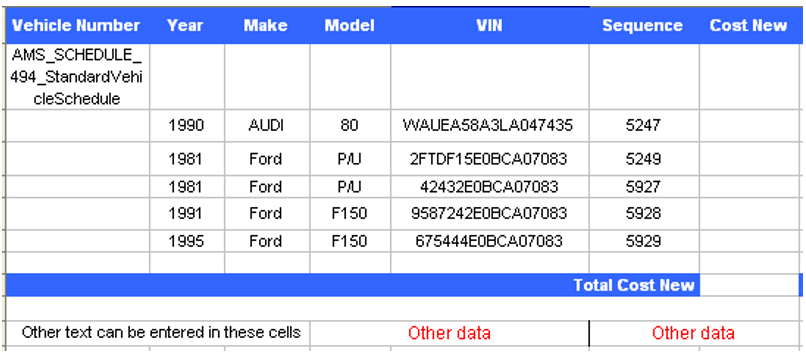
This example shows what happens to the above table if the third row does not have the same number of columns as the second row.

This was not the desired result (see below).

By placing the word DELETE in the third row / first column, the system will automatically remove this row once processing is complete.

Here are all the parts, properly working together:
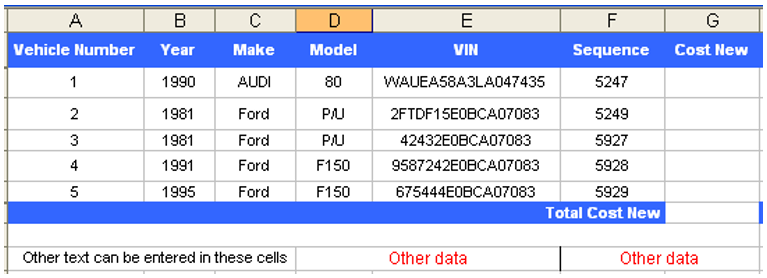
Iteration allows for the display of line-item sets such as Vehicles, Locations, multiple policies, etc., with greater control over the way the output is displayed. Iterations allow you to display multiple data in a different format from Sagitta schedules. The following section has examples that illustrate how Iteration can be used, as well as what happens when you display the data with and without using the Iteration feature.
The Iteration feature uses the Windows clipboard.
-
Anything already on the clipboard will be deleted, and you should not perform any cut-and-paste operations while Iteration is taking place.
-
This means that if you copy and paste in another program while you are creating a proposal, the other work may be embedded in your proposal, and your iteration data may appear in the other program.
-
-
In previous versions of AMS Word, if you had a database field that had the potential for more than one item (Additional Coverages line-item sets, Vehicles, Locations, etc.) and that database field was not iterated, only the first item would pre-fill to the proposal page. For example, if you entered the Year, Make, Model and VIN fields for vehicles but did not iterate it, the first vehicle’s data for each selected policy would pre-fill to the proposal despite the fact there may be 100 vehicles in total on the applicable policies. You must now have an iteration for this data to pre-fill for every record on the selected policies, since only the first record will no longer pre-fill.
You can use the Iteration feature to display all items in each line item set in much the same way that you use a standard schedule to build a Word table.
The similarities include the following:
-
All items in a single line-item set can be displayed (dated "on" or "off").
-
As many fields from that set as desired can be included.
-
Each field may be assigned its own format string.
-
You must insert a blank line after the AMS_ITERATE_END marker.
The differences include the following:
-
Standard Schedules are always displayed in table format; Iterations can have data placed anywhere on a page.
-
Iteration must be set up on a Word proposal page. Standard schedule must be defined within AMS Word Administrator.
-
Word page-breaks can be inserted if you wish for each item to appear on its own page.
-
Everything inside the markers will be copied to the Windows clipboard and pasted, as many times as there are line items in a set. This includes graphics, word tables, etc. In short, anything that can be placed in a Word document will be duplicated.
-
Iterations may include a nested iteration, and that nested iteration may include a reference to a standard schedule to display, in effect, an iteration on the nested iteration. This effectively extends iterations to three levels.
-
All valid AMS Field References that are NOT from the iterating table will be merged before iteration takes places. This allows for non-iterative data, such as policy numbers, to be included.
-
Example
For the proposal, we want to list each location along with each location's buildings. The policy we are working with has three locations, and each location has at least one building.
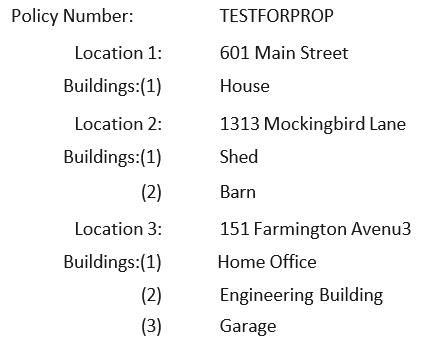
Data Shown Without Iteration — What Happens?
You would think that dropping in the database fields necessary for a location and its buildings would be enough to list all the locations and buildings for the policy, but that is not the case.
Here we simply insert the appropriate fields to our document using the Sagitta Database Tables and Fields dialog box. See the example below.

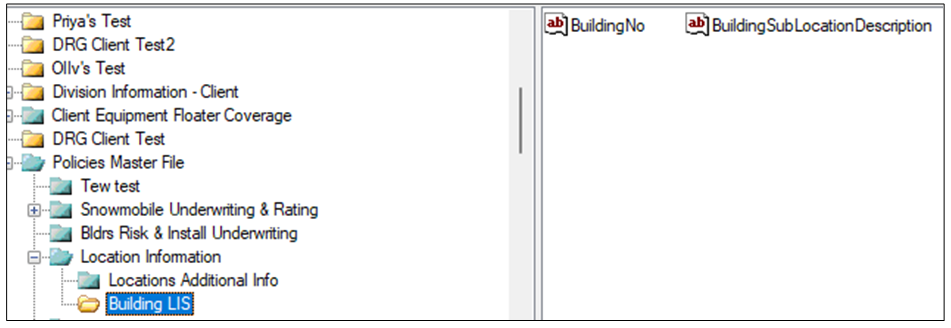
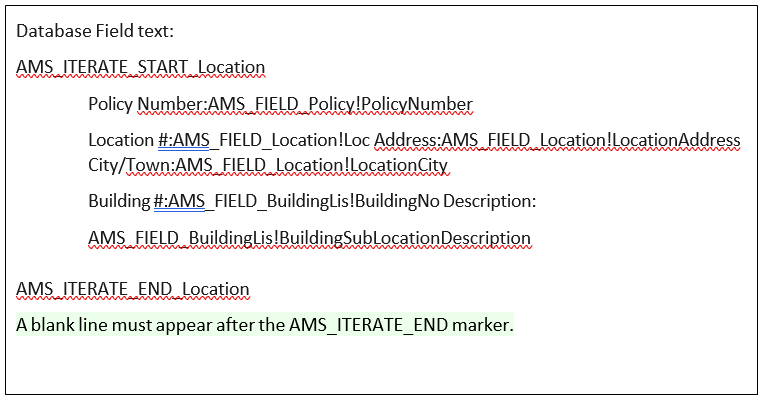
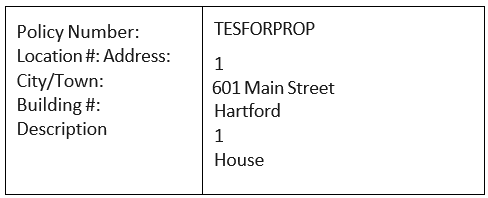
The resulting proposal follows. There is only one location with its associated data.
You must follow these guidelines to ensure that Iteration works properly. Iteration is a complex process that involves the cloning of Iteration Objects, creating, and duplicating Word bookmarks, and using the Windows clipboard to copy everything inside the markers (including the markers themselves). If you fail to follow these guidelines, it may cause processing to stop, and you will receive an error message. You must correct the source document before you can continue.
-
Every iteration marker (1st and 2nd level) must be on its own line.
-
Iteration markers MUST only be in the main text area of Word. Do not place a start marker inside a header and the end marker elsewhere, or vice-versa.
-
All iterations MUST have at least two markers, one to mark the start of the iteration area, and another to mark the end.
-
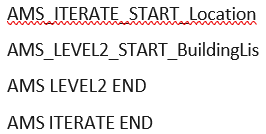
First Level start marker is AMS_ITERATE_START_Tablename. Tablename must be the name of a valid Sagitta table.
An example using the Table Location is AMS_ITERATE_START_Location.
-
First Level end marker is AMS_ITERATE_END
-
A blank line must be entered after the ‗AMS_ITERATE_END marker
-
Second Level start marker is AMS_LEVEL2_START_Tablename 4.
-
Second Level end marker is AMS_LEVEL2_END
-
Example
-
The table name of a second-level iteration must be a child table of the first-level iteration.
-
A standard schedule table name must be a child of the current iteration level.
-
Nested Iterations (Iterations inside an Iteration) are allowed one level deep and MUST be fully inside of first-level markers.
-
Second-level markers found outside of first-level markers are not allowed.
-
A second (or more) instance of the same child table is not allowed within the same second-level iteration.
Using the Sagitta Database Tables & Fields dialog box, we now choose the iteration feature. Use the Iteration button to select the function as follows.

-
Select the table you wish to iterate, and then click the Iterate button. In our example, we are iterating on the Location Database table. The following appears on the document page:

-
From the Field Names list, insert the fields you want to display between the start and the end of the iteration. The next example shows the insertion of Policy and Locations data fields:
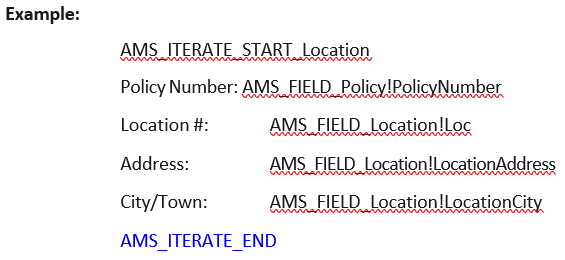
-
As you can see, we are missing the building information. We want to display information on all buildings for each location. Since the building information is a line-item set of Locations, we can use second-level iteration to display the data.
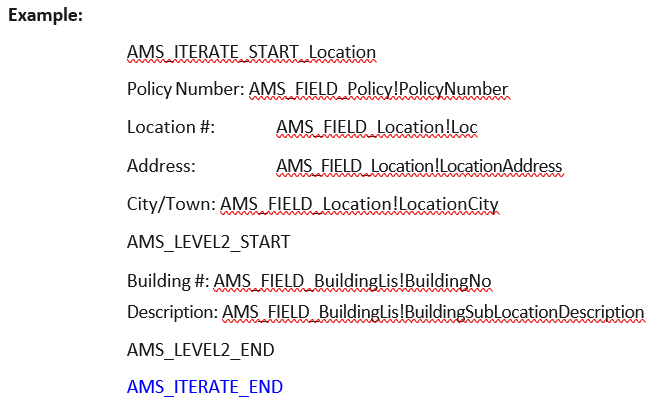
Output of this iteration process:
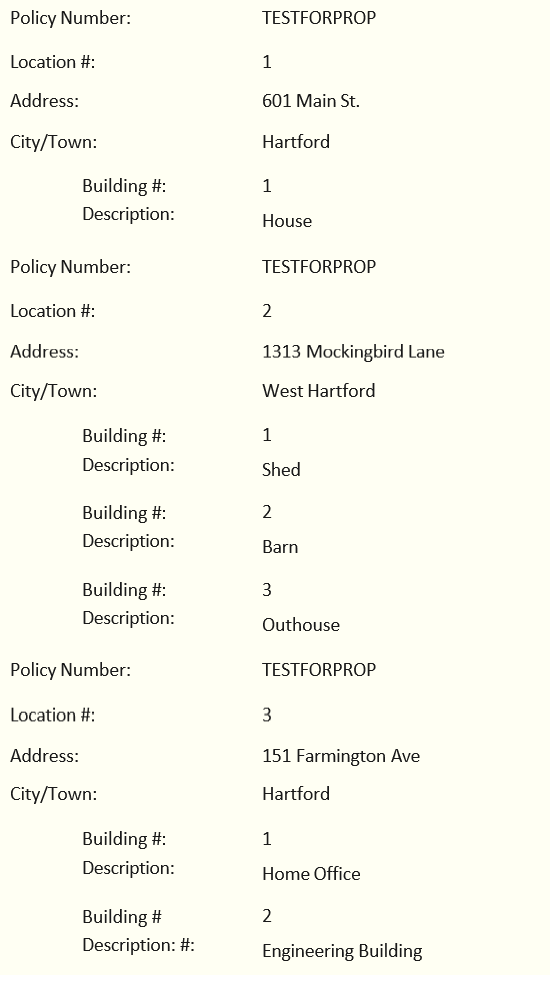

Example #1: First-Level Iteration
-
Iterating through all a client’s vehicles
-
Entry made in a Word document
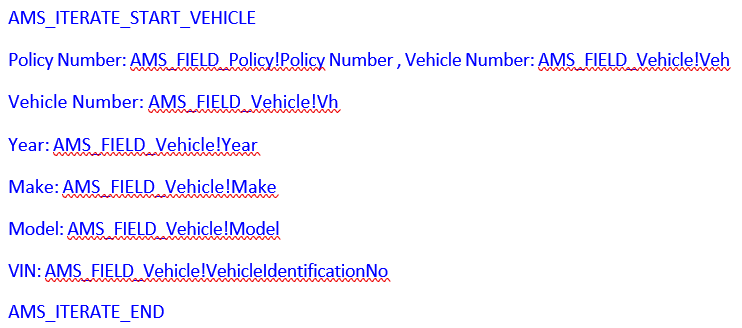
Results:
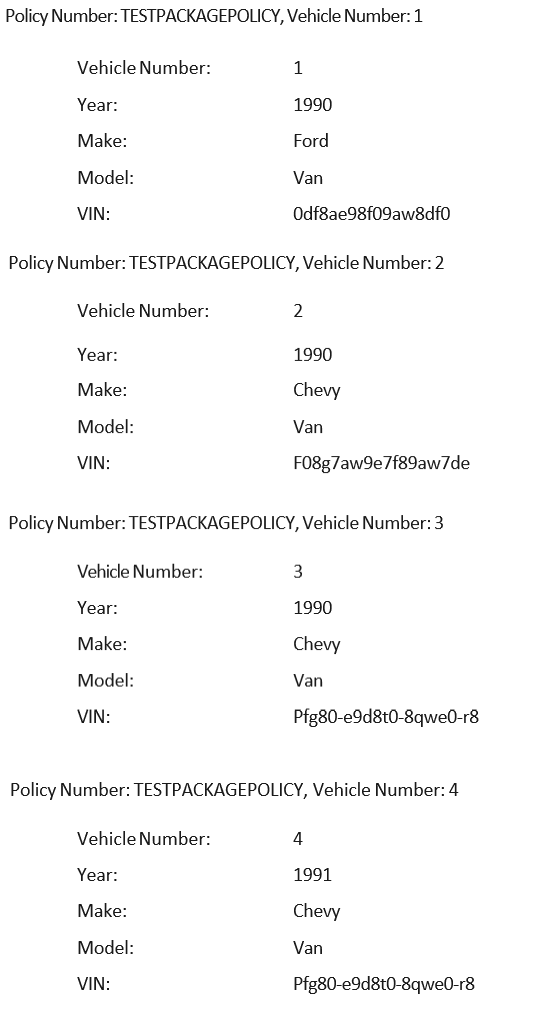
Example #2: First-Level Iteration
-
Iterating through all a client’s policies
-
Entry made in a Word Document
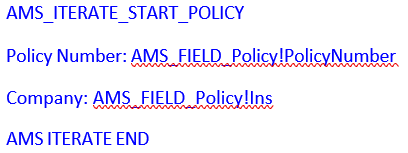
Results:
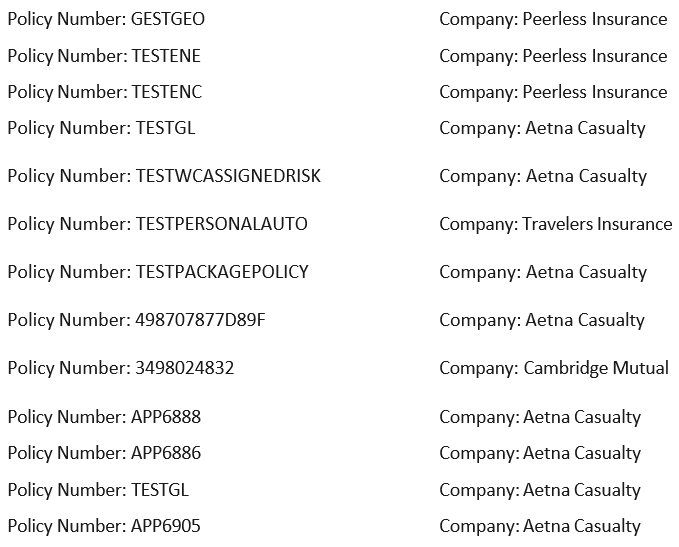
Example #3: Second-Level Iteration
-
All types in a personal schedule, and each item for that type
-
Entry made in a Word Document
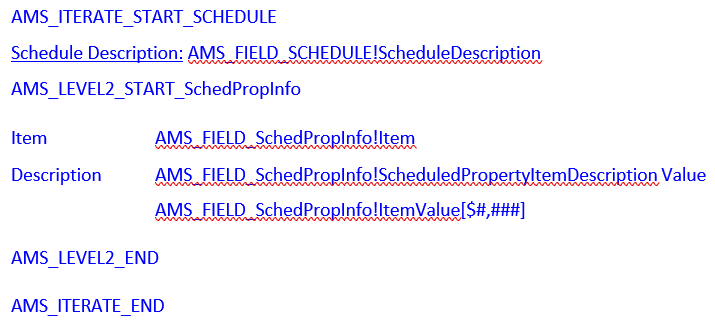
Results:
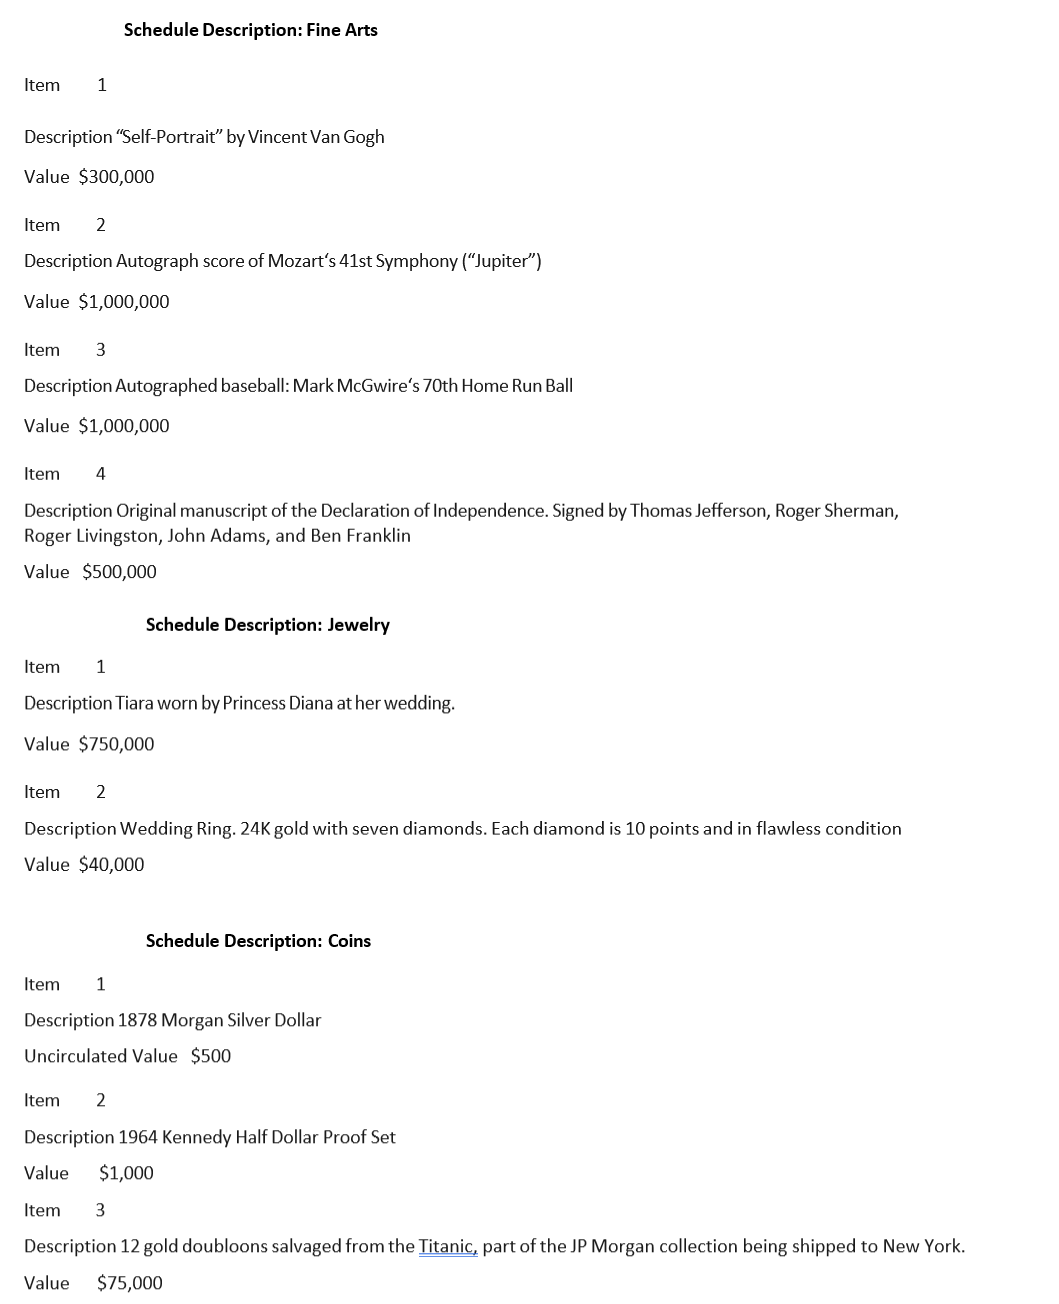
Use the AMS Formatting toolbar to select your referred format.

-
Sagitta data formats can be preset in proposals and standard schedules. The system provides four numeric formats plus three date formats.
-
The system will automatically enter the correct syntax when inserting merge references. Simply choose the format type before you enter the fields.
-
 Format types are selected from the toolbar, and only one format type at a time can be selected. That format type will remain selected until a different one is chosen. If you do not want a format type, select No Format.
Syntax entered by the system in proposal pages, templates, and standard text:
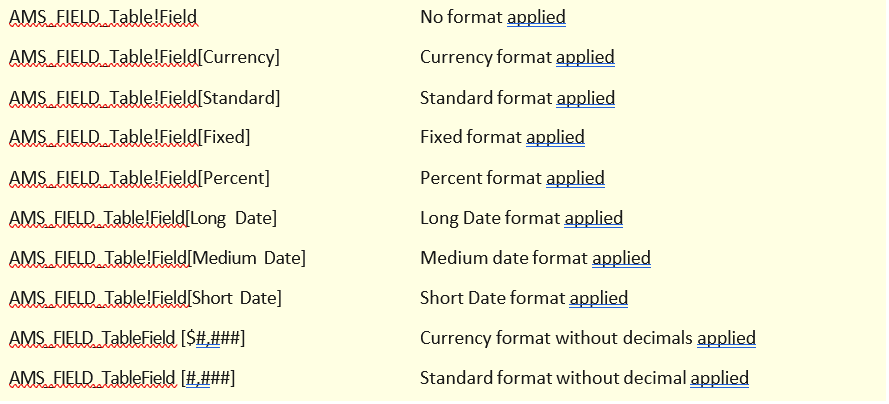
Items entered in Standard Schedules show the format that will be applied next to the field name in the scheduled items list. The item can be changed using the right-click menu.
| Format | Data Before Format Applied | Data After Format Applied |
| Currency | 12345 | $12,345.00 |
| Standard | 12345 | 12,345.00 |
| Fixed | 12345 | 12345.00 |
| Percent | .50 | 50.00% |
| $#,### | 12345 | $12,345 |
| #,### | 12345 | 12,345 |
| Long Date | 01/01/2022 | Saturday, January 01, 2022 |
| Medium Date | 01/01/2022 | 01-Jan-22 |
| Short Date | 01/01/2022 | 1/1/22 |
AMS Word Processing works with Word, Microsoft‘s full-featured word processor. Sagitta is fully integrated with Word in this product; you can build letters and memos in Word and Sagitta will keep track of them for you.
The form letters on your system have been prepared by someone in your agency using the Administrator. For more information, refer to the Use Administrator chapter.
The product makes use of the Windows clipboard for certain operations. You should not perform any cut and paste operations while a form letter is being compiled.
When you want to create, review or revise a letter or memo, start from Sagitta‘s Activities Log. Begin from this page, whether you are creating a new letter or accessing an existing activity.
Use the Activity Log Selection List to:
-
Find an existing memo, letter or diary item associated with a staff member, client, insurer, or policy.
-
Add a new memo or letter.
How to access the Activity Log Select List:
-
From the Sagitta Home page, click Activities.
-
From the Action Icons Toolbar on the Client Details page, click the View activity log icon.


You can limit the information the system has to search, and therefore speed up the search, by completing search criteria. Search criteria, such as date ranges, limit the information that the system must search.

You can complete any or all the criteria fields.
Status: The status (Open, Completed, Both [Open and Closed]) of the memo.
Date Type: The kind of date (Entry Date, Follow-up Date, Completed Date) associated with the item for which you are searching.
Note: If you complete this field, you must also complete the Date Range fields. If you entered Open in the Status field, you cannot enter a Date Type of Closed. Open items cannot have completed dates.
From/To: Enter the date range within which the item being searched for was created. To further refine the search, you can use the Additional Selection Criteria.
Memo #: The number that identifies the memo, letter or diary item for which you are searching. This number was assigned by the system when the item was created.
Loss #: The number that identifies the Claims item for which you are searching. This number was assigned by the system when you entered the Loss.
Doc(ument) Type: The type of document (e.g., N [Note], EN [Endorsement Follow Up]) for which you are searching.
Coverage: The Coverage code (e.g., AUT [Personal Auto], UMB [Umbrella]) for which you are searching.
The Activity Log Selection list displays memos, letters and diaries for the Type (Staff, Client, Insurer or Policy selected.) To act on an item, highlight the item by clicking on it, and then click the appropriate option.
You can click any of the column headings to sort the list in that order.
For example, to sort the list by insurer, click the Ins (Insurer) column heading. The report is immediately sorted in ascending insurer order.
The Activities Log page serves as a record of and the link to the actual letter document, which shows the text. (It also allows you to schedule follow-ups through the system).
This page pre-fills with information from the Client, Policy, or Loss pages. Your new document is automatically assigned a memo number. If you are viewing an existing document, you will see the completed page.
The page is divided into three sections. Use online Help and Search features to assist you in completing it.
This page supports more than one word processor; some fields may not apply to the word processor you are using.
Access these fields to generate a letter:
| Field | Description |
| Client Code | Pre-fills with the code and name of the client you are working on, or you can select a client code. |
| Insurer Code | Pre-fills with the insurer code and name of the insurer you are working on, or you can select an insurer code |
| Additional Interest | Select an additional interest. |
| Other Correspondent Name | Enter a correspondent name. |
| Contact Code | Select a Contact Code for this client. |
| Contact Name | Pre-fills with the Contact Name of the Contact Code selected. |
| Salutation | Pre-fills with the Salutation of the Client Code selected, or you can enter a salutation. |
| Word Processor | Select AMS Word to designate that you will be using this product. |
| Path | The temporary location where the letter is being stored. |
| Document Name | The name of the document. |
Follow these steps to create a letter.
-
Start in Sagitta at your client or policy page. Select Activity Log to continue to the Word Processing menu.
-
Select Add to create a new Letter activity
-
Complete the page with Policy Number and Letter Information.
-
Click Save.
-
Open a form letter folder.
-
Select a form letter.
You can click the preview button to display the contents of the form letter before you open it.
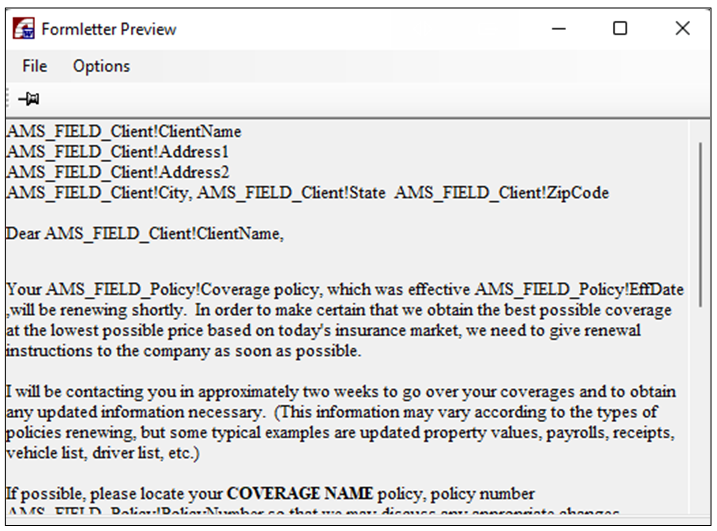
The Form Letter Preview window is then displayed. The information in the window is view mode only; you cannot make any changes to the text here. (If you select Blank, this window will have no text.)
-
From the Options menu, choose from the following options:
Option Action Do Not Include Dated Off Items in Schedules Select this option to ensure that dated-off Sagitta information will not appear in your proposals or schedules of insurance. Auto-Format Word Tables Select this option to ensure that the tables you create in Word from Standard Schedules are formatted with the current table format. Refer to the Table Auto-Format option on Word’s Table menu. Maximize Word When Finished Select this option to leave Word in a maximized state (i.e., so that it fills your entire page) after you have created your Sagitta document. Use Clipboard When Inserting Standard Text into Word Select this option to insert text from the Microsoft Clipboard. The Form Letters function uses the Microsoft Clipboard feature for text insertion, because transferring text from the clipboard is faster than transferring it from the hard disk. You cannot turn off the Clipboard feature in the Speed Compile function.
If you do not select this option, the system writes the standard text to a temporary file in the TEMP directory to preserve rich-text formatting, and then inserts it in Word.
Note: When you insert standard text into Word, anything residing in the Clipboard is discarded.
Auto-Display Compile Errors Select this option to display a dialog box, if there are compile errors. After you create a Word document, you can also check this option on the AMS menu to review compile errors. -
Click OK on the Prepare Word Processing Document window to launch the following automatic processes:
-
Word launches and the document is created.
-
If the form letter was not compiled in Administrator, it compiles now and becomes a Word document.
-
Merge references pre-fill with information from the Sagitta database.
-
System messages are displayed while the document is being built. Once the process is complete, the page displays the letter in Word.
When the document building process is complete, the Compile Errors window may be displayed. There are potentially two types of errors:
-
Data Not Found: These errors are displayed in the column on the left side of the Compile Errors dialog box. When the system cannot find data, it‘s because there is a corresponding blank field in the database. The document highlights in yellow the place where data is missing.
-
When the system cannot find a table or field needed for your document (most often a proposal), the cause may be:
-
A misspelled table or field name
-
No such table exists because it was deleted or changed.
-
The table is not used. For example, this might occur if you came from the Client page and had a reference in your letter to a policy number. If the policy number has not been specified, the system finds a compile error.
-

|
A table in this instance is a place in Sagitta where data is stored. It may be a Sagitta file, or a line item set within a file. A single Sagitta page is usually one file. |
The document is highlighted in blue where this information should appear.
Use Word’s formatting features to amend the look of your document.
Now that you have built a letter, you can add Sagitta database fields to it. To add information from the database to your letter, perform the following steps:
-
Click the insertion point in your document where you want the data to be inserted.
-
From the Add-ins > AMS menu, select Database Fields.
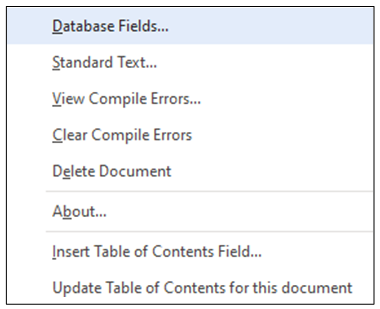
The Sagitta Database Tables and Fields page will appear.
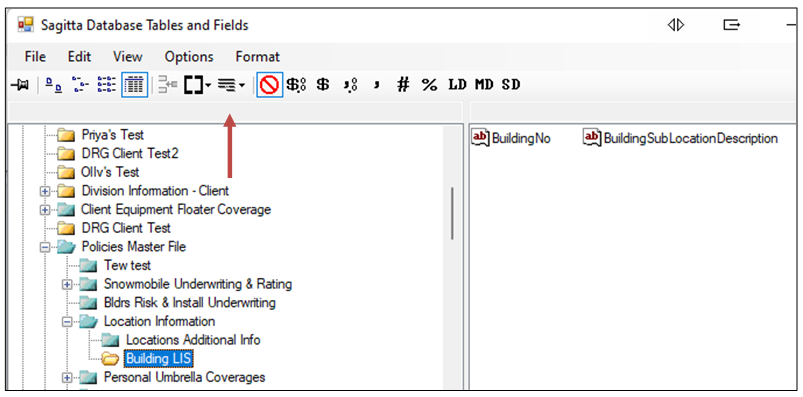
-
Open a file from Available Sagitta Tables (left pane).
-
From Fields Available... (right pane), select the type of information that you want to insert in your document.
-
Click the Insert button
 . The system will insert the data. Repeat this step until you have included all the information you require.
Use this function where there are multiple items such as policies, vehicles, drivers, locations, etc. This applies for both form letters and proposals.
-
Start from your AMS Word document. Click Add-ins > AMS > Database fields.
-
In the top left pane, open the folder and select the Sagitta table you need. A list of the items will be displayed in the lower pane.
-
Click an item to select it. The Use Table Builder for Single Item is now available to select.
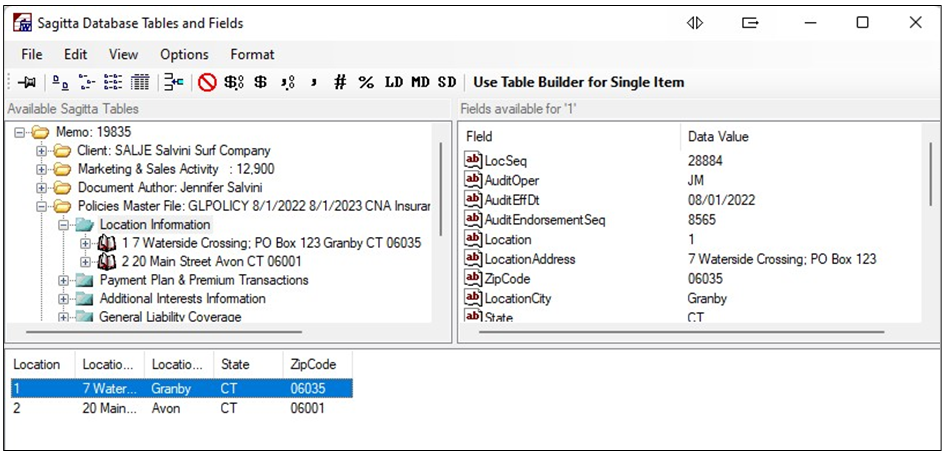
-
When you click Use Table Builder for Single Item, a Table Builder window appears. This will contain information that will be used for your table.
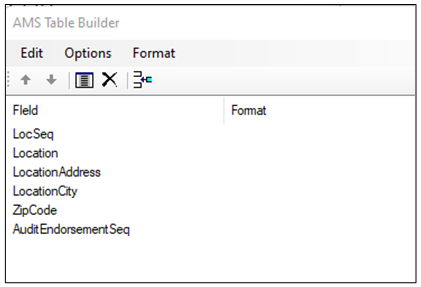
-
With the item selected in the bottom pane, click in the Fields Available list to select the column headings that are to be part of your table. As you double click the Field Name, it will appear in the Table Builder window.
-
When all fields are selected, click an insertion point in your document. This is the point at which the table will be added.
-
Click the Insert button
 on the Table Builder window toolbar to add the selected fields, in table form, into your document.
Each field will occupy a separate column, in the order listed in the Table Builder window.
-
From the AMS menu, select Standard Text. The Standard Text window will appear.
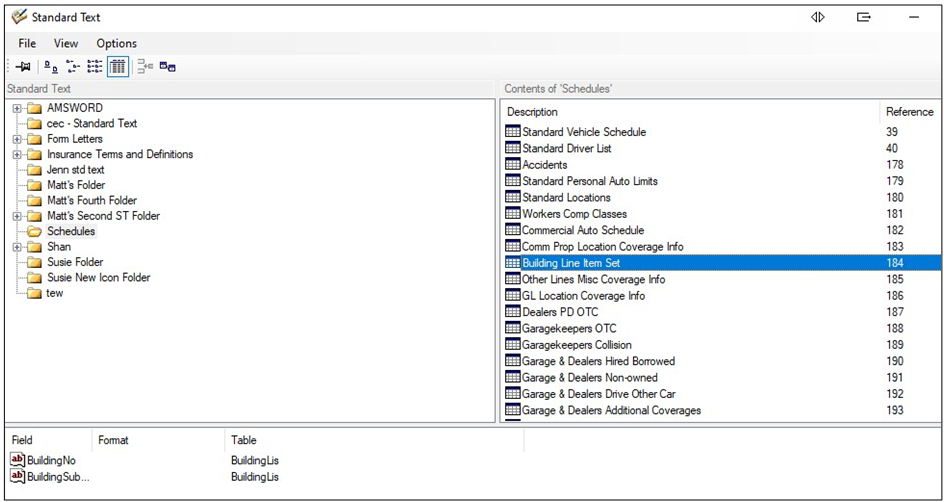
-
Click on the folder you need, then click the standard text item you wish to add to your document.

This process also applies to Schedules, which are another form of standard text.
-
Click the Insert button, or double-click the standard text. The system will insert the text into your document. Repeat this step until you have inserted all the standard text you need for your document.
When a new document is saved, Sagitta automatically stores the name and location of the created document (the source document) to a pre-configured location defined in the Import/Export and/or Division Master Maintenance pages. Sagitta uses a set of hierarchy rules to determine the storage location. For additional information, see the Personalizing the AMS Word Processing and Proposals Product > Document Storage Hierarchy Rules.
When you perform the Save As function in Word (and are personalized to do so), your document is saved either to a network or to a local drive. Depending on how your agency chooses to set up the personalization, you may also see the Copy / Replace prompt. For example:
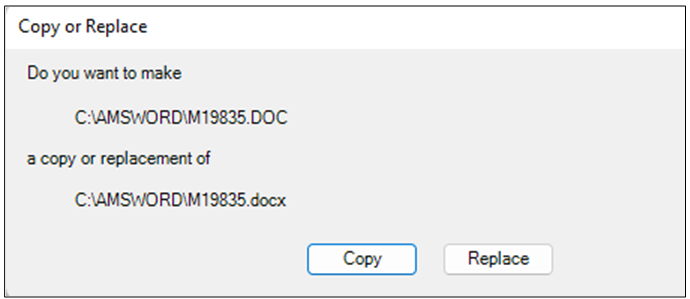
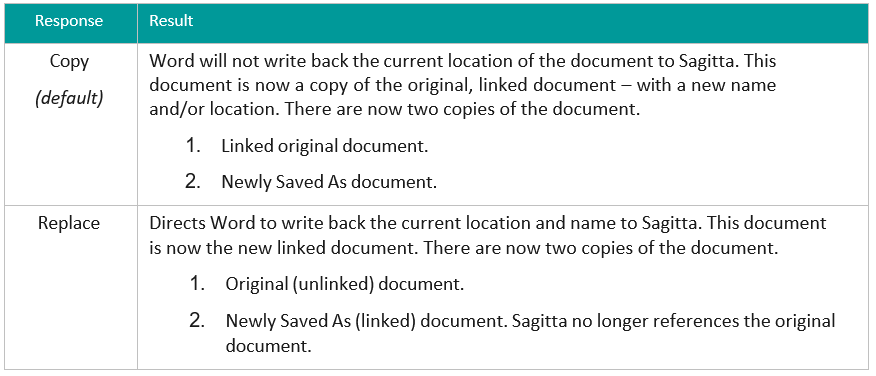
If you wish to delete a form letter, click Add-ins > AMS > Delete.
When you close a form letter, it is tied to Sagitta with an assigned M+ sequence number identifier. Once that number is assigned, the document cannot be deleted. You can only delete this document from the AMS menu, and only before the identifier is assigned.
The AMS Word Processing and Proposals product works in concert with Word, Microsoft’s full-featured word processor. Sagitta is fully integrated with Word in this product; you can build proposals in Word and Sagitta will keep track of them for you.
The proposals on your system have been prepared by someone in your agency using the Administrator. For more information, refer to the Using the Administrator chapter.
-
Be aware that the process of assembling a proposal can take a few minutes, depending on its size and complexity. You can continue with other Sagitta processing while the proposal builds in the background.
-
The proposal-build process and iterations make use of the Windows clipboard. You should not perform any cut-and-paste operations while proposal iteration or compile is running.
-
Start from the Sagitta application.
-
Select Proposals > Classic Proposals from the Client Primary Navigation bar. The Classic Proposals Selection List will be displayed.
-
Click Add. The Policy Selections for Schedules of Insurance & Proposals will be displayed.
-
Highlight the policies to be included in the proposal.
-
Enter a Schedule Description.
-
Select WD – AMS Word for Word Processor.
-
Click Next at the top of the page.
-
The AMS Proposal Selection Screen will be displayed.
-
Open the folder in the left pane, Proposal Setups.
The page displays client data, and states whether or not you had a match. If a client has more than one policy for a single line of business (e.g., two Homeowners policies) you will see a separate proposal page for each policy. This is helpful if, for example, you want to compare old and new policy terms.
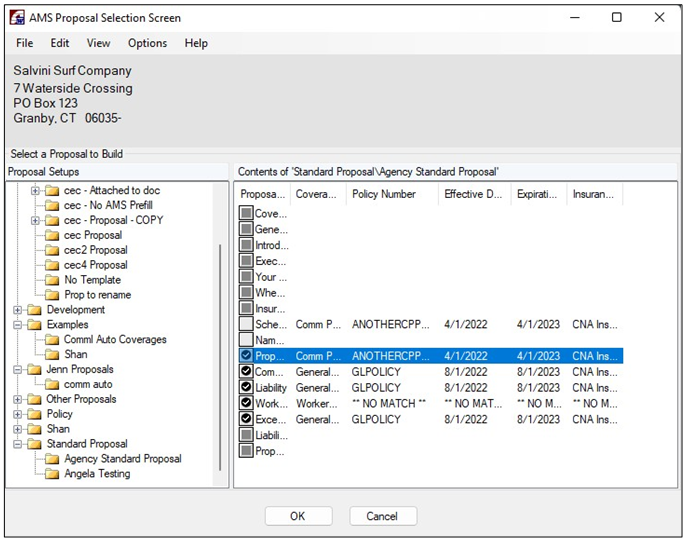

The Policy Number field displays the phrase ** NO MATCH ** if the system is unable to find a policy with coverage associated with the proposal page. This situation will occur if you selected a proposal that included a proposal page with a coverage that is not found in the policies selected within Sagitta. If the page is optional, you can right-click and select the page to include it or exclude it. For additional information about setting up proposals, please refer to Create / Maintain Proposals, Use Administrator.
Use the right-click menu to change the status for your optional proposal pages (Include or Exclude).
-
From the Options menu, choose one of the following options:
Option Select this option to ... Only Include Selected Policies ... only use policies selected for the proposal in a schedule of policies if one is included in the proposal, as opposed to showing all the Insured’s policies in the schedule. Do Not Include Dated-Off Items in Schedules ... ensure that dated-off Sagitta information will not appear in your proposals or schedules of insurance. Auto-Format Word Tables ... ensure that tables you create in Word from Standard Schedules are formatted with the current table format. Refer to the Table Auto-Format option on Word’s Table menu. Use Clipboard When Inserting Standard Text into Word ... insert text from the Microsoft Clipboard. The Form Letters function uses the Microsoft Clipboard feature for text insertion, because transferring text from the clipboard is faster than transferring it from the hard disk. You cannot turn off the Clipboard feature in the Speed Compile function.
If you do not select this option, the system writes the standard text to a temporary file in the TEMP directory to preserve rich-text formatting, and then inserts it into Word.
When you insert standard text into Word, anything that is in the Clipboard is discarded.
Sort Pages By Policy ... changes the proposal page display in the AMS Proposal selection page. -
Click OK to start the proposal assembly process.
This process may take several minutes, depending on the amount of data in the proposal. You can continue to work in Sagitta while the assembly runs.
When the document build process is complete, the Compile Errors window may display. There are two types of error:
| Error | Description |
| Data Not Found | These errors are displayed in the column on the left side of the Compile Errors dialog box. When the system cannot find data, it is because there is a corresponding blank field in the database. The document will highlight in yellow the place where data is missing. |
| Table and/or Field Not Found |
When the system cannot find a table or a field needed for your document (most often a proposal), the cause may be one of the following:
|
A table in this instance is a place in Sagitta where data is stored. It may be a Sagitta file, or a line item set within a file.
A single Sagitta page is usually one file.
The document is highlighted in blue where this information should appear.
Use this function where there are multiple items such as policies, vehicles, drivers, locations, etc. This applies for both form letters and proposals.
-
Start from your AMS Word document. Click Add-ins > AMS > Database fields.
-
In the top left pane, open the folder and select the Sagitta table you need. A list of the items displays in the lower pane.
-
Click an item to select it. The Use Table Builder for Single Item is now available to select.
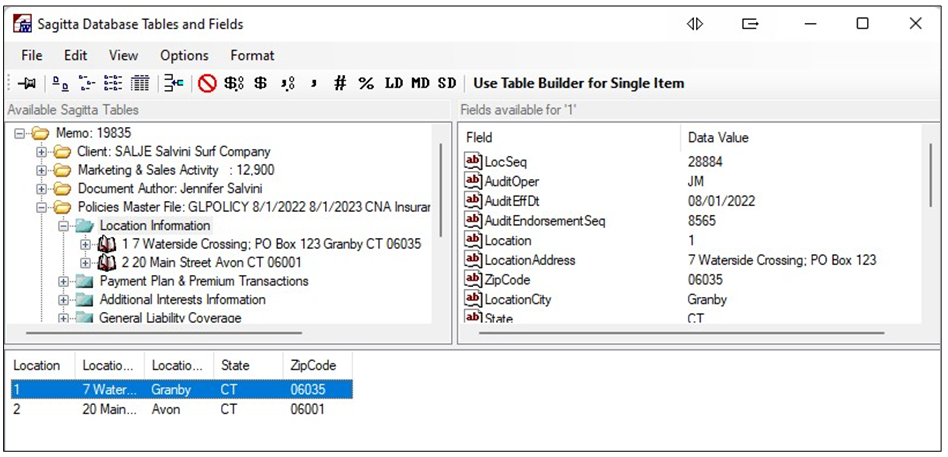
-
When you click Use Table Builder for Single Item, a Table Builder window appears. This will contain the information that will be used for your table.
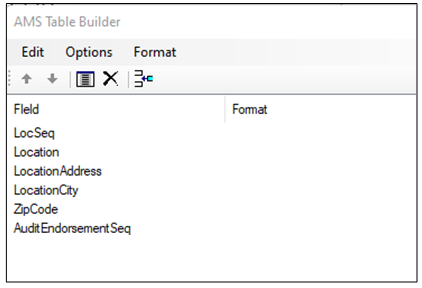
-
With the item selected in the bottom pane, click in the Fields available list to select the column headings that are to be part of your table. As you double click the Field Name, it will appear in the Table Builder window.
-
When all the fields are selected, click an insertion point in your document. This is the point at which the table will be added.
-
Click the Insert button
 on the Table Builder window toolbar to add the selected fields, in table form, into your document.
Each field will be a separate column, in the order listed in the Table Builder window.
-
From the AMS menu select Standard Text. The Standard Text window will appear.
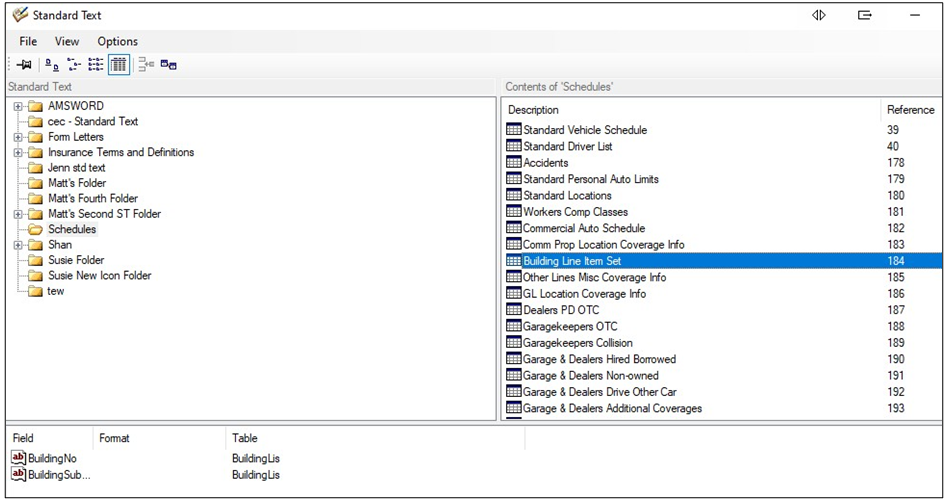
-
Double-click to open the folder you need, then select the standard text item you wish to add to your document.
This process also applies to Schedules, which are another form of standard text. Click the Insert button. The system will insert the text. Repeat this step until you have inserted all the standard text you need for your document.
When a new document is saved, Sagitta automatically stores the name and location of the created document (the source document) to a pre-configured location defined in the Import/Export and/or Division Master Maintenance pages. Sagitta uses a set of hierarchical rules to determine the storage location. For additional information, see the Personalizing the AMS Word Processing and Proposals Product > Document Storage Hierarchy Rules.
When you perform a Save As function in Word (and are personalized to do so), your document is saved either to a network or to a local drive. Depending on how your agency chooses to set up the personalization, you may also see the Copy / Replace prompt. For example:
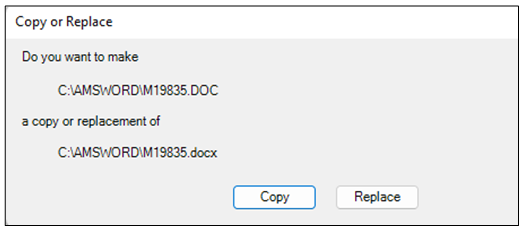
| Response | Result |
| Copy (default) |
Word will not write back the current location of the document to Sagitta. This document is now a copy of the original, linked document, with a new name and/or location. There are now two copies of the document:
|
| Replace |
This function directs Word to write back the current location and name to Sagitta. This document is now the NEW linked document. There are now two copies of the document:
|
If you wish to delete a proposal that has many errors, click Add-ins > AMS> Delete. You can repeat the compile process from the Sagitta Schedule page; there is no need to start over.
When you close the proposal, it is tied into Sagitta with an assigned S+ sequence number identifier. Once that number is assigned, the document cannot be deleted. You can only delete this document from the AMS menu, as described here.
-
Read through your proposal and make any necessary corrections as you would for any Word document. Once everything is correct to your satisfaction, it is ready to print.
-
Click File > Print.
A compiled proposal is like any other Word document. You can open, edit, resave / rename, and then print it again.
The AMS Word Processing and Proposals product can build upon your existing Word documents and proposals, adding enhanced functionality and the ability to add live information from your Sagitta database. If you have a library of shell letters in Jet, you can also re-use their text. Merge fields will need to be converted to AMS merge references.
There are two options for using Word documents that are already part of your system as AMS form letters or proposals.
-
Open the Word document in the usual way and save it as a .dot template file. This saves all the formatting information plus all the text.
Use this option where the text will not change, e.g., in a fax cover sheet.
-
Use the text of your Word document as standard text for the AMS product. To do this, start from the AMS Administrator window. Open Word, then open the source document (the one you want to copy). Copy the text, and then paste it into the Administrator’s Standard Text pane (bottom right).

|
Use the Edit menu or Ctrl+C and Ctrl+V to copy and paste. |
Your agency may already be using Word to create proposals for your clients. You can use the text of these documents in AMS Word Processing so that you can add Sagitta database information when the proposal is assembled. To do this, you turn your Word text into standard text.
If you have Word templates you are using for these proposals, they can be re-used for the new product. Refer to the Administrator chapter for more information on how to ―point‖ to an existing template.
-
Start from the AMS Administrator window.
-
Open Word, then open the source document (the one you want to copy).
-
Copy the text, then paste it into the Administrator’s Standard Text pane (bottom right).

|
Use the Edit menu or Ctrl+C and Ctrl+V to copy and paste. |