InsurLink Management
- Open the Administration Center.
- On the Sidebar menu, click the Utilities section, and then click InsurLink Management.
InsurLink is a powerful tool that allows you to service your client’s needs anytime, day or night using a web page linked to your agency's website. The web page is easy to navigate and offers your customers the ability to address their insurance needs at a time that is convenient for them. InsurLink gives you the power to choose which clients have access to this service and what they can see and do.
InsurLink is a licensed add-on for AMS360 Online agencies. For more information contact your Vertafore Account Manager.
|
InsurLink requires use of Vertafore Single Sign-On (VSSO). We will add InsurLink to your list of Vertafore products in VSSO. You'll then need to assign and activate those in your agency who will be using InsurLink. For more information on VSSO and the Administrator's Console, see VSSO Help. |
Use InsurLink Management to design the InsurLink web page that your insureds will see. You can also set default permissions (what a client/user can see and do) that will automatically populate to the InsurLink Customer Setup. See InsurLink Customer Setup for more information.
The views available for a client in InsurLink are:
- Policy data
- Claims
- Documents
- Certificates
- Billing Summary (Agency bill only)
The activities available for a client in InsurLink are:
- Request Policy Changes
- Auto ID cards
- Submit Claims
- Add Documents
- Add Certificate Holder
- Edit Certificate Holder Description
- Add Evidence of Property Insurance (EPI)
- Print Certificates and EPIs.
Please note that setup in InsurLink Management must be complete before the InsurLink view appears on the sidebar menu in the Customer Center.
|
Note: This update is part of the AMS360 20R2 release. Navigate to the AMS360 2020 20R2 Release Notes to review other enhancements and fixes that were part of the release. |
The InsurLink link is moving from the Views section to the Actions section under Integration Partners. In addition, when you click on InsurLink a new tab in your browser will open with the application.
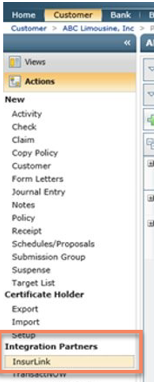
InsurLink
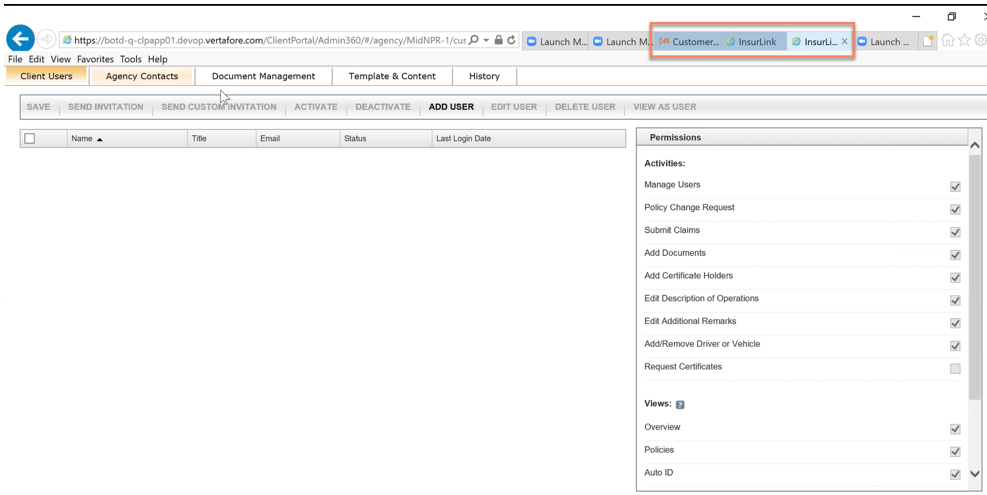
InsurLink: New Tab
The following sections describe the setup options available to your agency for your InsurLink web page and how your choices appear to your client.
At the top of this page is one of the most important pieces of InsurLink - the web address that links to your agency's InsurLink. Use on your agency web site to link your client's to their insurance information.
Enter your agency name and address as you want it to appear on the InsurLink web page.
If you have a Facebook, LinkedIn, Twitter, or Google + account, enter the URL in the appropriate field. When you enter a URL for a social media service, the icon for that service appears in the footer of your InsurLink web page.

Web site favicon
The Favicon is optional. If you choose to upload an icon image, the image will appear as the favorites browser icon on the browser tab.
iOS home screen
Add an icon to use when your client accesses the Portal with an iPhone or iPad device. When the client adds a shortcut to the site on their Home Screen, the icon you chose will appear on their device.
Use this to add text to your InsurLink home screen.
Default Permissions allow you to select the permissions you want every new InsurLink user to automatically be assigned. Individual permissions can be set at the Client Setup level.
If you do business in New York and plan to allow your insureds to print their own Auto ID cards from the Portal, you must enter your NY Issuer Key and Issuer ID. Without that information, the Auto ID cards are invalid.
Policy Preferences allows you to control which Lines of Business you want to display in InsurLink.
Select the Carrier Logo check box if you want to display the parent company logo when a writing company exists on Policy View. If you do not select this box, the writing company will display as text on the Policy View.
Use templates to create specific web pages for your InsurLink customers. Perhaps you will have one for commercial customers and one for personal. Or you have separate pages for each of your branch offices. The selections on this tab help you build the template for the web page. You then assign a template to a specific customer.
From this tab you can create a new template, edit, copy, or delete an existing one. The Assigned Customers column shows you the number of customers currently assigned to the template. Click the number to see the specific customers.
At any time while making your selections for the InsurLink web page, you can click Preview to see how your choice will appear on the insured access web page. Once you are satisfied with your choices, click Save to push the changes out to the live website. The changes will only appear for the customers who are assigned to the template.
The Page Header appears at the very top of the web page. You can add or change your agency logo, banner image, background color, accent color, and font color.
If you choose not to upload an agency logo graphic, the name of your agency will appear in the Header.

You can choose the style and appearance of your portal by selecting a Typography and Color set.
Choose to display the greeting and/or quick links on this template.
If you choose to display the agency contact information on this template. It shows on the footer below your agency's name and website. Your agency's name always appears in the footer and can't be changed. You have the option to use global agency contact information or specify an agency's contact information for a specific template. The same options are available for social media content.

Use this section to select which tabs will automatically display for all users in the portal. These views can be customized for individual users when assigning permissions for the customer in InsurLink - Customer Setup.
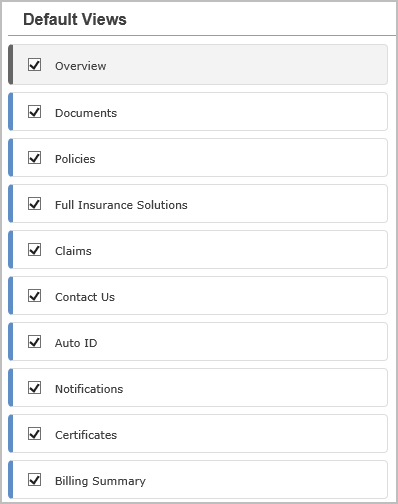
|
You can rearrange the order of the tabs by dragging and dropping them in the order you prefer. |
Enter content that you want to appear on the home page in InsurLink for this template.
The Custom Content tab provides a tool that you can use to add additional tabs (maximum 100) to your InsurLink web page. Access to these tabs can be given or denied by the permissions in InsurLink - Customer Setup.
Use these optional tabs to include information you'd like to provide to your client via the InsurLink web page. To create a page, you'll need the following:
- A title for the tab
- A description
- Content
You can enter simple text in the Custom Content tabs and it appears as it was entered. You can format the text using HTML tags. If you want to add a link that takes the user to another web page, outside the Portal, you can add the url to the tab using HTML tags. If you want the web page to appear within the Custom Content tab in the Portal, the page must have a url that begins with https:// or it will be blocked by most browsers.
|
The HTML character limit is 10,000 characters per custom tab. |
To create content other than simple text, we recommend someone do it who is familiar with HTML and the key concepts around it.
|
Using HTML in a custom tab to embed another web page, leveraging Iframe, you are required to provide a Hypertext Transfer Protocol Secure (HTTPS) link to that page. InsurLink protects client data by using HTTPS on all pages of the website. Current browsers block references to an HTTP page in Iframe on an HTTPS protected website. |
You can customize the messages sent about or from InsurLink. The messages you can customize are:
- Invitation (to use InsurLink)*
- Account Created
- Password Reset
- Document Upload Confirmations
- Document Folder/Share Link
- Policy Change Confirmation
- Claim Submission Confirmation
- Certificate Holder Request Confirmation
- Certificate Request Confirmation
*The invitation you are creating here is what will be sent to the insured when you select Send Invitation via the Client Users tab. If there is an instance where you want to tailor the invitation's content, select Send Custom Invitation. This option will allow you to make changes to the email prior to sending the invitation.
When customizing the email, you can insert certain tags (like merge fields) that will use information from the individual insured's account in the email response. The tags vary depending on the type of email. All emails include Contact First Name and Contact Last Name.
|
When customizing the Invitation or Password Reset messages, be sure to include the url tag shown in the sample. Those give the insured the url to click to sign in and setup their InsurLink account and the url to reset their password. These tags both have the red asterisk meaning they are required. |
You'll also need to choose a "Reply To" email address. Choose from the list. The list includes all employees set up in the Employee Center with an email address. You can choose only one address so it should be someone designated to monitor any replies received from the insured.
OR
You can choose a role that allows for the email to be sent from a person associated with the customer account. The available roles are:
- Customer Representative
- Customer Executive
- Policy Representative (available for policy related actions)
- Policy Executive (available for policy related actions)
You can define the automatic notification your agency receives from when a client performs an action in the Portal. The actions you can define for notification are:
- Document Uploaded
- Document Deleted
- Document/Folder Emailed
- Folder Access Requested*
- Policy Change Requested*
- Claim Submitted*
- Certificate Holder Requested*
- Certificate Holder Added
- Certificate Viewed
- Certificate Emailed
- Certificate Requested
*A notification is required for these actions.
You can choose either a Suspense or email notification or both. For a Suspense, choose from the list of users set up for your agency or use the generic Customer Executive or Customer Representative. Choosing one of the later will create the Suspense for the exec or rep assigned in Customer Setup. For the notification, “Policy Change Requested” you can choose Policy Representative or Policy Executive to create the Suspense for the exec or rep assigned in the policy.
When customizing the email, you can insert certain tags (like merge fields) that will use information from the individual insured's account in the email response. The tags vary depending on the type of email. All emails include Customer Name.
|
When customizing the Notification Email body, be sure to include the tags with asterisks shown in the sample. Those tags merge information about the customer into the message. A red asterisk means the tag is required. |
When creating a Suspense Notification you can choose only one "Assign To" from the list. However, when creating an Email Notification you can choose one or more (maximum 10) Recipients, as well as add an email address that isn't set up in AMS360.
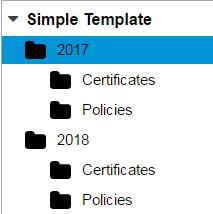
The Folder Templates tab provides you the ability to create folder templates and apply them to an individual agency account at the Customer level.
Folder Template Example
Users Report
InsurLink provides the Users report to show information about your insureds' use of the Portal.
The three boxes at the top of the page show you an overview of up-to-minute statistics for Active Users, Invited Users, and Logins Over Past 30 Days. The numbers are recalculated when the page is opened or refreshed. You can download a report before these boxes have finished loading if you want to immediately download a report.
To download a detailed report for Active and Invited users, click Download Current Users Report. For Internet Explorer you'll see a message at the bottom of the page asking if you want to open or save the report. When you open the report from the message or from a saved location, Excel opens and you'll see a spreadsheet similar to the following:

You can format and sort the data as you like.
Folders Report
InsurLink provides the Folders report to show information on folder security by customer. The report displays data only for folders with restricted permissions. To download the report, click Download Folders Report. For Internet Explorer you'll see a message at the bottom of the page asking if you want to open or save the report. When you open the report from the message or from a saved location, Excel opens and you'll see a spreadsheet similar to the following:

You can format and sort the data as you like.
Customer Template
Because you can assign different templates to different customers, this report provides information by customer. To download the report, click Customer Template Report. For Internet Explorer you'll see a message at the bottom of the page asking if you want to open or save the report. When you open the report from the message or from a saved location, Excel opens and you'll see a spreadsheet similar to the following:
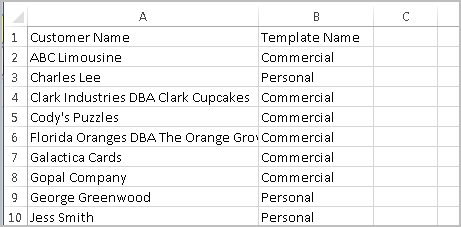
You can format and sort the data as you like.
Agency Contacts
InsurLink also provides the Agency Contacts report that provides information on agency contacts settings by customer. To download the report, click Agency Contacts Report. For Internet Explorer you'll see a message at the bottom of the page asking if you want to open or save the report. When you open the report from the message or from a saved location, Excel opens and you'll see a spreadsheet similar to the following:

You can format and sort the data as you like.