Purge Policy

|
Note: This update represents only a portion of the AMS360 23R1 release. Please navigate to AMS360 2023 R1 Release Notes to review other enhancements and fixes that were part of the release. |
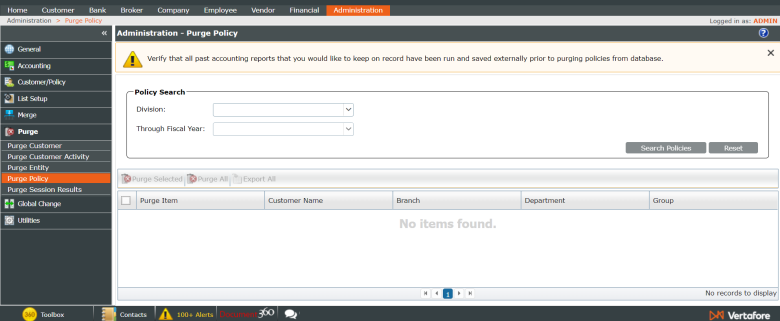
Users are able to purge policies from the database that are no longer active, provided they fall within a selected time frame within a closed fiscal year.
Workflow
How To:
-
Navigate to Administration Center.
-
Select Purge menu item.
-
Select Purge Policy.

-
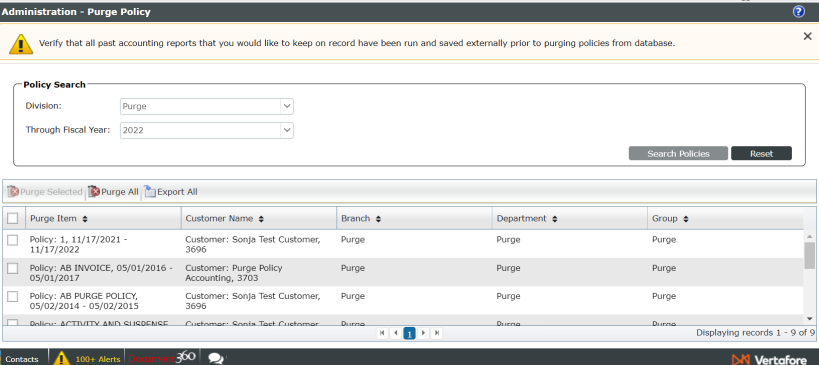
Select Division and Through Fiscal Year, then "Search Policies."

-
Select desired policies you wish to delete permanently, and then "Purge Selected" becomes available. However, if no items are selected, "Purge All" becomes available to permanently remove all listed results from the database.


-
Review and confirm the information in the Purge dialog box, and then click Continue.
-
Read the warning message, then click "Yes" to begin the Purge process. The status of the purge will be shown at the top of the screen.
-
When the Purge is completed, select Purge Results to see the details of this Purge, or select Purge again to start a new process.
Exporting Data:
When the Purge Item list is populated with eligible purge items, the Export button becomes available. You can use this button to export purge items to a .csv file, and then review eligible policies. Use this file as a worksheet to select policies for purging. The check box column of the Purge Item list is not exported. You may insert an additional column to the table for adding check marks for the policies you have selected. You may also sort columns, if necessary.
To review items eligible for Purge:
-
Click Export. A .csv file opens with purge items displayed. Review the list and make the necessary changes to the policies in the system. Either make them "Active" or mark them as "Exclude from Purge" so they aren't available to purge (see Exclude from Purge for details). If you don't see a policy you expected to see, review the Requirements section in Purge.
-
(Optional) To save the file, Vertafore recommends you rename the file to indicate the Purge Date Through date.
-
If changes are made to policies and they no longer meet the requirements for Purge, select search criteria again. A new list of policies eligible for Purge appears in the Purge Item list.
Requirements:
Policies must behave as follows:
-
Not be marked as "Exclude from Purge"
-
Be assigned to specified GL division
-
All activities associated with policy have a date/time stamp before selected Purge Through date
-
All suspense items associated with policy have been completed
-
All claims have been closed
-
Closed date is on or before Purge Through date
-
Cannot have any suspended billing
-
Invoices on policy are all Closed and Posted
-
Invoice balance is zero
-
All related Statements are closed and posted
-
All GL transaction dates are on or prior to Purge Through date
Considerations:
Keep the following considerations in mind when planning a Purge:
-
The Purge process cannot be canceled once it has begun.
-
There is no "undo" feature for purged data. Therefore, if you perform a Purge by mistake, or if a Purge should not have been done, a full restore is required.
-
An In-house agency must create a valid and current backup before purging data, in case you need to restore the data after the Purge.
-
An online agency must plan a timely review of the Purge Results, because an immediate request for a restore would minimize data re-entry.
-
You can process only one Purge at a time. If you attempt to start a Purge while another Purge process is still in process, an error message will appear. Click Refresh to see the latest purge status so you can monitor when the purge is completed. After the Purge is completed, you can select Purge and proceed to start your Purge.
-
Vertafore recommends that you perform a Purge:
-
Outside business hours.
-
After you have notified all users not to log into the system.
-
If you attempt to perform a Purge while applications requiring exclusive control are running, a message appears. The applications must be closed before you can start a Purge process.
-
-
The Purge process can be time-intensive, depending on the amount of data that is selected to purge.
-
To determine the estimated time for purging data:
-
Purge a small amount of data (select a few customers).
-
Review the Purge Results page to see the amount of time this purge required, and then determine time estimates for future purges.