In this topic we continue our discussion of the Coverage command located on the Tables Menu.
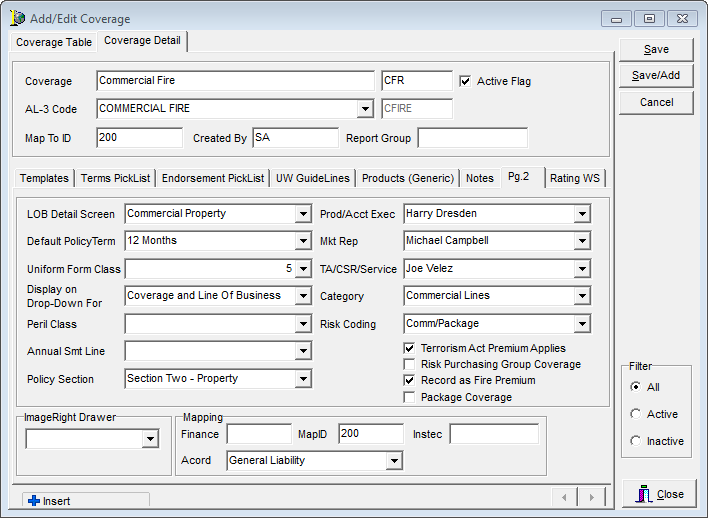
On the Coverage Detail Pg. 2 tab, you can define various properties that apply to the coverage. For example, the default term of the policy, the marketing representative associated with the coverage, etc. The available properties may not apply to all coverages, you should consider the selection of options carefully.
- Click the Pg. 2 tab.
- Enter the necessary information and select the necessary options based on the definitions provided next.
- LOB Detail Screen – additional detail screen to be displayed in AIM on the Quote Detail Pg. 2 tab and used with Rackley Rating (integration)
- Prod/Acct Exec – account executive in your company that is assigned to the coverage
- Default Policy Term – length of the policy term that will be assigned by default
- Mkt Rep – marketing representative in your company that is assigned to the coverage

To avoid receiving a warning message in AIM, the default policy term should only be entered if the term differs from the default policy term defined in System Parameters.
- Uniform Form Class – uniform policy code that applies to the coverage. If multiple cancellation notices are required for each state based on the coverage provided, additional mapping must be completed for that state.
- For each coverage class, determine the uniform policy code (1,2,3,4,5,6, 99c) that applies to the corresponding coverage. For a list of uniform policy codes, see the Uniform AuthenticWeb Web site: http://www.nils.com/pages/products/authenticweb.html
- If a form class is not specified, form class 1 is assumed. Uniform policy forms can be specified by state in the States table.
- TA/CSR/Service – service underwriter or customer service representative in your company that is assigned to the coverage
- Display on Drop-Down For – AIM drop-down lists in which the coverage should be available for selection
- Coverage list in the Submission Entry dialog box
- Line of Business list in the Premium Distribution dialog box
- Coverage and Line of Business (both lists – in the respective dialog box)
- Category – classify the coverage as either personal lines or commercial lines
- Risk Coding – defines the dialog box that will be displayed in AIM when binding a policy after invoicing. The dialog box is used to gather information for policy level risk Bordereau reporting.
- Select the following options as needed:
- Terrorism Act Premium Applies – Terrorism Risk Insurance Act (TRIA) coverage applies to the coverage.
- Risk Purchasing Group Coverage – the submission used to process the coverage will be processed as a Risk Purchasing Group (RPG) submission.
- Record as Fire Premium – the coverage should include a fire premium.
- Package Coverage – adds a field to the Terrorism Act Premium Endorsement dialog box in AIM so that you can separate the portion of TRIA premium attributed to the liability.
- In the ImageRight Drawer list, select the default ImageRight drawer for this coverage, if applicable, to ensure that files using the coverage are placed in the same drawer in ImageRight.
- In the ACORD list, you can select the appropriate ACORD value for the coverage, if applicable.
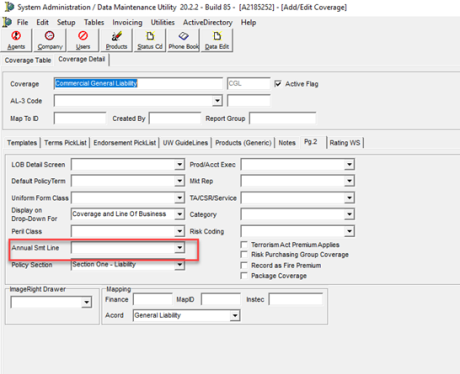
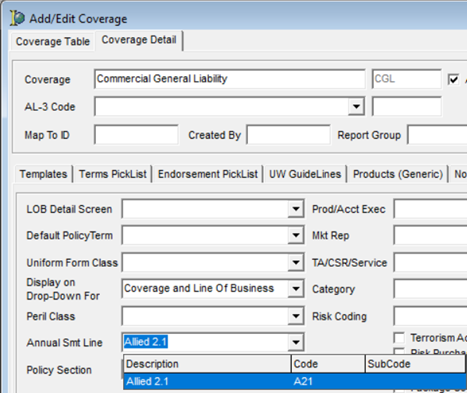
Annual Statement Line Setup
Some clients will need to capture information on their Premium BDX each month. Information entered here is then populated on the clients General Ledger.
Annual Statement Line is selected on the Coverage Table under Pg.2 tab. Prior to this, Annual Statement Line needs to be set up.
Set-up Process
- Open DMU (Data Maintenance Utility).
- From the Tables menu, select Peril – Premium Codes.
- Select Annual Line Statement in the right column.
- Click Add and enter the ID Code and Description
- Click Save, or Save/Add if you need additional codes setup.
![]()
- From the Tables menu, select Coverages.
- Select the first Coverage to be set up and click Edit.
- Select the Pg. 2 tab.
- On the Annual Smt Line field, click the drop-down and select the desired code setup.
Reporting
The data is stored in taaPremiumCoding and can be pulled into reports. (taaPremiumCoding.IDCode can be linked to Coverage.AnnualSmtLine).