Setup Windows Authentication
You can setup your AIM system to use Windows authentication to log onto AIM application. By default, AIM uses SQL authentication, in which users have user IDs and passwords that are unique from their Windows credentials. In this topic, we show you how to configure your AIM system to use Windows credentials.
New Install
If you are setting up a new install of AIM, you will need to configure CIS.INI as explained in Configure CIS.INI and then create and configure a new SQL Server login with administrator rights. This user account will be used to log on to Data Maintenance Utility and to create new users in your AIM system, as explained in Setup AIM Users in Data Maintenance Utility. You will not need an SA account as this newly created account will take the place of the SA account.
Converting from SQL Server Authentication to Window Authentication
If you are an existing AIM customer and already have user accounts configured using SQL Server authentication and want to begin using Windows authentication you will need to configure the CIS.INI file, create and configure a new SQL Server login with administrator rights. This user account will be used to create new users in your AIM system, as explained in Setup AIM Users in Data Maintenance Utility . You will need to create new Windows authentication accounts for all existing AIM users as existing SQL Server authentication accounts cannot be converted to Windows authentication accounts. These accounts can be removed or left orphaned as they will no longer be used. Additionally, System Option 25 in Data Maintenance Utility > System Parameters > Pg.2> Use DMU to Manage SQL Logins will be ignored.

|
Setting up Windows authentication in an existing AIM environment should be done with care. You will be required to create new user accounts in DMU for existing SQL authentication accounts. SQL authentication accounts cannot be converted to Windows authentication accounts. Records where the SQL authentication account user name is used will not be updated with the new Windows authentication account. |
Configure CIS.INI
Each of AIM’s 3 databases requires a Name-Value Pair section in the CIS.INI. Each section has 3 required pieces of information: the name of the server, the name of the database (CIS, AFD, or Claims), and the authentication (Windows Authentication or SQL Server Authentication).

If a single Windows Authentication connection is listed, the log on screen will not display. If a single SQL Server Authentication connection is listed, the logon screen will display and require a user name and password to be entered.
If there are multiple listed connections, the logon screen will behave differently depending on the kind of connection currently listed in the Database drop down.
- If the type of authentication is Windows Authentication, the user id and password will be disabled. Just click OK to log on.
- If the type of authentication is SQL Server Authentication, the user id and password will be enabled and are required to be entered.
Setup SQL Server Authentication Type
In the steps that follow, we show you how to configure the SQL Server authentication type that will be used in your AIM environment.
Note: Making changes at the server level affects other databases on the same SQL Server instance.
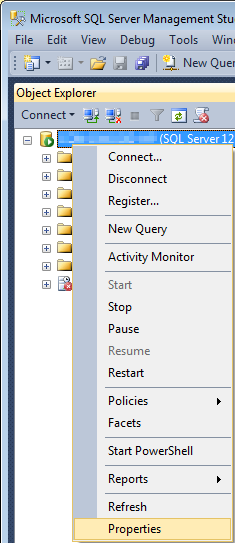
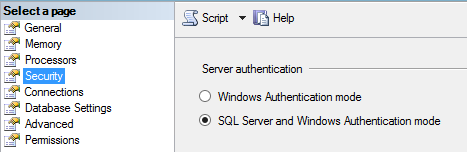
- In SQL Server Management Studio, right click the server instance, and then click Properties.
- In the Select a Page pane, click the Security node.
- In the Server authentication pane, select either Windows Authentication mode or SQL Server and Windows Authentication mode.
Note: Windows Authentication mode removed the requirement for users to enter a user ID and password at logon. Selecting SQL Server and Windows Authentication mode a user ID and password will be enabled and must be entered at log on. - Click OK.
Setup Initial SQL Server User
Before you can begin adding users in Data Maintenance Utility (DMU) you must first create a SQL logon with Administrator rights. This user account will be used to create additional users in DMU.
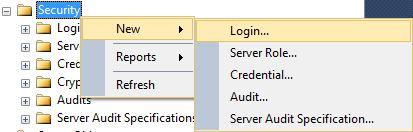
- In SQL Server Management Studio, right-click the Security node, point to New, and then click Login.
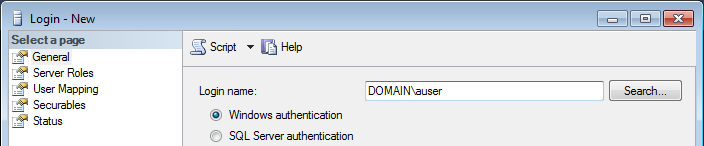
- In the Login name field, enter then domain name and user ID for the new logon.
- Select Windows authentication.
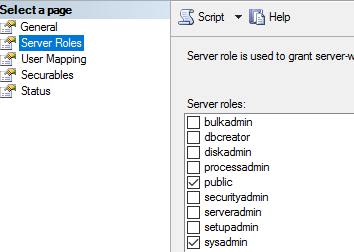
- Click the Server Roles node.
- In the Server roles pane, select public and sysadmin.
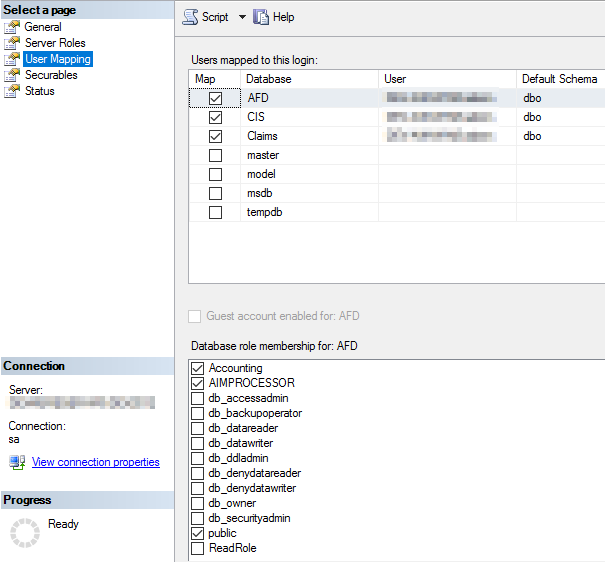
- Click the User Mapping node.
- In the Users mapped to this login pane, place a check mark next to the databases to which the login is to be mapped. You should map the user to the AFD, CIS, and Claims databases.
- Select a database by clicking the name of the database, and then in the Database role membership for: pane, select AIMPROCESSOR.
Note: For the AFD database, you must also select Accounting. - Repeat these steps for each remaining database.
- Click OK to create the logon.
- Under the Security node, right-click the new logon, and then click Properties.
- Click the Securables node.
- On the Explicit tab, scroll down and select Connect SQL if it is not already selected.
- Scroll down again and select View server state.
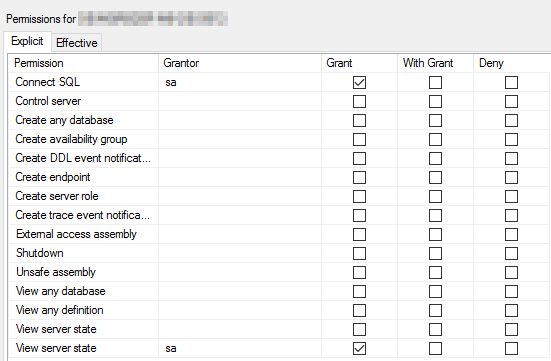
- Click OK to save your changes.
Setup AIM Users in Data Maintenance Utility
You will need to configure a network log in for user accounts in Data Maintenance Utility (DMU). You must log into DMU using an account that has SysAdmin rights in order to create a new user.
- In DMU, click the Tables menu, and then click User.
- Click Add to add a new user.
- Proceed to add the new user as normal.
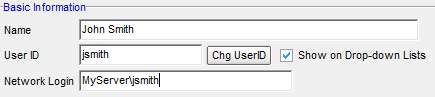
- Click the User Information tab.
- In the Network Login field, enter the domain name and network login in the following format:
domainname\networklogin
- Configure the additional user settings as you normally would. Refer to the User Help topic for more information on configuring users.