Workflow: InsurLink Setup Step-by-Step

|
InsurLink Setup must be performed in the order outlined below. Each step builds on the previous one. You cannot see InsurLink Management until you provision for it through VSSO. Then, you cannot see InsurLink Customer Setup until you have completed InsurLink Management. |
Step One: Configure Sagitta to Use InsurLink
Contact your account manager to purchase InsurLink and get set up in Vertafore Single Sign-On (VSSO).
Next, you'll need to complete the following steps to give your staff access to InsurLink in Sagitta:
- Install the prerequisite software:
- Sagitta Application Server: Sagitta Application 19.2.2.0 or later
- Sagitta Web Services Server: Sagitta Web Services 19.2.2.0 or later
- Sagitta Workstations: Vertafore Launcher 1.1.0 or later
- Refer to the VertaforeLauncher.msi Workstation Install document on MyVertafore for installation instructions.
- In Sagitta, make sure the Sagitta Instance Status is Registered. If not, follow instructions to Register your Sagitta Instance in VSSO using the Help article .


|
If you have previously registered the Sagitta Instance in VSSO (to use Vertafore eForms, for example), make sure your VSSO User ID and Password have not expired. The Password typically expires after six months. You can confirm your password has not expired by logging into Vertafore Single-Sign On. NOTE: Logging into VSSO with an expired password will force you to reset the password, and you will have to re-register your Sagitta Instance to update the password. |
- In VSSO, make sure that InsurLink has been added as a Product for your Agency.
For more information on Vertafore Single Sign-On, see VSSO Help. - In the Role Based Security page in Sagitta, create or edit at least one Security Role:
- Create or edit a role so that the InsurLink Access drop-down is set to Administrator. Users with this role will have access to InsurLink administrative pages, including those that manage templates. They will also be able to give Clients access to InsurLink.

- If the Security Role will be limited to administrative users, create or edit another role, which has the InsurLink Access drop-down set to CSR. These users can give InsurLink access to any Clients they can view in Sagitta.

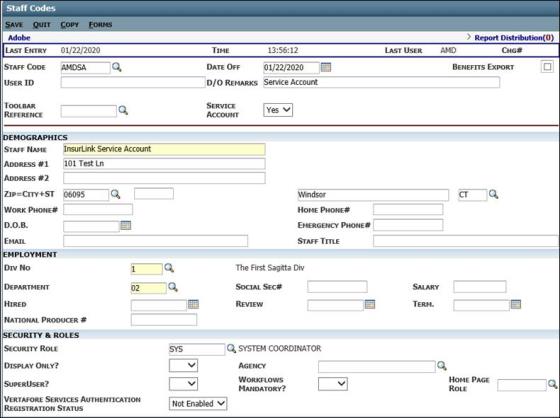
- In Sagitta, create a new Staff to be used for InsurLink End Insured actions. This Staff is called the Service Account.
- In the Staff Codes Maintenance page, create a new Staff Code.
- Enter all required fields.
- Enter a Security Role.
- Set the Service Account drop-down to Yes.
- Save the Staff Code.
- At the prompt to date off the associated Vendor code, click Yes.
- When the new staff code is reloaded, it will look like this:

- In Sagitta, go to the Vertafore Services Personalization page.
- Enter the newly created Service Account in the Service Account field.
- Enter at least one Sagitta user (recommended: the Sagitta System Administrator) in the Security Keys Expiration Notifications textbox.
- In the InsurLink URL field, enter this URL: https://clientportal.vertafore.com
- Save the page.
- Click Register for InsurLink. When completed successfully, the Status is updated to Registered, the Delta Sync Status will be updated to Enabled, and the Security Key's Created On and Expires On dates have been updated.

- In Web Service Import Personalization in Sagitta (Other > Personalization > Integration), in the Memo Format & Memo Author Information section, personalize a Memo Format Default and Memo Author Default.

For more information on completing the Web Service Import Personalization page, see the Sagitta Help article Web Service Import Personalization.
- In Other Transactions Maintenance in Sagitta (Other > Maintenance > Policy), in the InsurLink section, enter a value in the Create Memo (# of Days) field and in the Document Type field. These values will be used for Policy-level notifications from InsurLink.

If the personalization is not completed, the default document type, MM, and the default number of follow-up days, 1 day, will be used for these notifications. For Client-level actions, like the creation of Holders, attaching Holders to Certificates, and other Certificate requests, the default document type MM and 1 follow-up day will be used.
Step Two: Set Up the Agency for InsurLink
In InsurLink Management, link the Insured access page to your website and customize the page to align with your website colors and branding. Also set Default Permissions that determine the access choices that can be granted in Customer Setup.
Note that InsurLink Management should be completed prior to setting up a customer for InsurLink in Sagitta.
- Log in to Sagitta as a user who has Administrative access to InsurLink assigned in their Security Role.
- From the sidebar menu, click Vertafore Services > InsurLink Admin.
For complete details, please review the InsurLink Management section of this topic.
Step Three: Set Up the Customer for InsurLink Access
You can give your customer around-the-clock access to some of their insurance information by setting them up for InsurLink. This is a time-saver for your staff as the customer can print their own Auto ID card, check on policy coverages and limits, upload documents securely, or even send information about changes to their policy via InsurLink.
The steps below lead you through setting up a customer for InsurLink access.
- Open the Client in Sagitta.
- From the Primary Navigation menu, click InsurLink.

The InsurLink window opens to the Client Users tab.


In addition, all client contacts with an email address that are associated with the Client in Sagitta will appear on the tab.

- On the InsurLink Client Users window, select one or more users who will have access to InsurLink using the checkboxes.

- Under the Permissions list on the right, check or clear the Activities and Views to set what the user can see and do in InsurLink. Mark Manage Users to allow the selected user to add other users to their InsurLink page.

- When you have set the permissions, click Send Invitation to automatically send a default invitation, or Send Custom Invitation to load a template email to edit in your default email software. The Client User's status changes to Invited, and they will receive an automatic activation.


|
When you open InsurLink from the View menu and the Client User list is empty or a user is not in the list, you can edit the customer and either add an email address for the customer or add a Contact including their email address. Then, return to the InsurLink window and you will see the customer or contacts you entered with an email address. OR You can also add a user by clicking Add User on the Client Users tab in InsurLink Setup window. |
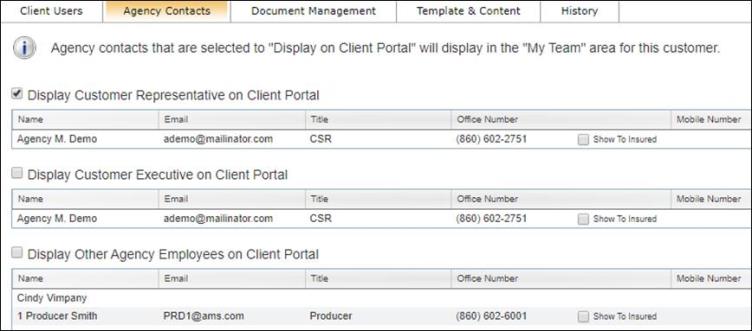
- Click the Agency Contacts tab. Select the employees that you want to appear on InsurLink for the client, marking which phone number(s), if any, should display in InsurLink.

- The information will appear under My Team in InsurLink.
- The Document Management step is optional. If you want to create folders and add documents for the client to see in InsurLink, you can do so on the Document Management tab. Documents must have a valid file extension (.doc, .pdf, etc.) to be imported.
You may want to establish an agency standard for file structure or create a folder template. This tab will also include any folders and files the insured has added from InsurLink
The Using InsurLink Help file describes the tabs and activities contained in InsurLink.
Browser Cache Note – Agency Users Testing with an Insured Login

|
Agency users – users with the Administrator or CSR permissions in Sagitta – who also wish to create an Insured login in InsurLink for testing purposes should always use separate browsers or a separate, non-caching mode window (Incognito in Google Chrome, InPrivate in Internet Explorer, or Private in Mozilla Firefox) for their Insured actions. Within the same browser session, you CANNOT log in to two separate roles. If you have previously logged in with one role in one browser session, you can also clear your browser cache to be able to log into the other role instead. |