In this topic, we continue our discussion of homeowner property on the HomeOwners tab in Units At Risk.
On the Detail tab, you will enter information about the property that describe the construction, occupancy, protection class, coverages, and coverage dates. We will show you how to add property details and discuss all of the various details that you can add so that you can add and edit properties on your own.
- In the
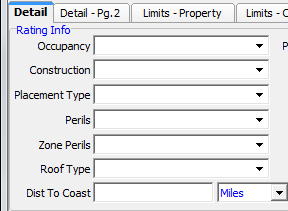
Rating Info pane, enter the following information in the boxes provided.
- Occupancy – occupancy status of the property
- Construction – type of construction materials used
- Placement Type – placement type for the selected property
- Perils – flood peril for the selected property
- Zone Perils – flood zone peril for the selected property
- Roof Type – type of roof for the selected property
- Dist to Coast – distance, in miles or feet, to the nearest coast line
- Protection Class – protection type ID code, populated by your selection in the Protection pane
- Key Rate – key rate ID code for the selected property
- Territory ID – territory ID code for the selected property
- Map Page – flood map page ID code
- Map Grid – flood map grid ID code
- Location # – location number
- Building # – building number
- Tie Down – indicates whether the property is tied down (applies mainly to mobile homes)
- Sinkhole – indicates whether the property is near a sinkhole
- In the Protection pane, select one of the following protection classes.
|
The Occupancy, Construction, Placement Type, Perils, Zone Perils, and Roof Type lists are populated via the Lookup Codes table in Data Maintenance Utility (DMU). Please consult with your AIM system administrator to make changes to these lists. |

- In the
Coverages pane, enter the following information in the boxes provided.
- Building – value of the building
- Contents – value of the contents of the building
- Year Built – year that the building was built
- In the
Coverage Effective Dates pane, enter the coverage effective dates, or
click
 to use the Calendar.
- Date Added – date on which the property was added to the policy
- Date Dropped – date on which the property was dropped from the policy
