Create Multiple Activities Simultaneously
|
Note: This update is part of the AMS360 21R1 release. Navigate to the AMS360 2021 R1 Release Notes to review other enhancements and fixes that were part of the release. |
You can now create multiple activities at once by selecting multiple policies when creating an activity.
By default, all users will have access to create multiple activities simultaneously, regardless of if "No Access" shows in the Secured Item List.
-
Feature: All Centers
-
Group: Activity/Suspense
-
Task: Link-Select Multiple Policies Winform
-
Access: Full Access

Security Group Setup
|
Note: If agency users are only part of a permanent Security Group in AMS360 that cannot be modified, the group will need to be copied into a non-permanent group before access can be modified. Please contact support for assistance setting up new Security Groups. |
- When you create a new activity, you will now see an option next to the Policy drop-down menu for Select Multiple.
- This feature is only accessible if the Center field is set to Customer.

Select Multiple
-
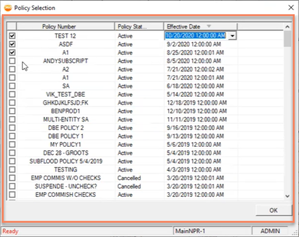
After clicking Select Multiple, the Policy Selection window will open, showing all available policies for selection. The policies can be sorted by Policy Number, Policy Status, or Effective Date, by selecting the respective column headers.
-
If a policy has multiple effective dates, click the drop-down arrow on the Effective Date cell to select the one you want to use.
-

Select multiple policies

Choose an effective date
-
Click OK to save your selection and return to the main Activity winform.
-
Continue making any remaining edits in the Activity winform.
-
If you need to revisit the Policy Selection window to edit your selected policies, click on Edit beside the Policy drop-down.
-

-
If file attachments (emails, documents, photos, etc.) are added to an activity being created by multiple policies, each attachment will be accessible in each copy of the activity.
-
When you are finished creating your activity, click on Save and Close.
-
Refresh the Activities page to see the newly created activities for each selected policy.

Newly created activities for each selected policy
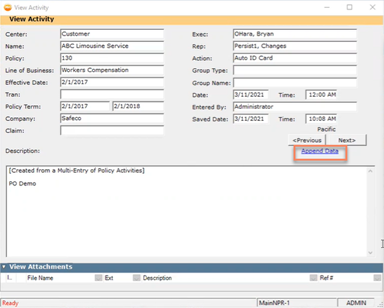
- Creating multiple activities using this method ensures each activity will contain the same description and attachments. If you would like to make unique changes to an activity’s description or attachments, select the activity from the menu to open the View Activity window. From here, click Append Data.

Append Data
-
This will open a new Append Data winform. Here, you can add any additional text to the description or attach files to the Activity. When you are finished adding your information, click Save.

Add description text or attachments to an Activity
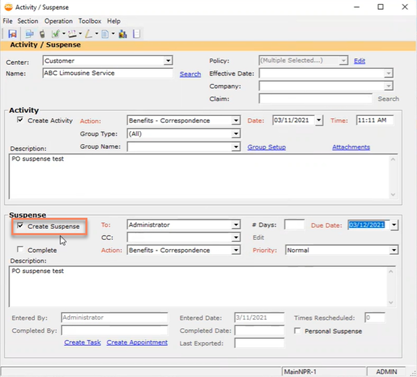
- You can create an individual suspense for each policy selected by checking the Create Suspense box. Each suspense will be assigned to the same person and share the same inputted values for all required fields, including Due Date, Action, Priority, and Description.

Create suspense for multiple policies/activities
-
Click Save and close the Activity/Suspense winform.