Sagitta Integration
The Sagitta integration allows users to bridge customer, policy, and submission data from Sagitta into Commercial Submissions - including customer details, coverages, and more. Any user with access to Sagitta and the Submissions role in Commercial Submissions will be able bridge customer data.
NOTE: An admin must connect your Sagitta instance to Commercial Submissions before you can send customer data.
|
Entity |
Sagitta UI Element |
Commercial Submissions Field |
|
Client |
Client Details > Client Name |
Basic Information > Business name |
|
Client |
Client Details > Website |
Business Information > Web URL |
|
Client |
Client Details > Statuses > FEIN |
Business Information > FEIN, SSN, ITIN |
|
Client |
Client Details > Statuses > Date Business Started (Years in Business) |
Business Information > Year business started |
|
Client |
Client Details > Nature of Business |
Business Information > Description of business operations |
|
Client |
Contacts > Con #1 |
Contacts > list item #1 |
|
Client |
Contacts > Con #1 (edit) > Primary Information > First Name |
Contacts > list item #1 (edit) > First name |
|
Client |
Contacts > Con #1 (edit) > Primary Information > Last Name |
Contacts > list item #1 (edit) > Last name |
|
Client |
Contacts > Con #1 (edit) > Primary Information > Title |
Contacts > list item #1 (edit) > Title/Descriptor |
|
Client |
Contacts > Con #1 (edit) > Email Addresses |
Contacts > list item #1 (edit) > Email |
|
Client |
Contacts > Con #1 (edit) > Phone Numbers |
Contacts > list item #1 (edit) > Phone number |
|
Client |
Contacts > Con #1 (edit) > Addresses > Address 1 |
Contacts > list item #1 (edit) > Street address 1 |
|
Client |
Contacts > Con #1 (edit) > Addresses > Address 2 |
Contacts > list item #1 (edit) > Street address 2 |
|
Client |
Contacts > Con #1 (edit) > Addresses > City |
Contacts > list item #1 (edit) > City |
|
Client |
Contacts > Con #1 (edit) > Addresses > State |
Contacts > list item #1 (edit) > State |
|
Client |
Contacts > Con #1 (edit) > Addresses > ZIP |
Contacts > list item #1 (edit) > ZIP code |
|
Client |
Client Details |
Locations > list item #1 |
|
Client |
Client Details > Address #1 |
Locations > list item #1 (edit) > Street address 1 |
|
Client |
Client Details > Address #2 |
Locations > list item #1 (edit) > Street address 2 |
|
Client |
Client Details > City |
Locations > list item #1 (edit) > City |
|
Client |
Client Details > St |
Locations > list item #1 (edit) > State |
|
Client |
Client Details > Zip Code |
Locations > list item #1 (edit) > ZIP code |
|
Workers Comp |
General Information > Coverage and limits > Each accident |
|
|
Workers Comp |
Workers Comp Coverages > Coverages > Limits > Disease Policy Limit |
General Information > Coverage and limits > Disease - Policy |
|
Workers Comp |
Workers Comp Coverages > Coverages > Limits > Disease per Employee |
General Information > Coverage and limits > Disease - Each employee |
|
Workers Comp |
Locations > Loc #1 |
Locations > list item #1 |
|
Workers Comp |
Locations > Loc #1 (edit) > Address (value before semicolon) |
Locations > list item #1 (edit) > Street address 1 |
|
Workers Comp |
Locations > Loc #1 (edit) > Address (value after first semicolon) |
Locations > list item #1 (edit) > Street address 2 |
|
Workers Comp |
Locations > Loc #1 (edit) > City |
Locations > list item #1 (edit) > City |
|
Workers Comp |
Locations > Loc #1 (edit) > County |
Locations > list item #1 (edit) > County |
|
Workers Comp |
Locations > Loc #1 (edit) > St |
Locations > list item #1 (edit) > State |
|
Workers Comp |
Locations > Loc #1 (edit) > Zip Code |
Locations > list item #1 (edit) > ZIP code |
|
Workers Comp |
Locations > Loc #2 |
Locations > list item #2 |
|
Workers Comp |
Not shown in mapping key |
Employee Information > (Class code list) item #1 |
|
Workers Comp |
Workers Comp Underwriting > list item #2 (edit) > Classification > item #1 |
Employee Information > (Class code list) item #2 |
|
Workers Comp |
Workers Comp Underwriting > list item #2 (edit) > Classification > item #1 (edit) > ITEM # |
Employee Information > (Class code list) item #2 (edit) > Class Code |
|
Workers Comp |
Workers Comp Underwriting > list item #2 (edit) > Classification > item #1 (edit) > # of Full Time Employees |
Employee Information > (Class code list) item #2 (edit) > Number of full-time employees |
|
Workers Comp |
Workers Comp Underwriting > list item #2 (edit) > Classification > item #1 (edit) > # of Part Time Employees |
Employee Information > (Class code list) item #2 (edit) > Number of part-time employees |
|
Workers Comp |
Workers Comp Underwriting > list item #2 (edit) > Classification > item #1 (edit) > Exposure |
Employee Information > (Class code list) item #2 (edit) > Payroll |
|
Workers Comp |
Not shown in mapping key |
Owners/Officers Included/Excluded > item #1 |
|
Workers Comp |
Workers Comp Underwriting > list item #1 (edit) > Individuals Included/Excluded > item #1 |
Owners/Officers Included/Excluded > item #2 |
|
Workers Comp |
Workers Comp Underwriting > list item #1 (edit) > Individuals Included/Excluded > item #1 (edit) > Individual's Name |
Owners/Officers Included/Excluded > item #2 (edit) > Name |
|
Workers Comp |
Workers Comp Underwriting > list item #1 (edit) > Individuals Included/Excluded > item #1 (edit) > Title/Relationship |
Owners/Officers Included/Excluded > item #2 (edit) > Job title |
|
Workers Comp |
Workers Comp Underwriting > list item #1 (edit) > Individuals Included/Excluded > item #1 (edit) > Ownership % |
Owners/Officers Included/Excluded > item #2 (edit) > Ownership |
|
Workers Comp |
Workers Comp Underwriting > list item #1 (edit) > Individuals Included/Excluded > item #1 (edit) > Renumeration |
Owners/Officers Included/Excluded > item #2 (edit) > Salary |
|
Workers Comp |
Workers Comp Underwriting > list item #1 (edit) > Individuals Included/Excluded > item #1 (edit) > Included/Excluded |
Owners/Officers Included/Excluded > item #2 (edit) > Included |
|
Workers Comp |
Workers Comp Underwriting > list item #1 (edit) > Individuals Included/Excluded > item #1 (edit) > Location |
Owners/Officers Included/Excluded > item #2 (edit) > Location |
|
Workers Comp |
Workers Comp Underwriting > list item #1 (edit) > Individuals Included/Excluded > item #1 (edit) > Class |
Owners/Officers Included/Excluded > item #2 (edit) > Class Code |
|
Workers Comp |
Workers Comp Underwriting > list item #2 (edit) > Classification > item #1 (edit) > Location |
Employee Information > (Class code list) item #2 (edit) > Location |
|
GL |
General Liability Coverages > Deductible > Deductible Amount && Basis = Property |
General Information > Property damage deductible |
|
GL |
General Liability Coverages > Deductible > Deductible Amount && Basis = Bodily Injury |
General Information > Bodily injury deductible |
|
GL |
General Liability Coverages > Limits > General Aggregate |
General Information > Coverage > General Aggregate |
|
GL |
General Liability Coverages > Limits > Products & Completed Operations Aggregate |
General Information > Coverage > Products/Completed operations aggregate |
|
GL |
General Liability Coverages > Limits > Personal & Advertising Injury |
General Information > Coverage > Personal & advertising injury |
|
GL |
General Liability Coverages > Limits > Each Occurrence |
General Information > Coverage > Each occurrence |
|
GL |
General Liability Coverages > Limits > Damage to Rented Premises (each occurrence) |
General Information > Coverage > Damage to rented premises |
|
GL |
General Liability Coverages > Limits > Medical Payments (Any one person) |
General Information > Coverage > Medical expenses |
|
GL |
General Liability Coverages > Additional Coverages > Limit #1 |
General Information > Optional liability coverage > Hired/Non-owned auto |
|
GL |
General Liability Coverages > Additional Coverages > Limit #1 |
General Information > Optional liability coverage > EPLI |
|
GL |
General Liability Coverages > Additional Coverages > Limit #1 |
General Information > Optional liability coverage > E&O |
|
GL |
General Liability Coverages > Additional Coverages > Limit #1 |
General Information > Optional liability coverage > Cyber liability |
|
GL |
General Liability Coverages > Additional Coverages > Limit #1 |
General Information > Optional liability coverage > Liquor liability |
|
GL |
General Liability Coverages > Additional Coverages > Limit #1 |
General Information > Optional liability coverage > D&O |
|
GL |
General Liability Coverages > Additional Coverages > Limit #1 |
General Information > Optional liability coverage > Employee benefits |
|
GL |
General Liability Coverages > Additional Coverages > Limit #1 |
General Information > Optional liability coverage > Medical payments |
|
GL |
Locations > List of locations > Loc #1 |
Locations > (list of locations) > Item #1 |
|
GL |
Locations > List of locations > Loc #1 (Edit) > Address (left of first semicolon) |
Locations > (list of locations) > Item #1 > Street Address 1 |
|
GL |
Locations > List of locations > Loc #1 (Edit) > Address (value after first semicolon) |
Locations > (list of locations) > Item #1 > Street Address 2 |
|
GL |
Locations > List of locations > Loc #1 (Edit) > City |
Locations > (list of locations) > Item #1 > City |
|
GL |
Locations > List of locations > Loc #1 (Edit) > County |
Locations > (list of locations) > Item #1 > County |
|
GL |
Locations > List of locations > Loc #1 (Edit) > St |
Locations > (list of locations) > Item #1 > State |
|
GL |
Locations > List of locations > Loc #1 (Edit) > Zip code |
Locations > (list of locations) > Item #1 > ZIP code |
|
GL |
General Liability Underwriting > Hazard/Classification > Haz #1 |
Locations > (list of locations) > Item #1 > Class Codes > Item #1 |
|
GL |
General Liability Underwriting > Hazard/Classification > Haz #1 (Edit) > Class Code |
Locations > (list of locations) > Item #1 > Class Codes > Item #1 > GL Class Code |
|
GL |
General Liability Underwriting > Hazard/Classification > Haz #1 (Edit) > Exposure |
Locations > (list of locations) > Item #1 > Class Codes > Item #1 > Gross Sales (premium basis) |
|
GL |
Locations > List of locations > Loc #2 |
Locations > (list of locations) > Item #2 |
|
BOP |
Policy Details > Policy Number |
Prefill LOB Information > Type |
|
BOP |
|
Prefill LOB Information > Carrier |
|
BOP |
Policy Details > Effective Date |
Prefill LOB Information > Effective Dates |
|
BOP |
Coverages > General Liability Coverages > Additional Coverages |
BOP Liability C&L > Property damage liabililty deductible |
|
BOP |
Coverages > General Liability Coverages > Additional Coverages |
BOP Liability C&L > Property deductible |
|
BOP |
Coverages > General Liability Coverages > Limits |
BOP Liability C&L > General Liability Limits (Occurence/Aggregate/Completed) |
|
BOP |
Locations > Loc #1 |
Locations > list item #1 |
|
BOP |
Locations > Loc #1 (edit) > Address (value before semicolon) |
Locations > list item #1 (edit) > Street address 1 |
|
BOP |
Locations > Loc #1 (edit) > Address (value after first semicolon) |
Locations > list item #1 (edit) > Street address 2 |
|
BOP |
Locations > Loc #1 (edit) > City |
Locations > list item #1 (edit) > City |
|
BOP |
Locations > Loc #1 (edit) > County |
Locations > list item #1 (edit) > County |
|
BOP |
Locations > Loc #1 (edit) > St |
Locations > list item #1 (edit) > State |
|
BOP |
Locations > Loc #1 (edit) > Zip Code |
Locations > list item #1 (edit) > ZIP code |
|
BOP |
Locations > Loc #1 (edit) > Buildilngs/Sub-locations |
Locations > list item #1 (edit) > Building item #1 |
|
BOP |
Underwriting > Comm'l Prop. Underwriting > Property Details #1 (edit) > Year Built |
Locations > list item #1 (edit) > Building item #1 (edit) > Year built |
|
BOP |
Underwriting > Comm'l Prop. Underwriting > Property Details #1 (edit) > # of Stories |
Locations > list item #1 (edit) > Building item #1 (edit) > Number of stories |
|
BOP |
Underwriting > Comm'l Prop. Underwriting > Property Details #1 (edit) > (wiring) Year Updated |
Locations > list item #1 (edit) > Building item #1 (edit) > Last electrical update |
|
BOP |
Underwriting > Comm'l Prop. Underwriting > Property Details #1 (edit) > (plumbing) Year Updated |
Locations > list item #1 (edit) > Building item #1 (edit) > Last plumbing update |
|
BOP |
Underwriting > Comm'l Prop. Underwriting > Property Details #1 (edit) > (roofing) Year Updated |
Locations > list item #1 (edit) > Building item #1 (edit) > Last roofing update |
|
BOP |
Underwriting > Comm'l Prop. Underwriting > Property Details #1 (edit) > Roof Type |
Locations > list item #1 (edit) > Building item #1 (edit) > Roof type |
|
BOP |
Underwriting > Comm'l Prop. Underwriting > Property Details #1 (edit) > Construction |
Locations > list item #1 (edit) > Building item #1 (edit) > Construction material |
|
BOP |
Underwriting > Comm'l Prop. Underwriting > Property Details #1 (edit) > Sprinklered area % |
Locations > list item #1 (edit) > Building item #1 (edit) > Is there an automatic sprinkler system? |
|
BOP |
Coverages > Comm'l Prop. Location Specific Coverages > Location specific coverages #1 (edit) |
Locations > list item #1 (edit) > Building item #1 (edit) > Building Limit |
Sagitta Personalization and Configuration
Overview of Steps:
-
Add the Sagitta Authentication Management page to Role Based Security to the Sagitta Admin’s role.
-
Add the Client App Registration page to Role Based Security to the Sagitta Admin’s role.
-
Add Commercial Submissions Access to Role Based Security for users who will use Commercial Submissions.
-
Configure Web Services information in the Vertafore Services Personalization page (and make sure Web Services are set up properly if they aren’t already)
-
Confirm that the AMS-WEB-UI Client App is Enabled.
-
Provision users to be Vertafore Authenticated in the Sagitta Authentication Management page.
-
Launch Commercial Submissions and log in using VSSO credentials.
Role Based Security Steps
Add Commercial Submissions Access to Commercial Submissions Admins and CSRs
In the Integration Partner Access section on the Role Based Security page, there is a dropdown, Commercial Submissions Access, where you can set the access level for Commercial Submissions for each Role.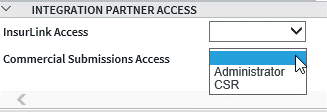
Options are Blank is for no access, CSR is for submissions access, Administrator is for access to settings for your agency instance within Commercial Submissions.
Add Sagitta Authentication Management in Role Based Security to Sagitta Admins’ Role (Sagitta Online Only)
-
Go to Role Based Security (Other > Personalization > System)
-
Enter the role to add the new page to in the Role Based Security Code field
-
Select a menu to add the new menu item to or use the Quick Entry Section. Using Quick Entry Section will add it to the Other > Personalization > Client/Staff menu
-
Enter SSO.USERS.DISPLAY in the Program field
-
Select a value in Access
-
Save the page when done
Add Client App Registration in Role Based Security to Sagitta Admins’ Role
-
Go to Role Based Security (Other > Personalization > System)
-
Enter the role to add the new page to in the Role Based Security Code field
-
Select a menu to add the new menu item to or use the Quick Entry Section. Using Quick Entry Section will add it to the Other > Personalization > System menu
-
Enter CLIENT.APPS.REGISTRATION in the Program field
-
Select a value in Access
-
Save the page when done
Vertafore Services Personalization Steps
Prerequisite
Using Commercial Submissions requires that you have set up a Sagitta Web Services server and it is properly configured to use in Sagitta. For more information, refer to the Help article, Personalize Vertafore Services. The Web Service Connection Information section must be completed to use Commercial Submissions.
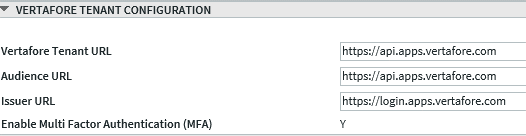
Configure the Vertafore Tenant section
To use Commercial Submissions, the Vertafore Tenant Configuration section must be completed.
-
Vertafore Tenant URL – Prepopulated with the URL for Vertafore Tenant services
-
Audience URL – Prepopulated with URL for Vertafore Tenant services
-
Issuer URL – Prepopulated with Vertafore token Issuer URL
-
Enable Multi Factor Authentication (MFA) – This flag is editable prior to setting the first user to Vertafore Provisioned in the Sagitta Authentication Management page.
Once a user is provisioned, this flag cannot be changed.
Set this field to Yes to have Multi Factor Authentication for all Vertafore Provisioned users who log in with SSO.
Note: This MFA field only applies to new Vertafore Provisioned users that use Single Sign-On. Multi Factor Authentication for Sagitta logins (who do not use SSO) is separate, and not affected by this field. The Disable Multi Factor Authentication checkbox in the Staff Codes Maintenance page does not affect Vertafore Provisioned users, either.
Configure the Commercial Submissions Section
To use Commercial Submissions, the related section in the Vertafore Services Personalization page must be completed.

-
Commercial Submissions URL – Prepopulated with the URL for Commercial Submissions.
Client App Registration Steps
A new Client Application was added to the Client App Registration page, with the ID AMS-WEB-UI, that is used for Commercial Submissions.
When this Client Application is selected, the following fields display:
This Client Application Enabled? field will have No by default. Once the onboarding process is complete, this Client Application can be enabled. Onboarding is complete when the agency is set up to start provisioning users to the Vertafore tenant platform.
The Generate Secret button will also be disabled.
Provisioning Users for use in VSSO
If your agency uses Commercial Submissions, you must provision the users from your Sagitta system into VSSO so that they can be given access to Commercial Submissions.
Provision Users Using Sagitta Authentication Management – Sagitta Online Only
The Sagitta Authentication Management page has been added to provision users in VSSO.

-
All users to be provisioned must have an email address. The email address must be unique to that user.
-
Go to Sagitta Authentication Management (Other > Personalization > Client/Staff)
-
Use the selection criteria at the top of the page to display one user (e.g., use Staff Code or User ID), or more than one user (e.g., use Division, or Division and Department, etc.)
-
Click Select – the users display in the grid
-
Click to select a user or, Ctrl or Shift and click to select multiple users
-
Click the Set SSO Authentication button – the selected users change from Sagitta (the default) to Vertafore in the Authentication Method column
-
If a selected user does not change to Vertafore, contact Vertafore Support to determine the reason
-
Accepted name suffixes are Jr., Sr., I, II, III, IV, V, VI and Esq. Other name suffixes will fail
-
If there are two or more users with the same email address, provisioning will fail for any of those users, whether the other users with that same email address are selected or not.
-
After the names have Vertafore in the Authentication Method column, they will be available in VSSO. These users will still have to be assigned access to the Commercial Submissions product.
-
A new display-only field, Vertafore Provisioned, has been added on the Staff Codes page to display the provisioning status of a user with Commercial Submissions. The field will display Yes if the user is provisioned to Vertafore in the Sagitta Authentication Management page and will display No if the user is not provisioned (i.e., has Sagitta in the Authentication Method column).
After users are set to be Vertafore Authenticated, continue to the following steps to configure them to use Commercial Submissions.
Provisioning Users Manually
If you are a Sagitta InHouse agency, you can create users in VSSO. Make sure that the users created has the same email address as the same user in Sagitta. When this user begins to use Commercial Submissions, their Sagitta user will be updated to indicate that they also exist in VSSO.
For more details, refer to the Help article, Create a new VSSO user account.
Configure the Integration in Commercial Submissions
Note - you must have the Super Admin role to complete this section of configuration. For more information, see this page.
Log into Commercial Submissions and go into Admin Mode by clicking the person icon at the top right side of the screen 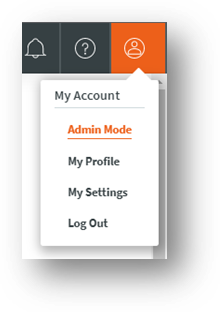
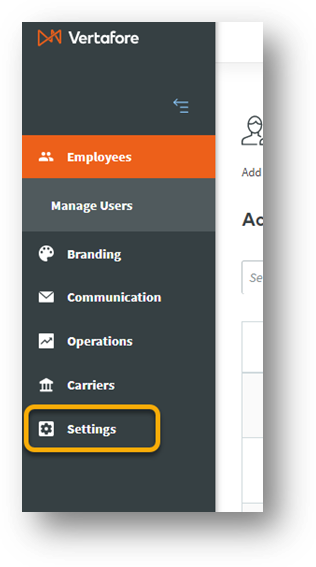
Using the tool bar on the left, click on Settings.
You can choose to set your Sagitta integration at the parent or child office level. For more info on configuration which to choose, see the Configure Your Agency Hierarchy section of the Configure Commercial Submissions Help page.
Click the three dot menu on the right of the entity you’d like to pull data into and select Edit

Scroll down to the bottom of the Agency Info section. You will see two options here; select Sagitta. 
The Web services server is needed for On-Prem customers and is the unique server where the Sagitta API resides. This URL will start with https://. This should match what is in the “Sagitta Web Services Server URL” field on the Vertafore Services Personalization page in Sagitta.

The Account code is for Online users is gemdata. For On-Prem users please check with your IT department to confirm your Account code (the code is likely gemdata).

The Connection code is the agency code that an online user needs to log into Sagitta.

For in-house users, if a user is unsure of what the Connection code is, you can find it in Sagitta by going to Other > Personalization > Vertafore Services Personalization. It will be in the Web Service Connection Information. In the box labeled Connection Code.

Once the connection is made between Commercial Submissions and Sagitta you will find the link to Commercial Submissions in two areas.
An admin in Sagitta will be able to see the section labeled “Vertafore Services”. Once selected the link to Commercial Submissions will show.

Sagitta users will see the button for Commercial Submissions as one of the top selections on the client's page.

Customer data can either be pushed from Sagitta into Submissions or pulled directly from Sagitta into Submissions.
Push Customer Data from Sagitta to Submissions
NOTE: IE11 is not supported by Submissions and thus cannot be used to push data from Sagitta.
Once configuration of the integration is complete, a new tab called Comml Submissions will appear within a client.

-
To push over customer data, select this button.
-
On the pop up that appears, select the Commercial Submissions Office that the AMS360 customer should be associated to
-
Select to either Create a Quote or Create a Submission-
-
Create Quote – this workflow allows you to receive an instant quote in real-time from a carrier. For a list of carriers that provide real-time quotes, see this page.
-
Create Submission – this workflow allows you to populate forms that can then be emailed off to an underwriter.
-
-
Select Continue to import data or select Cancel to return to the Commercial Submissions Dashboard

This will upload customer information form AMS360 into Commercial Submissions.
Pull Customer Data from Sagitta into Submissions
This will open a new tab on your browser and take you to the Commercial Submissions platform.
-
On the pop up that appears, select the Commercial Submissions Office that the AMS360 customer should be associated to
-
Select to either Create a Quote or Create a Submission-
-
Create Quote – this workflow allows you to receive an instant quote in real-time from a carrier. For a list of carriers that provide real-time quotes, see this page.
-
Create Submission – this workflow allows you to populate forms that can then be emailed off to an underwriter.
-
-
Click Continue; the page will now load with customer info populated

Import Policy Data into Submissions
NOTE: A customer file must have first been pulled into Commercial Submissions to allow policy prefill
-
While on an application page, select the Prefill Info button in the top right corner.

-
Select the policy or submission to import into Commercial Submissions and click Prefill.

You have now imported policy details into the application. To clear the app, select the Clear Info button at the top of the page.
For more assistance in connecting Commercial Submissions with Sagitta, contact Vertafore support.