Define the Export Options
In this section, we are going to explain how to configure the options that define the format that will be applied to exported items, the storage location of exported content, and more.
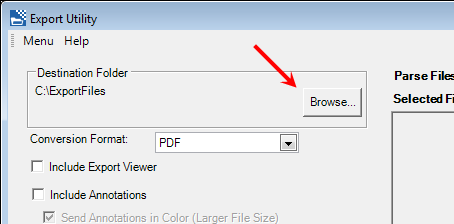
- Click Browse in the Destination Folder pane to begin the process of defining the storage location for exported content.
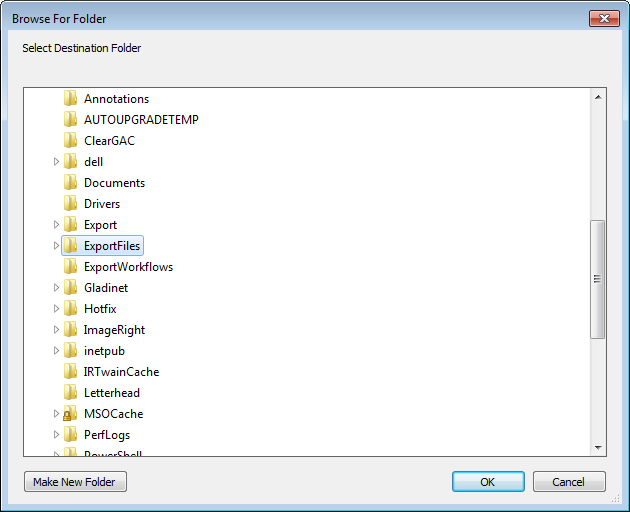
- In Browse for Folder, locate the folder that you want to use (ExportFiles in our example), and then click OK. You can click Make New Folder if you need to create and name a new folder. The storage path will be updated in the Destination folder pane.
- Below the Destination Folder pane, you can define the conversion format, inclusion of a viewer, inclusion of annotations, and more. It is important to note that the availability of certain options is dependent on the selected state of other options.
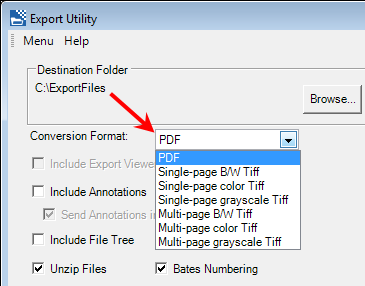
- You can
select the format in which content will be exported in the Conversion
Format list. To make the list available, uncheck Include Export Viewer,
and then select one of the options.
- PDF (Portable Document Format) – A file that can be viewed on different computer platforms using a PDF viewer, typically Adobe Reader. If you select PDF, you will be able to configure Bates numbering options as explained later.
- Single-page gray scale TIFF (Tagged Image File Format) – Each page of the file will be converted to a non-color, single-page TIFF.
- Single-page color TIFF – Each page of the file will be converted to a color, single-page TIFF.
- Multi-page gray scale TIFF – The pages in the file will be converted to one non-color, multi-page TIFF, that is, all the pages in one file.
- Multi-page color TIFF – The pages in the file will be converted to one color, multi-page TIFF, that is, all the pages in one file.
- Select
the options that follow the Conversion Format list based on your needs
and the following descriptions:
- Include Export Viewer (which disables certain other options) – A viewer that can be used to view exported files will be included with the exported content. Typically, the viewer is used by people who do not have ImageRight Desktop installed to view files. For more information about using the viewer, see Using ImageRight Export Viewer.
- Include Annotations – Annotations on the images will be included in the exported items.
- Send Annotations in Color – Included annotations will be in color as opposed to monochrome. The size of the exported file will be larger, so consider the use of this option carefully. A color-based conversion format option like Single-page color TIFF must be selected also.
- Include File Tree – The file tree directory (PDF bookmarks) in a PDF file will be included.
- Unzip Files (available when the PDF conversion format is selected) – Any compressed (zipped) items in a file will be decompressed and converted, making it possible to view the content in the PDF output.
- Bates Numbering (available when the PDF conversion format is selected) – Identifying numbers recognized in the legal, medical, and business fields will be placed on the pages. Bates numbering is a separate option that must be purchased.
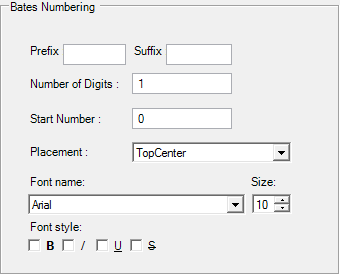
- Enter
the appropriate information in the Bates Numbering pane to configure the
appearance of the numbering on PDF files to meet your needs. The options
we selected in our example would result in a number like CONY01200GA being
applied to the top center on each page of the PDF.
- Prefix – Characters that precede the Bates number. You might use characters to identify the office which generated the export.
- Suffix – Characters that follow the Bates number.
- Number of digits – Number of digits that will be used in the number, that is, the length.
- Start Number – First number used with each successive number being incremented.
- Placement
– The number will be placed at the position you select.
- Top left
- Top right
- Top center
- Bottom left
- Bottom right
- Bottom center
- Font name and Size – Name of the font that will be used and the point size.
- Font
style
- B – bold
- I – italic
- U – underline
S– strikethrough