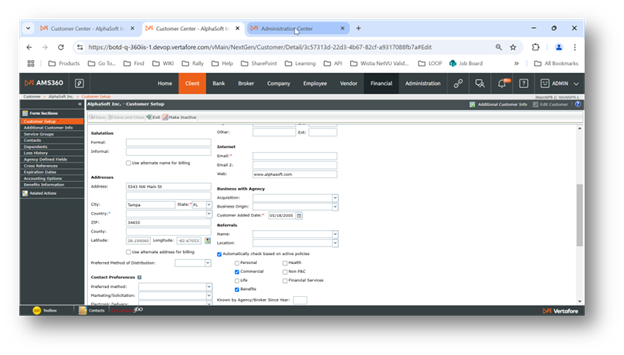
Customer Setup
New Customer
- Open the Customer Center.
- Click New Customer.
Enter or change customer information by choosing each section of the form from the sidebar menu. Save your entries as often as you like or wait until you're finished entering data for the entire form. You don't lose information when switching between sections.
When you are finished, you have the following options:
- Save: Saves what you've entered and the form remains open.
- Save and Close: Saves what you've entered
and returns you to the Customer View page.
- For a new customer - the default view for the customer displays.
- For an existing customer - the Customer Overview appears.
- Exit: Closes the form without saving information
you've entered since you last saved the form and does one of the following:
- For a new customer when no information has been saved - Returns you to the Customer Search page.
- For an existing customer - Returns you to the Customer Overview for the customer.
Customer Setup is a section of the Customer data entrypage. The customer information you enter in this section is used for the policy Named Insured, as well as invoices and other customer communications. You can also create a target list based on name, city, state, or ZIP Code.
If the customer has no active policies with your agency, but you want to retain the customer information, do the following:
-
Click Views > Customer Overview.
-
Click Edit Customer.
-
On the Form Sections menu, click Customer Setup.
-
Click Make Inactive.
The button changes to Make Active so that you can re-activate the account in the future.
"Profile Questions" has been renamed to “Agency Defined Fields”.
Value:
The updated language will continue to allow agencies to add fields that are important to their business while providing a clearer understanding of the feature.
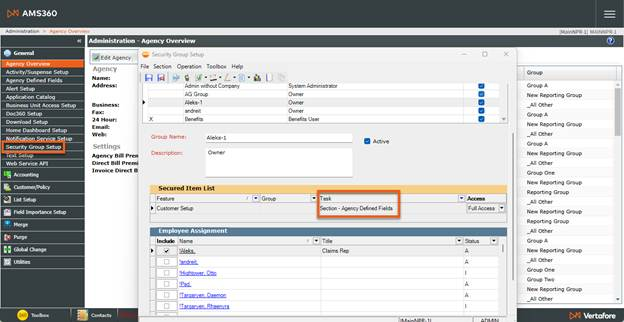
Workflow for Customer Setup:
-
Navigate to the Administration Center.
-
Under the "Secured Item List" section, filter "Feature to Customer Setup" (you can leave "Group" blank).
- Under "Tasks" you will see that "Profile Questions" is now named "Section – Agency Defined Fields".
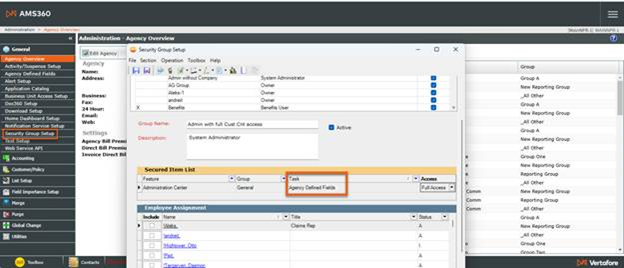
Workflow for Administration:
-
Navigate to the Administration Center.
-
Under "General" select "Security Group Setup".
- Under the "Secured Item List" section, filter "Feature to Administration Center".
- Filter "Group to General".
- Under "Tasks" you will see that "Profile Questions" is now named "Agency Defined Fields".
"Profile Questions" and "Answers" text are replaced with "Agency Defined Fields" and "Values", respectively.
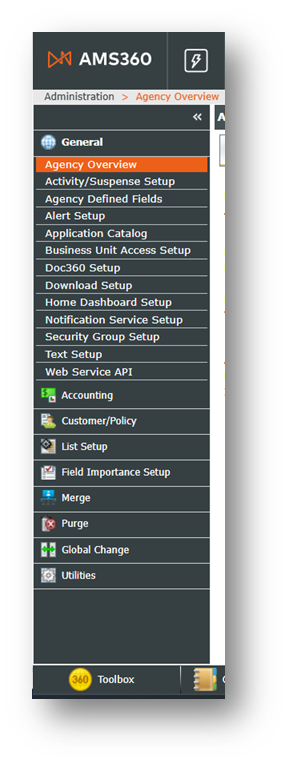
• Menu changes to show Agency Defined Fields
• Admin Center menu item moved from Customer/Policy to General section
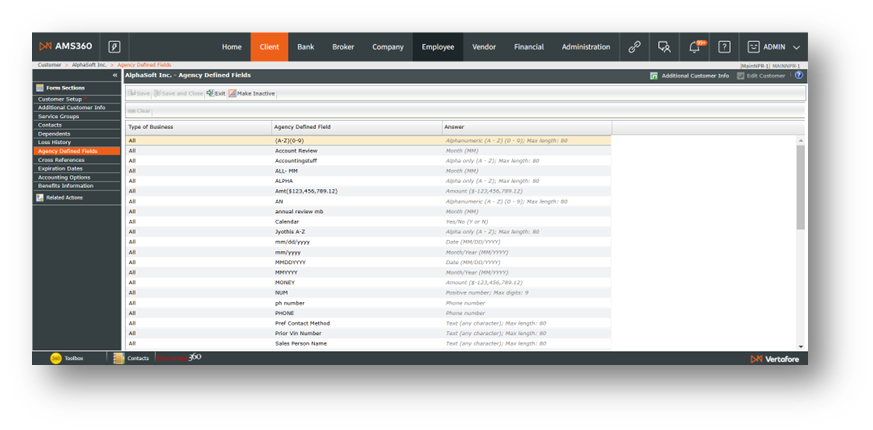
• View and forms changed to Agency Defined Field with Values
Value: Pave the way for Agency Defined Fields throughout AMS360
Workflow:
Go to the Administration Center > General > Agency Defined Fields. This is the new menu item that replaces the old "Profile Questions". The words" Agency Defined Fields" replace "Profile Questions" and" Questions" in the menu, view title, and in the grid.

Go to the Customer Center > Edit Customer > Agency Defined Fields. The words "Agency Defined Fields" replace "Profile Questions" in the menu, breadcrumb, title, and in the grid headings.
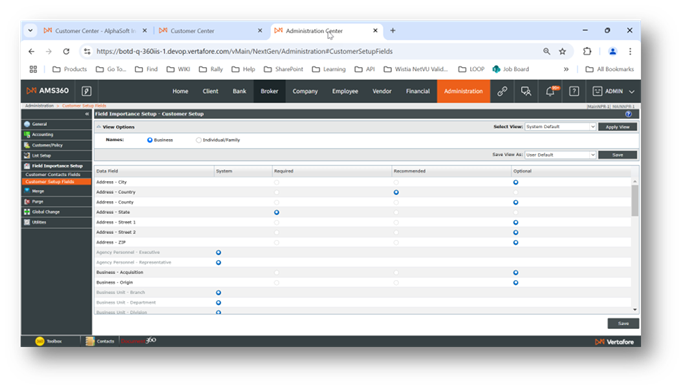
"Customer Setup" now has the "Field Importance Setup" capability.
-
In the Admin Center you can choose "Required", "Recommended" or "Optional" for each Customer Setup field by policy name type: Business, Individual/Family, or both.
-
In the Customer Setup the required fields have the red asterisk, recommended have blue asterisk. The required fields must be entered to save the customer.\
Value: Better data collection during policy creation by requiring and recommending fields to be entered.
Required, Recommended or Optional Fields:
-
"Required" fields have a red asterisk and must be entered by the user or the user will not be able to save.
-
"Recommended" fields have a blue asterisk and are suggested as important to enter but the user can save without entering them.
-
"Optional" fields may less important, be entered or not, and the user can save without entering them.
Workflow:
-
Navigate to Administration Center > Field Importance Setup > Customer Setup Fields.
-
Select the filter for Customer Name Type: "Business", "Individual/Family", or both. All fields default to "Optional", except "System" fields which are required and are disabled.
-
Select the radio button under "Required" for fields that must be entered to save the customer. Select the radio button under "Recommended" for fields that would be nice to have filled out, but are not required to save the customer.
Navigate to Customer Center > Edit Customer > Customer Setup and see that the fields that are "Required" have a red asterisk. If these are not entered then the customer changes will not be saved, and you will see an error message. Fields that are "Recommended" will have a blue asterisk to let you know these are recommended to be entered.
Key Fields
|
Type* |
|||
|
|
Customer |
Mark this option for customers who have business with your agency. |
|
|
|
Prospect |
Use this option for qualified sales leads. This option allows you to enter policy information. |
|
|
|
Suspect |
Typically an unqualified sales lead. When you import a purchased lead list into AMS360, all names imported are marked as Suspects. |
|
|
Settings |
|||
|
|
Exclude from Target List |
Select to prevent the customer from being included in a Target List, even though they meet the criteria. |
|
|
|
Exclude from Purge |
Select to prevent the customer from being included in a Purge. even when they meet the criteria. |
|
|
|
Employee Access Secured |
Mark this check box to activate the Assign Employees link. Click the link to open the Employee Assignment form where you can assign employees security access to this customer. For more information about securing the customer, see Security in AMS360. If you change security options, the affected user must exit AMS360 and log back in before the security updates are applied. |
|
|
Names |
|||
|
|
Individual* Family* Business* |
These options determine whether or not you can enter multiple first names. More… If you are entering a business, choose Business. You can fill in the names and business name fields. If the Administration Center, Mandatory Field Setup option for NAICS # is selected, then a NAICS # will be required to save the customer. |
|
|
|
First Middle Last |
Enter the customer's name as you want it to appear on forms and correspondence, including capitalization and punctuation. More... |
|
|
|
Firm Name |
Commercial Accounts Only Enter the name as you want it to appear on forms and correspondence, including capitalization and punctuation. |
|
|
|
DBA |
Commercial Accounts Only Enter the DBA (Doing Business As) name, if applicable. This name appears in the Customer Overview. |
|
|
Salutation (These names are used in correspondence and other customer communications.) |
|||
|
|
Formal |
Enter the customer's formal name, including any prefix or suffix (e.g., Dr., Mr., Ms., Mrs. or Jr. III, etc). |
|
|
|
Informal |
Enter the customer's preferred informal address, such as a diminutive name or nickname. |
|
|
|
Use Alternate name for billing |
Use this option when all billings are mailed to a name other than the customer name. For example a CPA or Business Manager. More... |
|
|
Addresses |
|||
|
|
|
Latitude and Longitude |
This area is not in use. |
|
Agency Personnel |
|||
|
Choose the primary service team members. These names flow to policy information, In policy you can change personnel, as well as add Service Team members. |
|||
|
|
Representative* |
||
|
|
Broker's Customer |
Marking this option and choosing a Broker changes the way receivables are handled. More... |
|
|
|
Broker |
||
|
Business Unit |
|||
|
Division* |
If you use Business Units, choose the combination that applies to the majority of the business for this customer. More.... |
||
|
Branch* |
|||
|
Department* |
|||
|
Group* |
|||
| Acquisition | Click in the dropdown box to select the mode of acquisition for this customer. | ||
| Business Origin | Click in the dropdown box to select how this customer was reached to begin the business relationship. | ||
|
|
Automatically Check Based on Active Policies |
Select to have AMS360 automatically mark the check boxes for types of business for active policies this customer has. |
|
|
|
Notation |
Choose a Notation to identify something about the customer that is important to your agency. To add or edit Notations, in the Administration Center, click Customer/Policy Setups > Notations. You must have appropriate security rights to access Administration Center. |
|
|
Multiple Entity Account Information |
|||
|
|
Customer Type |
Choose the type of customer you are entering. Standard is the default. When you choose Master/Multiple Entities the: |
|
* Required fields