When you open an ImageRight file, the corresponding content (images, documents, etc.) will be displayed in the ImageRight Content Viewer. The viewer is equipped with flexible commands that you can use to manipulate images for clarity and ease of use.
The ImageRight file structure (file, folder, document, and page) is displayed in the left portion of the viewer. The number of pages in each level is also displayed in the file structure.
To view the contents of the file, select the appropriate level in the file structure. The viewer toolbar options change depending on the content selected in the file structure.
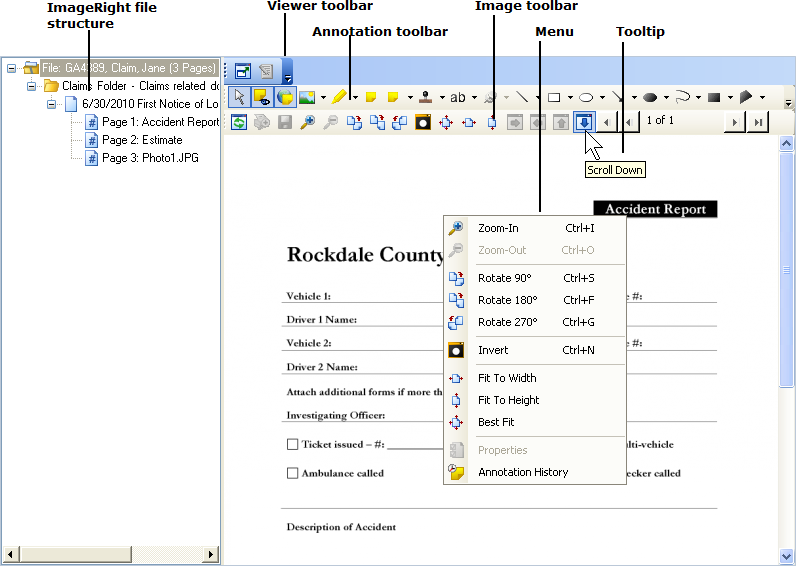
You can invoke a number of commands by simply clicking an icon on the
toolbars. You can display a tooltip by pointing at the icons on the toolbar
that will help you determine their functions. If you cannot see all the
buttons on a toolbar, you can change the size of the viewer or click the
arrow at the end of the toolbar to display the hidden buttons. To change
the size of the viewer, point at the border between the file structure
and the image view. When the pointer changes to  ,
drag the border as needed. You can also resize the Microsoft Outlook window
using the typical Windows functions.
You can enlarge the image (zoom in) using your pointer. To enlarge the image, drag the pointer over a section (draw a box around a section). When you release the pointer, the section will be enlarged.
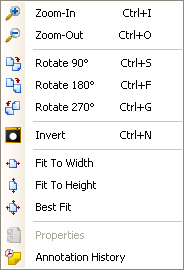
When you right-click an image, a menu will be displayed. You can invoke the menu commands by clicking an item, by clicking the corresponding toolbar icon, or using the keyboard shortcut shown on the menu.
In the table that follows, we provide a description of the commands that you will find on the menu, the toolbar buttons (other than those on the Annotation toolbar), and the keyboard shortcuts you can use.
For information about the annotation tools, see Annotation Toolbar.
|
Function |
Description |
|
|---|---|---|
|
Zoom In |
Enlarge an image |
|
Zoom Out |
Downsize an enlarged image |
|
|
Rotate 90° |
Rotate the image in 90° increments |
|
|
Rotate 180° |
Rotate the image in 180° increments |
|
|
Rotate 270° |
Rotate the image in 270° increments |
|
|
Invert (negative image) |
Convert the image to negative view (often used to view damage in a photo) |
|
|
Fit to Width |
Adjust the image to the width of the window |
|
|
Fit to Height |
Adjust the image to the height of the window |
|
|
Best Fit |
Adjust the image for the best overall fit (view all the image) |
|
|
Properties |
Reserved for future use |
|
|
Annotation |
Display the creation history of annotations |
|
|
Toolbar Icons Keyboard Shortcuts |
|
|
|
|
Toggle Full Screen |
Ctrl+Ctrl or Ctrl+M – Switch between full screen view and normal view |
|
|
Edit in external application | Open a document that is in preview mode for editing in the native application |
|
|
Refresh |
Refresh the display of the image to show any changes |
|
|
Print Zoomed Area |
Reserved for future use |
|
|
Save |
Save annotations added to the image |
|
|
Scroll Right |
Ctrl+ |
|
|
Scroll Left |
Ctrl+ |
|
|
Scroll Up |
Ctrl+ |
|
|
Scroll Down |
Ctrl+ |
|
None |
Reset Image |
Ctr+R or double-click to reset a zoomed image to its original size |
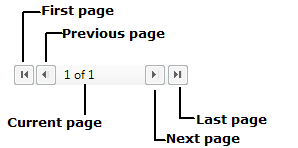
When you are viewing an image with multiple pages, you can use the Page toolbar to move through the pages. If you do not see the Page toolbar, click the arrow at the end of the Image toolbar. You change the page being viewed by clicking the arrows on the navigation control.
- To
go to the first or last page, click
 or
or  .
. - To
go to the previous or next page, click
 or
or  .
.
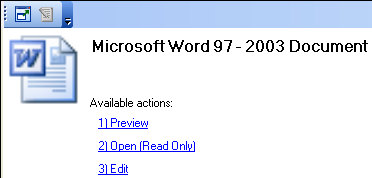
When you are viewing a file stored in its native format, the appearance in the viewer will change. You can open files in their native format, change them, and save the changes, all while working in Outlook Interface, provided the native program is installed on the computer. You will find this helpful if you want to keep a working (changeable) copy of documents, spreadsheets, etc., in files.
When you see an icon representing the native program, that is, a file (document) stored in its native format, click the appropriate link in the viewer to manage the related file.
- Preview – The first page of the selected item will be displayed in the ImageRight Viewer.
- Open (Read only) – The file will be opened in the native program, but any changes you make cannot be saved in the original file.
- Print – A PDF form can be printed.
- Edit (or click
 )
– The file will be
opened in the program, and you can make changes. You will be prompted
to save your changes when you close the file.
In the Outlook Interface Viewer Options, you can turn on the auto preview of certain file types. With the preview turned on, the first page of the item selected in the file tree will be displayed in the viewer in read-only mode automatically.
|
In order to preview Microsoft Office 2007 files, Office 2007 or later must be installed on the computer being used. In order to edit PDF (Portable Document Format) files, you must have Adobe Acrobat installed. You cannot edit PDFs using Adobe Reader. |
When viewing an email message that you have imported into ImageRight in the viewer, you are presented with options for how to manage email messages sent from within the ImageRight file.
- In the Send Email Action list, select the desired action to take when replying to email messages in ImageRight.
- Drop email back into current location
- Drop email back into new location
- Do not drop email back into file
- Click ↑ to select formatting options for email messages and attachments being dropped back into ImageRight.
- MSG – the message body will be imported in MSG format.
- Native – the body of the e-mail message will be kept in its native format, HTML for example, as opposed to being converted to an image, PDF, or other format.
- PDF – the message body will be converted to PDF format.
- Select Import Email Attachments to the File Tree to import all email attachments to the file tree.


 – Move the
zoomed image one space to the right
 – Move the
zoomed image one space to the left
 – Move the
zoomed image one space up
 – Move the
zoomed image one space down