In this topic, we continue to show the commands located on the Setup Menu.
If you are using the .NET version of the ImageRight application, that is, version 4.x or later, you will need to configure DMU to work with ImageRight using the ImageRight.NET Setup menu command. In order to use this command you must first install AIM Integration Framework.
Please review the Install ImageRight Integration topic for more information regarding the installation of the ImageRight integration framework.
In order to configure DMU to work with ImageRight.NET, the ImageRight Desktop application must be running on the same computer.
- Enable ImageRight.NET integration on the Pg. 3 tab (see AIM Integration Framework) in System Parameters.
- Start the ImageRight Desktop application.

|
The ImageRight Desktop application must be open to populate the ImageRight file structure during setup. |
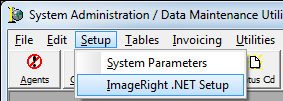
- On the Setup menu, click the ImageRight.NET Setup menu command.
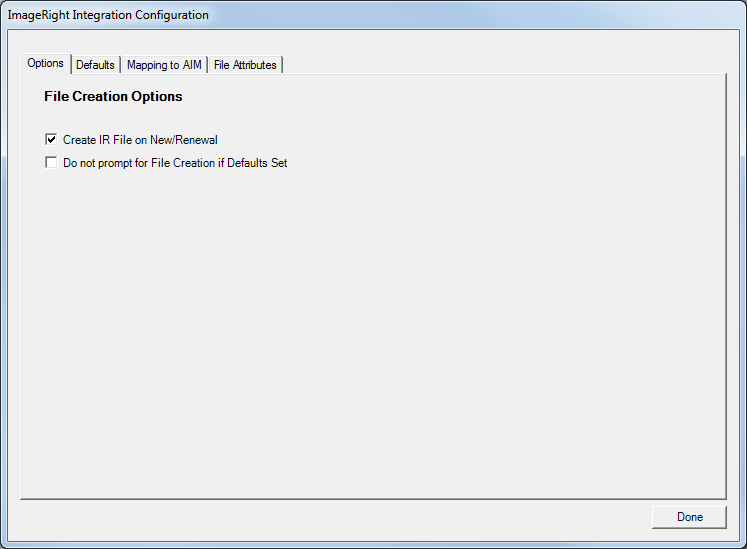
Options
You can use the settings on the Options tab to specify whether AIM files will be created in ImageRight for new and renewal submissions. You can also specify whether the user will be prompted to create the files or if they will be created automatically.
- Select Create IR File on New/Renewal, located on the Options tab, to prompt the user to create a file in ImageRight when processing a new or renewal submission in AIM.
- Select Do Not Prompt for File Creation if Defaults Set to suppress the file creation prompts normally encountered in AIM. The ImageRight file will still be created.
Defaults
When creating the ImageRight files for user, team, retail agent/broker, and market company, the following guidelines must be followed for the integration to work correctly:
- User files – ImageRight file number and the AIM user ID must match, that is, the an ImageRight file should be created that uses the AIM user ID as the file number.
- Team files – ImageRight file number must match the name of the team ID as configured in DMU.
- Retail agent/broker files – ImageRight file number must match the name of the agent as configured in DMU (see Add a New Retail Agent Broker).
- Market company files – ImageRight file number must match the name of the market company as configured in DMU. If the quote in AIM has not been bound, this option will not open a market company file (see Company Detail).
-
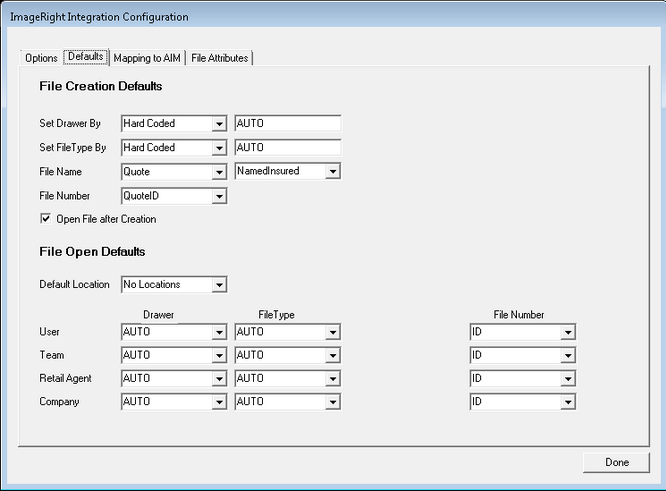
In the Set Drawer By list, located in the File Creation Defaults pane, select a method for automatically assigning an ImageRight drawer for files created in AIM.
You can choose from various CIS database values to automatically assign the drawer. Alternatively, you can select Hard Coded and enter a drawer name manually in the unlabeled box (available when Hard Coded is selected) to the right. If anything other than Hard Coded is selected, the box is unavailable. If locations are used in your ImageRight file structure, the drawer name should follow a location\drawer format. -
In the Set File Type By list, use the same method that we just discussed to either hard code the ImageRight file type or select a value from the CIS database to automatically define the ImageRight file type based on your selection.
If Hard Coded is selected, the file type must be typed in exactly as it appears in ImageRight. -
In the File Name list, use the same method that we just discussed to either hard code the ImageRight file name or select a value from the CIS database to automatically define the ImageRight file name based on your selection.
-
In the File Number list, select either InsuredID or QuoteID.
The ImageRight file number will be created automatically based on your selection.

|
The insured centric type of file structure is seldom used, and it has several limitations as compared with the quote centric type of file structure. The InsuredID option should be carefully considered before use. Consult with AIM implementation technician before designing this type of file structure to make sure that the limitations are fully understood. |
- Select Open File after Creation to set the default value when creating a file in ImageRight from AIM. You can change the values when the options are presented in AIM.
- In the Default Location list, located in the File Open Defaults pane, select the ImageRight location, if applicable.
File open defaults are the default settings that will be utilized when the user clicks the Open ImageRight File menu command on the ImageRight menu in AIM. File open defaults are used to open user, team, retail agent/broker, and market files when such files already exist in ImageRight. These files are not created automatically via the integration. - In the User Drawer list, select the default ImageRight drawer that will be used to open existing user files in ImageRight.
- In the User File Type list, type the file type to be used when existing files are opened in ImageRight. The file type must be typed exactly as it appears in your ImageRight system.
Alternatively, you can select Hard Coded from the list, then type the file type in the unlabeled box to the right of the File Type list. - Repeat the process that we just explained for the Team, Retail agent, and Company boxes shown in the File Open Defaults pane.
|
|
In our example, all options have been configured using the Underwriting drawer and file type. This is the simplest method when only one ImageRight drawer and file type are to be used. If other drawers and file types are required, configure the options accordingly. |
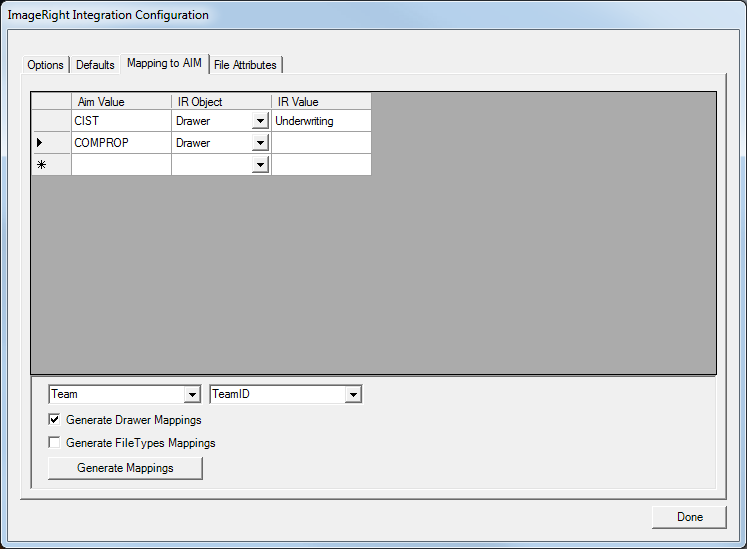
Mapping to AIM
After the file creation and file open defaults have been configured, the AIM to ImageRight mappings can be configured. If the drawer and file type have been set to Hard Coded, the Mapping to AIM options are not used.

For the purposes of this guide, we will use the TeamID value that we configured in the File Open Default pane, located on the Defaults tab, to map AIM to ImageRight.
- In the first list, located at the bottom of the dialog box, select the AIM value that you want to map.
- In the second list, select the CIS database value that best corresponds to the AIM value that you just selected.
- Select Generate drawer mappings if you are mapping the drawer.
- Select Generate file types mappings if you are mapping a file type.
- Click Generate Mappings to generate the AIM to ImageRight mapping entry in the grid.
|
|
The results displayed in the grid vary, depending on the number of teams configured in your AIM system. Data in the IR Value column will not be populated automatically and must be entered manually. |
- In the IR Value column, type the ImageRight value, that you are mapping to.
For example, if you are mapping to a drawer, then you must type the name of the drawer. - Use the same process to generate file type mappings, if applicable.
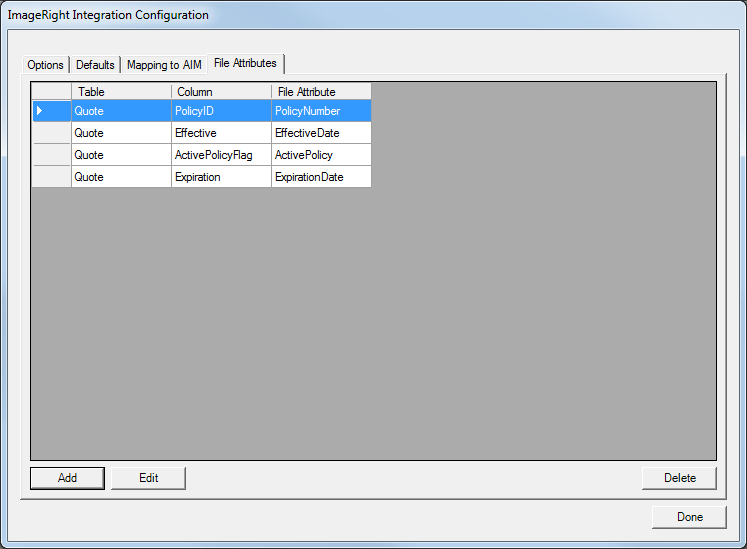
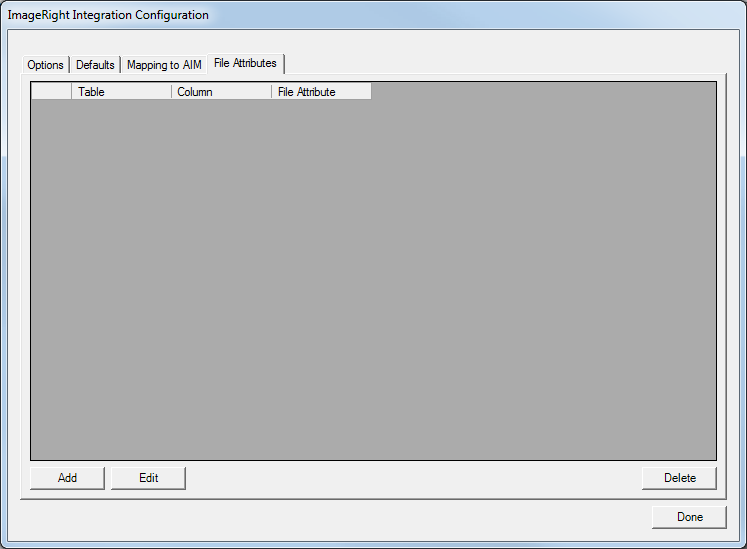
File Attributes
The File Attributes tab is used to configure file attributes for ImageRight files. File attributes are properties of a file that make the file identifiable. Examples vary widely, but might include policy numbers, specific document types, named insured information, etc.

|
It is helpful to have the ImageRight Enterprise Management Console (IEMC) application running on the same computer or a nearby computer since the programmatic name used for the file attributes will be needed for configuration. |
- Click the Add button, located on the File Attributes tab, to begin entering ImageRight file attributes from IEMC.
- In the Source table in AIM list, located in the Add/Edit File Attribute dialog box, select the database table or view in the CIS database from which to pull the file attribute data.
- In the Source column list, select the database column that contains the file attribute value that you want to send to ImageRight. The selection of available columns varies depending on which source table you selected and the file attribute value should correspond to the ImageRight file attribute value. For example, if the ImageRight file attribute is a policy number, then the source column that you select should contain the policy number.
- In the File attribute in IR box, type the programmatic name of the ImageRight file attribute obtained from IEMC.
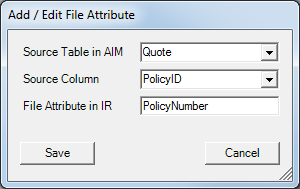
- Repeat this process to add attributes as needed.
- If an attribute needs to be modified, select the record in the grid and click Edit to change the settings of the attribute.
To remove an attribute, select the record in the grid and click Delete. - Click Done, when you are finished editing the AIM to ImageRight mapping settings.