Manage Organizations
An additional organizational layer was introduced in Version 6.7.0. Similar in nature to a firewall, the organizational layer is a method to share or prevent access to specific data elements across divisions in Agency Information Manager (AIM).

|
It is important to note that the organizational layer does not impact AIM Accounting. |
This feature is not enabled automatically upon upgrade or installation of AIM; rather it must be enabled via settings in your database and can then be managed through the user interface in Data Maintenance Utility (DMU).

|
Should your agency wish to enable this feature, it is strongly recommended that a thorough discussion be held with your management staff and a Vertafore professional, and that the feature be subjected to complete testing in your test environment. Once this option is enabled, disabling it becomes very complex. |
The order of organizational hierarchy in AIM, from highest to lowest, is:
- Organizations
- Divisions
- Teams
Data elements that can be controlled through use of this feature include:
- Agent Access
- Company Access
- System Parameters
- Payment Terms
- Commission Rates
- State General Defaults
Aspects of this feature include:
- Clearance search: Permits the clearing of a submission against the entire database while shielding specific data elements such as premiums and commission from users not assigned to that organization.
- Invoice Register: All organizations teams are shown for users with Invoice Register Module security, but the Invoice Register can be filtered down to individual teams.
- Renewal Manager: Prevents users from one organization to reviewing data belonging to another organization.
- Organization switch: Permits switching quickly from one organization to another without the need to log out of, and back into, AIM.
At this time the organization feature does not impact data displayed in either production reports or logs. Access to data in these areas of AIM may be secured in theSystem Parameters of DMU and overridden by settings in the User table to secure that data.
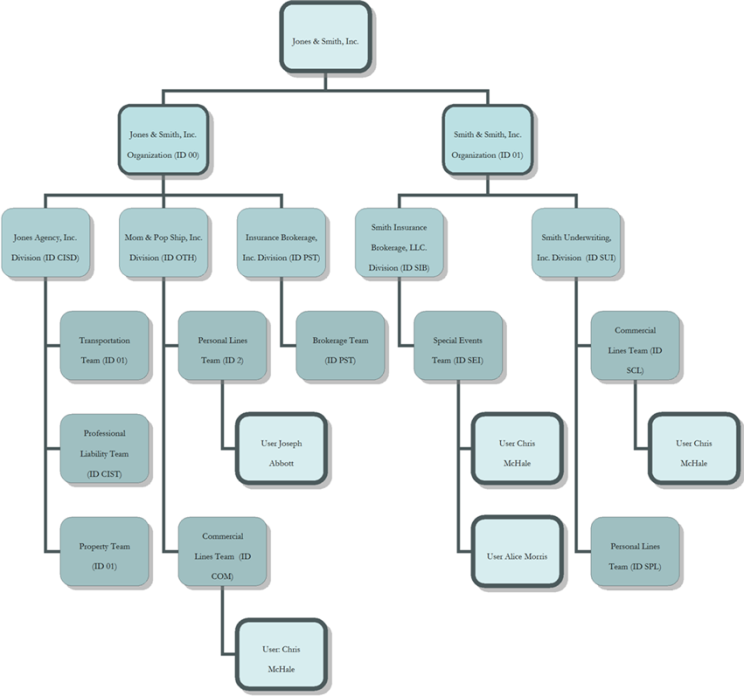
In an effort to illustrate the examples given later in this document, we outline our sample agency’s history, organizations, divisions, teams and users here.
Jones & Smith, Inc.: The Back Story
In January of this year, the Jones Agency, Inc. acquired the Smith & Smith, Inc. agency. The final legal entity is named Jones & Smith Inc.
Organizations, Divisions, Teams & Users
The flagship entity of this combination is The Jones Agency, Inc. which historically specialized in Transportation, Professional Liability and Property risks. Over the course of several years, they have also purchased smaller agencies with a broader range of products resulting in several divisions such as M& P Insurance, LLC. and Insurance Brokerage, Inc.
Smith & Smith, Inc. is comprised of two divisions in order to separate their lucrative Special Events book of business from the traditional property and casualty book of Commercial and Personal lines.
For various reasons, not the least of which is the need to shield data and market access from other organizations, they have decided to organize into two organizations, as follows:
- Jones & Smith, Inc.
- Smith & Smith, Inc.
Each organization involves several divisions, which in turn is comprised of one or more teams per division.
User Chris McHale, VP of Commercial Lines Underwriting, is a member of multiple teams, as his duties require the ability to work with many different markets, retail agents and team members.
User Alice Morris, VP of Brokerage Accounts, is a member of the Special Events team of the Smith Insurance Brokerage, Inc. division.
Retail Agencies Access
The Halstead Agency, Inc., has long been appointed as a Retail Agent by the M&P Insurance, LLC. division. However, the owner is not interested in pursuing other lines of business because he does not have the resources to specialize sufficiently in those other areas.
Through the use of the Master Datasets feature only users in the M&P Insurance, LLC. division have access to the Halstead Agency, Inc. For additional information regarding this feature, please refer to Configure Master Data Sets.
Companies Access
The Allianz Insurance Company has an exclusive contract with the Smith Insurance Brokerage, LLC. division of Smith & Smith, Inc. No other branch has access to this market, and so need to be prevented from accessing it in error. Through the use of the master datasets feature, this carrier is limited to access only by the Smith Insurance Brokerage, LLC division. For additional information regarding this feature, please refer to Configure Master Data Sets.
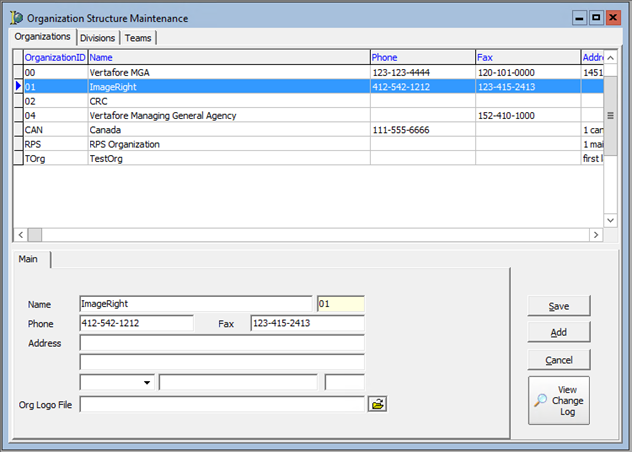
Once the organization feature has been enabled in the database, AIM will automatically create an organization based upon the information entered on the Company Information tab of the DMU System Parameters. In our example, the default company information is displayed as Jones & Smith, Inc.
To open the Organization table in DMU, click the Tables menu, and then click Division/Team/Org.
The grid shown in Organization Structure Maintenance displays all of the organizations your agency has defined. Note that in this example, Jones & Smith, Inc. organization is the selected as the default organization based upon system parameters.
When highlighted, the detail of the organization is displayed in the fields in the bottom pane for editing.
- Use the Save, Add and Cancel buttons to make edits to existing organizations, add new organizations, or abandon edits or additions.
Note that once a division has been assigned to an organization, it cannot be reassigned to another organization. The division must be inactivated, recreated, and assigned to the proper organization.
- Click the Divisions tab to display divisions that are assigned to the organization selected on the Organizations tab.
- Use the radio buttons located in the Filter pane to filter the divisions displayed in the grid.
- Show Divisions for Organization;
- Show All Divisions
-
The Main tab, located below the grid, displays the name, phone number, fax number, and address information for the division selected in the grid. If the division is active, place a check in the Active check box. If the division has been assigned to the incorrect organization, clear the check box and create a new division under the correct organization.
- Use the Copy from Organization button to copy phone, fax and addresses details from the organization, if applicable.
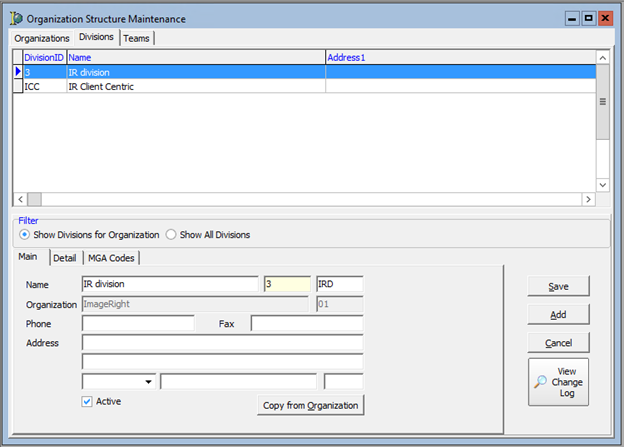
- Click the Save, Add, and Cancel buttons to save changes to a division, add a new division, or abandon unsaved changes and additions, as required.
-
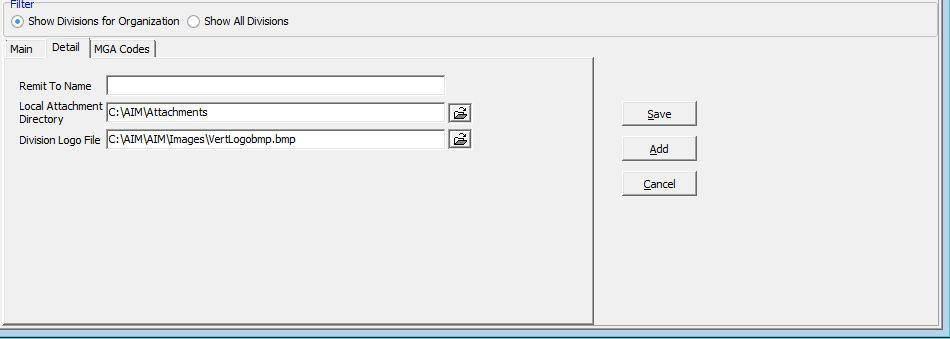
On the Detail tab review and make changes as needed:
-
Remit To Name – The name displayed on AIM invoices other than the division name.
-
Local Attachment Directory – The directory on your network where attachments to AIM are saved. Click
 to locate and select the directory.
 -
Division Logo File – The directory on your network where the division-specific logo is stored for the purposes of document design. Click
 to locate and select the directory.
-
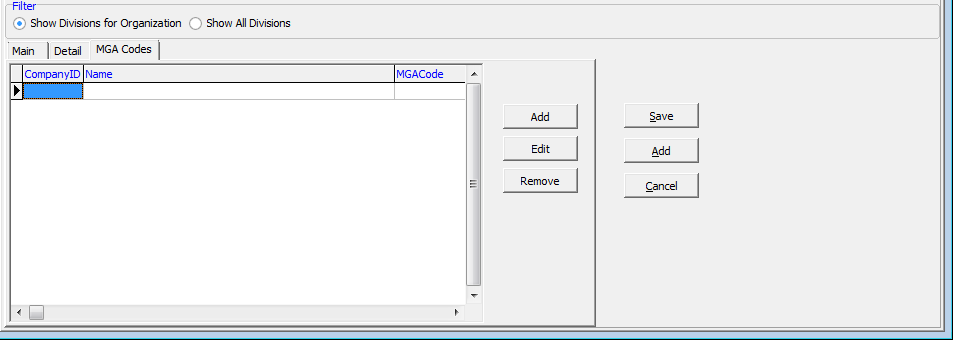
- On the MGA Codes tab you can maintain division-specific carrier MGA codes for use with Vertafore Policy Issuance (VPI).
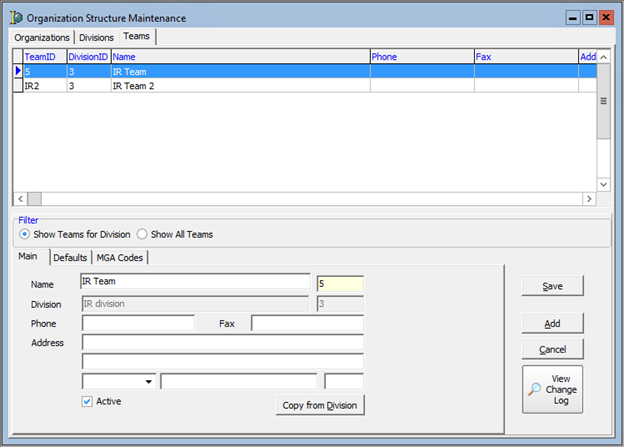
- Click the Teams tab to display teams that are assigned to the division selected on the Divisions tab.
- Use the options located in the Filter pane, to filter the teams in the grid.
- Show Teams for Division;
- Show All Teams
The Main tab of the bottom pane displays phone, fax and address information for the team selected in the grid.
- Click the Copy from Division button to copy phone, fax and addresses details from the division.
- Click the Save, Add, and Cancel buttons to save changes to a team, add a new team, or abandon unsaved changes and additions, as needed.
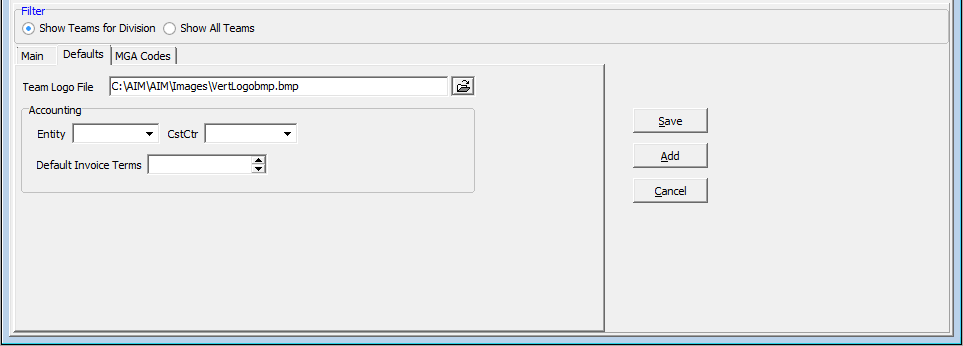
- On the Defaults tab, enter the following information, if applicable:
- Team Logo File – Network location where the division-specific logo is stored for purposes of document design. Click to locate and select the directory.
- Accounting:
- Entity and CstCtr fields – Reserved for future development;
- Default Invoice Terms – Team-specific invoice terms, that override the terms set in System Parameters, and the Company or the Agent tables.
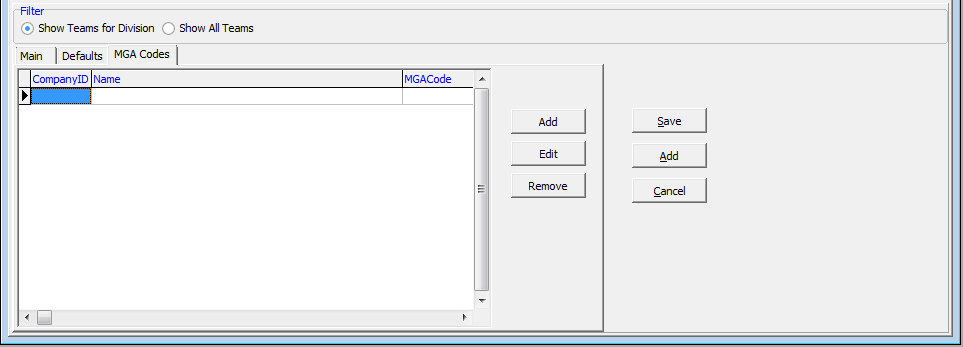
- You can use the MGA Codes tab to maintain division-specific MGA codes for carriers for use with Vertafore Policy Issuance.
- Save your changes, if applicable.
The organization feature of AIM is intended to prevent access by one user to data that belongs to another organization. However it is realistic to expect that at times a user will need to cross organizations. To that end, it is possible to allow a user to access multiple teams (and therefore multiple divisions and organizations) with a simple setting in the user table. Enabling this feature allows the user to switch organizations in AIM without the need to log in again.
- To begin, open the User table in DMU.
- Select the user to be modified, and then click Edit.
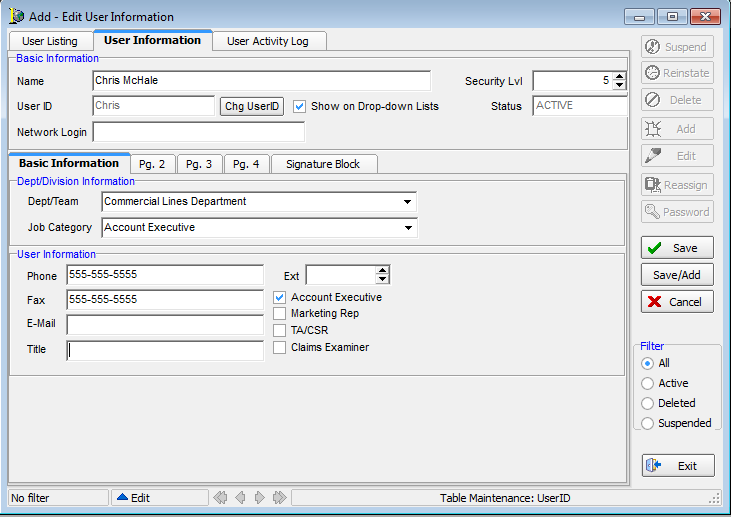
- The Basic Info tab displays the department/team of which the user is already a default member.
- In this example, the user is a default member of the Jones & Smith, Inc. organization – M&P Insurance, LLC. Division – Commercial Lines team.
- Click the Pg.3 tab.
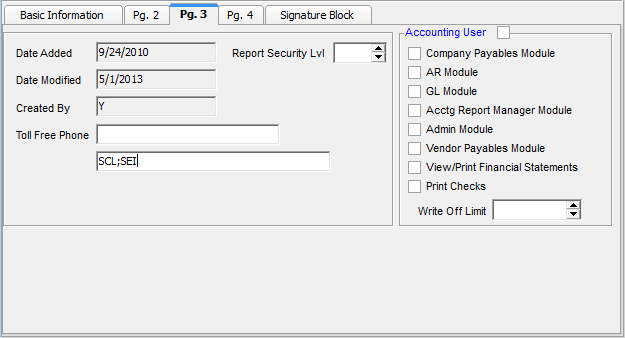
- In the unlabeled field in the left pane, enter the TeamID for any other teams this user may belong to, inside or outside the user’s default organization.
- TeamIDs should be separated only by a semi-colon, as illustrated in Figure 10.
- In this example, we are granting access to the Special Events team – Smith & Smith, Inc. Brokerage division – Smith & Smith, Inc. organization.
- Save your changes by clicking the Save button.
The implementation of the new organizational structure allows you to manage certain datasets in AIM on an organization level; meaning that your retail agency and company plants, system parameters, payment terms, commission rates, and state general defaults can be managed differently for each organization as needed. With the exception of the Retail Agency and Company tables, including commission rates, if you have not enabled the organization feature of AIM the features outlined in this chapter will not be available to you for configuration.
Retail Agency & Company Datasets
Your retail agency and company plants may be also be managed by division should your agency elect not to implement the organization feature. For additional information on this feature including a list of impacted AIM fields, please refer to the Configure Master Data Sets.
System Parameters
Differing sets of system parameters for each of your organizations may be easily managed in Data Maintenance Utility.
In System Parameters, you can select the organization to be configured.
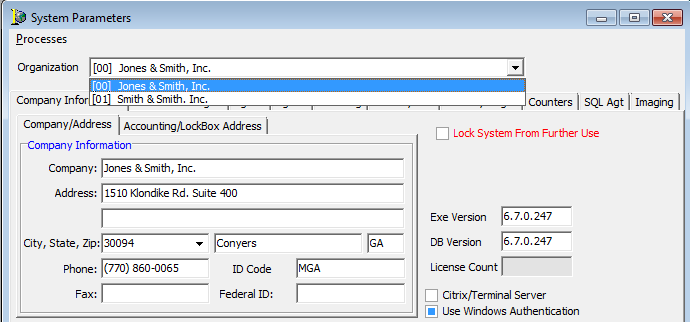
- In the Organization list, located in System Parameters, select the organization to be configured.
- Enter the system parameters for this organization as required.
- When complete, click Save to save your edits or Cancel to abandon them.
- Click Exit.
Payment Terms
Company Payable and Agent Receivable payment terms may be set by organization. The hierarchy of payment terms is as follows:
Accounts Payable:
- Company Payment Terms By Organization, if record exists;
- Company Default Payment Terms, if record exists;
- Default Payment Terms – System Parameters
Accounts Receivable:
- Producer Payment Terms By Organization, if record exists and override checked;
- Producer Default Payment Terms, if override checked;
- Company Payment Terms By Organization, if record exists;
- Company Default Payment Terms, if record exists;
- Producer Payment Terms by Organization, if record exists, no override checked;
- Producer Default Payment Terms, if record exists;
- Team Default Payment Terms, if record exists;
- Default Payment Terms – System Parameters
In this workflow, we outline both Accounts Payable and Receivable to further illustrate the feature.
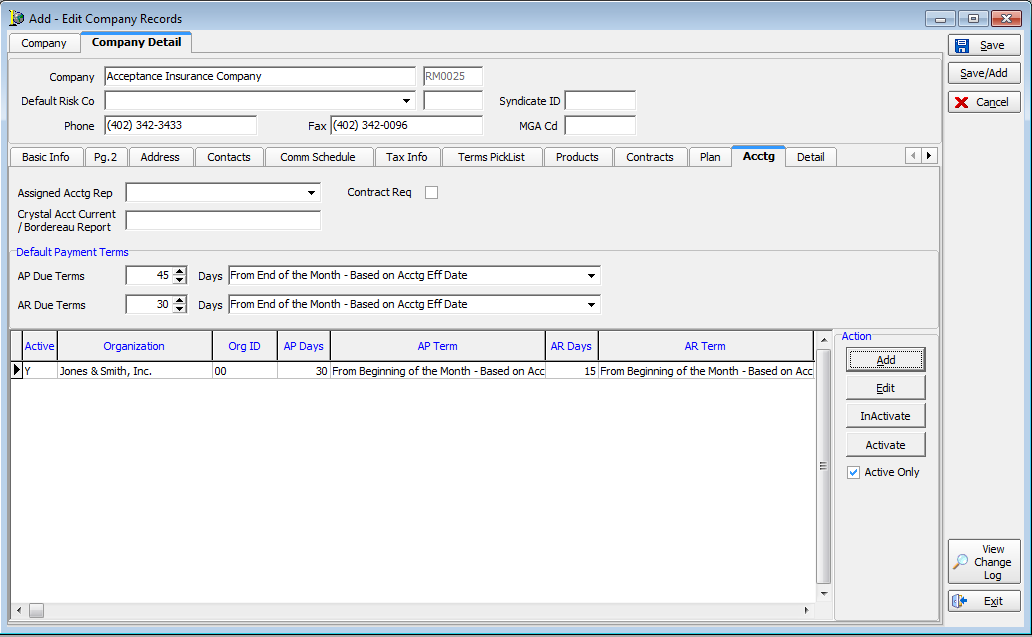
- To begin, open the Company table in DMU.
- Click the Acctg tab. A new grid has been added to allow terms to be set by organization.
- The Action buttons are defined as follows:
- Add – Add/define a new rule.
- Edit – Edit of the currently selected record.
- Inactivate – Inactivate the currently selected record.
- Activate – Activate the currently selected record.
- Active Only Checkbox – Change the grid view to display only active records for viewing/editing.
- Click Add.

- Complete the fields in New Payment Terms:
- Company – Automatically populates with the name of the company being edited;
- Organization – Select the appropriate organization from the drop down field;
- AP Due Terms:
- Days – Enter or select the number of days will be used in the calculation of the due date;
- Unlabeled list box – Select an option from the list.
- AR Due Terms:
- Days – Enter or select the number of days will be used in the calculation of the due date;
- Unlabeled list box – Select an option from the list. For additional information regarding this parameter, please refer to the DMU Help file.
The Active option is selected automatically.
- When complete, click OK to save this record, Save/Add to save this record and continue adding additional records, or Cancel to abandon the edits.
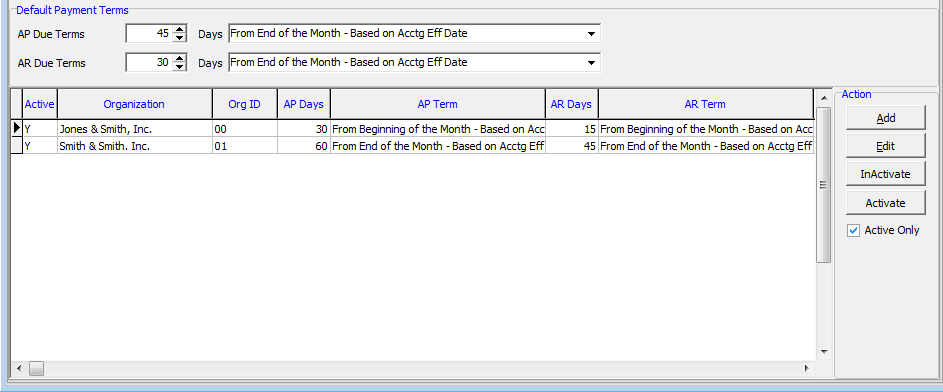
-
The new organization rules are displayed in the grid. When all required rules have been added, save the company record.

|
Clicking the Cancel button does not cancel the changes you have entered in the grid, as they were already committed to the database. Should this entry have been made in error, you must mark the rule as Inactive. |
Several enhancements to the management of Commission Rates were introduced in AIM Version 6.7.0. The intent of these improvements is to allow you to manage both agent and dated commission rates either by product or by company.
- The Commission Rates tab of the Product table has been enhanced to allow both agent and dated commission rates to be set by organization and division.
- A Commission Rates tab has been introduced into the Company table to allow commission rates to be set by organization and division.
- Hierarchy of Commission Rate Settings:
- Product Commission Rates:
- Agent Commission Rates – If active records exist;
- Dated Commission Rates – If active records exist;
- Default Commission Values
- Product Commission Rates:
- To begin, select the required product in the grid, and then click Edit.
- Navigate to the Comm Schedule tab.

|
If dated or agent commission rates are set in the Product table when organizations are enabled, those records will be automatically updated to apply to all organizations and divisions. |
Dated Commission Rates are used to enforce commission rates based upon the effective date range of a policy.
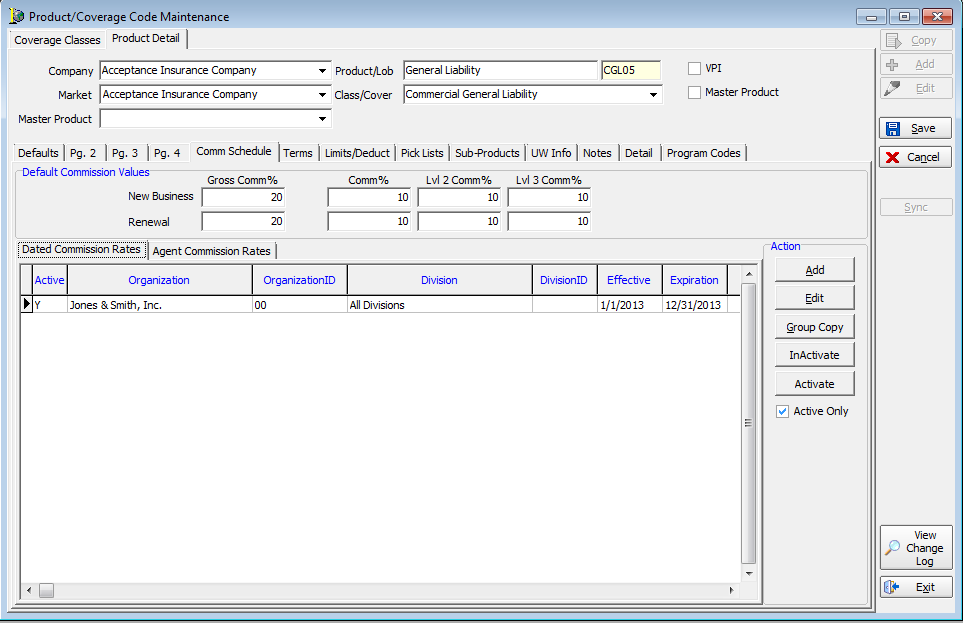
- The Dated Commission Rates tab is active by default. The Action buttons are defined as follows:
- Add – Add/define a new rule.
- Edit – Edit the currently selected record.
- Group Copy – Copy the selected commission record to other products for ease in maintenance.
- Inactivate – Inactivate the currently selected record.
- Activate – Activate the currently selected record. Multiple records may be activated or inactivated at once by using the Shift+click and/or Ctrl+click keyboard commands.
- Active Only – Change the grid view to display only active records for viewing/editing.
- Click the Add button to display the Edit Commission Schedule window.
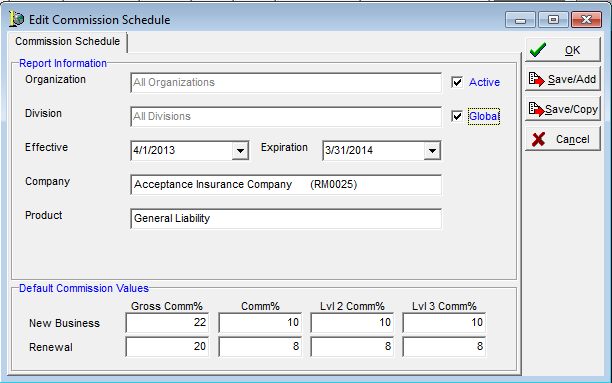
- Note that the Active and Global check boxes are activated by default. Select Globalif this rule is to be used for all organizations and divisions.

- If this rule is to be set for a specific organization/division, clear the Global check box to enable the Organization and Division lists.
- Complete fields in this window, defined as follows:
- Organization – Select the desired organization from the list.
- Division – Defaults to All Divisions. If this rule is to be specific to a specific division, select the desired division from the list.
- Effective – The effective date of the rule. This field defaults to the current date.
- Expiration – The expiration date of the rule. This field will default to one year from the current date.
- Company – Defaults based on the selected product and cannot be edited.
- Product – Defaults based on the selected product, and cannot be edited.
- Default Commission Values – For additional information regarding these fields, refer to the DMU Help file.
- When complete, click OK to save the record, Save/Add to save this record and continue adding additional records, Save/Copy to save this record and copy for purposes of creating an additional record or Cancel to abandon the edits.
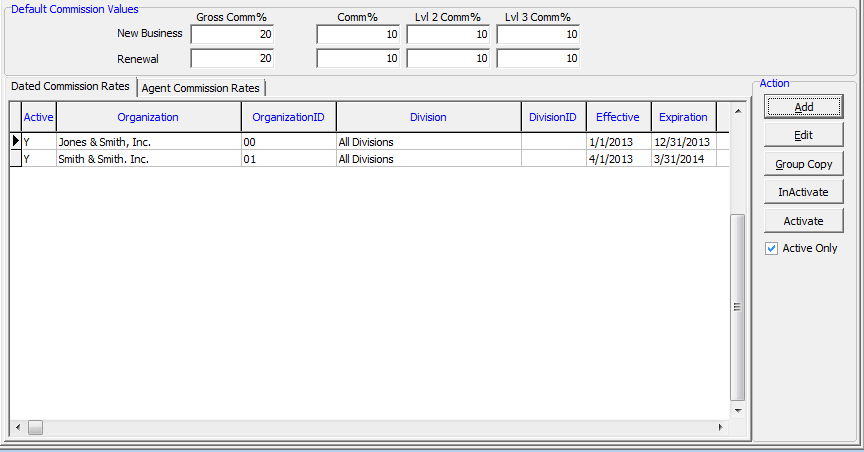
- The new organization/division rules are now displayed in the grid.
- When all required rules have been added, save the product record.

|
Clicking the Cancel button will not cancel the changes you have entered in the grid, as they were already committed to the database. Should this entry have been made in error, you must mark the rule as Inactive. |
Agent commission rates are used to manage product commissions by a specific retail agent or group of retail agents.
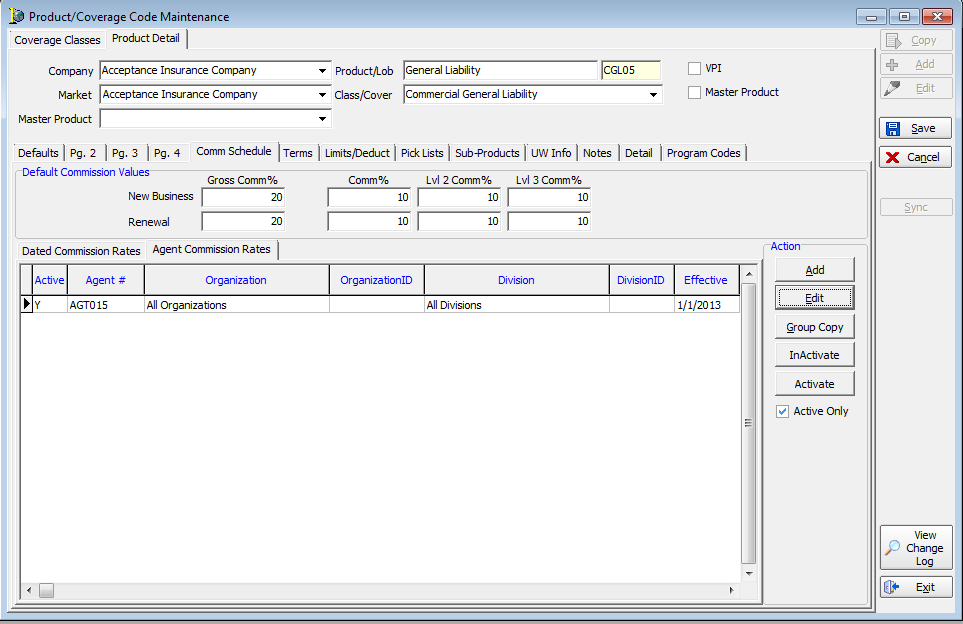
- Click the Agents Commission Rates tab.
- The Action buttons are defined as follows:
- Add – Add/define a new rule.
- Edit – Edit the currently selected record.
- Group Copy – Copy the selected commission record to other products for ease in maintenance.
- Inactivate – Inactivate the currently selected record.
- Activate – Activate the currently selected record. Multiple records may be activated or inactivated at once by using the Shift+click and/or Ctrl+click keyboard commands.
- Active Only – Change the grid view to display only active records for viewing/editing.
- Click the Add button to display the New Commission Schedule dialog box.
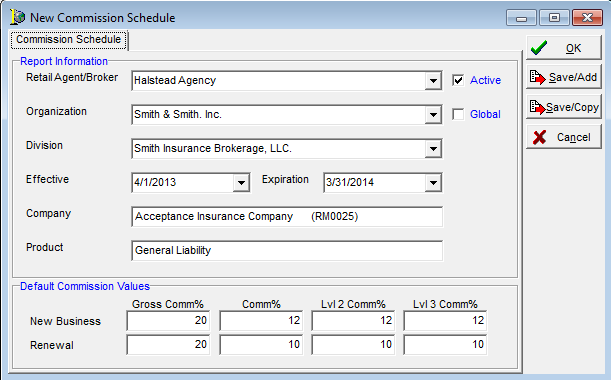
- Select the desired retail agent from the Retail Agent/Broker list.
Note that the Active and Global check boxes are selected by default. The Global check box denotes that the rule is used for all organizations and divisions.

- If this rule is to be set for a specific organization/division, clear the Global check box to enable the organization and division drop down fields.
- Complete the rest of the fields in this window, defined as follows:
- Organization – Select the desired organization from the list.
- Division – Defaults to All Divisions. If this rule is to be specific to a specific division, select the desired division from the list.
- Effective – The effective date of the rule. This field defaults to the current date.
- Expiration – The expiration date of the rule. This field defaults to one year from the current date.
- Company – Defaults based on the selected product and cannot be edited.
- Product – Defaults based on the selected product, and cannot be edited.
- Default Commission Values – For additional information regarding these fields, please refer to the DMU Help file.
- When complete, click OK to save this record, Save/Add to save this record and continue adding additional records, Save/Copy to save this record and copy for purposes of creating an additional record or Cancel to abandon the edits.
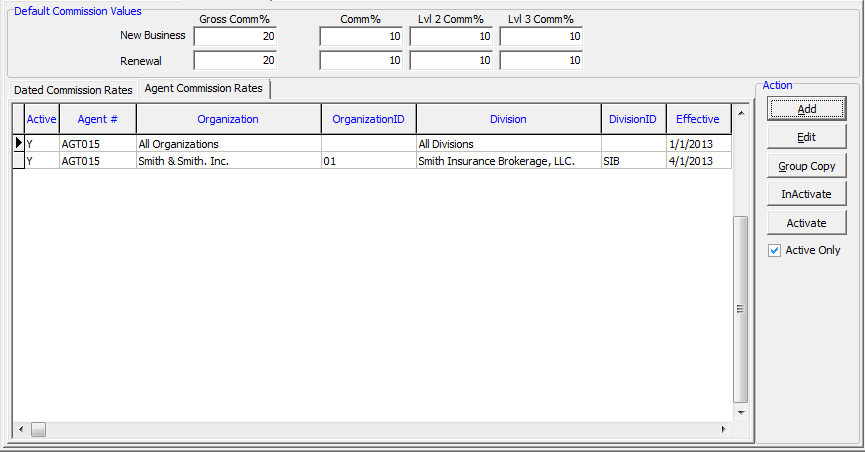
- When all required rules have been added, save the product record.

|
Clicking the Cancel button will not cancel the changes you have entered in the grid, as they were already committed to the database. Should this entry have been made in error, you must mark the rule as Inactive. |
State general defaults, i.e. affidavit requirements and licensing information, may now be managed by organization. When the organization feature is enabled, no change is made to the current state general defaults settings – those settings will apply to all organizations unless and until a new organization-specific rule is added.
- To begin, click the Tables menu of the DMU, and then click States to display the States Defaults dialog box.
- Select the state to be edited, and then click Edit.
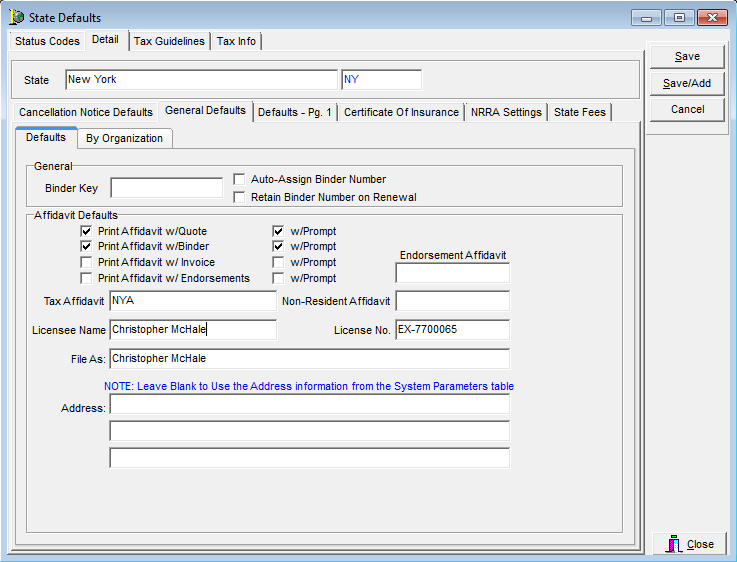
- Any currently existing defaults are displayed for review or edit.
- Click the By Organization tab to set defaults for specific organizations.
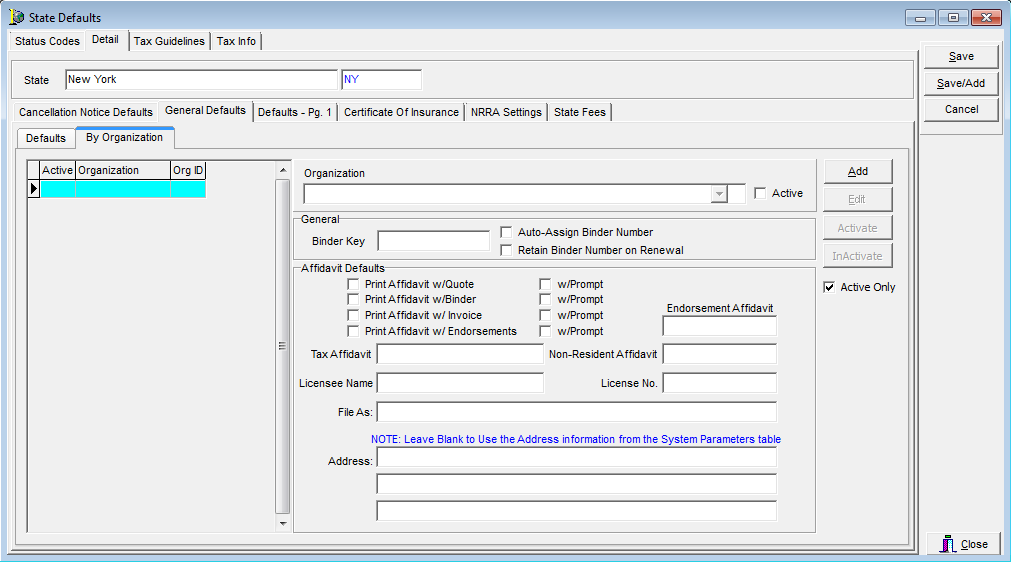
- In the grid on the left side of the By Organization tab, a list of organization-specific rules is displayed. The action buttons are defined as follows:
- Add – Add/define a new rule.
- Edit – Edit the currently selected record.
- Group Copy – Copy the selected commission record to other products for ease in maintenance.
- Inactivate – Inactivate the currently selected record.
- Activate – Activate the currently selected record. Multiple records may be activated or inactivated at once by using the Shift+click and/or Ctrl+click keyboard commands.
- Active Only – Change the grid view to display only active records for viewing/editing.
All fields are protected until such time as the Add or Edit buttons are clicked.
- To add a new rule, click the Add button.
The fields are now available for editing. - Select the required organization from the list, and then enter all required information.
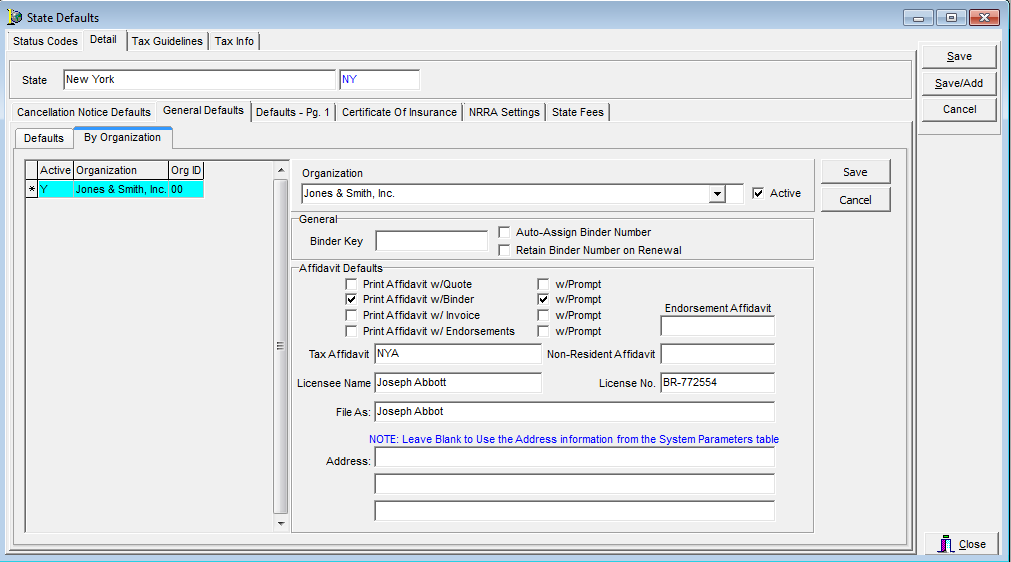
- When complete, click the Save button to save the rule, or Cancel to abandon it.
- The left grid displays all created rules.
- When complete, click Save to save the edits to the state, or Cancel to abandon them.
Enabling the organization feature of AIM impacts the clearance search and the Renewal Manager module. Each of these changes is outlined in this document. AIM also clearly displays the name of the organization that your user is currently logged on to, as well as offers the ability to log into a different organization without having to log out of and back on to AIM.

When you log on to AIM, the name of the organization – Smith & Smith, Inc. for example - is displayed on the title bar as is the name of the division and team to which you are assigned.
A user’s membership in an organization is determined by his team membership. When you log on to AIM, you are automatically logged on to the organization as defined by your team. In the steps that follow, we show you how to switch between organizations.
In our earlier example, Chris McHale is to have access to several teams/divisions/organizations.
- Click the Edit menu, and then click Switch Organization.
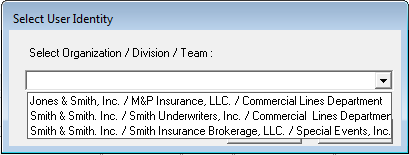
- In Select User Identity, click in the list box to display a list of organizations to which this user has access.
- Select the organization from the list.
- Click OK.

The title bar of AIM displays the name of the newly selected organization, including the division and team that were selected in the foregoing steps.
The intent of imposing an organizational structure on your database is to shield certain data elements from specific users while still allowing them to clear new submissions against the entire database.
In our example we demonstrate users Chris McHale and Alice Morris. In our preceding case study we indicated that:
- Chris McHale is a member of multiple teams, spanning multiple divisions and organizations, and;
- Alice Morris is a member only of the Special Events team of the Smith Insurance Brokerage, Inc. division of the Smith & Smith, Inc. organization
- A submission has been received for clearance, and we will follow through the results that each of the above users will receive.
- The submission in question is named Buster’s Pet Food Mfg., Inc. Chris McHale received the submission first, and has entered it into AIM through the clearance process as proscribed by his agency’s procedural requirements. Since he is the Account Executive of record, the submission is assigned to his primary team/division/organization.
- The submission has been received from the Halstead Agency, Inc.
- At the same time, Alice Morris has received the same submission, and is preparing to enter it into AIM via the Clearance Search process.
When Chris clears the submission, he is allowed to proceed since he is the first employee to work the submission. He is also allowed to enter the retail agent as The Halstead Agency, Inc.
When Alice attempts to clear the submission, she is able to see that it has already been cleared in AIM. However, when she views the submission record the text is displayed in gray.
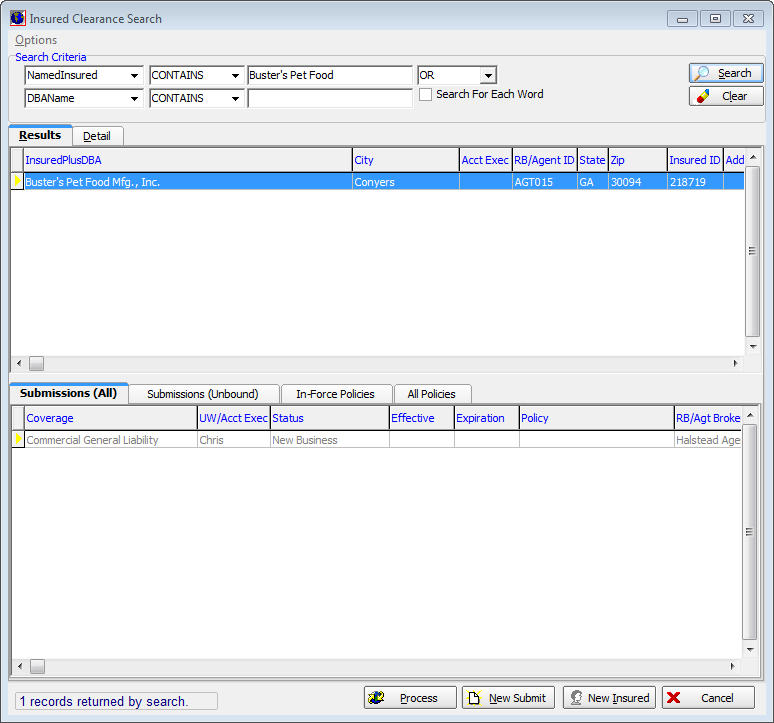
When Alice attempts to view the details of the insured and submission by clicking the Process button, a warning is displayed indicating that she is not able to view this submission.

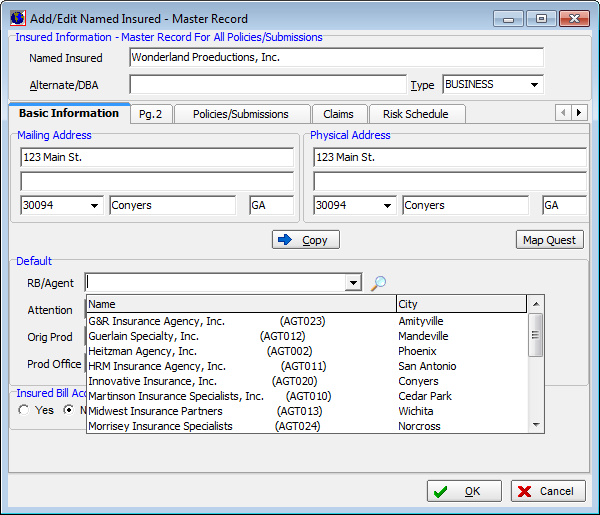
Moving on to the next submission that Alice has received, she proceeds to clear it in AIM for entry. The Wonderland Productions, Inc. submission has been received from the Halstead Agency.
Since access to the Halstead Agency, Inc. is not allowed for her team/division/organization, Alice is unable to proceed with entry as Halstead Agency is not available in the RB/Agent drop down field for selection.
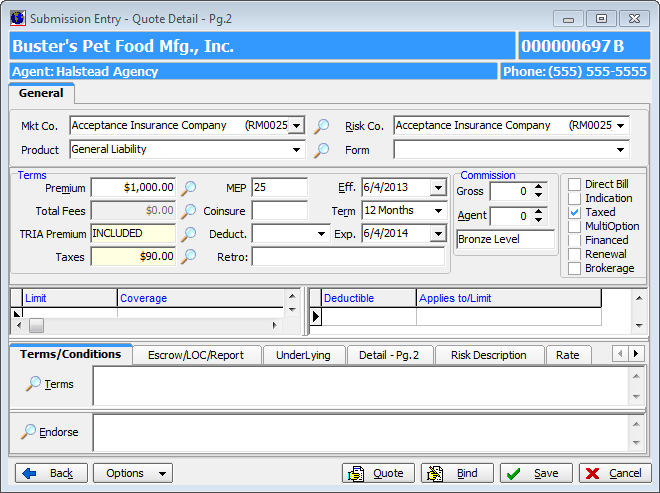
The company Allianz Insurance has a contract only with the Smith Insurance Brokerage, LLC division. User Alice Morris is a member of that team/division/organization, while user Chris McHale is not.
When attempting to quote a submission with Allianz, Chris is unable to select Allianz from the Company list in Submission Entry-Quote Detail – Pg. 2.
If your agency has assigned default Account Executives in the Coverage or Agent tables, and that default is outside of the current user’s team/division/organization, they will be warned that the Account Executive will not be assigned.

With the addition of the organization feature, the data in the Renewal Manager module has been protected from viewing by any user outside that organization. In order to view another organization’s Renewal Manager data, it is necessary to first switch to that organization.