| This feature, or some fields and options described, might not be available depending on your settings, security rights, or platform package. |
The Dec Page View is available from the Policy tab in the Customer Center. This feature provides a quick reference summary of the most current policy information. The view includes: Customer Information, Lines of Business, Risks, Coverages, and Premiums.
The most current policy information appears for the policy Dec Page View ![]() . For the Dec Page View of a transaction, click this same icon, which appears on the policy transaction line.
. For the Dec Page View of a transaction, click this same icon, which appears on the policy transaction line.
In the Customer Center, with a customer open, click the Policy tab.
Click the Dec Page View icon ![]() for the policy or specific transaction that you want to view.
for the policy or specific transaction that you want to view.
The Dec Page View opens in another window.
When you are finished, close the window.
You can prevent the premiums from displaying on the Dec Page View by taking the following steps:
From the Policy tab in the Customer Center, click View Options.
Click Include Premium Amounts on Dec Page View to remove the checkmark and then click Apply.
Click the Dec Page View icon for the policy or transaction you want to see. The information appears without premiums.
If this is the view you will use most often you can save it as your default. After removing the checkmark in step 2, check Save as User Default View and then click Apply.
AMS360 has a number of permanent lines of business and you can add more using Line of Business Setup. When editing a permanent line of business or adding new lines of business, you can assign a System Data Entry interface, if one does not already exist.
The System Data Entry interface is used to collect line of business detail. This interface defaults when the line of business is added to a policy. The System Data Entry forms available for viewing in Dec Page View are as follows:
Dwelling Fire
Farm & Ranch
Homeowners
Private Passenger Auto
Personal Inland Marine
Personal Umbrella
Watercraft
Business Auto
Commercial Umbrella
Crime
Garage & Dealers
General Liability
Glass & Sign
Property
Specialty
Truckers
Workers Compensation
Health
Life
|
System Data Entry Interface |
What happens? |
|
LOB Includes Interface |
When a system data entry interface is used to enter line of business data, the Dec Page View displays current basic policy information, line of business, risk, coverage, and premium information. Example: A Farm Owners Liability line of business is assigned the General Liabilitysystem data entry interface. Consequently, theDec Page View includes current basic policy information, line of business name, risk, coverage, and premium information entered at the line of business level. |
|
LOB Does Not Include Interface |
For lines of business not assigned one of the system data entry interfaces above, the Dec Page View displays the basic policy information and only the line of business name. Example: The Dec Page View for a Garage and Dealers policy that is not assigned one of the system data entry interfaces above, displays only basic policy information and the line of business name. |
Click the Policy Number link in the Basic Policy Information section to open the Policy data entry form for the policy you are viewing.
Click the Line of Business link in the Lines of Business section to open the specific Line of Business data entry form for the line of business you are viewing.
The toolbar allows you to navigate to various functions for the policy. The icons include the following:
|
Icon |
Action |
Uses |
|
|
Displays the following sub-menu of policy transactions:
|
Use to initiate one of the transactions listed. |
|
|
Displays the following sub-menu of actions in eForms Manager:
|
Use to open eForms Manager for this policy and initiate one of the forms listed. |
|
|
TransactNOW |
Use to launch TransactNOW for this policy. This button only appears if the policy is set up for TransactNOW. |
|
|
Email with Contacts |
Use to open Contacts and initiate an email message with the DEC Page as an attachment. |
|
|
Printer Friendly Version |
Use to print the Dec Page View. You will still need to go into Page Setup (File/Page Setup) to change margins and remove the header and footer information. |
|
|
PL Rating |
Use to launch Personal Lines Rating for this policy with Silver Plume. This button only appears if you have authorization. |
|
|
Claim |
Opens the Claims data entry form. |
|
|
Schedules/Proposals |
Opens the Schedules/Proposals data entry form. |
|
|
Form Letters |
Opens the Form Letters data entry form. |
|
|
Contacts |
Opens the Contacts data entry form. |
|
|
Activity |
Opens the Activity/Suspense data entry form so you can enter an activity. |
|
|
Suspense |
Opens the Activity/Suspense data entry form so you can enter a suspense. |
|
|
Notes |
Opens the Notes data entry form. |
|
|
Pro Rata Wheel |
Opens the Pro Rata Wheel form. |
|
|
Application Preview |
Opens the Acord application for viewing. |
|
|
Prevail Network |
Opens Prevail Network Integration so you can check the policies you wish to quote for premium financing. |
|
|
Compare |
Opens Compare Policies/Submissions so you can view the differences between policies/submissions transactions. |
|
|
Endorse |
Opens the Endorsement data entry form. |
|
|
Renew |
Opens the Create Renewal/Rewrite Policy data entry form. |
|
|
Cancel |
Opens the Cancellation data entry form. |
You can print the Dec Page View in one of the following ways:
Print the information from the browser window by clicking the Printer Friendly Version icon or from the menu by selecting File > Print. If you choose this option, see the Page Setup section below for more information on changing margins and removing the header and footer.
Save the page as an HTML file and use an HTML text editor such as Word or Ront Page to modify or print the information. (The changes made via the text editor are not saved to the AMS360 generated Dec Page View.)
Copy any or all of the information and paste it into a text editor such as Word and modify or print the information.
Page Setup allows you to select the paper size and source, include or exclude the header/footer information, select the page orientation, and set the margins for your printed DEC page.
To access Page Setup, from the menu select File > Page Setup.
|
Options |
What is this? |
|
Page Size |
Select from the list of available page sizes and sources. |
|
Page Source |
|
|
Header/Footer |
Record the contents of the header and footer fields (they may be needed later) and then delete the entries in those fields. The browser header and footer information will not print. This change affects all web page printing on this workstation. If desired, you can re-enter the contents of the header and footer fields when you have finished printing the Dec Page View. |
|
Orientation |
Select the page orientation, PortraitorLandscape, for printing. |
|
Margins |
Enter the desired left, right, top, and bottom margins in inches. |
This applies toInternet Explorer 7only
If the Dec Page appears under the Customer Center, or is minimized to the task bar, you can change your browser settings so the Dec Page appears in a new tab.
Click Start > Control Panel. The Control Panel dialog box appears.
Be sure the view is set to Classic View.
Double click Internet Options. The Internet Properties dialog box appears.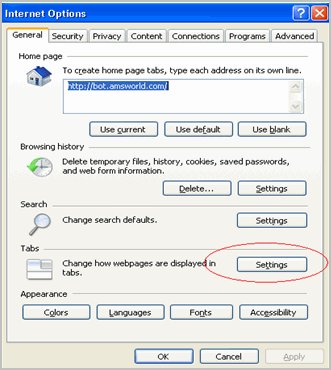
Under the General tab, click the Tabs > Settings button. The Tabbed Browsing Settings dialog box appears.
Check Always switch to new tabs when they are created and Always open pop-ups in a new tab.
ClickOKfrom each dialog box to save your changes.
Do you want to print a more detailed summary of the policy? See Schedules/Proposals.
|
My Vertafore Support | Vertafore University | NetVU Network | Vertafore.com © 2015 Vertafore, Inc. and its subsidiaries. All Rights Reserved. Vertafore, the Vertafore design, AMS360, Vertafore Producer Advantage, Producer Plus, AgencyEDGE, ReferenceConnect, BenefitPoint, Engage, and WorkSmart are registered trademarks of Vertafore, Inc. or its subsidiaries. Third party marks belong to their respective holders. AMS360 Classic Help updated 5/18/2016 11:03 PM |