Open topic with navigation
Workflow: Entering a Multiple Entity Customer and Policy
Multiple Entity customers and policies provide a means of grouping and billing customers who are insured by one policy. Examples of these types of customers are condominium associations where owners are covered by one policy and each shares a cost of that policy. Another example is a franchise where one policy covers multiple locations and each location is responsible for a portion of the billed premium.
You cannot change a Master Customer to a Standard Customer once you add a Sub-Customer and enter a policy.
This topic outlines how to enter multiple entity customer and policy information. For more information on billing and tracking receivables for multiple entity customers and policies see Workflow: Bill a Multiple Entity Policy and Track Receivables.
To create a multiple entity customer and policy do the following in the order listed:
 Enter the Master and Sub Customers
Enter information for the Master Customer using the same procedure as a standard customer, with one addition. In the Multiple Entity Account Information section of the Customer Information data entry form do the following:
-
Select Master/Multiple Entities from the Customer Type list.
-
Choose the Track Receivables option that applies. The choices are:
|
Option
|
What does this mean?
|
|
At Sub-customer Level
|
Choose this option if you need to bill each Sub-customer separately.
With this option, invoicing, payments, and accounts receivable are entered and tracked for each Sub-customer.
|
|
At Master Customer Level
|
Choose this option if you need to bill only the Master Customer.
With this option, invoicing, payments, and accounts receivable are entered and tracked only for the Master Customer.
|
-
Click Add New Sub-customer. The Customer Information data entry form appears for you to enter the Sub-customer name and other information. To make data entry easier the key fields that must match the Master Customer pre-fill, and the link to the Master Customer is completed for you.
-
When you have finished entering information for the Sub-customer, click Save & Close. The Master Customer data entry form appears so you can enter another Sub-Customer, if applicable.
-
When you finish entering, saving and closing the Sub-customer data entry forms, click Save & Close on the Master Customer data entry form.
-
Continue by entering the policy information to the Master Customer. For more information on this process, see the next section of this topic, Enter the Policy Detail.
Enter the Policy Detail
Use the Create New Policy and Policy topics for information on entering standard policy information. The following instructions summarize the standard entry information and highlight the steps specifically for multiple entity policy data entry:
-
From the Customer Center, with the Master Customer open, choose Action > Policy > New. The Create New Policy data entry form appears.
-
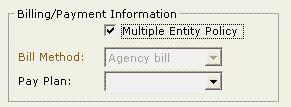
Enter the information about the policy, and in the Billing/Payment Information area of the form, check the Multiple Entity Policy checkbox (see figure below).
-
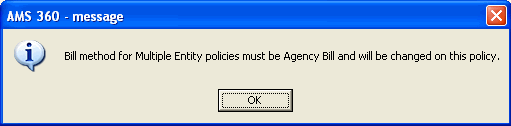
When you click on the Multiple Entity Policy checkbox, you get a message indicating that multiple entity policies must be "Agency Bill". Click OK. The Bill Method becomes Agency Bill and cannot be changed.
-
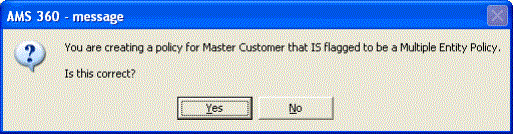
When you click OK on the Create New Policy data entry form you receive a message stating that you are about to create a multiple entity policy on a master customer. Is this correct?. Click Yes. The Policy data entry form appears.
-
In the Multiple Entity sub-section of Basic Policy Information click Get Sub-customers. The Get Sub-customers data entry form appears.
-
Use the Get Sub-customers data entry form to select the sub-customers that you want to include on this policy. You can also choose to add each sub-customer on the policy as an additional named insured, if appropriate. For more detailed information on this data entry form see the Get Sub-customers topic.
The sub-customers selected here are automatically selected when you choose the Split Premium link in the Transaction Premiums and/or the Transaction Fees, Taxes, Finance, & Down Payments sub-sections of the Transaction Premium / Billing section of the Policy data entry form.
-
Enter the remaining policy information as you would for a standard Policy. See the next section of this topic, Enter the Policy Premium for information on creating the premiums to bill each sub-customer.
Enter the Policy Premium
When you have entered the policy detail and are ready to enter premiums/fees, taxes, and other billing information use the following steps:
-
In the Transaction Premiums / Billing section of the Policy form, the line of business you previously entered in the Line of Businesssection, appears as a row in the Transaction Premiums grid. If you want to invoice using this line of business, you can enter the premium amount by typing it in the Premium field on the grid.
If a line of business does not appear in the grid you can select Newfrom the section menu and add the information, including the premium, so you can create an invoice. Entering the information here does not create a line of business on the policy for you.
-
For multiple entity billing you must divide the premium between the sub-customers. To do this, click the Split Premium link in the Multiple Entity column of the Transaction Premiums grid. The Multiple Entities data entry form appears.
-
Use this data entry form to add sub-customers that are to be billed a portion of the premium. To do so, click Get Sub-customers. The Get Sub-customers data entry form appears.
-
The form displays all of the sub-customers associated with the master customer who are not already assigned a portion of the premium.
Even if Sub-customers are not already added to the policy in the Basic Policy Information > Multiple Entity section of the policy, you can add them to this section and assign premium to them now.
-
When you have finished selecting sub-customers that are to be billed a portion of the premium, click OK. The Multiple Entities data entry form reappears.
If you add a sub-customer in error, you can delete them from the grid in two ways:
-
From the grid select the line for the sub-customer you want to delete and then right-click and choose Delete from the menu that appears.
-
Enter 0 (zero) in the premium field for the sub-customer. When you save your changes you receive a message that states there are sub-customers without premium and asks if you want to remove them from the list. Click Yes.
-
When you have finished assigning premium amounts, click Save, and then click Close. You return to the Policy data entry form.
-
If you have fees, taxes, finance, and down payments to enter and split you can do it in the Transaction Fees, Taxes, Finance, & Down Payments sub-section, using the same method as explained for the premium above.
-
When you have finished entering and splitting premium and other charges you are ready to create the invoices. See Workflow: Bill a Multiple Entity Policy and Track Receivables for more information on that process.