In our example, we are going to explain how to add a simple annotation (filled ellipse). As with all our examples, you can modify the steps and apply the features shown to your own needs. If you follow the steps here, practice, and review the description of the annotation tools, described in Annotation Toolbar, you will soon master adding annotations.
Generally, to apply an annotation, you:
- View the image (and certain PDF files) to which you want to add an annotation.
- Click the annotation tool on the Annotation toolbar.
- Drag the mouse pointer over the image (page) or click the image to create the annotation.
You can add annotations to images and certain PDF documents, but you cannot add annotations to documents in their native format, for example, Microsoft Office documents. Also, annotations cannot be added to:
- Portfolio PDFs that are not split so that they appear as multiple pages in the file tree.
- Adobe LiveCycle 1.7 and later PDFs that have active form controls.
- Adobe LiveCycle 1.7 and later PDFs that have dynamic XFA forms.
- Adobe LiveCycle 1.6 and earlier PDFs.
- To add
a filled ellipse, click the Filled Ellipse button. If you have predefined
multiple versions of an annotation tool, you can click the arrow next
to the button and click the specific version that you want to use (Red
Ellipse or Blue Ellipse in our example). In our example, Red Ellipse is
selected for use as indicated by
 .
The selected version of the annotation will be used each time you click
the button until you change your selection.
.
The selected version of the annotation will be used each time you click
the button until you change your selection. - With the
annotation tool selected, do one of the following:
- Point at the image where you want to apply the annotation and click the mouse button.
- Point at the image where you want the annotation and drag the mouse pointer to add the annotation. When the annotation is the desired size, release the mouse button.

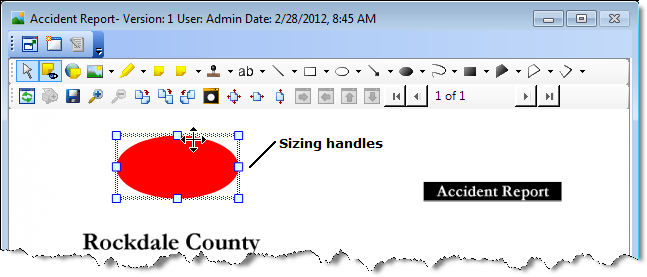
- Before
an annotation is locked, you may resize or move it. Click the annotation
to select it (as indicated by the sizing handles and selection grid) and
do one of the following:
- To resize the annotation, drag a sizing handle until the annotation is the shape and size you want. To maintain the annotation's proportions, drag one of the corner sizing handles.
- To
move the annotation, point at the selection grid and drag the annotation
and drop it in the new location. The pointer changes to
 during the move operation.
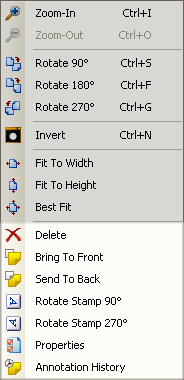
- Before
an annotation is locked, you can change its attributes and position it
in layers if needed. Right-click an unlocked annotation and click the
appropriate menu command based on these descriptions. The appearance of
the menu may change based on the type of annotation selected.
- Delete – remove the selected annotation from the image.
- Bring to Front – move an annotation in front of another to create layers.
- Send to Back – move an annotation behind another to create layers.
- Rotate Stamp 90° – rotate a text stamp ninety degrees.
- Rotate Stamp 270° – rotate a text stamp two hundred and seventy degrees.
- Properties – open the Properties dialog box and change the attributes, for example, the color of the annotation.
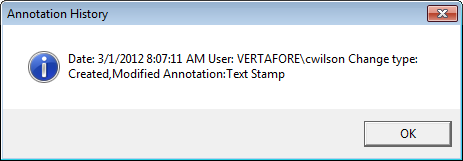
Annotation History – view information about the creation of a locked annotation, for example, the name of the person who created the annotation.
- To lock
annotations, click
 on the toolbar
or view a different image in the file. Remember when you lock an annotation
other than a sticky note, you can make no further changes to it, and you
cannot delete the annotation. A locked annotation is permanent.
on the toolbar
or view a different image in the file. Remember when you lock an annotation
other than a sticky note, you can make no further changes to it, and you
cannot delete the annotation. A locked annotation is permanent.
|
In our example, we used
a private annotation, one that is available to only the user who
is logged onto Desktop. If you would like to use global annotations,
turn them on by pressing the Include Global Annotations button
( |
 ).
).
When you click an annotation tool it is only activated for one use.
Would you like to be able to use the same annotation multiple times on
the same image? Maybe you need to draw several arrows on the same image.
If you hold down the Shift key and then click the tool you need, you can
use the annotation as many times as needed. To release the selected annotation,
click another tool or the Selection Tool button ( ).
).
Earlier we mentioned that you could open the Properties dialog box related to an annotation tool and change its attributes. We explain how to change the attributes of the annotation tools in Annotate Menu. While the presentation of the attributes may be slightly different in Image Viewer when you are adding annotations, the concepts are the same; therefore, we will not repeat the specifics here.
You can use the annotation tools below to add text or notes to an image. Because the use of these annotations differs from simply drawing a line, we provide more details in separate topics. To learn more, click the appropriate link.