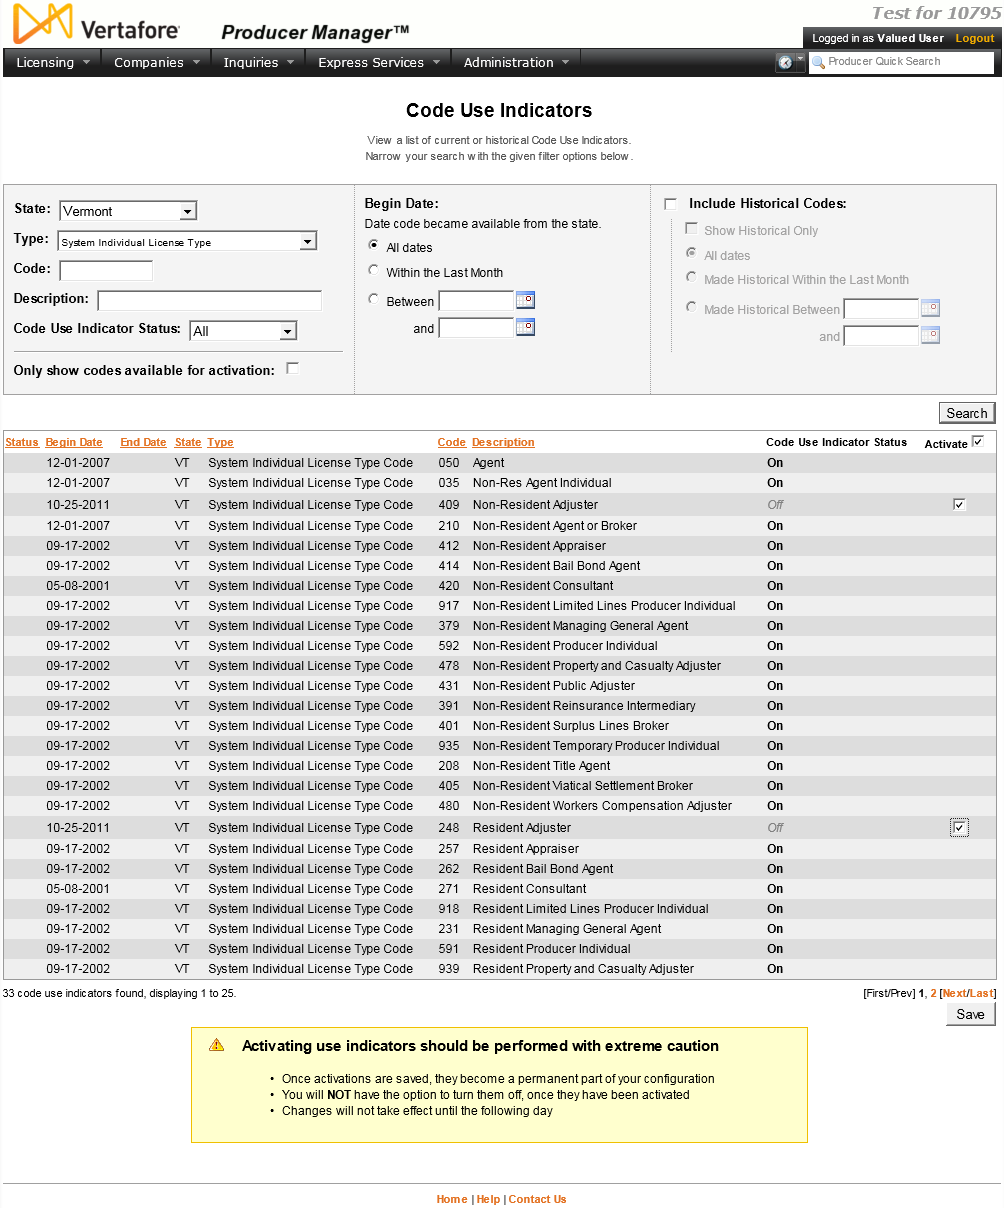
Code Use Indicators

Note: Note: Although you may use the Code Use Indicators page to review the codes that are enabled in your company's instance of the Sircon Platform, you cannot enable or disable code use indicators yourself on this page. To request a code use indicator to be enabled, please contact your Vertafore representative.

Most insurance license classes, most major lines and many limited or specialty lines, and most related appointment types are available for submitting or tracking in Sircon Producer Manager and Producer Express. In the Sircon Platform, all state-specific license classes, LOA, and appointment types are represented by database codes.

To configure the system to reflect only the licenses, LOA, and appointments that are important to your company's business, you can enable certain codes for specific states while leaving disabled other codes of no concern to your company.

With code configuration in place:

  • Only enabled codes representing licenses, LOA, and appointments will be available for tracking on producer records or for use as filter criteria when running inquiries

  • A user or automated process may submit a license or appointment request only for a type whose code is available and enabled

  • An automated data reconciliation (e.g., Quick Sync Producer or Scheduled Syncs) will update a producer record only with information pertaining to a code that is in use in the system; it will ignore that of a disabled code

  • A producer sales authorization request will process only for product types that are data mapped to licenses, LOA, or appointments for which codes are enabled

Use the Code Use Indicators page to view the availability of and enable state-specific codes in your company's deployment of the Sircon Platform, including the following:

  • License classes (license types)

  • License categories (South Carolina only)

  • Lines of authority (qualifications)

  • Appointment types

  • Termination reasons (license, LOA, and appointment)

  • Education credentials course categories

From among the entirety of codes in the system, you can determine which codes are configured to be either enabled or disabled in your company's specific deployment of PLM. You also can activate any codes that are of business interest to your company.

ClosedView screen capture

To open the Code Use Indicators page, from the Administration menu select Configure System, and then select View Code Use Indicators.

The Code Use Indicators page contains the following sections:

ClosedSearch Fields

Offers fields allowing you to narrow the default display of all active codes in the system.

Fields and controls include the following:

  • State: From the dropdown menu, select the name of a state whose codes you want to filter the Search Results by.

  • Type: From the dropdown menu, select a code type whose codes you want to filter the Search Results by.

  • Code: Enter a code or partial code to filter the Search Results by the entered criterion. You may enter as few as one character. The system will filter the Search Results to display codes that begin with the entered value.

  • Description: Enter the name or partial name of a code description to filter the Search Results by the entered criterion. You may enter as few as one character. The system will filter the Search Results to display codes whose description includes the entered value in any character position.

  • Code Use Indicator Status: From the dropdown menu, select a value to filter the Search Results by enabled codes, pending enabled codes, disabled codes, or all codes.

  • Only show codes available for activation: Click to checkmark the checkbox to filter the Search Results to include only codes that are disabled and available to be activated.

  • Begin Date: You may filter the Search Results by a date or range of dates on which a code was added to the entirety of codes in the system. Use the following date filters:

  • All dates: Click the radio button to ignore date criteria as a filter in the Search Results.

  • Within the Last Month: Click the radio button to filter the Search Results to include only codes that were added to the entirety of codes in the system in the past 30 days.

  • Between[y]and[z]: Click the radio button to filter the Search Results to include only codes that were added to the entirety of codes in the system within a specified date range, where [y] is the first date in the range and [z] is the last date in the range.

  • Include Historical Codes: Click to checkmark the checkbox to include codes in the Search Results that have been inactivated in the system, usually because of state regulatory changes. An inactive code has a date value in the End Date field and a Status of Historical. You also may filter the Search Results to display codes that were inactivated within the past 30 days or during a specific range of dates.

  • Show Historical Only: Click to checkmark the checkbox to include only codes in the Search Results that have been inactivated in the system.

  • All Dates: Click the radio button to display all inactive codes, regardless of inactivation date.

  • Made Historical Within the Last Month: Click the radio button to display only codes that were inactivated in the system within the past 30 days.

  • Made Historical Between[y]and[z]: Click the radio button to display codes that were inactivated in the system within a specified date range, where [y] is the first date in the range and [z] is the last date in the range.

ClosedSearch Results

By default, displays in a table all codes in the system, except codes representing license classes, LOA, appointment types, etc. that are no longer supported by states and that have been inactivated in the system. Codes are sorted alphabetically by Description. When filtered by selections in the Search Fields section, displays results of filtered search.

Click a column heading to re-sort the table by the selected information category. Click a column heading once to sort the table in ascending order by that category, and click it again to re-sort the table in descending order by that category.

Fields and controls include the following:

  • Status: For each code listed, displays its current status. A code added within the past 30 days has a value of New; a system-inactivated code has a value of Historical. All other codes have no Status value.

  • Begin Date: For each code listed, displays the date on which it became active in the system.

  • End Date: For each code listed, displays the date on which it was inactivated in the system.

  • State: For each code listed, displays the name of the state that corresponds to the code.

  • Type: For each code listed, displays the code type. Code types include the following:

  • Appointment Processing Firm License Category                      

  • Appointment Processing Individual Licensee License Category

  • Education credentialing course category

  • System Agency License Type

  • System Appointment Termination Reason

  • System Appointment Type

  • System Individual License Type

  • System License Termination Reason

  • System Qualification

  • System Qualification Termination Reason

  • Code: For each code listed, displays its alphanumeric value.

  • Description: For each code listed, displays its long-name description.

  • Code Use Indicator Status: For each code listed, displays its status in your company's deployment of Producer Manager. On indicates that it is currently enabled; Off indicates that it is currently disabled, and Pending indicates that is has been selected for activation and is pending becoming enabled.

  • Activate: Available only for codes with aCode Use Indicator Statusof Off. For any code listed, click to checkmark its corresponding checkbox to select it for activation. Click again to de-select it.

To select all available codes listed on the current page of Search Results, click the checkbox to the right of the Activate column header. Click again to de-select all selected codes.

ClosedPage Controls

  • Search: Click to re-display the Search Results section based on current filter criteria set in the Search Fields.

  • [x]code use indicators found, displaying[v]to[w]: Displays the total number of codes in the system, and the range in numbers of codes currently displaying in the section. (Maximum 20 per page.)

  • First/Prev: Click First to open the first page of results; click Prev to open the preceding page of results.

  • 1, 2, 3, ...: Click a numeral to open a specific numbered page of results.

  • Next/Last: Click Next to open the succeeding page of results; click Last to open the last page of results.

  • Save: Click to enable selected codes to be activated in your company's deployment of the Sircon Platform. The Confirm Changes dialog box will open.

  • Activate: On the Confirm Changes dialog box, click to confirm the action to activate selected codes.

  • Cancel: On the Confirm Changes dialog box, click to abort the action to activate selected codes and return to the Code Use Indicators page.

Warnings

Activating a code on the Code Use Indicators page is an irreversible action. To preserve data integrity in producer records, once activated a code cannot be inactivated. Therefore do not activate a code unless you are absolutely sure doing so meets your company's business purposes. If you realize you have activated a code in error, contact Vertafore Sircon customer support as soon as possible at (877) 876-4430.

Notes

Note: So just what are code use indicators, anyway? Code use indicators are intended to configure the system to reflect only the licenses, LOA, or appointments that are important to your company's business, while shielding out those of no concern. The effect of this configuration is that users at a life/health/annuities carrier never see data or submit transactions that deal with property/casualty lines of business, or vice versa. This can make the system less confusing and error-prone for users. Were all code use indicators enabled, then a producer record in your system would contain all of a producer's state license and qualification (LOA) information, instead of being filtered to contain only compliance information that is germane to your company's business. Indeed, because they want a "360-degree view" of their agents' compliance records, many agency Producer Manager customers use the "all-on" code use indicator approach. Most carrier customers, however, prefer to limit their view to business-centric compliance information. For more information, please consult your Vertafore representative.

Note: Please allow 24 hours for the Code Use Indicator Status of an activated code use indicator to change from "Pending" to "On."

Tips

States frequently inactivate license classes, LOA, and appointment types, as well as their associated codes, and replace them with new ones. When a code is retired by a state, Vertafore globally makes the code historical in the Sircon Platform and unavailable for future use. However, the code must remain in existence in the system (with a Code Use Indicator Status of On) to support license, LOA, or appointment history in producer records. On the other hand, Vertafore does not automatically update your company's configuration of the Sircon Platform to support new or replacement codes. Therefore, you can use the Code Use Indicator page to monitor state code changes in the system, determine whether to enable a new or updated code, and enable the code in the Sircon Platform, if needed. For more information, see Mass Updating Producer Records After a State Regulatory Change.

To filter the Search Results by available license classes, select System Agency License Type or System Individual License Type from the Type dropdown menu in the Search Fields section. To filter the Search Results by available LOA, select System Qualification from the Type dropdown menu in the Search Fields section. To filter the Search Results by available appointment types, select System Appointment Type from the Type dropdown menu in the Search Fields section.

To quickly view the newest codes that Vertafore has added to the system, with the default view displaying in the Search Results section, click the Status column heading twice to sort the results in ascending order by status.


© 2024 Vertafore