When you prepare an e-mail message, you can select options that will place copies of the message body and attachments in the file. After you send the message and attachments, you can select certain options that will dictate where they are filed.
|
If you need more information about selecting the options to file attachments and the message body, see Selecting the E-Mail Options. For more information about the options in the Import dialog box, see Import Dialog Box Explained. |
- If you
select one of the options below when preparing an e-mail message, the
Import dialog box will be opened after you send the message (click
 ). In our example, the e-mail attachment is
being sent in its native format, TIFF. Later, we will show you an example
of the Import dialog box when the attachment is being sent as a
PDF file.
). In our example, the e-mail attachment is
being sent in its native format, TIFF. Later, we will show you an example
of the Import dialog box when the attachment is being sent as a
PDF file.- Drop attachments into the file
- Drop message body into the file
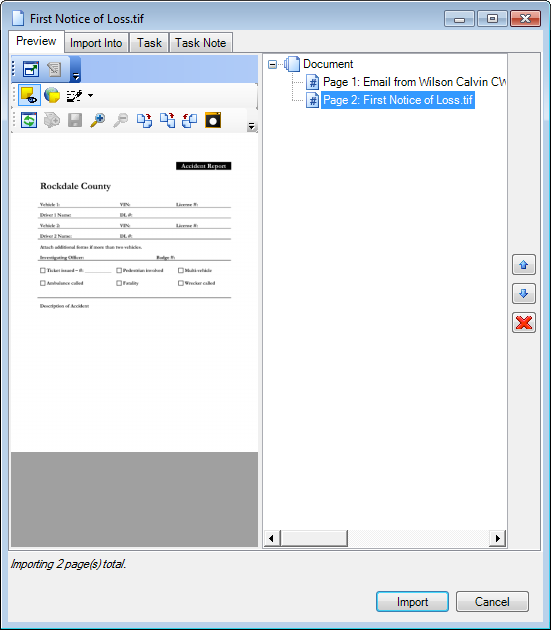
- On the Preview tab, you can select an item on the right side of the dialog box and see a preview on the left.
- If there
are multiple pages in the messages, you can change the order of pages
in a document. Select the page that you would like to move and click
 (move up) or
  (move down) on the right side of the dialog box as needed.
 - To prevent
a page from being stored in the file, select the page in the list and
click
 . Items remaining in the list will
be filed based on the options you configure as explained later.
 - You can
redact an image before it is imported. Click
 to use
the redaction tool. For more information about redacting an image, see
Redact Image. It is important to note that
when you complete the import of an image that you redacted, a copy of
the original image is not created. Only the redacted image will be viewable
in Desktop.
 - You can
change the size of the page being previewed by doing one of the following:
- Drag the mouse pointer over a section (draw a box around a section). When you release the mouse button, the section will be enlarged.
- Double-click the enlarged page to restore the size.
- Right-click the image and click a command on the menu to change the size (fit) of the preview.
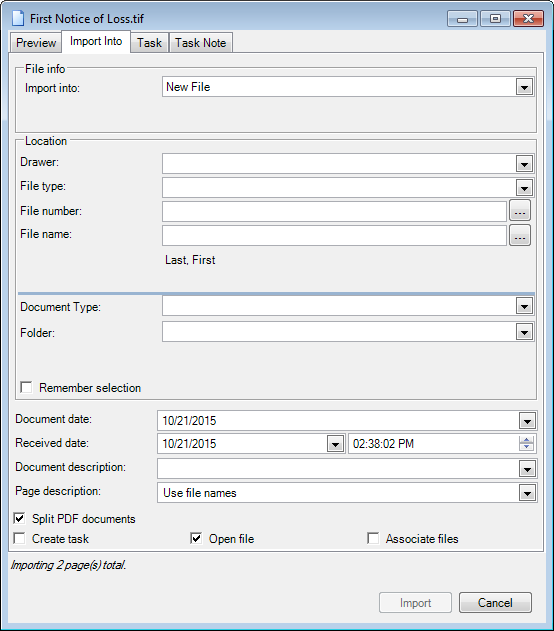
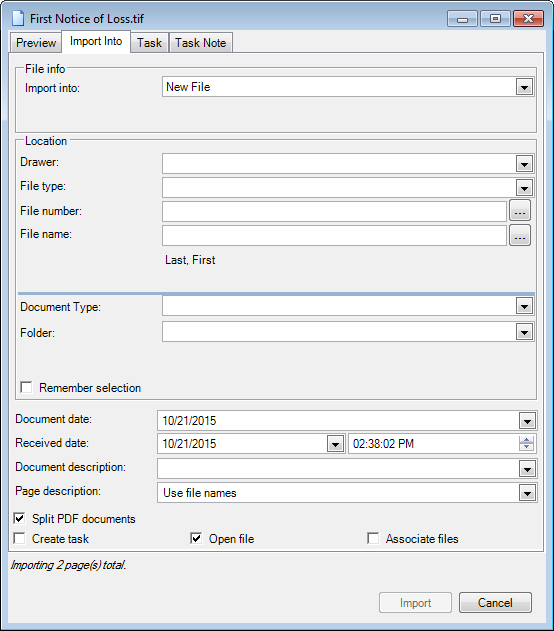
- On the Import Into tab, you configure the options related to the file structure, that is, the options that direct where the message will be filed.
- In the
File info pane, select the destination where you would like to place the
message and attachments.
- Current file and position
- Current file
- New file
- New temporary file
- Existing file
- With the Current file and position or Current file option selected, select Place at the beginning, and the message will be placed at the beginning of the file (the first document in the first folder).
- If you select Current file and position or Current file in the File info pane, certain file options in the Location pane will not be available. If either of these options is selected, you can switch to Desktop and select a different file or position while the Import dialog box is open.

- If you
select New file (as in our example) or New temporary file, you must select
or enter the file location information listed below that will be applied
to the message.
- Drawer
- File type
- File number– enter a number if you selected the new file option. (File number is unavailable if New temporary file is selected.)
- File name (File name is unavailable if New temporary file is selected.)
- Document type
- Folder
- Select
the Remember selection option, indicated by
 , and
the file structure items that you selected will be remembered and presented
each time you import a message.
 - If you would like to change the document date on the items, enter the new date value in the Document date box. You can click the arrow and select the date from a calendar.
- If you
want to change the received date and time, enter the new date and time
values in the Received date boxes. Typically, the date and time are updated
to reflect the date and time e-mail messages were received.
- You can type the new date value or click the arrow and pick the date from a calendar.
- You can type a new time value or use the arrows to set the time.
- As needed, you can enter a description in the Document description or Page description boxes. The entered descriptions will be displayed in Desktop, replacing the system generated descriptions. The display of the entered document descriptions is optional and is turned on in File Tree Options.
-
Select the Split PDF documents option and multipage PDF documents will be added as a document with multiple pages displayed in the file tree. For more information about splitting PDFs, see Split PDFs into Individual Pages.
- Select the Create task option to create a task related to the item being imported. Selecting this option updates the same option on the Task tab. The workflow, etc., selected on the Task tab, as explained later, will dictate where the task is created.
- Select the Open file option, and the file will be opened in Desktop after the import process completes.
- You can create a related files relationship between a new or new temporary file and the open file (the file where the e-mail message originated). To do so, select the Associate files option.
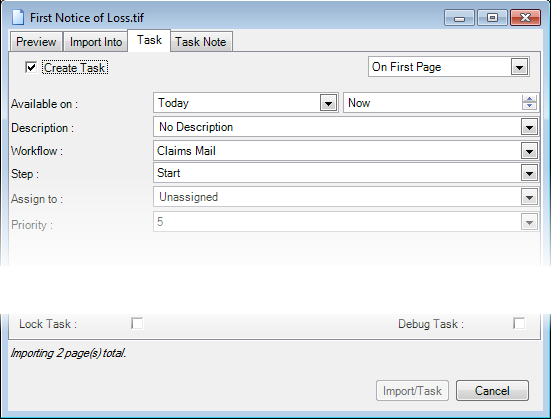
- On the Task tab, select
the Create task option if you would like to create a task on the message
being imported. Selecting this option updates the same option on the Import
Into tab. Enter (select from the lists) the following information:
- On first page – To create the task on the first page of the document.
- On the document – To create the task on the document, not just a single page.
- Available
on – The date and
time the task will be available in the ImageRight To Do List. To change
the date and time values do one of the following:
- Select the date and time values and type new values as needed.
- Click the value to be changed and use the arrow keys to change the value. The left and right arrow keys are used to advance or return to a value to be changed. The up and down arrow keys are used to change the value.
- Click the arrow next to the date to open a calendar. Use the arrow keys at the top of the calendar to change the displayed month as needed. Click the desired day to select it.
- Click the arrows next to the time to change the time, or select the time element to be changed and type the new value.
- Description – The text description that will be associated with the task and displayed in the navigation bar. Enter a description of the task in the box. As an alternative, you may click the down arrow and select a description that was used previously.
- Workflow – The workflow in which the task will be created.
- Step – The workflow step in which the task will be created.
- Assign to – The name of the person, group, or role to which the task will be assigned.
- Priority – The order of importance assigned to the task (0 – highest to 9 – lowest).
- Lock task – The file will be opened, and the task will be locked.
- Debug task – The task can be used for testing workflow changes. This option is typically used by the person who maintains your organization's workflows. Tasks will be added to the workflow and can be processed without affecting actual production workflow tasks, reporting, etc.
- You can
add a note (optional) to the task if needed.
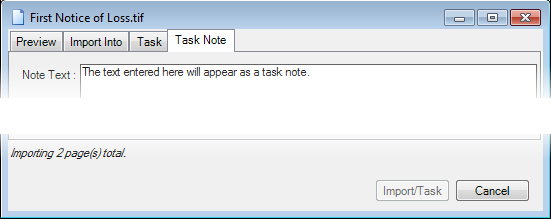
- Click the Task Note tab.
- Type the text of the note in the Note text pane.
- Click Import (Import/Task) to complete the import process. Click Cancel to end the import process.
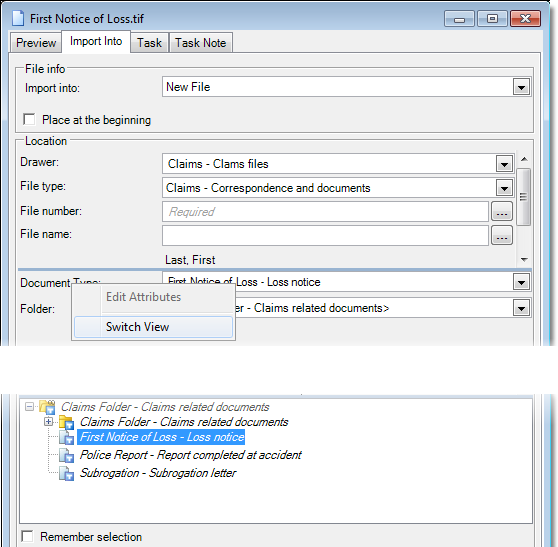
In our earlier example, we demonstrated the selection of file structure information from drop-down lists on the Import Into tab. Now, we want to show you how to change the view on the Import Into tab. you can select from two different view styles in the area where you select the folder and document.
|
You can change the size
of the Import dialog box. Point at a border of the dialog
box. When the pointer changes to |
- Right-click in the folder/document
area and click Switch View to change to a hierarchical tree view. Click
 or
or  as
needed to expand the folder types of the hierarchy, and then select the
document type.
Your organization may associate attributes like state, policy type, agent name, etc., with ImageRight files. If so, you can edit the attributes in the Import dialog box as needed. For more information about updating attributes, see Import Dialog Box Explained.
 , drag the
dialog box to the desired size.