The Import dialog box is opened in a number locations or steps when you are importing (from the ImageRight Desktop Scanner, with Microsoft Add-In, drag-and-drop operations, attach files, etc.,) into ImageRight. Here, we explain the options in the dialog box in more detail. Our discussion relates to all options in the dialog box. The available options may vary based on the type of import you are performing and the selections you make.
The items that will be imported are listed on the right side of the Preview tab. Multiple items are displayed either as separate documents or as one document based on whether you have elected to split imported content as explained in Import Dialog Options.
You can:
- Select an item in the list and view a preview on the left side of the dialog box.
- Change
the order of the pages in a document. Select the page that you would like
to move and click
 (move up)
or
(move up)
or  (move down) on the right side of the
dialog box.
(move down) on the right side of the
dialog box. - Remove
items from the import process. Select the item to be removed, and click
 .
. - Add items outside of ImageRight to the import list using a drag-and-drop operation. You might use this functionality to add multiple e-mail messages or files to be imported in one action. Items added in this manner will be:
- Appended to existing items.
- Remain in their native format, that is, the items will not be converted to PDF images.
You can change the size and orientation of the preview. It is important to note that changing the preview of the image will not affect the imported image, that is, the entire image will be imported.
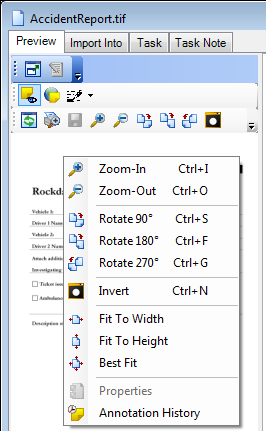
- Drag the mouse pointer over a section (draw a box around a section). When you release the mouse button, the section will be enlarged.
- Right-click the image and click a command on the menu to rotate the image or change the size (Zoom In or Zoom Out).
- Double-click an enlarged image or press Ctrl+R to restore the size of the preview.
The commands on the menu and the buttons on the toolbars function in the same manner as those in the Image Viewer. For more information about the commands, see Image Viewer Explained.
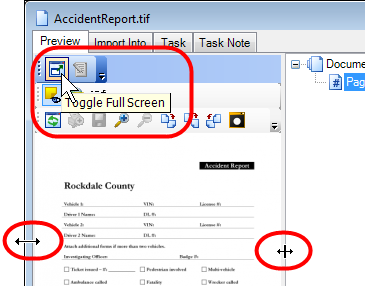
You can change the size (view) of the dialog box.
- Point
at a border of the dialog box. When the pointer changes to
 ,
drag the dialog box to the desired size.
,
drag the dialog box to the desired size. - Point
at the border between the panes. When the pointer changes to
 ,
drag the panes to the desired size.
,
drag the panes to the desired size. - Click
the Toggle Full Screen icon (
 )
or press Ctrl+M or press Ctrl+Ctrl to switch between full screen view
and normal view.
)
or press Ctrl+M or press Ctrl+Ctrl to switch between full screen view
and normal view.
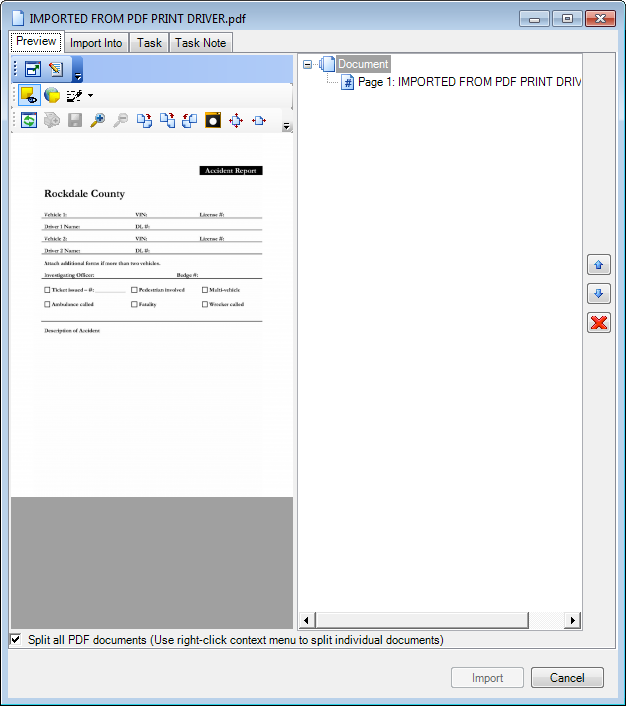
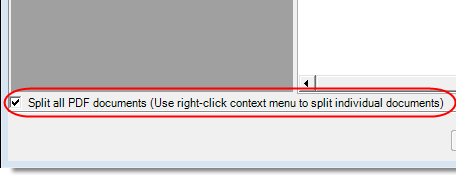
You can split all multipage PDF documents being imported into separate individual PDF documents by selecting Split all PDF documents.
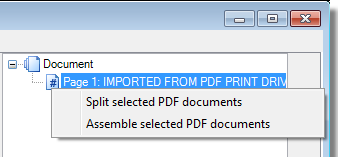
Right-clicking individual PDF documents or pages displays the following options:
- Split selected PDF documents – splits the selected multipage PDF documents into separate individual PDF documents
- Assemble selected PDF documents – combines multiple individual PDF documents into a single PDF document
You can redact an image in the preview window. Click  on the toolbar to enable the redaction tool. For more information about
redaction, see Redact Image. It is important
to note that when you redact an image in the preview mode, a copy of the
original image is not created. Only the redacted image will be viewable
in Desktop.
on the toolbar to enable the redaction tool. For more information about
redaction, see Redact Image. It is important
to note that when you redact an image in the preview mode, a copy of the
original image is not created. Only the redacted image will be viewable
in Desktop.
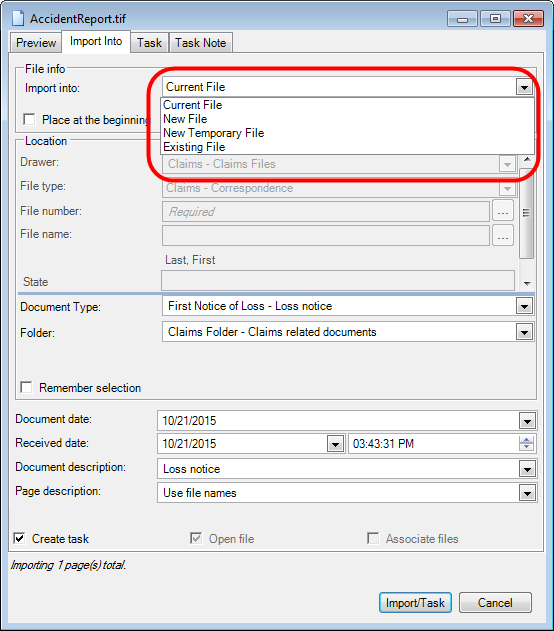
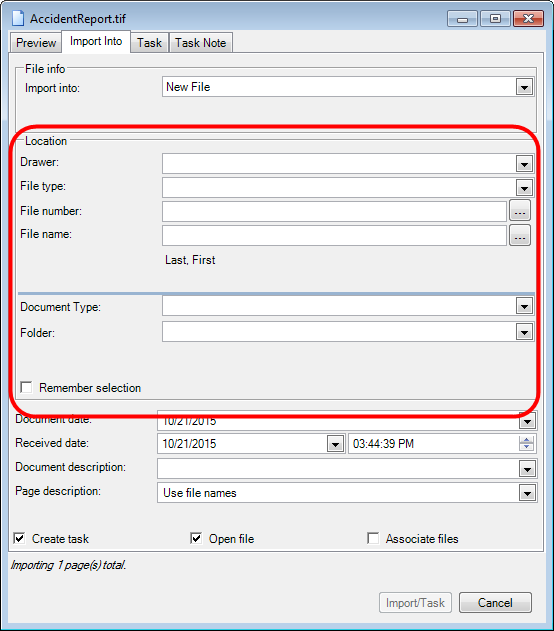
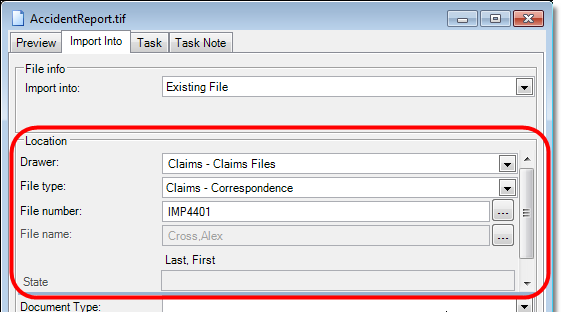
On the Import Into tab, you configure the options related to the file structure, that is, the options that direct where the imported items will be filed.
In the File info pane, select the destination where you would like to place the items and the options related to placement and the document date based on the following descriptions:
- Current file and position – Items will be placed in the position selected in the file that is open in Desktop.
- Current file – Items will be placed in the file that is open in Desktop. You can define the folder and document type as explained later.
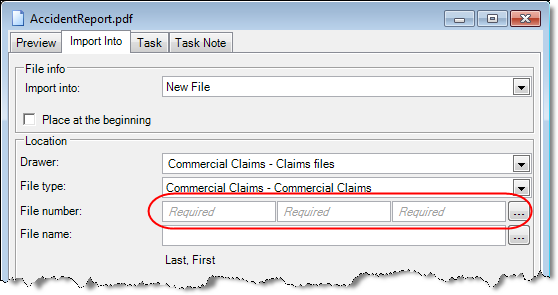
- New file – Items will be placed in a new file that is created using the new file name and new file number you enter.
- New temporary file – Items will be placed in a temporary file, and a system-generated file number will be assigned.
- Existing file – Items will be placed in a file that already exists in ImageRight based on the file number you enter.
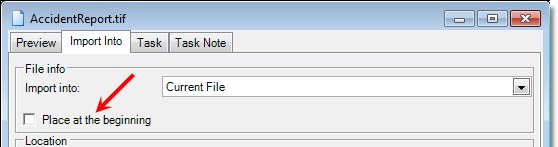
If you select Current file or Current file and position in the File info pane, you can:
- Switch to Desktop and select a different file or position while the Import dialog box is open.
- Select Place at the beginning, and the items will be placed at the beginning of the file (first document in the first folder).
In the Location pane, you enter the location information listed below that will be applied to the documents.
- Drawer
- File type
- File number (File number is unavailable if New temporary file is selected.)
- File name (File name is unavailable if New temporary file is selected.)
- Document type
- Folder
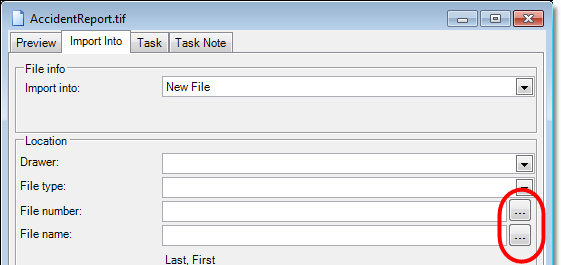
If you do not know the file number or file name when you are importing items, you can find them using the lookup functionality. In our example that follows, we are going to explain how to lookup a file number. You can easily modify our steps to lookup a file name.
|
You can use wildcard characters in your search for a file number or file name as explained in Using Wildcard Characters. |
- On
the Import Into tab, click
 next
to either the File number or File name box to open the File Lookup dialog
box. Alternatively, you may use the following keyboard shortcuts:
next
to either the File number or File name box to open the File Lookup dialog
box. Alternatively, you may use the following keyboard shortcuts:- Ctrl+Shift+3 – file number
- Ctrl+Shift+5 – file name
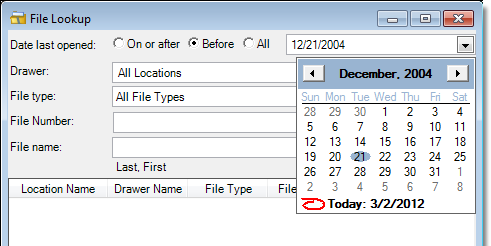
- The Date
last opened selection defaults to All. If you want to narrow your search
based on the date the file for which you are searching was last opened:
- Select the appropriate option (On or after or Before).
- Enter the comparison date in the box or click the down arrow and select the date on the calendar. You can click the right and left arrows to advance the calendar or click Today to jump to the current date. You can click on a date value and use the up and down arrow keys to set the date.
- Enter the file related information in the remaining boxes. In our example, we searched for all files in all locations that begin with the letter G (search with or without a wildcard by entering G% or G). We could narrow the search by entering additional information, for example, a drawer name or specific file type.
- Click Search.
- To
associate a file in the list with the items being imported, do one of
the following:
- Select the file and click OK.
- Double-click the file.
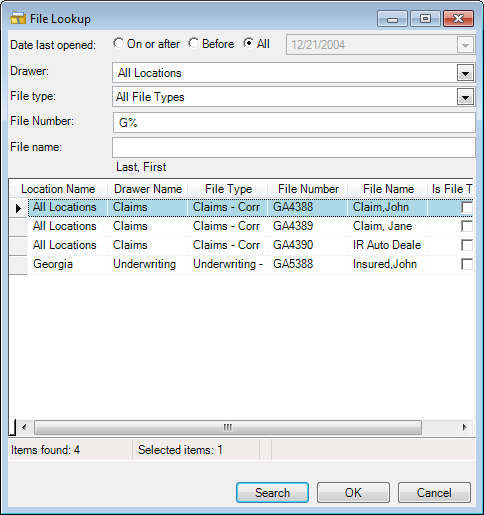
The information on the Import Into tab will be updated based on the file that you select.
If your organization uses multi-part file numbers (one to three parts), you will see multiple file number boxes when you select a drawer and file type combination for which multi-part file numbers are applicable.
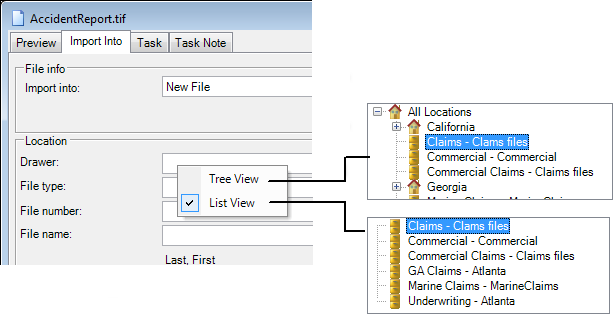
You can choose from two different view styles in the Location pane where
you select the drawer and file type. You can choose from a tree view or
list view. To do so, right-click the Drawer (or Location) box and select
Tree View or List View, indicated by  .
.
- Tree view displays the location names and drawer names. The label or name of the list changes to either Location or Drawer. When you expand a location, the drawers related to that location will be displayed.
- List view displays all the drawers without the location branches.
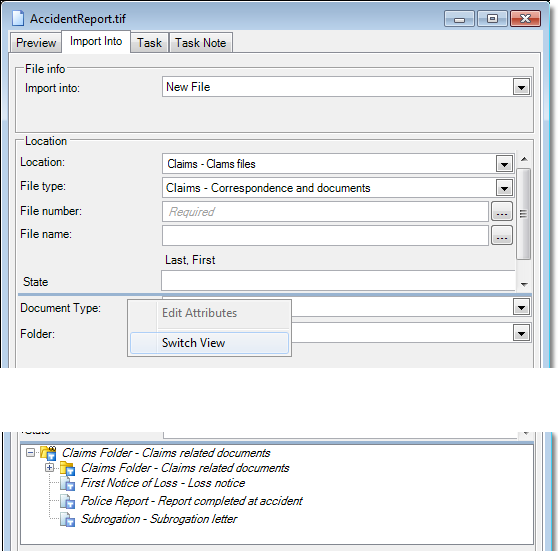
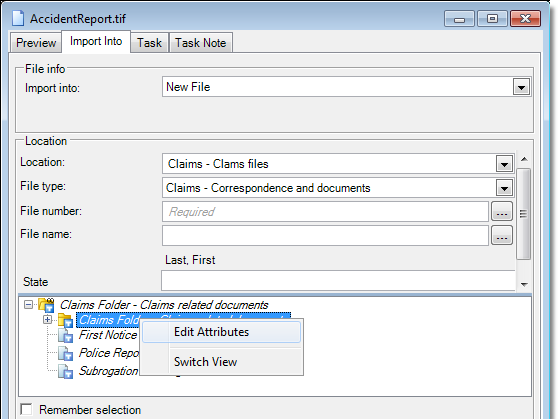
You can choose from two different view styles in the area where you select the folder and document. You can choose from a drop-down list or a hierarchical tree view. To switch the view types, right-click the folder/document area and click Switch View, as shown in the upper portion of the screen capture.
In the tree view:
- Click
 or
or  as
needed to expand the folder types of the hierarchy as shown in the lower
portion of the screen capture, and then select the document type.
as
needed to expand the folder types of the hierarchy as shown in the lower
portion of the screen capture, and then select the document type. - Folder
types in which repeatable folders can be created are marked with
 .
.
In the drop-down list view, folder types are enclosed in less than and greater than signs (< >), for example, <Claims>.
When using the drop-down lists, you can filter the list of document types and folder types to make it easier to find the items you need.
- When you enter the first letter of the document type or document description in the Document type list box, a list of matching documents will be presented. You can filter the list further (reduce the number of items in the list) by typing additional letters in the list box. When you select a document type, the Folder field will be populated automatically to display the folder in which the document will be stored. If multiple folders are related to the document type, the Folder list will contain only those folders in which the document may be placed.
- You can search for folders in the list by typing a letter or letters as noted earlier. When the document type is selected, the document description is updated automatically in the Document description list. The document description can be changed by either typing a new description or selecting a description from the list.
You can select the Remember selection option near the bottom of the dialog box, and the last used file structure settings that you selected will be remembered and presented the next time the dialog box opens.
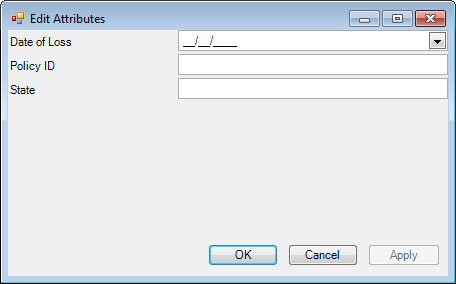
Your organization may associate attributes like state, policy type, agent name, etc., with ImageRight files. If so, you can edit the attributes in the dialog box.
- The
file attributes are shown in the Location pane. Enter the attribute in
the box next to the attribute name. If you can't see the attributes, resize
the pane. To resize the pane, point at the border. When the pointer changes
to
 drag the pane to the desired size.

- To enter
an attribute for the folder or document type:
- Switch the view to tree view, as explained earlier.
- Right-click the folder or document type.
- Click Edit Attributes on the menu.
- Enter the attribute changes in the Edit Attributes dialog box.
- Click OK to save your changes and return. Click Apply to save your changes and retain the dialog box for further use. Click Cancel first to dismiss the dialog box without saving your changes.
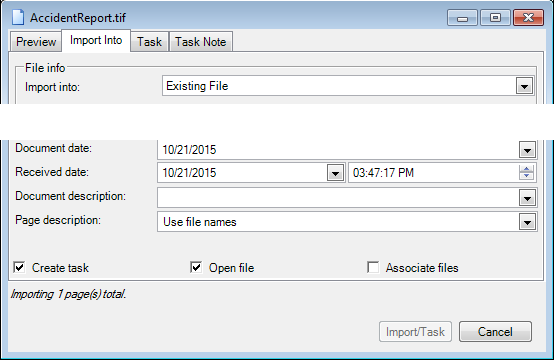
You can change the document date and received date and time.
- You might change the document date to reflect the date a letter was received as opposed to the date the letter was added to ImageRight.
- Typically,
the received date and time are changed to reflect the date and time an
e-mail message was received.
- If your ImageRight system administrator has configured the file structure to display the received date of e-mail messages, the messages are displayed in date order in the file tree based on the received date.
- If you import multiple messages, the most recent received date will be applied to the messages.
To change the dates or time, update the values in the Document date or Received date and time boxes by doing one of the following:
- Type a new date or time value.
- Click the arrow and pick the date from a calendar.
- Click a date or time value and use the up and down arrow keys to set the new value.
- Use the arrows next to the time to set the new time value.
If you have selected the option in Desktop Settings to split imported content into multiple documents, the document date and the received date cannot be changed when you are importing multiple documents.
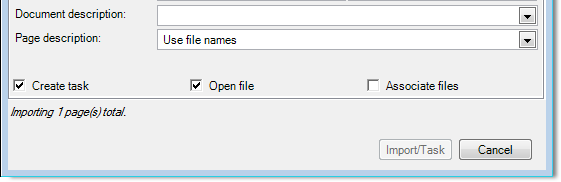
As needed, you can enter text for the descriptions below. The descriptions will replace the system-generated descriptions and will be displayed in the file structure.
- Document description – Text may appear at the document level in the Desktop file tree. Display of the document description is optional and is turned on in the File Tree Options. In some instances, you may be able to select a predefined description in the list by clicking the arrow.
- Page description – Text may appear at the page level in the Desktop file tree. In some instances, you may be able to select a predefined description in the list by clicking the arrow. If you select Use file names, the name of the file being imported will be used as the page description.
You can select the:
- Create task option to create a task related to the item being imported. Selecting this option updates the same option on the Task tab. The workflow, etc., selected on the Task tab, as explained later, will dictate where the task is created.
- Open the file option, and the file will be opened in Desktop after the import process completes.
- Associate files option and create a related files relationship between a new file or a new temporary file and the file open in Desktop.
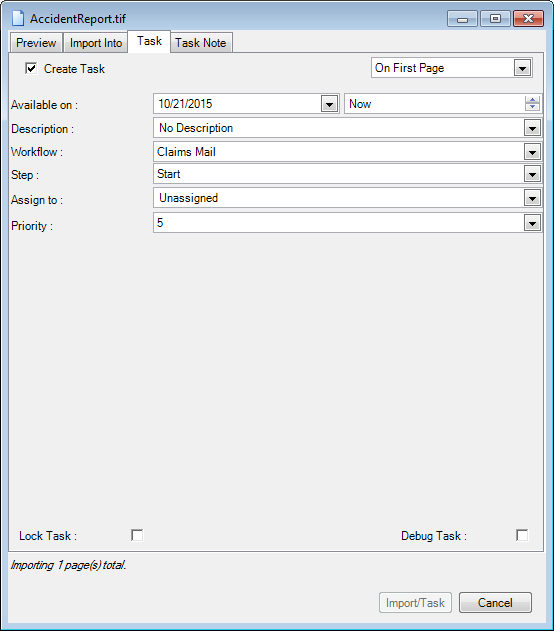
On the Task tab, select the Create task option if you would like to create a task on the items being imported. Selecting this option updates the same option on the Import Into tab. You can select the level at which the task should be created and other options that determine the status of the task.
- On first page – Task will be created on the first page of the document.
- On the document – Task will be created at the document level, not on a single page.
- Available
on – Dictates the
date and time the task will be available in the ImageRight To Do List.
To change the date and time values, do one of the following:
- Select the date and time values and type new values as needed.
- Click the value to be changed and use the arrow keys to change the value. The left and right arrow keys are used to advance or return to a value to be changed. The up and down arrow keys are used to change the value.
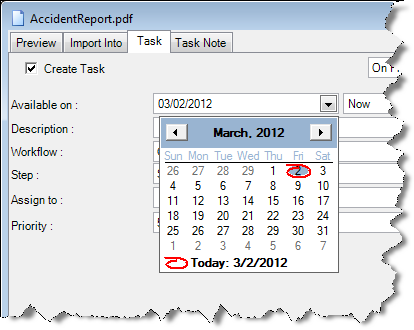
- Click the arrow next to the date to open a calendar. Use the arrow keys at the top of the calendar to change the displayed month as needed. Click the desired day to select it. Click the displayed month and select a new month from the list. Click the year, and then use the arrows to set a new year.
- Click the arrows next to the time to change the time, or select the time element to be changed and type the new value. Use the arrow keys to change the time as described earlier.
- Description – The text that will be associated with the task and displayed in the navigation pane. In some instances, you may be able to select from a list of ten recently used descriptions by clicking the down arrow.
- Workflow – The workflow in which the task will be created.
- Step – The workflow step in which the task will be created.
- Assign to – The name of the person, group, or role to which the task will be assigned.
- Priority – The importance assigned to the task (0 – highest to 9 – lowest).
- Lock task – The task will be locked, and the file will be opened immediately after the import process completes.
- Debug task – The task can be used when you are testing workflow changes. This option is typically used by the person who maintains your organization's workflows. Tasks will be added to the workflow and can be processed without affecting actual production workflow tasks, reporting, etc.
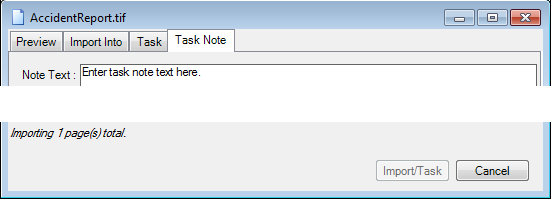
Task notes are optional, but if you choose to, you can add notes on the Task Note tab. For more information about task notes, see Task Note on the File View Tab.
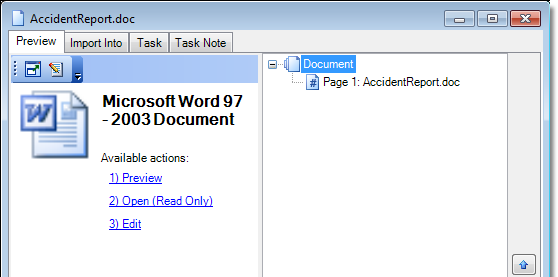
In our earlier examples, we were importing an image into Desktop. If you import a PDF form or a file in its native format, you will notice a difference in the appearance of the Preview tab.
In our example, we are importing a Microsoft Word document. If the program related to the item being imported is installed on your computer, you will see the program's icon, and you will be able to open the item by clicking the available commands.
- Preview – A preview of the file will be displayed in the dialog box.
- Open (Read Only) – The file will be opened in its native program in read only mode. In read only mode, you cannot save changes made to the original.
- Print – A PDF form can be printed.
- Edit (click
 )
– The file will be opened in its native program. You can make and save
changes in the file.
)
– The file will be opened in its native program. You can make and save
changes in the file.
In order to preview or edit Microsoft Office 2007 files, Office 2007 or later must be installed on the computer being used.
In order to edit PDF files, you must have Adobe Acrobat installed. you cannot edit PDFs using Adobe Reader.