ImageRight PDF Printer
In other topics, we have discussed several ways images, documents, etc., may be captured in ImageRight. Generally, documents are scanned to create images or PDF files in ImageRight. Documents, for example, word processing documents, outside of ImageRight may also be attached to an ImageRight file. Now we are going to look at yet another way to add PDF documents to ImageRight.
ImageRight PDF Printer may be used for printing a file outside of ImageRight into ImageRight. Typically, if you can print the item using a non-ImageRight application, you can use ImageRight PDF Printer to convert the item to a PDF document and add it to ImageRight.
If you are printing an e-mail message with attachments into ImageRight, you must open the attachments in their default application and follow the steps in this topic to print them. As an alternative, you can drag the attachments and add them to items being printed, as explained later.
The ImageRight Print Service must be running and in the Started status on the workstation in order to import documents into using ImageRight PDF Printer.
|
As a general rule, existing PDFs should not be imported into ImageRight using the PDF Printer. PDFs comes in all shapes and sizes. Converting an existing PDF to PDF using the PDF Printer can have unintended results, such as file size growth or quality degradation. Please consider using alternative methods for importing existing PDFs such as the Adobe Plug-In, the Microsoft Add-In, download, or drag and drop. If you encounter a scenario where the PDF Printer must be used to import existing PDFs, please submit an IDEA and contact your Vertafore account manager so we can better server your business needs. |
|
For more information about the Import dialog box discussed later, see Import Dialog Box Explained. |
- Open the file that you would like to print. In our example, we are using Microsoft Word 2010, but you should be able to adapt our steps easily for other applications.
- Click the File tab followed by Print, and then select the ImageRight PDF Printer in the printer list.
- In the list of available printers, select ImageRight Printer.
- Click Print.
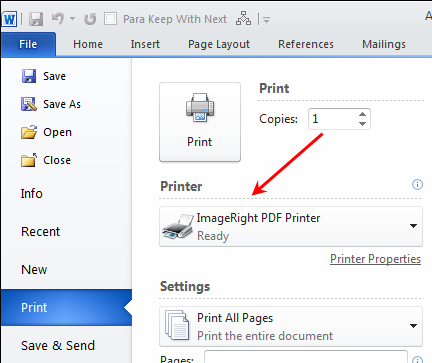
- The items being printed will be converted to a PDF file.
- When the
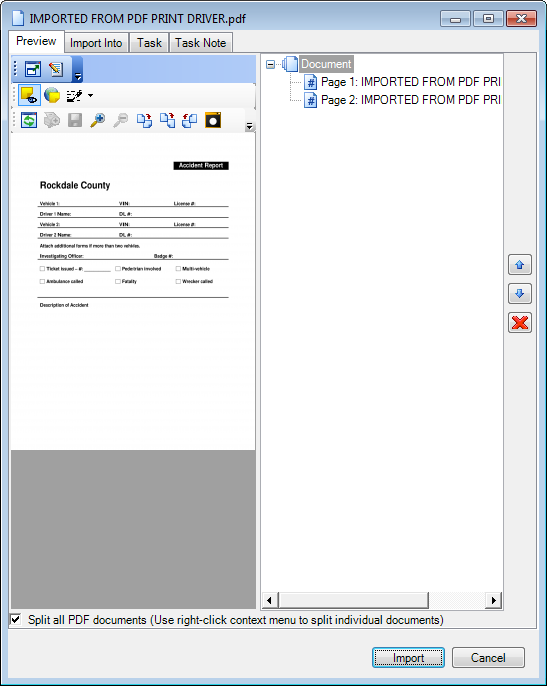
Import dialog box opens, you are ready to configure the filing
options to be applied. The items that are being imported appear in the
on the right side of the Preview tab. You can:
- Change
the order of items. Select the item to be moved and click
 (move up) or
  (move down) on the right side of the dialog box.
 - Select an item in the list and see a preview on the left side of the dialog box.
- Select
an item in the list and click
 to remove it from the list.
- Change
the order of items. Select the item to be moved and click
- You can split all multipage PDF documents being imported into separate individual PDF documents by selecting Split all PDF documents.
-
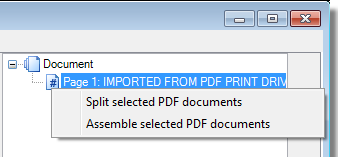
Right-clicking individual PDF documents or pages displays the following options:
-
Split selected PDF documents – splits the selected multipage PDF documents into separate individual PDF documents
-
Assemble selected PDF documents – combines multiple individual PDF documents into a single PDF document
-
- You can
redact an image before it is imported. Click
 to use
the redaction tool. For more information about redacting an image, see
Redact Image. It is important to note that
when you complete the import of an image that you redacted, a copy of
the original image is not created. Only the redacted image will be viewable
in Desktop.
 - On the Import Into tab, you select the options related to the file structure, that is, the options that direct where the items will be filed.
- In the
File info pane, select the destination where you would like to place the
items.
- Current file and position
- Current file
- New file
- New temporary file
- Existing file
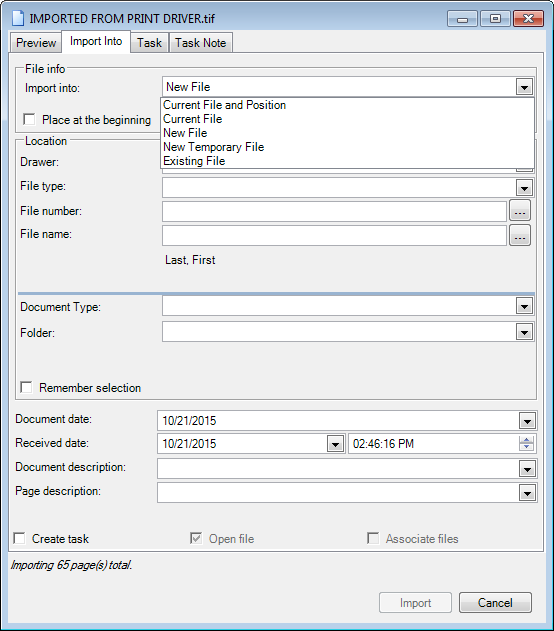
- With the Current file or Current file and position option selected, select Place at the beginning, and the item will be placed at the beginning of the file (the first document in the first folder).

- In
the Location pane, select the file structure related information that
you would like applied to the imported document.
- Drawer
- File type
- File number
- File name
- Document type
- Folder
- If you would like to change the document date on the items, enter the new date value in the Document date box. You can click the arrow and select the date from a calendar.
- If
you want to change the received date and time, enter the new date and
time values in the Received date boxes. Typically, the date and time are
updated to reflect the date and time e-mail messages were received.
- You can type the new date value or click the arrow and pick the date from a calendar.
- You can type a new time value or use the arrows to set the time.
|
If you have selected the option in Desktop Settings to split imported content into multiple documents, the document date and the received date cannot be changed when you are importing multiple documents. |
- As needed, you can enter a description in the Document description or Page description boxes. The entered descriptions will be displayed in Desktop, replacing the system generated descriptions. The display of the entered document description is optional and is turned on in File Tree Options.
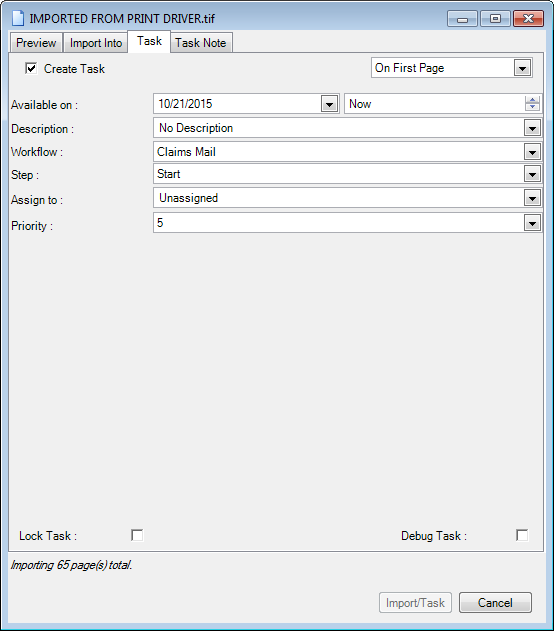
- Select the Create task option to create a task related to the item being imported. Selecting this option updates the same option on the Task tab. The workflow, etc., selected on the Task tab, as explained later, will dictate where the task is created.
- On the Task tab, select the Create task option if you would like to create a task on the document being imported. Selecting this option updates the same option on the Import Into tab.
- Enter
(select from the lists) the following information:
- On first page
- On the document
- Available on (date and time)
- Description
- Workflow
- Step
- Assign to
- Priority
- Lock task
- Debug task
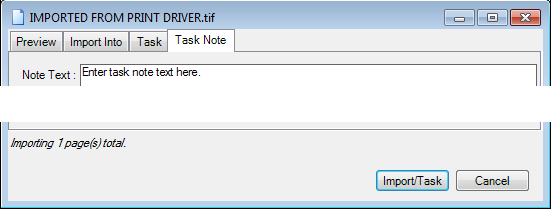
- On the Task Note tab, you can add an optional note to the task.
- Click Import (Import/Task) to complete the import process. Click Cancel to end the import process.
You can print multiple items in one action after the Import dialog box opens and the Preview tab is displayed by doing one of the following:
- Open the second item to be printed, and then print the item as explained earlier. The second item will be added to the Preview tab. You can repeat this action until all items are added.
- Drag items from outside ImageRight, files, e-mail messages, e-mail attachments, etc., to the list of items on the Preview tab.
Items you add to the Preview tab will be:
- Displayed based on whether you have elected to split imported content as explained in Import Dialog Options. The items added may be treated as separate documents, or they me be added to the existing document.
- Appended to any existing items.
- Be in their native format, that is, the items will not be converted to another format.