Once you have performed a basic search on the Submission Log tab, as described in Admin Clearance, you may find that you need to enter a new submission. In the steps below, we show you how to enter a new submission in Admin Submission Entry.
- In Admin Submission Entry, click New.

- Perform
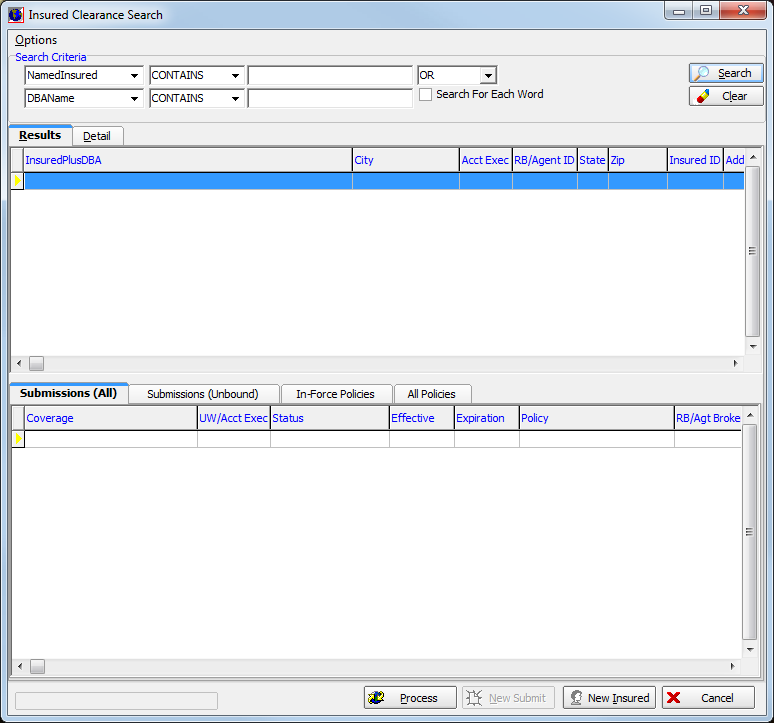
a clearance search as explained in Insured Clearance Search.
- If the insured does not already exist in your AIM system, click New Insured and add the insured as described in New Insured.
- Once the insured is located or added, click New Submit to create a new submission.

- On the
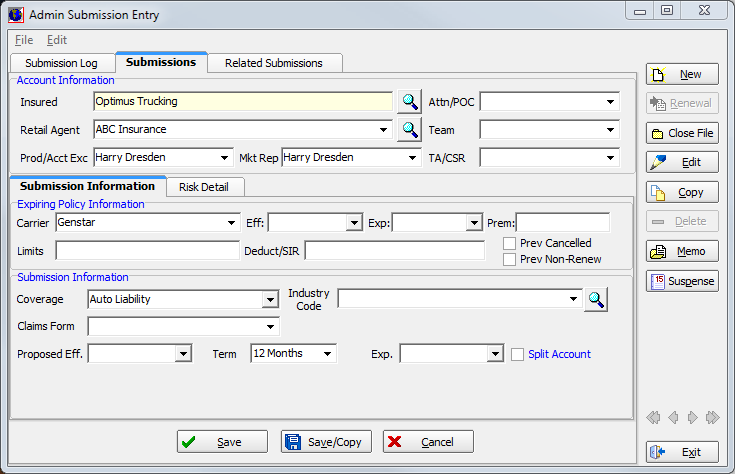
Submissions tab, enter the following information:
- Insured – name of the insured (automatically
populated). Click
 to change the insured's
name and
address.
 - Attn/POC – to the attention of or point of contact
- Retail Agent – select the retail
agent or click
 to search
for a retail agent/broker(see Understanding Searches in AIM)
 - Team – team within your agency to which the submission is assigned
- Prod/Acct Exc – product or account executive assigned to the submission
- Mkt Rep – market rep
- TA/CSR – technical assistant or customer service representative
- Insured – name of the insured (automatically
populated). Click

- On the
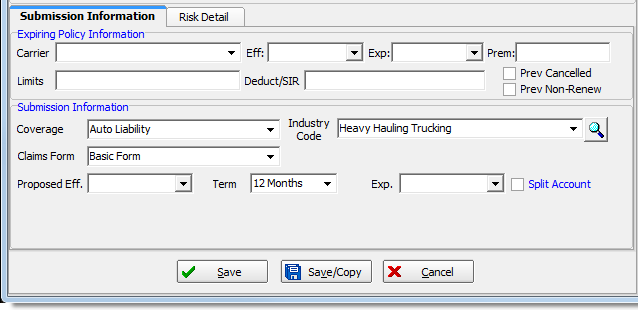
Submission Information tab, enter the following information about the
expiring policy, if applicable:
- Carrier – carrier of the expiring policy
- Eff – effective date
- Exp – expiration date
- Prem – premium amount
- Limits – policy limits
- Deduct/SIR – deductible/self-insured retention
- Prev Cancelled – previously cancelled
- Prev Non-Renew – previously marked as non-renewable
- In the
Submission Information pane, enter information about the new submission.
- Coverage – coverage being quoted
- Industry Code – standard industry
classification, if applicable.
Click to search for a specific code.
 - Claims Form – type of claim form to be used, if applicable
- Proposed Eff. – proposed date that
the policy would become effective (Click
 to use
the Calendar.)
 - Term – length of policy
- Exp. – expiration date of the policy
(Click
 to use the Calendar.)
 - Split Account – used only for reporting purposes

- Click
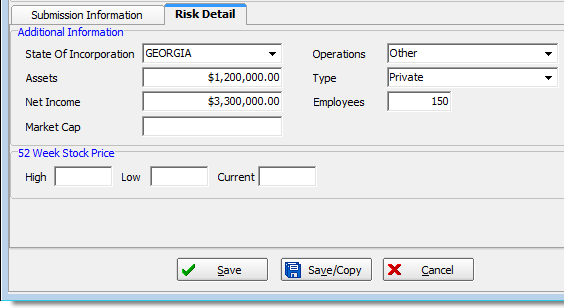
the Risk Detail tab and enter any applicable information about the risk
in the spaces provided.
- State of Incorporation – state in which the risk is incorporated
- Operations – type of operation; list of operations is a lookup code maintained in Data Maintenance Utility
- Assets – insured's financial assets
- Type – type of entity
- Public – publicly traded
- Private – privately owned
- Net Income – insured's annual net income
- Employees – number of employees employed by the insured entity
- Market Cap – insured's market capital
- In the
52 Week Stock Price pane, if the entity is publicly traded, enter information
about the track of stock prices for the past 52 weeks.
- High – 52 week high
- Low – 52 week low
- Current – current stock price at the time of submission
- Click
Save to save your changes, or click Save/Copy to save your changes and
copy submission details into a new submission.
Alternatively, you can click Cancel to abandon your changes and close Admin Submission Entry.
