You can use the Search command to search for documents, files, folders, or tasks based on criteria that you define, for example, the file type or document type. You might use this command if you are searching for an incoming fax that had been indexed incorrectly. You can set specific criteria, search for the files matching the criteria, and when the search is complete, you can review the list of results to locate the document.
For the most part, the entry of the search criteria as explained later is optional. However, we suggest that you enter all the known criteria to narrow your search, which will help improve system response time.
|
You can also use the search functionality described here in the File Open dialog box. Just open the File Open dialog box, click the Search tab, and follow our examples here. |
- On the File menu, click Search to open the Search dialog box.
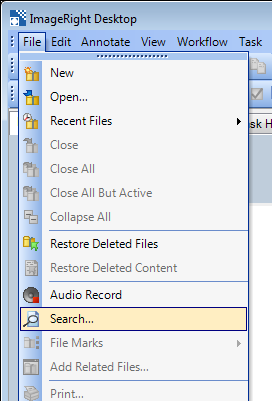
- Click the Search tab if it is not already displayed.
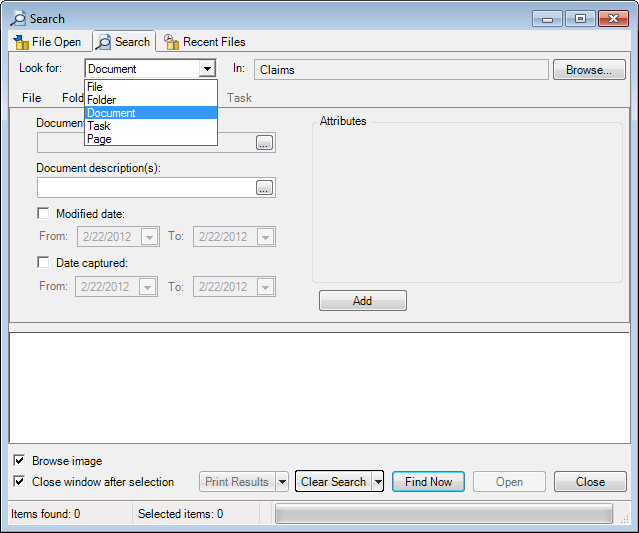
- Select the item you would like to search for in the Look for list. In our example, we are going to select Document. You can modify our steps easily to search for files, folders, and tasks.
- The In box designates the locations and drawers in your ImageRight system that you want to search. Click the Browse button to open the Select Locations and Drawers dialog box.
- In Select Locations and Drawers:
- Select
the appropriate locations, indicated by
 . You can
select multiple locations in the list.
. You can
select multiple locations in the list. - Click OK to save your selections. Click Cancel to dismiss the dialog box without saving your changes.
- Click Clear All to remove all selections and start over.
- Select
the appropriate locations, indicated by

- Click
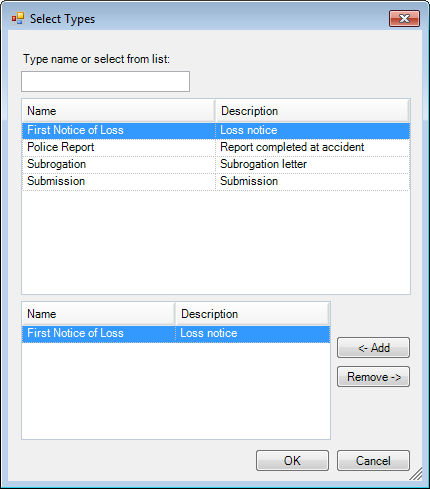
 in the Document types list to open the Select Types
dialog box.
in the Document types list to open the Select Types
dialog box.- The available
document types are listed in the top portion of the dialog box. To add
a type to your search criteria, select it and click the Add button. You
can:
- Type the name of the document in the Type name or select from list box to narrow your search of the list. When the matching document is highlighted, click it to select it.
- Double-click a document type to add it as search criteria.
- Select multiple document types using Shift+click or Ctrl+click. With multiple documents selected, you can click Add to add them to the bottom portion of the dialog box with one action.
- Remove a document type from the criteria. Select it in the bottom list and click Remove, or simply double-click the document.
- Click OK to save your changes or Cancel to return to without saving changes.
- The available
document types are listed in the top portion of the dialog box. To add
a type to your search criteria, select it and click the Add button. You
can:
- You can
type the document description in the Document description box.
- This is not the document name. For example, the document name might be First Notice of Loss, and the description might be Loss notice.
- You can type multiple descriptions. Multiple descriptions must be separated by a semicolon (;).
- Alternatively, you can click
in the Document description box to open the Add
String Values for Search dialog box.
- Type the descriptions (one at a time) in the Type value box and click Add.
- To remove a description from the search criteria, open the Search String List dialog box, select the description, and then click Remove.
- Click OK to save your changes or Cancel to return without saving changes.

- You can
define these date criteria.
- Modified date – date the document was last modified (changed).
- Date captured – date the document was added to ImageRight.
- To change
the dates, select the appropriate check box and do one of the following:
- Select the date value to be changed and type the new value.
- Select the date value to be changed and use the arrow keys to set the new value.
- Click the arrow to open a calendar and select the date on the calendar. Click the arrows at the top of the calendar to move through the months.

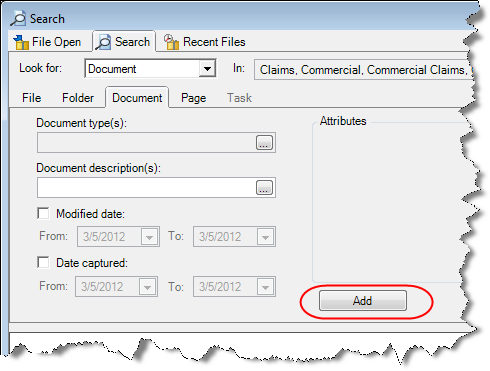
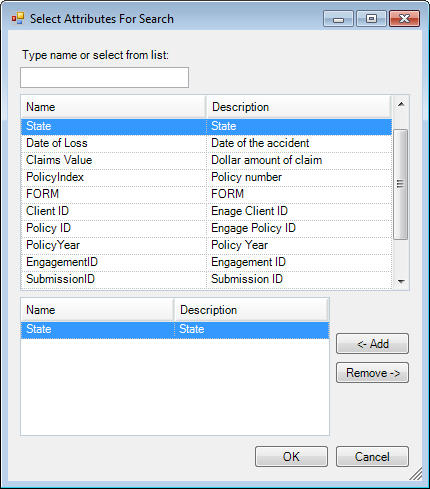
- To base
your search on one or more attributes, like agent name, used by your organization,
click the Add
button under the Attributes pane to open the Select Attributes for
Search dialog box. You will see all the attributes for all levels (document,
file, folder, etc.) However, the search will be based on the level specific
attributes. In other words, you cannot search for a document based on
a file level attribute. You can:
- Type the name of the attribute in the Type name or select from list box to narrow your search of the list. When the matching attribute is highlighted, click it to select it.
- Click an attribute to select it.
- Use Shift+click or Ctrl+click to select multiple attributes.
- Click Add to add selected attributes to the bottom portion of the dialog box, that is, the search criteria.
- Select an attribute in the bottom list and click Remove to remove it from the criteria.
- Click OK to save your changes.
|
The ability to encrypt attributes was added in ImageRight 6.4. If you are searching for an encrypted attribute, you must enter the exact value. Wildcard searches will not find encrypted attributes. |
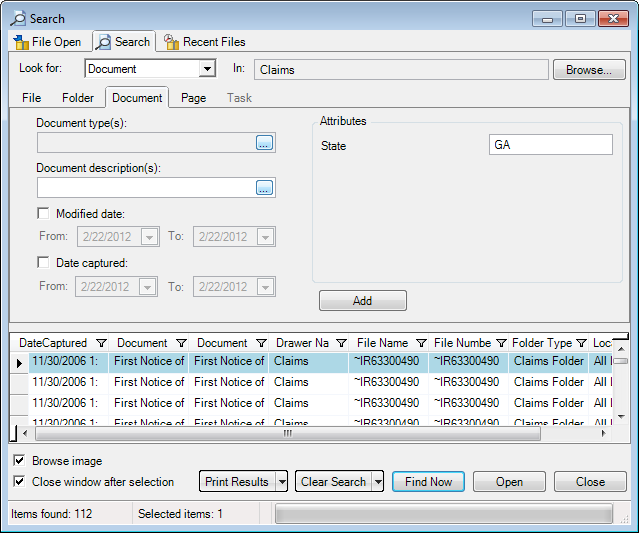
- The added attribute will appear in the Attributes pane. Enter the value of the attribute to be used as criteria.
- Click the Find Now button to execute your search. Files that have documents matching the criteria will be displayed in the results list.
|
When attributes are used in search criteria, files that contain only system-defined, default attribute values will not be returned in the search results. Search results will include those files in which the attributes have been updated manually, for example, using Set Task Attributes (see Set Task Attributes on the To Do List Tab) or by entering the attribute when the file is created. |
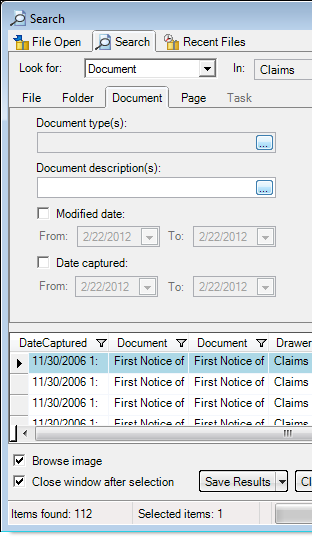
Once the list of files that matches your search criteria is displayed, you will find this information helpful.
- To open a file in the list, select it and click the Open button. As an alternative, you can double-click the file.
- To open multiple files, select them using Shift+click or Ctrl+click, and then click Open.
- Select the Browse image option, and you can view the first image in the file that you select in the list.
- Select Close window after selection, and the Search dialog box will close after you open a file. Uncheck the option to retain the dialog box for further use.
- Two counts of items found and items selected are displayed in the status bar.
- You
can:
- Clear all your search criteria and start over by clicking the Clear Search button. If you don't see the button, click the arrow next to Clear Tab and select Clear Search.
- Clear the search criteria on just the tab being viewed by clicking the Clear Tab button. If you don't see the button, click the arrow next to Clear Search and select Clear Tab.
- Filter the list as explained in Show Filters.
- Customize the appearance of the columns as explained in Change the Column Layouts.
Print or Save Search Results
You can print or save the list of results displayed in the File Open or Search dialog box. In our example, we are going to explain the steps to use in printing the search results. You can easily adapt our steps as needed to print the list in the File Open dialog box.
- Click the Print Results button to open the Print dialog box. If you do not see the Print Results button, click the arrow next to Save Results and select Print Results.
- In the Page settings pane, enter the name of the report in the Title box and an identifiable description in the Description box. The date and time the report is generated will be entered automatically on the printed report.
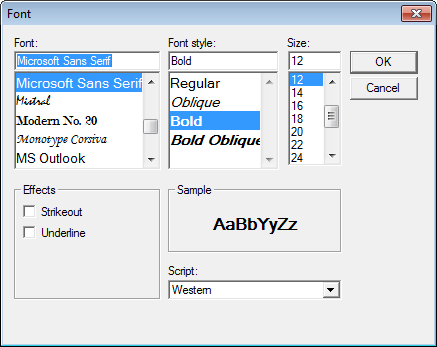
- You can
change the font and font style used in the report. Click the appropriate
button to open the Font dialog box.
- Header Font selections will be applied to the report name, description, and date and time.
- Grid Font selections will be applied to the column headings and rows of the report.

- Select the appropriate options (font, style, size, etc.) in the Font dialog box.
- Click OK to save your font settings.
- Select the Show grid lines option if you would like lines between the rows of data.
- Select Alternate grid row colors, and every other row of the report will be shaded with a color.
- In the Printer settings pane, select the paper orientation.
- Click Print to continue or Cancel to return without printing the report.
- In the Windows Print dialog box, select the printer that you want to use, adjust the properties, the print range, and the number of copies as needed.
- Click Properties to configure the properties of the printer, for example, color or black and white printing, just as you would for any document being printed. The preferences that you can configure are dependent on the printer software and are not related to Desktop functionality; therefore, we are not going to explain the details.
- Click OK to complete the report.

In our next example, we are going to explain how to save the search results list.
- Click the Save Results button. If you do not see the button, click the arrow next to Print Results and select Save Results.
- In the Save As dialog box, locate the folder in which you would like to save the file.
- Type a name in the File name box.
- Select the file type in the Save as type box.
- Click Save to save the file or Cancel to return without saving the changes.

More Search Options
When you select an item to search for in the Look for list, you can narrow your search further by entering criteria on the tabs listed below as well.
- File
- Folder
- Page
The steps for entering the criteria on these tabs are essentially the same as those explained earlier; therefore, to eliminate redundancy, we have intentionally omitted the detailed steps in our discussion of the tabs.
It is important to note that the use of keyword lookup criteria, for example, note keywords, is possible only if your organization has implemented ImageRight Keyword lookup.
On the File tab you can enter these search criteria:
- File type
- File number
- File name
- Note keyword
- File status (permanent, temporary, or both)
- Attributes
The file number area always displays three boxes.
- If your organization does not use multi-part file numbers, you should use the first box for input of the number.
- If your organization uses or has ever used multi-part file numbers (one to three parts), you can use all three boxes.

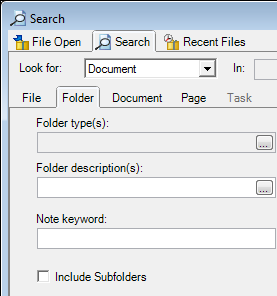
On the Folder tab, you can enter these search criteria:
- Folder type
- Folder description
- Attributes
- Note keyword
- Include subfolders
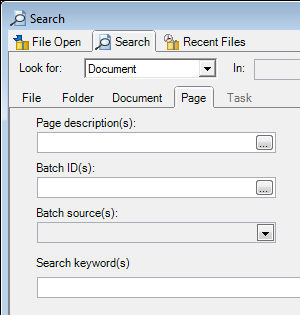
On the Page tab, you can enter these search criteria:
- Page description – text that defines a page of a document.
- Batch ID – system-generated number associated with documents when they are added to ImageRight. Often used to search for batches of documents that were scanned into ImageRight.
- Batch Source – identifies the source of documents when they were added to ImageRight, for example, scanner or e-mail.
- Search key words – text on a page,in a note, or in an annotation that can be used as search criteria. For more information about using key words to define your search criteria, see Keyword Lookup.
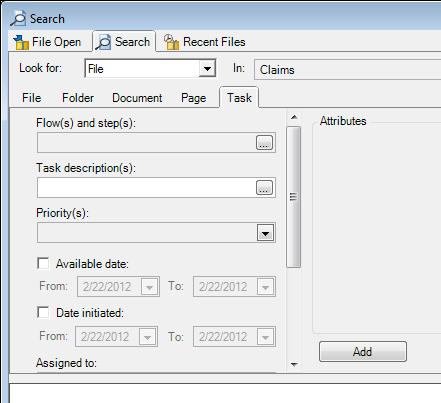
On the Task tab, you can enter these search criteria:
- Flow (workflow) and step – workflow and step where the task is located.
- Task description – text description of task or work to be done.
- Priority – level of importance for task (0 – highest to 9 – lowest)
- Available date – date the task was available to you.
- Date initiated – date the task was created.
- Assigned to – name of the ImageRight user to whom the task is assigned.
- From flow and step – workflow and step where the task was located before it entered the current workflow and step.
- From user – the name of the person who last released the task.
- Task status – current status of task (ready to be processed, in error status, and both).
- Attributes – user-defined data typically used to identify or store specific information.
For more information about searching for tasks, see Task Search.