| This feature, or some fields and options described, might not be available depending on your settings, security rights, or platform package. |
Use the Checks data entry form to issue checks, record EFT's (Electronic Funds Transfers), or to enter handwritten checks. As with receipts and journal entries, you can access checks from a number of different places in the system, based on the type of check you are creating.
The Bank Center can be used to issue one or many checks to various payee types. To open a Bank Center Check form:
In the Bank Center open the bank account where the checks are to be issued.
Select New Check from the Actions menu. The Bank Center Check form displays.
Select a Pay To type from the list. If the payee is an Insured, enter a few letters of the insured's name in the Name field and click the Search link to locate the appropriate customer account.
Tab to the Name field and make a selection.
Tabbing out of the Name field displays the available vouchers for the payee type selected in step #3.
Open the voucher section representing where in the general ledger the non-bank portion of the check should be recorded. Using section menu options of New or Edit, or type-in-grid functionality, if available, complete the desired voucher sections.
Click Post and New to post the check and activate another blank check form, or click Post to post the check and close the form. If you want to post and print the check, click Post and Print.
ALT+F; N for Post and New.
ALT+F; P for Post.
ALT+F; R for Post and Print
See Section Descriptions later in this topic for more details about voucher sections.
The following voucher sections are available depending upon the selection made from the Pay To list, in the General Information section.
|
Pay To |
Voucher Sections |
|
Broker |
|
|
Brokerage Company |
|
|
Employee |
|
|
Fee Company |
|
|
Finance Company |
|
|
Insurance Company |
|
|
Insured |
|
|
Other |
|
|
Vendor |
|
You can access the Check form from many places throughout AMS360. Where you are when you access a check form controls what voucher sections display and what choices you have about where the check posts in the general ledger.
Depending on which center you are working in when you decide a check should be created, you may be able to generate the appropriate check without opening the Bank Center.
Following are examples of types of checks and the system location where they are commonly created:
|
If the payee is... |
and the check is for... |
access the check form by... |
|
Customer |
|
Customer Center
Customer Register Option
|
|
Company - Direct Bill Deposit for a Single Customer |
Payment of funds to a company for a Direct Bill Deposit transaction. An alternate workflow is available to create a check to the company immediately after posting the Direct Bill Deposit receipt. See the Receipts topic for more information. |
|
|
Company - Direct Bill Deposit for Multiple Customers |
Payment of funds to a company for Direct Bill Deposit amounts for multiple customers. |
|
|
Broker |
|
Pay Commission Statement(Gross Brokersonly) Pay Commission Statements for gross brokers are prepared and processed just like Employee Commission Statements. Checks associated with these statements are created as part of the Pay Statement process. |
|
Insurance/Brokerage/ Fee Company (Agency Bill) |
Premium payments to companies on agency bill invoices/statements. |
Pay Account Current
|
|
Insurance/Brokerage Company (Direct Bill) |
Checks issued to insurance/brokerage companies to refund commission over-payments, or return commissions. |
|
|
Finance Companies |
Payments due to finance companies for finance company receivables. |
|
|
Employee |
Payments to employees for salary, expense reimbursements or draws against future commission. |
|
|
Vendor |
Payments to vendors entered in Vendor Setup for agency operating expenses. |
|
Creating a check involves entering general information about the check such as the bank the check is drawn on, the check number, the payee and other descriptive information.
|
Fields |
What is this? |
|||||||||||||||
|
Date |
Using the Date Picker, enter or select the Date you want the check to post to the general ledger. The current system date defaults. Depending on the type of check, close attention should be paid to the Date field:
|
|||||||||||||||
|
Account Balance |
Click the button to display the current bank account balance posted to the general ledger. |
|||||||||||||||
|
Type |
Select the appropriate check Type you are entering:
When entering and posting a handwritten check, the Handwritten option opens the Check # field. Type the check number and issue date from the check, to insure a proper audit trail. |
|||||||||||||||
|
Bank |
If the Check form is accessed from the Bank Center, the bank defaults from the bank selected in the Bank Center and cannot be changed. If the bank displayed is incorrect click Cancel If the Check form is accessed from other than the Bank Center, select the desired bank. |
|||||||||||||||
|
Pay To |
Select the Pay To from the list provided. Your selection in this field populates the Name list. If the Check form is accessed from the Bank Center, this field defaults as blank. If it is accessed from other than the Bank Center, this field defaults based on the center and the entity selected in that center. Example If a fee company was selected in the Company Center, then the Pay To would default to Fee Company. Choose Other to issue a check to a one-time or infrequent payee that is not in the agency's database. When selecting Other as the Pay To type the Name list box disappears indicating you need to enter the payee's name and address in the appropriate fields. When the Pay To is a Company, the Co Address field appears. so you can select which address to use for the check. The company types are:
|
|||||||||||||||
|
Name |
|
|||||||||||||||
|
Co. Address |
When the Pay To is a Company, the Co Address field appears. Select which address to use for the check.
|
|||||||||||||||
|
Pay to the Order of |
The Pay to the Order of field defaults from the Name field for the Broker, Employee and Vendor Pay To's and from the Co. Address for the company Pay To's, but can be changed. For the Pay To type Other, type in the Pay to the Order of and Address. |
|||||||||||||||
|
For |
Information in this field prints on the check as a description line below the payee name and is also available as a displayed field in certain accounting features and reports. When the check Type is standard or handwritten, the default description is Trust Check or Operating Check, depending upon whether the bank type, for the selected bank in Bank Setup, is a trust or operating account. If the check Type is EFT, the default description is EFT. Change this description line to make the information meaningful to the check recipient, such as an invoice number or date. |
|||||||||||||||
|
Memo |
This is a free-form description field. Information entered here prints on the 'tear-off' voucher part of the check and is available in certain accounting reports such as the Cash Disbursement Journal. |
|||||||||||||||
|
Check # |
Defaults based on the Type selection:
|
|||||||||||||||
|
Amount |
This field is calculated based on the total of the amounts entered in the voucher sections of the check. See the Available Voucher Sections discussion later in this topic for more information. This field is display only and can be altered only by editing a voucher row amount before check posting. |
One or more of the following voucher sections are available when entering/posting a check. The voucher section controls the general ledger posting of the non-bank account portion of the check.
Use this voucher section to attach a Ready to Pay account current statement to a check with a Pay To of an Insurance, Brokerage, or Fee Company. Posting the check clears the company payable for all invoices included in the statement.
General ledger account numbers available for posting depends upon the Pay To type:
|
Pay To |
General Ledger Account Number |
|
Insurance Company |
#21111 - Accounts Payable to Insurance Companies. |
|
Brokerage Company |
#21112 - Accounts Payable to Brokerage Companies. |
|
Fee Company |
#21119 - Accounts Payable to Fee Companies. |
The grid fills with any account current statements with a status of Ready to Pay for the company selected in the Name field.
|
Option/Checkbox |
What is this? |
|
Select All |
Click the button to place a check mark in the Pay column for all of the account current rows in the grid. |
|
Clear All |
Click the button to remove all check marks in the Pay column for all of the account current rows in the grid. |
|
Display All Statements |
Check this box to display ready-to-pay account current statements for all companies. This feature is handy if you want to pay more than one company on a single check. |
|
Refresh |
At times it may become necessary to refresh the Account Current grid. To refresh click the |
|
Pay |
Check the box to attach an account current statement to the check. |
You can also pay a Ready to Pay account current, by opening the account current from the Financial Center and selecting one of the pay options from the Pay Statement section.
This voucher section is available when the Check form is accessed from the Employee or Broker centers, or accessed from the Bank center with the Pay To equal to Employee or Broker. Posting the check clears the employee or broker payable for all invoices included in the statement.
General ledger account numbers available for posting depends upon the Pay To type:
|
Pay To |
General Ledger Account Number |
|
Employee |
#21131 - Commissions Payable - Agency Business |
|
Broker |
#21135 - Commissions Payable - Broker Business |
The grid fills with any commission payable statements with a status of Ready to Pay for the employee or broker selected in the Pay To field.
|
Option/Checkbox |
What is this? |
|
Select All |
Click the button to place a check mark in the Pay column for all commission statement rows in the grid. |
|
Clear All |
Click the button to remove all check marks in the Pay column for all commission statement rows in the grid. |
|
Display All Statements |
Check this box to display ready to pay commission statements for all employees or all brokers. This feature is handy if you have created more than one account for an employee or broker, and want to pay one or more of these commission statements on one check. |
|
Refresh |
At times it may become necessary to refresh the Pay Commission grid. To refresh, click the |
|
Pay |
Check the box to attach a commission statement to the check. |
You can also pay a Ready to Pay commission statement, by opening the commission statement from the Financial Center and selecting one of the pay options from the Pay Statement section.
When entering a check involving a receivable account, the key step is locating the customer/broker/finance company's invoice balance to which the check is to be applied. See the sections below for more information.
The default option is Non-Zero Balance Items Only. All open invoices for the selected insured display in the grid, regardless whether the invoices are brokered or non-brokered.
Check the Auto Fill box to plug the Invoice Balance into the Amount column. A default description is also entered. These fields can be changed if desired.
Invoice rows displaying in the grid as 'grayed out' are disabled because they do not match the bank's division selected in the General Information section.
To apply a check against a closed invoice (one with a zero balance), select the All Invoices Since option, and enter a specific as of date. Click Get Data and AMS360 returns all invoices for the insured from the selected date to the current system date.
Enter the check payments to the appropriate invoices in the type-in-grid.
Invoice rows displaying in the grid as 'grayed out' are disabled because they do not match the bank's division selected in the General Information section.
Click Add On Account on the section menu to apply a check to an insured's accounts receivable without attaching it to a specific invoice.
Enter the Amount to apply on account, a meaningful Description and...
Leave the Policy field blank to apply on account money at the customer level.
Select a policy from the Policy list to apply on account money at the customer/policy level.
To write one check clearing receivables on more than one customer account, do the following:
In the General Information section, select the customer to whom this check is to be made payable.
In the Insured Accounts Receivable section, for the customer selected above, apply money to the appropriate invoices.
Then, search for the second customer in the Insured Accounts Receivable section. The voucher section for this customer refreshes with the invoices belonging to the new customer. Apply money to the appropriate invoices.
Continue in this fashion until all invoices for all applicable customers are applied.
You can also apply money on account if no specific invoice is involved.
When all customer/invoices are applied and the check amount is positive, Post as usual.
The default option is Non-Zero Balance Items Only. All open invoices for all customers of the selected broker appear in the grid. Enter the check payments to the appropriate invoices in the type-in-grid. Invoice rows displaying in the grid as dimmed' are disabled because they do not match the bank's division selected in the General Information section.
If you wish to see receivable balances for a specific customer of the selected broker, click the column filter arrow ![]() on the Customer grid column and select the desired customer name.
on the Customer grid column and select the desired customer name.
To apply a check against a closed invoice (one with a zero balance), select the All Invoices Since option, and enter a specific as of date. Click Get Data and AMS360 returns all invoices for the broker from the selected date to the current system date. Enter the check payments to the appropriate invoices in the type-in-grid.
Invoice rows displaying in the grid as 'grayed out' are disabled because they do not match the bank's division selected in the General Information section.
Click Add On Account on the section menu to apply a check to an insured's accounts receivable without attaching it to a specific invoice.
Enter the Amount to apply on account, a meaningful Description and then do one of the following:
Leave the Customer and Policy fields blank to apply on account money at the broker level.
Search for a Customer to apply on account money at the broker's customer level.
Search for a Customer and select a Policy from the list to apply on account money at the broker's customer/policy level.
In the Display group, select the applicable finance company. The default option is Non-Zero Balance Items Only. This displays all open invoices for the selected finance company. Enter the check payments to the appropriate invoices in the type-in-grid.
Invoice rows displaying in the grid as 'grayed out' are disabled because they do not match the bank's division selected in the General Information section.
If you want to see receivable balances for a specific customer of the selected finance company, click the column filter arrow ![]() on the Customer grid column and select the desired customer name.
on the Customer grid column and select the desired customer name.
To apply a check against a closed invoice (one with a zero balance), select the All Invoices Since option, and enter a specific as of date. Click Get Data and AMS360 returns all invoices for the finance company from the selected date to the current system date.
Enter the check payments to the appropriate invoices in the type-in-grid.
Invoice rows displaying in the grid as dimmed are disabled because they do not match the bank's division selected in the General Information section.
Click Add on Accounton the section menu to apply a check to a finance company's accounts receivable without attaching it to a specific invoice.
Enter the Amount to apply on account, a meaningful Description and do one of the following:
Leave the Customer and Policy fields blank to apply on account money at the finance company level.
Search for a Customer to apply on account money at the finance company's customer level.
Search for a Customer and select a Policy from the list to apply on account money at the finance company's customer/policy level.
Occasionally you may receive a direct bill commission statement from one of your companies that reflects a credit balance due the company. If activity with this company is limited, you may be required to issue a return commission check.
If your agency uses the Direct Bill Statement method in AMS360 to invoice direct bill activity, first build the statement and then reconcile it to reflect the correct return commission amount due to the carrier. The statement posts to account #11241 or #11242
Then use the Direct Bill Commission Receivables voucher section to issue the refund check.
If Insurance Company is the Pay To selection, GL account #11241 defaults as the posting account.
If Brokerage Company is the Pay To selection, GL account #11242 defaults as the posting account.
Posting a direct bill return commission check to your insurance company via the Direct Bill Commission Income section, assumes you do not bill your direct bill business on AMS360.
Account numbers available for posting depend upon whether the Pay To is an insurance or brokerage company:
#40121 - P&C DB Commission Inc - Insurance Company
#40221 - L&H DB Commission Inc - Insurance Company
#40321 - Other DB Commission Inc - Insurance Company
#40421 - FS DB Commission Inc - Insurance Company
#40122 - P&C DB Commission Inc - Brokerage Company
#40222 - L&H DB Commission Inc - Brokerage Company
#40322 - Other DB Commission Inc - Brokerage Company
#40422 - FS DB Commission Inc - Brokerage Company
|
Fields |
What is this? |
|
Amount |
Enter the amount of the direct bill return commission payment to the company. |
|
Branch |
Since the accounts in this business unit are income accounts, select a Branch (if turned on in your agency) for this transaction. |
|
Department |
Since the accounts in this business unit are income accounts, select a Department for this transaction. |
|
Group |
Since the accounts in this business unit are income accounts, select a Group (if turned on in your agency) for this transaction. |
Use the Direct Bill Deposit section, to issue a check to an insurance/brokerage company, against an already posted direct bill deposit receipt.
Find the customer in the Customer Center. Select Actions > New Receipt and enter the direct bill deposit receipt through the Direct Bill Deposit voucher section.
These monies are posted to general ledger account #21121-DB Deposits Payable - Insurance Companies or #21122 - DB Deposits Payable - Brokerage Companies.
Click Post. An AMS360 message appears asking if you want to immediately create a check to the company for the direct bill deposit.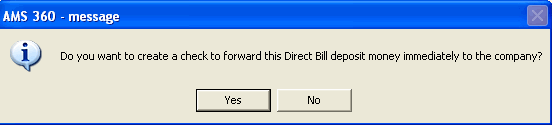
Click Yes. This opens the Direct Bill Deposit Check form with the correct General and Direct Bill Deposit information prefilled.
Review and Post.
You can also initiate a direct bill deposit check to a company for multiple direct bill deposit receipts. This type of check through the Company Center, utilizes the Direct Bill Deposit voucher section and gathers all direct bill customer receipts that match the check's company and division.
From the Company Center, with the company open, click Actions > New Check. The company's name and address default.
Open the Direct Bill Deposit section.
Click Pay All Balances to default the receipt balance for all direct bill deposits into the Amount column, along with a default Description.
Use the type-in-grid to edit amounts or descriptions, as necessary.
To remove a customer from the check, enter a 0.00 Amount to pay.
Zero amount customers do not post to the general ledger.
Post and print the check, as normal.
Use this voucher section to record gross salary payments made by check to your staff members.
The system defaults any general ledger account numbers between 61000 and 62000 into this grid. If you need to create additional Administrative Salaries accounts, be sure they fall within this number range.
Use this voucher section to enter draws against future salaries or commissions. Entries to this section post to general ledger #21139 and are subledgered by employee.
When the actual salaries or commission checks are paid, these draws are then deducted from the payment.
Use the Employee Expenses and Reimbursements section to record an expense or reimbursement transaction for an employee. The general ledger account is #21160 and is subledgered by employee. A few examples are:
Employee personal phone calls expense.
Dependent health payment expense
Mileage allowance reimbursement.
Continuing education reimbursement
Book reimbursement
Use this check voucher section to record taxes withheld from employee salaries or tax deposit payments made to the taxing agencies.
The system defaults any general ledger account numbered between 21210 and 21220 into this grid. If you need additional tax accounts to default for data entry, be sure they fall within this number range.
The Other GL Accounts section is available to distribute monies being paid out against general ledger accounts other than those available through more specific check sections (Insured AR, Broker AR, Employee Draw, etc.). Click New to add a voucher row, complete the necessary fields and click Update.
|
Fields |
What is this? |
|
GL # |
Select the GL # you wish to record the check to. |
|
Amount |
Enter the Amount to post to this general ledger account. This amount is generally a debit (positive) amount but can be a credit. |
|
Description |
Enter a Description for the transaction. A default description pulls to the field but can be changed to reflect information specific to the check being issued. |
|
Business Unit |
Assign the appropriate Business Unit combination to the voucher transaction line. |
|
1099 |
If this is a 1099 expense reimbursement, select the appropriate 1099 Category and Type. Questions as to whether this is a qualified 1099 expense should be directed to your agency accountant. Broker, Employee, and VendorIf the Broker, Employee, or Vendor is setup with a 1099 default, this information automatically pulls to the 1099 Category, and Type information. If necessary, this can be changed. If this is not a 1099 transaction, delete the Category and Type. |
|
GL # Required Fields |
The GL # Required Fields drop-down lists are subledger entities (customer, broker, insurance company, brokerage company, etc.). Depending upon the GL # selected, the account may require a subledger entity be chosen. If the account is subledgered, its subledger entity becomes active when the account is selected. |
To Post, or Cancel a check, click the File menu and make your selection.
|
Posting Type |
Icon |
What Happens |
|
Post and New |
|
Posts the current check and then displays a blank Bank Center Check form to facilitate entering another check. Use this option when entering a group of checks, such as for bill paying. This feature is only available from the Bank Center. |
|
Post |
|
Posts to the general ledger. See Reports - Checks for check printing instructions. |
|
Post and Print |
|
Executes the Post action, plus immediately prints the check. Make sure the proper check stock is loaded in the printer. |
|
Cancel |
|
Cancels the check action, and returns you to your point of origin. |
Multiple users of AMS360 can access the Check form and post checks while other users are simultaneously printing checks. If you are currently locked out of printing checks for a specific bank, you'll receive a system message with a Retry option. You can continue to Retry printing until the lock is clear. Otherwise, you can cancel out of the form and try again later.
Rather than entering the same data every month for the same checks, see Workflow: Copy a Check and Recurring Checks for alternative solutions.
|
My Vertafore Support | Vertafore University | NetVU Network | Vertafore.com © 2015 Vertafore, Inc. and its subsidiaries. All Rights Reserved. Vertafore, the Vertafore design, AMS360, Vertafore Producer Advantage, Producer Plus, AgencyEDGE, ReferenceConnect, BenefitPoint, Engage, and WorkSmart are registered trademarks of Vertafore, Inc. or its subsidiaries. Third party marks belong to their respective holders. AMS360 Classic Help updated 5/18/2016 10:57 PM |
