Review Rejected Appointments
Use the Review Rejected Appointments page to review state and county appointment or termination requests that did not process successfully, possibly because of a system error, user-aborted processing, or state denial. You also may elect to submit a new appointment or termination request based on a rejected request after resolving the issue that caused the processing exception.
The Review Rejected Appointments function uses a three-page, "wizard" procedure, whereupon on the first page you search within a specified time period for appointment or termination requests that were rejected, select one or multiple requests from the resulting list on the second page, and then diagnose the reason for the denial and resolve the selected requests in one way or another on the third page.
 View screen capture of transaction search
View screen capture of selected transactions
View screen capture of transaction diagnosis and resolution
To open the Review Rejected Appointments page, choose one of the following methods:
-
From the Licensing menu, select Appointments, and then select Review Rejected Appointments
-
In the Task Links section of the Producer Manager Home page, click the Review Rejected Appointments link.
The Review Rejected Appointments page contains the following sections:
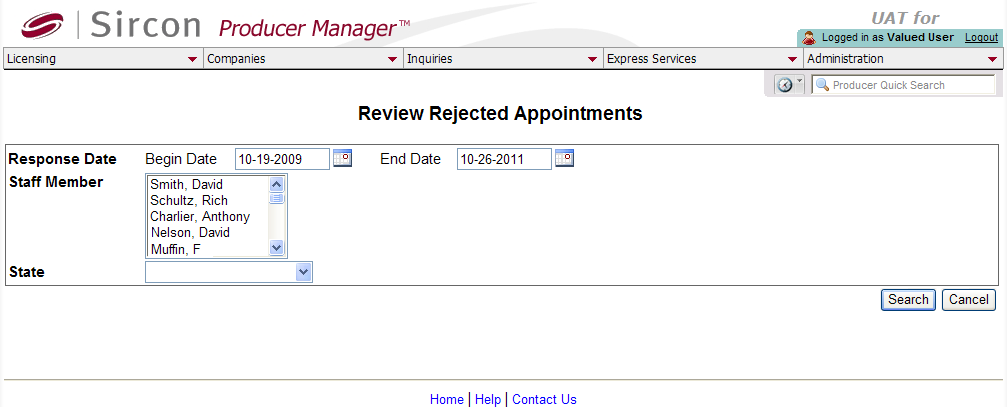
Rejected Transaction Search
Enter criteria by which to search for rejected appointment or termination transactions.
Fields and controls include the following:
-
Response Date: Required. Select a period of time during which the system encountered processing exceptions. Enter the following date criteria:
-
Begin Date: Defaults to seven (7) days prior to the current date. Enter a date representing the first date of the time period to search for processing exceptions. Or, click the Calendar button ( ) to open a popup calendar from which you can click to select a date.
-
End Date: Defaults to he current date. Enter a date representing the last date of the time period to search for processing exceptions. Or, click the Calendar button () to open a popup calendar from which you can click to select a date.
-
Staff Member: Click to select one or multiple names of staff members who submitted a rejected transaction request. Press the CTRL key and click to select multiples. Or, leave unselected to ignore staff member name as a search criterion; the system will return processing exceptions that met all other search criteria, regardless of staff member criteria.
-
State: From the dropdown menu, select the name of a state to which a transaction request was submitted but that was rejected. Or, leave unselected to ignore state name as a search criterion; the system will return processing exceptions that met all other search criteria, regardless of state criteria.
-
Search: Click to execute the search based on selected input criteria. The page will reload and open the Unresolved Rejected Appointments section.
-
Cancel: Click to abort the operation and open the Producer Manager Home page.
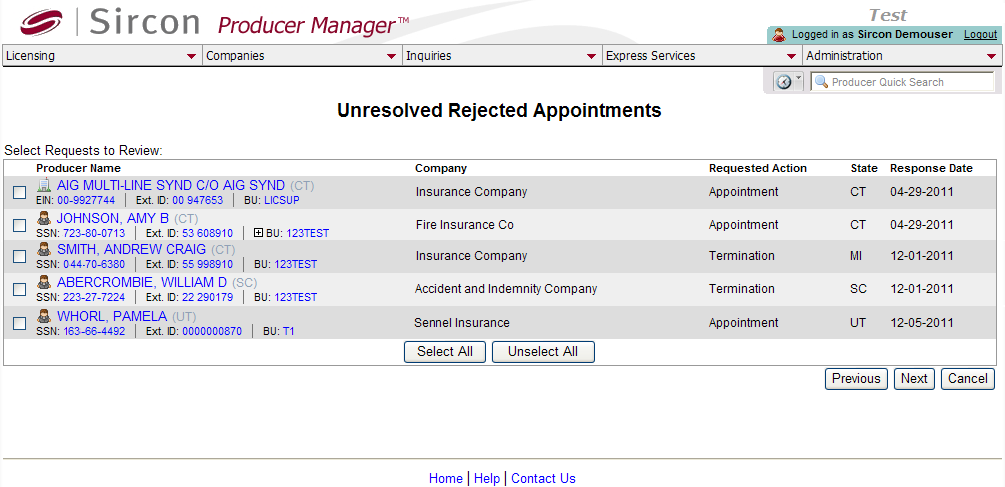
Unresolved Rejected Transactions
The Unresolved Rejected Appointments section displays a table listing all state and county appointments and terminations that met the criteria entered in the Rejected Transaction Search section. Offers a checkbox corresponding to each listed transaction, allowing you to select it for diagnosis and resolution.
If no transactions met your search criteria, the table will be empty.
Fields and controls include the following:
-
 : For each transaction listed, click to checkmark the checkbox to select it for diagnosis and resolution.
-
Producer Name: For each transaction listed, displays a producer name as a blue hyperlink. Click a desired producer hyperlink to open the selected producer's record in the Review/Update Producer page. Also displays a producer's residence state(s) codes in parentheses.
-
SSN: Individual producers only. For each transaction listed, displays a producer's Social Security Number as a blue hyperlink. Click a desired SSN hyperlink to display in the Search Results of the Advanced Producer Search page producers with the selected Social Security Number.
-
EIN: Firm producers only. For each transaction listed, displays a producer's Federal Employer Identification Number as a blue hyperlink. Click a desired EIN hyperlink to display in the Search Results of the Advanced Producer Search page producers with the selected Federal Employer Identification Number.
-
Ext. ID: For each transaction listed, displays a producer's ID code in your company's preferred external system as a blue hyperlink. Click a desired Ext. ID hyperlink to rerun the search to display in the Search Results of the Advanced Producer Search page with the selected external system ID. Available only if an ID code for your company's preferred external system is recorded for a listed producer.
-
BU: For each transaction listed, displays as a blue hyperlink the short names of the business units, active or inactive, with which a producer is associated. Click the node ( ) to expand the field to display all business units. Click the node (
 ) to collapse the information. Click a desired BU hyperlink to rerun the search to display in the Search Results of the Advanced Producer Search page associated with the selected business unit. Available only if at least one business unit is recorded for a listed producer.
-
Company: For each transaction listed, displays the name of the carrier appointing company for which the transaction was submitted.
-
Requested Action: For each transaction listed, displays the requested transaction type (e.g., Appointment, Termination, County Appointment, etc.).
-
State: For each transaction listed, displays the two-letter abbreviation or code of the state to which the transaction was submitted for processing.
-
Response Date: For each transaction listed, displays the date on which the transaction was marked as an exception, either because of a system error or state denial.
-
Select All: Click to checkmark the checkbox of all listed transactions.
-
Unselect All: Click to clear the checkmark from the checkboxes of all selected transactions.
-
Previous: Click to open the Rejected Transaction Search section. The original search criteria will persist.
-
Next: With at least one transaction selected, click to open the Diagnosis and Resolution section.
-
Cancel: Click to abort the operation and open the Producer Manager Home page.
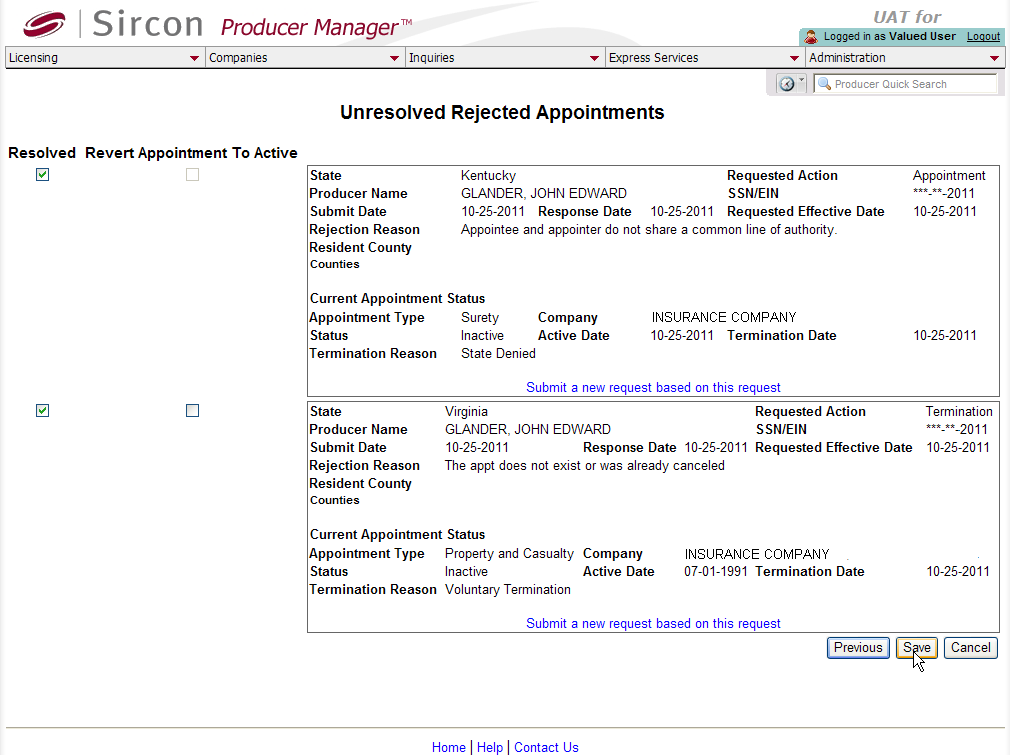
Diagnosis and Resolution
Displays details of selected rejected appointments and terminations and offers controls to resolve them on a case-by-case basis.
-
Transaction Details: For each selected transaction, displays details of selected rejected appointments and terminations. Fields include the following:
-
State: Displays the name of the state to which the transaction was submitted for processing.
-
Requested Action: Displays the requested transaction type (e.g., Appointment, Termination, County Appointment, etc.).
-
Producer Name: Displays the Last, First, and Middle name of the individual producer for whom the transaction was submitted or displays the firm Name of the firm producer for which the transaction was submitted.
-
Submit Date: Displays the date on which the transaction was submitted.
-
Response Date: Displays the date on which the transaction was marked as an exception, either because of a system error or state denial.
-
Requested Effective Date: Displays the value of the Effective Date field on the appointment or termination request.
-
Rejection Reason: Displays the system validation error message or state denial reason.
-
Resident County: Florida resident individual appointments and terminations only. Displays the name of the producer's resident appointment county.
-
Counties: Florida non-resident individual appointments and terminations only. Displays the names of the producer's non-resident appointment counties.
-
Current Appointment Status: For each selected transaction, displays details of the appointment affected by the rejected appointment or termination transaction.
-
Appointment Type: Displays the type of appointment affected by the rejected appointment or termination transaction.
-
Company: Displays the name of the appointing company whose appointment is affected by the rejected appointment or termination transaction.
-
Status: Displays the status of the appointment after being affected by the rejected appointment or termination transaction.
-
Active Date: Displays the date on which the appointment affected by the rejected appointment or termination transaction became effective.
-
Termination Date: Displays the date on which the appointment affected by the rejected appointment or termination transaction became inactive.
-
Termination Reason: Displays the reason why the appointment affected by the rejected appointment or termination transaction became inactive.
-
Resolved: For each transaction you wish to clear from the list of unresolved rejected transactions -- whether or not you have done anything to resolve or retry them -- click to checkmark the checkbox. The operation is completed when you click the Save button.
-
Revert Appointment to Active: Available for rejected termination transactions only. Click to checkmark the checkbox corresponding to an appointment that was set to a Status of Inactive (in spite of a rejected termination transaction) to reset the appointment to a Status of Active. The operation is completed when you click the Save button.
-
Submit a new request based on this request: For a rejected appointment transaction, click to open the Add Appointments page, where you can resubmit the appointment request after remedying the reason for the transaction rejection. For a rejected termination transaction, click to open the Terminate Appointments page, where you can resubmit the appointment request after remedying the reason for the transaction rejection.
-
Previous: Click to open the UnresolvedRejected Transaction section. The selected set of records will persist.
-
Save: Click to commit all changes to the system and reload the page with a confirmation message displaying.
-
Cancel: Click to abort the operation and open the Producer Manager Home page.
Notes
Note: A termination request, even one that did not process successfully, still may update the Status field of an appointment on a producer's record to Inactive. You can reset the Status of an appointment that was inactivated by a failed termination request by clicking to checkmark the Revert Appointment to Active checkbox, and then clicking the Save button. Be aware that doing so might put your producer data out of synchronization with state data.
Note: Depending on the regulations of the appointment state, your company may incur duplicate transaction fees when you resubmit a transaction that the state had rejected earlier. Contact the state department of insurance for details.
Note: The Review Rejected Appointments page can be Vertafore-configured using the RVW_RJCT_ELEC_APPTS_ONLY_IND business rule to display only appointment or termination requests that were submitted electronically and disinclude those with a "Paper" submission method, such as for requests directed to Vertafore Outsourcing Services. For more information, see Configuration Options or consult your Vertafore representative.
Tips
If the volume of rejected transactions available in the Review Rejected Appointments page becomes unmanageable, contact your Vertafore representative about performing a data fix to mark as resolved a subset of transactions in the system back-end (i.e., set RJCT_RSLV_IND to "Y").