Add Scheduled Sync
If you have system administrator permissions, use the Add Scheduled Sync page to set up a new automated system job to update with external data a defined group of producer records at defined intervals.
To open the Add Scheduled Sync page, from the Administration menu select Data Reconciliation and then select View Scheduled Syncs. Then, on the Scheduled Syncs page, click the Add Scheduled Sync link in the upper-right corner of the page. (For more information, see View Scheduled Syncs.)
The Add Scheduled Sync page uses a wizard process consisting of the following steps:
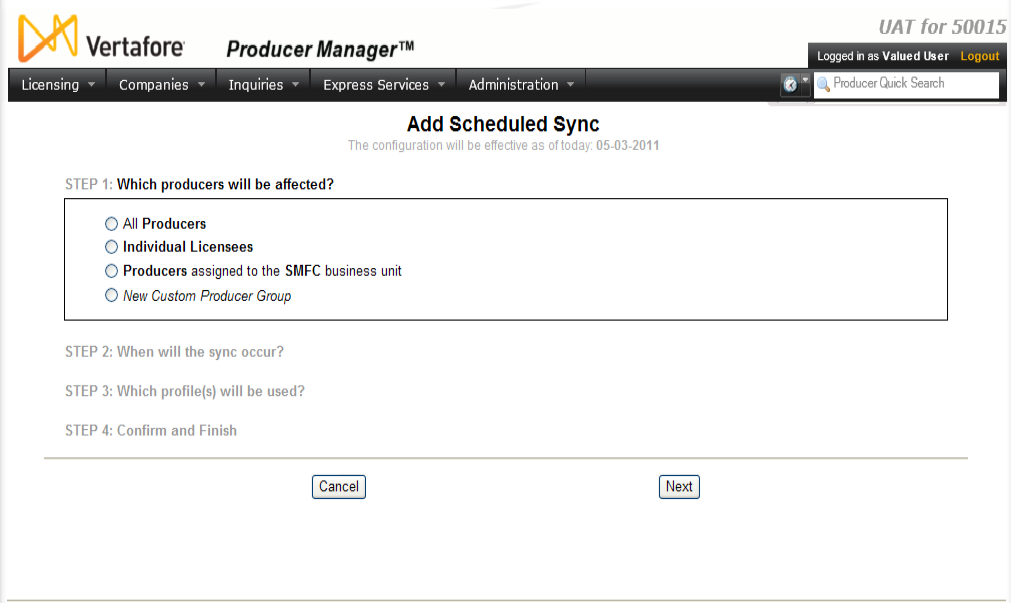
 Step 1
Define group characteristics of producers that would be affected by the Scheduled Sync.
 View screen capture
Field and controls include the following:
- [Settings for an already defined producer group]: Click the radio button corresponding to a group of producers that has already been defined for an existing Scheduled Sync
OR
New Custom Producer Group: Click the radio button to define a new group of producers to be eligible for a Scheduled Sync, and then select from among the following configuration options:
- Producer Type: Required. Click to checkmark the checkbox and select from the dropdown menu either Individual Licensee or Firm.
- Producer Status: Optional. Click to select a record status (not license or qualification status) that a producer must hold in order to be included in the group for which you are setting up a Scheduled Sync: Active, Inactive, or Pending. If desired, press the CTRL key and click to select multiple statuses.
- Maximum number of days that the Producer Status is unchanged (1-365): Optional. Enter a whole number representing the number of lapsed days after a change in a producer's record status that the producer no longer will be included in the group for which you are setting up a Scheduled Sync.
- Producers that hold an active license: Click to checkmark the checkbox to include producers with at least one active license in the group for which you are setting up a Scheduled Sync.
- Business Unit: Optional. Click to select one or multiple business units to which a producer must belong in order to be included in the group for which you are setting up a Scheduled Sync. Press the CTRL key and click business unit names to select multiples.
- Cancel: Click to return to the Scheduled Syncs page.
- Next: Click to continue to the next step in the process.
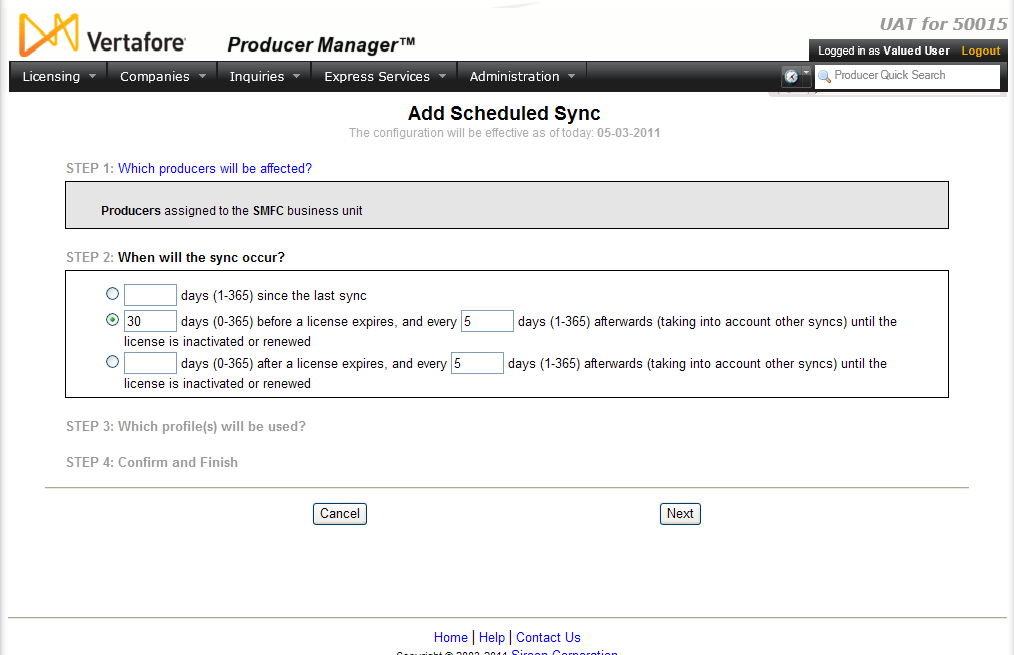
 Step 2
Set timing conditions of the scheduled sync.
 View screen capture
Fields and controls include the following:
-
[nn]days (0-365) before a license expires, and every[nn]days (1-365) afterwards (taking into account other syncs) until the license is inactivated or renewed: Enter in the first field a number from 0 to 365 to specify the number of days before the expiration date of any license held by any producer included in the group defined in Step 1 whereupon the producer would be synced by the new Scheduled Sync. Then enter in the second field a number from 1 to 365 to specify the interval in days after the first Scheduled Sync that additional syncs should occur until the license is found to be renewed or inactive.
-
[nn]days (0-365) after a license expires, and every[nn]days (1-365) afterwards (taking into account other syncs) until the license is inactivated or renewed: Enter in the first field a number from 0 to 365 to specify the number of days after the expiration date of any license held by any producer included in the group defined in Step 1 whereupon the producer would be synced by the new Scheduled Sync. Then enter in the second field a number from 1 to 365 to specify the interval in days after the first scheduled sync that additional syncs should occur until the license is found to be renewed or inactive.
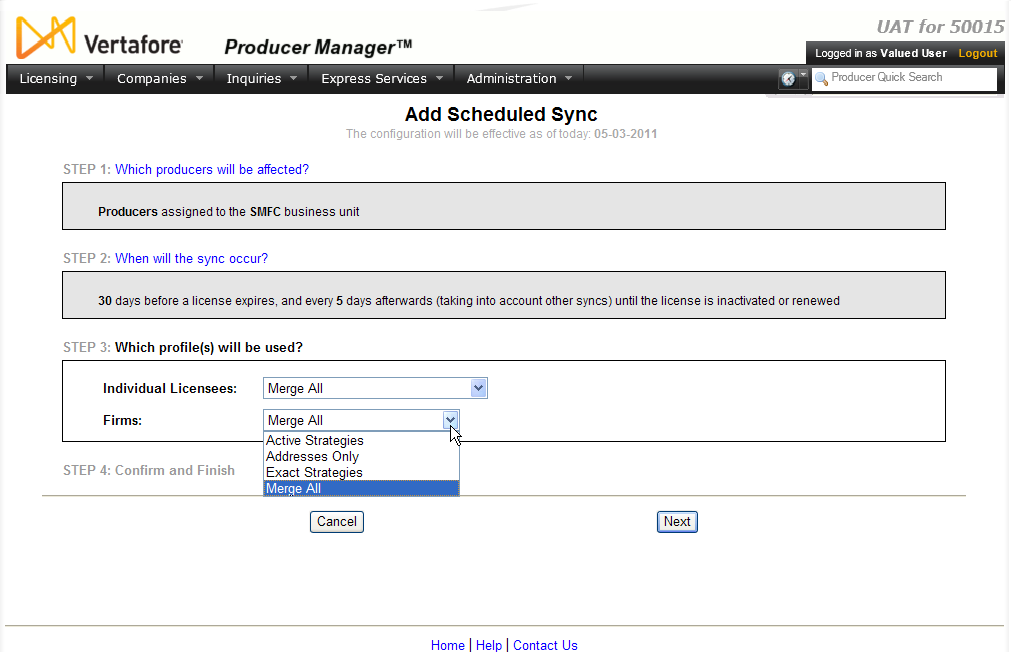
 Step 3
Select a merge profile to apply to the Scheduled Sync. (For more information, see Maintain Data Reconciliation Profiles.)
 View screen capture
Fields and controls include the following:
-
Which producers will be affected?: Click to return to the options in Step 1.
- When will the sync occur?: Click to return to the options in Step 2.
-
Individual Licensees: From the dropdown menu, select a configured merge profile to apply to any automated data reconciliation of an individual licensee record performed under the Scheduled Sync.
-
Firms: From the dropdown menu, select a configured merge profile to apply to any automated data reconciliation of a firm record performed under the Scheduled Sync.
-
Cancel: Click to return to the Scheduled Syncs page.
-
Next: Click to continue to the next step in the process.
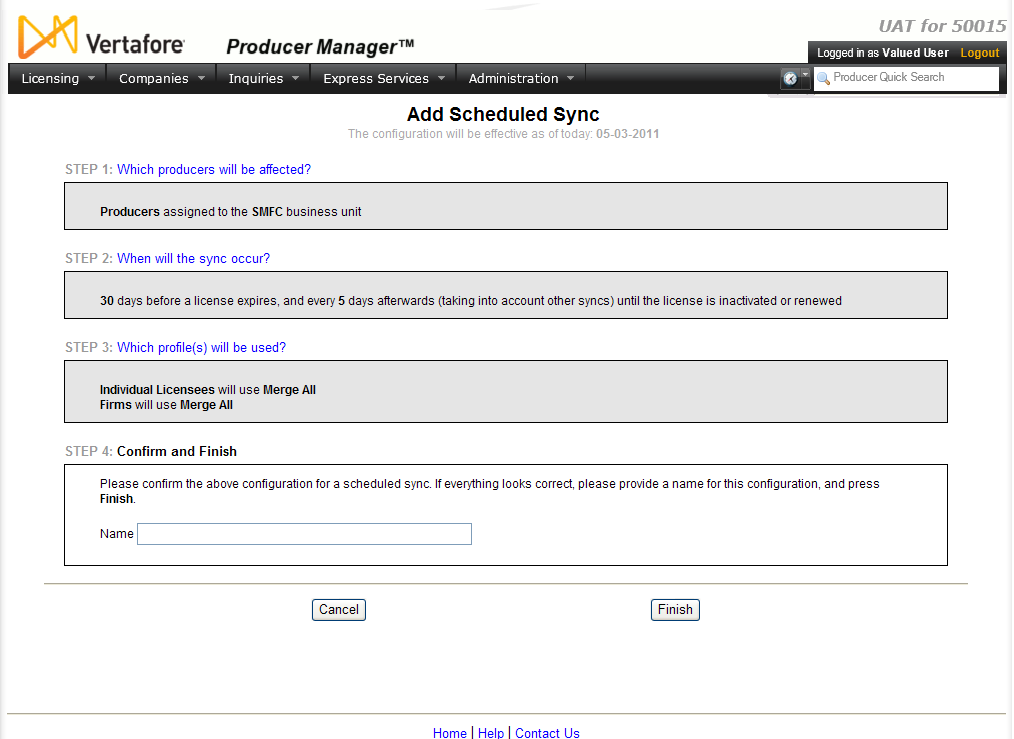
 Step 4
Confirm your selected settings and name the new scheduled sync.
 View screen capture
Fields and controls include the following:
-
Which producers will be affected?: Click to return to the options in Step 1.
-
When will the sync occur?: Click to return to the options in Step 2.
-
Which profile(s) will be used?: Click to return to the options in Step 3.
-
Name: Enter a name for the new scheduled sync. After you click the Finish button, the schedule sync will be listed by your chosen name in on the Scheduled Syncs page.
The scheduled sync will be effective as of today and will automatically be set as Active on the Scheduled Syncs page. In the evening, the scheduled sync will run, and results will be found on the Data Reconciliation Requests page. For more information, see Data Reconciliation Requests.
Notes
Note: Regardless of the value entered in the [nn]days (1-365) since the last sync field, a producer record that has never been updated through an automated data reconciliation will be subject to the first automated data reconciliation to run under a Scheduled Sync.
Note: Although at one time a producer record may qualify for automated data reconciliation based on the criteria of multiple Scheduled Sync configurations, it will undergo a maximum of one automated data reconciliation per 24-hour period.
Tips
For advice and best practices for maximizing automated data reconciliations, see Setting Up Automated Data Reconciliations.
The system can be Vertafore- and user-configured to automatically submit an appointment request to a customer-defined "restricted" or "pre-appoint" state if, following an automated data reconciliation, a producer is found to hold an active license and LOA in that state (a.k.a., "AutoAppoint"). For more information, see Administer Producer Business Rules, Configuration Options, or consult your Vertafore representative.
A firm that is the branch agency of a master agency may share an identical EIN with the master agency. The licenses held by both the branch and master agencies in a particular state each may be reported on the national Producer Database (PDB) identically, except for license number. When performing an automated data reconciliation operation and encountering a situation where a firm entity holds multiple licenses of the same class or type in the same state, Producer Manager ignores the information and does not update the firm's record with PDB data from that state. Depending on your company's business practices, this situation may require manual data upkeep of the master and branch agencies' license data. You may use the Locked From Data Reconciliation Updates feature on the Correct License Data and Correct Qualification Dates pages to protect master and/or branch agency license data from being overwritten inadvertently by an automated data reconciliation operation, such as Quick Sync Producer or Scheduled Syncs. You also may set a Producer Business Rule to protect license data from automated updates resulting from a Scheduled Sync but not Quick Sync Producer. For more information, consult your Vertafore representative.


